background image

13

Oven Controls

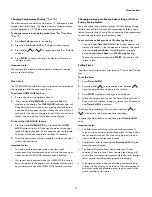
Changing Temperature Display (ºF or ºC)

The electronic oven control is set to display °F (Fahrenheit) when 
shipped from the factory. The display may be changed to show 
either Fahrenheit or ºC (Celsius) oven temperatures.

To change temperature display mode from °F to °C or from 
°C to °F

1.

Press 

Broil

HI 

appears in the display.

2.

Press and hold 

Broil

 until 

F

 or 

C

 appears in the display.

3.

Press either 

 or 

 to toggle between 

F

 or

C

 mode 

choices. 

4.

Press 

START 

to accept change. The display will return to 

the time of day.

Important note:

The temperature display mode cannot be changed when the 
oven is set for cooking.

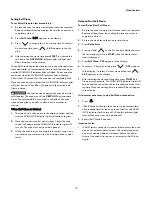
Oven Lock   

The OVEN LOCK feature allows you to lock the oven portion of 
the appliance while the oven is not in use.                                 

To activate OVEN LOCK feature

:

1.

Be sure the door is completely closed.

2.

 Press and hold 

OVEN LOCK

 for 3 seconds.

 Loc 

will 

appear in the display. The 

OVEN LOCK 

indicator light will 

flash while the motor driven door latch begins locking the 
oven door. Do not open the door during this time. Allow 15 
seconds for the door to completely lock. Once oven door is 
locked, the time of day will appear in the display.

To cancel the OVEN LOCK feature

1.

Press and hold 

OVEN LOCK

 for 3 seconds. The 

OVEN 

LOCK

 indicator light will flash and the motor driven door 

latch will begin to unlock. Do not open the door at this time. 
The door will unlock completely in about 15 seconds.

2.

The oven control keys will be available and the oven door 
can be opened again.

Important notes:

To avoid possible damage to the oven door latch 
mechanism, do not attempt to open of close the oven door 
whenever the OVEN LOCK indicator light is flashing.

If a control key is pressed when the OVEN LOCK is active, 

Loc

 will appear in the display as a reminder that the oven 

keys are inactive when the OVEN LOCK feature is active.

Changing between continuous bake setting or 12-Hour 

Energy Saving feature

The oven control has a factory-preset 12-Hour Energy Saving 
feature that will turn the oven off automatically if the oven is 
left on for more than 12 hours. The control may be programmed 
to override this feature to continuously bake.

To set continuous bake mode or 12hr Energy Saving:

Press and hold 

Timer Set/Off

 until the control beeps once 

(about 6 seconds). 

- - hr

 will appear in display. The control 

is set for 

continuous bake.

 Press 

Clean

 key to toggle 

between 

continuous bake

 and 

12hr Energy Saving.

To save the selected mode press 

START.

 The display will 

return to idle.

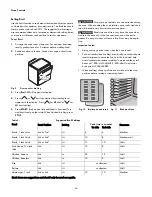
Setting Timer

 The timer may be set from 1 minute up to 11 hours and 59 min-
utes. 

To set the timer

1.

Press 

Timer Set/Off

.

2.

Press and hold 

 to increase the time. Release 


when the desired time appears in the display. 

3.

Press 

START

 and timer will begin to count down.

4.

When the set time has run out, the Timer will sound with 3 
beeps and will continue to beep 3 times every 60 seconds 
until 

Timer Set/Off

 is pressed.

To change time remaining in Timer, press and hold 

 or 

 to increase or decrease any time remaining.

To cancel the Timer before at any time, press 

Timer Set/Off


once.

Important notes:

The timer does not start or stop the cooking process. It 
serves as an extra timer in the kitchen that will beep when 
the set time has run out. The timer may be used alone or 
when any other oven function is active.

The indicator light located above 

Timer Set/Off

 will glow 

when the timer is active.

The timer will display hours and minutes until 1 hour 
remains. When less than 1 hour remains, the display will 
count down in minutes and seconds. Once the timer has less 
than 1 minute remaining only seconds will display.

If the timer is active when oven cooking, the minute timer 
will show in the display by default. To view information of 
any other active oven function, press the key once for the 
active function to view status.

Содержание 790.9414 Series

Страница 1: ...eléctrica color number numéro de color Use Care Guide Guía de uso y cuidada English Español Model Modelos 790 9414 P N 807190401 Rev A Sears Brands Management Corporation Hoffman Estates IL 60179 U S A www kenmore com www sears com ...

Страница 2: ...gs 4 A service technician to instruct the user in correct product installation operation or maintenance 5 A service technician to clean or maintain this product 6 Damage to or failure of this product if it is not installed operated or maintained according to all instructions supplied with the product 7 Damage to or failure of this product resulting from accident abuse misuse or use for other than ...

Страница 3: ...should not be left alone or unat tended in the area where appliance is in use They should never be allowed to sit or stand on any part of the appliance including the storage drawer lower broiler drawer warmer drawer or lower double oven Indicates a potentially hazardous situation which if not avoided may result in death or serious injury Indicates a potentially hazardous situation which if not avo...

Страница 4: ...cement Act requires the governor of California to publish a list of substances known to cause cancer birth defects or other reproductive harms and it requires busi nesses to warn customers of potential exposures to such substances Read and follow the below instructions and precautions for unpacking installing and servicing your appliance Remove all tape and packaging before using the range Destroy...

Страница 5: ...ng the door of a hot oven Let hot air or steam escape before you remove or replace food in the oven Keep oven vent ducts unobstructed The oven vent is located below the backguard Touching surfaces in this area when the oven is on may cause severe burns Do not place plastic or heat sensitive items on or near the oven vent These items can melt or ignite Placement of Oven Racks Always place oven rack...

Страница 6: ...easy spillovers that may ignite or a pan that has boiled dry may melt Glazed cooking utensils Only certain types of glass glass ceramic ceramic earthenware or other glazed utensils are suitable for cook top service without breaking due to the sudden change in temperature Check the manufacturer s recommendations for cook top use When flaming foods under a ventilating hood turn the fan on Improper c...

Страница 7: ... move the gasket Some birds are extremely sensitive to the fumes given off during the self clean cycle of any oven Move birds to another well ventilated room DO NOT TOUCH SURFACE HEATING UNITS OR SURFACE COOKING ELEMENTS AREAS NEAR THESE SURFACE HEATING UNITS OR INTERIOR SURFACE OF THE OVEN Both surface heating and oven heating elements may be hot even though they are dark in color Areas near surf...

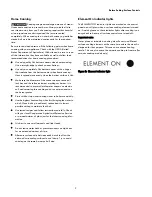
Страница 8: ...urns may occur if the surface element is touched before it has cooled sufficiently Do not place plastic items such as salt and pepper shakers spoon holders or plastic wrappings on top of the range when it is in use These items could melt or ignite Potholders towels or wooden spoons could catch fire if placed too close to the surface elements Do not use aluminum foil to line surface unit drip bowls...

Страница 9: ...ass cooktops and to center canners on the burner grates Start with hot tap water to bring water to boil more quickly Use the highest heat seating when first bringing the water to a boil Once boiling is achieved reduce heat to lowest possible setting to maintain that boil Use tested recipes and follow instructions carefully Check with your local Cooperative Agricultural Extension Service or a manuf...

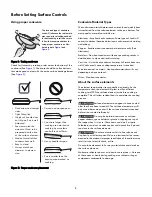
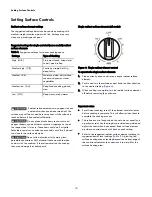
Страница 10: ...d cookware on single radiant surface element 2 Push in and turn the surface control knob in either direction to the desired setting Figure 4 3 When cooking is complete turn the radiant surface element off before removing the cookware Important notes For efficient cooking turn off the element several minutes before cooking is complete This will allow residual heat to complete the cooking process Th...

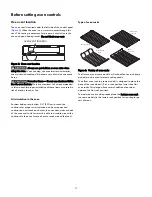
Страница 11: ...aking results allow 2 4 5 10 cm around the cookware for proper air circulation and be sure pans and cookware do not touch each other the oven door sides or back of the oven cavity Hot air must be able to circulate around the cookware in the oven for even heat to reach around the food Type of oven racks The flat oven rack some models or flat handle oven rack some models may be used for most cooking...

Страница 12: ...t a specific amount of time needed for cooking Automatically cancels cooking process at end of set time 15 Delay Start Use with Bake and Self Clean functions to program a delayed start bake or delayed start self clean cycle 16 LIGHT Use to turn internal oven light on and off Setting Clock When the appliance is first powered up or when the power sup ply to the appliance has been interrupted 12 00 w...

Страница 13: ...en the OVEN LOCK feature is active Changing between continuous bake setting or 12 Hour Energy Saving feature The oven control has a factory preset 12 Hour Energy Saving feature that will turn the oven off automatically if the oven is left on for more than 12 hours The control may be programmed to override this feature to continuously bake To set continuous bake mode or 12hr Energy Saving Press and...

Страница 14: ...Press or to increase or decrease the current set temperature to the new oven temperature Important notes The oven will bake no longer than 12 hours If you wish to bake for a longer period see Changing between continuous bake setting or 12 Hour Energy Saving mode for detailed information Dark or dull pans absorb more heat than shiny bakeware resulting in dark or over browning of foods It may be nec...

Страница 15: ... setting is 11 hours and 59 minutes Setting Delay Start Delay Start allows you to set a delayed starting time to the oven baking or cleaning functions FOOD POISONING HAZARD Do not let food sit for more than one hour before or after cooking Doing so can result in food poisoning or sickness Foods that can easily spoil such as milk eggs fish meat or poultry should be chilled in the refrigerator first...

Страница 16: ... fire occur close the oven door and turn the oven off If the fire continues use a fire extin guisher Do not put water or flour on fire Flour may be explo sive Important notes Always arrange oven racks when the oven is cool For best results when broiling use a broil pan with broil pan insert designed to drain the fat from the food and help avoid spatter and reduce smoking To purchase them call Sear...

Страница 17: ...en light see Replacing oven light in the Care and Cleaning section Adjusting oven temperature Your appliance has been factory calibrated and tested to ensure an accurate baking temperature For the first few uses follow your recipe times and temperature recommendations carefully If you think the oven is cooking too hot or too cool for your recipe times you may adjust the UPO user programmable offse...

Страница 18: ...res from a self clean cycle and will melt Do not use oven cleaners or oven protective coatings in or around any part of the oven interior Clean any soil from the oven frame the door liner outside the oven door gasket and the small area at the front center of the oven bottom Fig 12 on page 18 These areas heat sufficiently to burn soil on Clean using soap and water prior to starting Self Clean Remov...

Страница 19: ... will beep and the OVEN LOCK indicator light will turn off The oven door may now be opened 3 When the oven interior has completely cooled wipe away any residue or powdered ash with a damp cloth or paper towel Delayed Start Self Clean To start Delay Start Self Clean 1 Be sure the oven is empty and all oven racks are removed Remove all items from the cooktop Be sure oven door is completely closed 2 ...

Страница 20: ...l cleaners or any other types of cleaners containing any abrasive chlorides chlorine or ammonia It is recommended to use mild dish soap and water or a 50 50 solution of water and vinegar Porcelain enamel broiler pan and insert available by mail order Door liner and body parts Gentle scouring with a soapy scouring pad will remove most spots Rinse with a 1 1 solution of clear water and ammonia If ne...

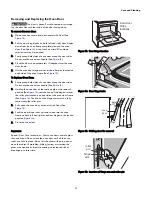
Страница 21: ...Figure 15 2 Holding the oven door at the same angle as the removal position See Figure 15 seat the hook of the hinge arm over the roller pins located on each side of the oven door frame See Figure 16 The hook of the hinge arms must be fully seated onto the roller pins 3 Fully open the oven door horizontal with floor See Figure 13 4 Push the door hinge locks up toward and into the oven frame on bot...

Страница 22: ...he oven interior light bulb Important note Use a paper towel or cotton glove while handling the new bulb when installing 1 Turn electrical power off at the main source or unplug the appliance 2 Replace bulb with a new 40 watt appliance bulb 3 Turn power back on again at the main source or plug the appliance back in 4 Be sure to reset the time of day on the clock Figure 17 Replacing oven light wire...

Страница 23: ... temperature before placing food in the oven Use proper rack position for baking needs Set oven temperature 25 F 12 C lower than recommended Cakes not done in center Oven too hot Incorrect pan size Pan not centered in oven Set oven temperature 25 F 12 C lower than recommended Use pan size suggested in recipe Use proper rack position and place pan so there is 5 1 cm to 10 2 cm 2 to 4 of space on al...

Страница 24: ...acks from oven cavity before starting a self clean cycle Clean using a mild abrasive cleaner following manufac turer s instructions Rinse with clean water dry and replace in oven Oven smokes excessively when broiling Incorrect setting Follow broiling instructions in Setting Broil on page 16 Meat too close to the broil element Reposition broil rack to provide proper clearance between the meat and b...

Страница 25: ......

Страница 26: ......

Страница 27: ......

Отзывы: