background image

3

KENMORE ELITE

®

 APPLIANCE WARRANTY

ONE YEAR LIMITED WARRANTY

When installed, operated and maintained according to all 
instructions supplied with the product, if this appliance fails due 
to a defect in material or workmanship within one year from the 
date of purchase, call 1-800-4-MY-HOME

®

 to arrange for free 

repair. 

TWO-YEAR LIMITED WARRANTY ON ELECTRONIC 
CONTROL AND POWER SUPPLY BOARD

For two years from the date of purchase, when this dishwasher is 
installed, operated and maintained according to all instructions 
supplied with the product, Sears will replace any part of the 
electronic module and power supply board that fails due to 
defective materials or workmanship. After the first year, customer 
assumes any labor costs associated with replacement of these 
parts.

TWO-YEAR LIMITED WARRANTY ON THE ULTRA WASH 
WASH SYSTEM

For two years from the date of purchase, when this dishwasher is 
installed, operated and maintained according to all instructions 
supplied with the product, Sears will replace any part of the Ultra 
Wash wash system (motor, pump, spray arms, spray tower, motor 
seals and pump gasket) that fails due to defective materials or 
workmanship. After the first year, customer assumes any labor 
costs associated with replacement of these parts.

FIVE-YEAR LIMITED WARRANTY ON UPPER AND LOWER 
RACKS

For five years from the date of purchase, when this dishwasher is 
installed, operated and maintained according to all instructions 
supplied with the product, Sears will replace parts for the upper 
or lower dish rack if the rack rusts due to defective materials or 
workmanship. After the first year, customer assumes any labor 
costs associated with dish rack replacement.

LIMITED WARRANTY FOR THE LIFE OF THE DISHWASHER, 
ON KENMORE ELITE STAINLESS STEEL TUB MODELS, 
AGAINST LEAKS IN THE TUB AND INNER DOOR PANEL

For the life of the dishwasher, if a leak should occur as a result of 
rust-through of the stainless steel tub or inner door panel, Sears 
will replace the tub or inner door panel free of charge.

If this appliance is used for other than private family purposes, 
this warranty applies for only 90 days from the date of purchase.

THIS WARRANTY COVERS ONLY DEFECTS IN MATERIAL 
AND WORKMANSHIP. SEARS WILL NOT PAY FOR:

1.

Expendable items that can wear out from normal use, 
including but not limited to filters, belts, light bulbs, and bags.

2.

A service technician to instruct the user in correct product 
installation, operation or maintenance.

3.

A service technician to clean or maintain this product.

4.

Damage to or failure of this product if it is not installed, 
operated or maintained according to all instructions supplied 
with the product.

5.

Damage to or failure of this product resulting from accident, 
abuse, misuse or use for other than its intended purpose.

6.

Damage to or failure of this product caused by the use of 
detergents, cleaners, chemicals or utensils other than those 
recommended in all instructions supplied with the product.

7.

Damage to or failure of parts or systems resulting from 
unauthorized modifications made to this product.

DISCLAIMER OF IMPLIED WARRANTIES; LIMITATION OF 
REMEDIES

Customer’s sole and exclusive remedy under this limited 
warranty shall be product repair as provided herein. Implied 
warranties, including warranties of merchantability or fitness for a 
particular purpose, are limited to one year or the shortest period 
allowed by law. Sears shall not be liable for incidental or 
consequential damages. Some states and provinces do not allow 
the exclusion or limitation of incidental or consequential 
damages, or limitations on the duration of implied warranties of 
merchantability or fitness, so these exclusions or limitations may 
not apply to you.

This warranty applies only while this appliance is used in the 
United States and Canada.

This warranty gives you specific legal rights, and you may also 
have other rights which vary from state to state.

Sears, Roebuck and Co.

Dept. 817WA, Hoffman Estates, IL 60179

Sears Canada Inc.

Toronto, Ontario, Canada M5B 2B8

PRODUCT RECORD

Record your complete model number, serial number, and 
purchase date. You can find this information on the model and 
serial number label located on the product.

Have this information available to help you obtain assistance or 
service more quickly whenever you contact Sears concerning 
your appliance. 

Model number __ __ __. __________________________________________

Serial number___________________________________________________

Purchase date __________________________________________________

Save these instructions and your sales receipt for future 
reference. 

Содержание 665.1398 Series

Страница 1: ...dado Lave vaisselle ULTRA WASH Guide d utilisation et d entretien Models Modelos Modèles 665 1310 color number número de color numéro de couleur Sears Roebuck and Co Hoffman Estates IL 60179 U S A www sears com W10250189A Sears Canada Inc Toronto Ontario Canada M5B 2B8 www sears ca ...

Страница 2: ...ou can trust will be working on your product Unlimited service calls and nationwide service as often as you want us whenever you want us No lemon guarantee replacement of your covered product if four or more product failures occur within twelve months Product replacement if your covered product can t be fixed Annual Preventive Maintenance Check at your request no extra charge Fast help by phone we...

Страница 3: ... AND WORKMANSHIP SEARS WILL NOT PAY FOR 1 Expendable items that can wear out from normal use including but not limited to filters belts light bulbs and bags 2 A service technician to instruct the user in correct product installation operation or maintenance 3 A service technician to clean or maintain this product 4 Damage to or failure of this product if it is not installed operated or maintained ...

Страница 4: ... keep them out of the reach of children When loading items to be washed 1 Locate sharp items so that they are not likely to damage the door seal and 2 Load sharp knives with the handles up to reduce the risk of cut type injuries Do not wash plastic items unless they are marked dishwasher safe or the equivalent For plastic items not so marked check the manufacturer s recommendations Do not touch th...

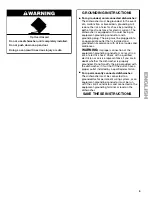
Страница 5: ... grounded in accordance with all local codes and ordinances WARNING Improper connection of the equipment grounding conductor can result in a risk of electric shock Check with a qualified electrician or service representative if you are in doubt whether the dishwasher is properly grounded Do not modify the plug provided with the dishwasher if it will not fit the outlet have a proper outlet installe...

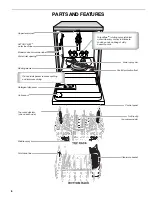
Страница 6: ...p rack adjusters one on each side Middle spray arm Fold down tines Active vent Rinse aid dispenser reduces spotting and improves drying Lower spray arm Overfill protection float Control panel Silverware basket No flip clip on some models TurboZoneTM rotating spray jets blast water into every corner to eliminate soaking and scrubbing of dirty baked on soils ...

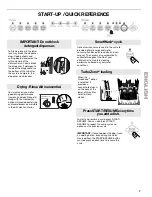
Страница 7: ...ER DRYING Lock Refill Full Add SmartWash cycle Optical soil sensors are used in the cycle to provide optimal energy and water consumption based on load size and soil amount The sensors also automatically calibrate throughout the life of your dishwasher to maintain cleaning performance based on your water conditions TurboZoneTM loading When the TurboZoneTM option is selected it provides a concentra...

Страница 8: ...om forming droplets that can dry as spots or streaks Filling the dispenser The dispenser holds 5 oz 150 mL of rinse aid Under most conditions this will last 1 to 3 months 1 Turn the knob to the REFILL position and remove 2 Pour rinse aid into the opening until the indicator points to FULL Do not overfill 3 Clean up any spilled rinse aid Spilled rinse aid can create excessive suds 4 Replace the kno...

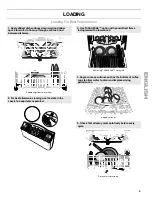
Страница 9: ...silverware cleaning use the slots in the covers to keep items separated 3 Use TURBOZONE option with your dirtiest items facing toward the lower back Soil facing TURBOZONE spray jets 4 Angle concave surfaces such as the bottom of coffee cups to allow water to drain and improve drying performance Angled surfaces 5 Check that all spray arms spin freely before every cycle Spray arms spin freely ...

Страница 10: ...y in the top rack 10 place load 12 place load Deluxe Adjustable 2 position Rack You can raise or lower the top rack to fit tall items in either the top or bottom rack Adjusters are located on each side of the top rack Raise the top rack to accommodate items up to 9 22 cm in the top rack and 13 33 cm in the bottom rack or lower the top rack to accommodate items up to 11 28 cm in both the top and bo...

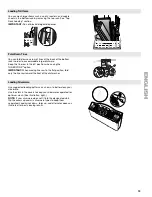
Страница 11: ...1 Pull the rack forward slightly to access clips 2 While pressing the ridges in push back on the clip until the outer side releases Slide the clip to the inside of the track edge to remove the clip 3 After removing both clips pull rack out To replace the top rack 1 Place the rollers on each side of the rack into the rack tracks and push the rack back 2 Align the open side of the clip with the insi...

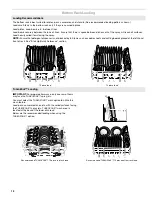
Страница 12: ...penser is not blocked by tall items such as cookie sheets and cutting boards placed at the left hand front of rack See Start Up Quick Reference section 10 place load 12 place load TURBOZONE Loading IMPORTANT For proper performance only one row of items may face the TURBOZONE spray jets You must select the TURBOZONE wash option to utilize this wash feature Load pans casserole dishes etc with the so...

Страница 13: ...ition when using the TURBOZONETM option IMPORTANT When moving tine row to the flat position fold only the tine row toward the front of the dishwasher Loading Silverware Use suggested loading patterns as shown to better clean your silverware Use the slots in the covers to keep your silverware separated for optimum wash See illustration right NOTE If your silverware does not fit into the designated ...

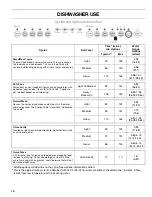
Страница 14: ... your toughest items such as casseroles with baked on food residue Use with TURBOZONE option to get the best baked on soil cleaning Light to Medium 93 144 6 93 26 24 Heavy Baked On 105 153 6 93 7 83 26 24 29 64 Normal Wash Senses the soil level and makes adjustments in the water and energy used The Energy Guide information is based on this cycle Light 84 152 3 95 14 95 Medium 99 167 4 13 15 6 Heav...

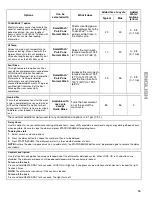
Страница 15: ... 41 C to 120 F 49 C and the final rinse from 140 F 60 C to 155 F 68 C 25 35 0 2 8 0 10 6 Heated Dry Turns the heat element on after the wash cycle is completed Use rinse aid with or without the Heated Dry option for best drying results Plastic items are less likely to deform when loaded in the top dish rack Available with any cycle except Quick Rinse Turns the heat element on at the end of the was...

Страница 16: ...r the spraying action to stop then open the door completely 2 Check whether the detergent dispenser cover is still closed If it is open the wash cycle has already started and adding a dish is not recommended 3 If detergent has not yet been used detergent dispenser cover is closed you may add a dish 4 Firmly close the door and press START RESUME DishwasherEfficiencyTips Hot water dissolves and acti...

Страница 17: ...e Knives No Handles of some knives are attached to the blade with adhesives which can loosen if washed in the dishwasher Pewter Brass Bronze and Copper No High water temperatures and detergent can discolor or pit the finish Disposable Plastics No Cannot withstand high water temperatures and detergents Plastics Yes Always check manufacturer s recommendations before washing Plastic items may vary in...

Страница 18: ...mbing codes require the addition of a drain air gap between a built in dishwasher and the home drain system Check the drain air gap when your dishwasher is not draining well The drain air gap is usually located on top of the sink or countertop near the dishwasher To order a drain air gap please call 1 800 4 MY HOME Ask for Part Number 300096 NOTE The drain air gap is an external plumbing device th...

Страница 19: ... surfaces are difficult to dry because they have a porous surface which tends to collect water droplets Towel drying may be necessary Use of rinse aid along with the Heated Dry option is needed for proper drying Proper loading of items can affect drying See specific loading instructions within this guide Glasses and cups with concave bottoms hold water This water may spill onto other items when un...

Страница 20: ...me the cycle FOOD SOILS REMAIN ON DISHES Be sure the dishwasher is loaded correctly Improper loading can greatly decrease the washing performance see Loading for Best Performance Check filter to ensure it is properly installed Clean it if needed See Cleaning Instructions in ULTRA WASH Filtration System for details Select the proper cycle and option for the type of soils The Pots Pans cycle with th...

Страница 21: ...detergent is needed ETCHING PERMANENT CLOUDINESS This is an erosion of the surface of the glassware and can be caused by a combination of water that is too hot from using too much detergent with soft water or by pre washing Detergent needs food soil to act upon If etching has occurred the glassware is permanently damaged To avoid further etching adjust the detergent amount to match the water hardn...

Страница 22: ...22 Notes ...

Страница 23: ...quien usted puede confiar Llamadas de servicio ilimitado y servicio en todo el país con la frecuencia que usted desee cuando usted desee Garantía sin disgustos reemplazo de su producto protegido si ocurren cuatro fallas o más del producto en el transcurso de doce meses Reemplazo del producto si su producto protegido no puede ser reparado Revisión anual de mantenimiento preventivo a solicitud suya ...

Страница 24: ...iene vigencia por 90 días a partir de la fecha de compra ESTA GARANTÍA CUBRE SOLAMENTE LOS DEFECTOS DE MATERIAL Y MANO DE OBRA SEARS NO PAGARÁ POR LO SIGUIENTE 1 Los artículos no reutilizables que pueden gastarse por el uso normal incluyendo pero sin limitación filtros correas focos y bolsas 2 Un técnico de servicio para enseñarle al usuario cómo instalar operar o mantener el producto adecuadament...

Страница 25: ...avavajillas y manténgalos fuera del alcance de los niños Al introducir los artículos para lavar 1 Coloque los artículos puntiagudos de manera que no dañen el sello de la puerta 2 Introduzca los cuchillos filosos con los mangos hacia arriba para reducir el riesgo de cortaduras No lave artículos de plástico que no lleven la indicación lavables en la lavavajillas u otra similar Lea las recomendacione...

Страница 26: ...lado y conectado a tierra de acuerdo con todos los códigos y ordenanzas locales ADVERTENCIA La conexión inadecuada del conductor de conexión a tierra puede resultar en riesgo de choque eléctrico Pregunte a un electricista calificado o a un agente de servicio si no está seguro si la lavavajillas está adecuadamente conectada a tierra No modifique el enchufe que viene con la lavavajillas Si no cabe e...

Страница 27: ...na de cada lado Brazo medio de rociado Puntas plegables Orificio de ventilación activo El despachador del agente de enjuage reduce las marcas de agua y mejora el secado Brazo rociador inferior Flotador de protección de sobrellenado Panel de control Canastilla para cubiertos Sujetadores seguros en algunos modelos Los surtidores de rociado giratorios TurboZone echan chorros de agua a todas partes pa...

Страница 28: ... suciedad ópticos en dos oportunidades para proporcionar un consumo óptimo de energía y agua en función del tamaño de la carga y la cantidad de suciedad Los sensores también se calibran automáticamente durante la vida útil de su lavavajillas para mantener el rendimiento de limpieza en función de las características del agua USE RINSE AID FOR BETTER DRYING Lock Refill Full Add CargadeTurboZoneTM Cu...

Страница 29: ...o manchas o rayas Llenado del depósito El depósito tiene capacidad para 5 onzas 150 mL de agente de enjuague En condiciones usuales esta cantidad durará de uno a tres meses 1 Gire la perilla hacia la posición de REFILL Volver a llenar y retírela 2 Vierta el agente de enjuague en la abertura hasta que el indicador esté en FULL Lleno No sobrellene 3 Limpie todo el agente de enjuague derramado El age...

Страница 30: ...tas de modo que los artículos se mantengan separados 3 Use la opción TURBOZONE colocando sus artículos más sucios mirando hacia la parte posterior inferior Artículos sucios mirando hacia los surtidores de rociado TURBOZONE 4 Coloque en ángulo las superficies cóncavas tales como la base de las tazas de café para permitir que el agua se drene y así lograr un funcionamiento mejorado del secado Artícu...

Страница 31: ...0 puestos Carga para 12 puestos Canasta de lujo ajustable en 2 posiciones Usted puede subir o bajar la canasta superior para acomodar artículos más altos tanto en la canasta superior como en la inferior Los ajustes se encuentran a cada lado de la canasta superior Levante la canasta superior para acomodar artículos de hasta 9 22 cm en la canasta superior y hasta de 13 33 cm en la canasta inferior o...

Страница 32: ...ner acceso a los sujetadores 2 Mientras presiona las aristas hacia adentro presione el sujetador hacia atrás hasta que se desprenda el lado de afuera Deslice el sujetador hacia adentro del borde del riel para sacarlo 3 Luego de quitar ambos sujetadores jale la canasta hacia afuera Para volver a colocar la canasta superior 1 Coloque las ruedillas que están a cada lado de la canasta dentro de los ri...

Страница 33: ...arolas para galletas y tablas para cortar colocadas en el lado izquierdo del frente de la canasta Vea la sección Puesta en marcha Referencia rápida Carga de 10 puestos Carga de 12 puestos Cómo cargar en TURBOZONE IMPORTANTE Para un funcionamiento adecuado solamente una hilera de artículos puede mirar hacia los surtidores de rociado TURBOZONE Usted deberá seleccionar la opción de lavado TURBOZONE p...

Страница 34: ...ción TURBOZONETM IMPORTANTE Cuando mueva la hilera de puntas hacia la posición plana pliegue solamente la hilera de puntas hacia el frente de la lavavajillas Carga de cubiertos Siga los modelos de carga sugeridos según se muestra para limpiar mejor los cubiertos Para un óptimo lavado use las ranuras que están en las tapas para mantener los cubiertos separados Vea la ilustración a la derecha NOTA S...

Страница 35: ...ndurecidos a causa del horneado Úselo con la opción TURBOZONE para obtener la mejor limpieza de la suciedad endurecida por el horneado Ligera a mediana 93 144 6 93 26 24 Rebelde Endurecida a causa del horneado 105 153 6 93 7 83 26 24 29 64 Normal Wash Lavado normal Detecta el nivel de suciedad y hace ajustes en el agua y energía utilizadas La información de Energy Guide Guía de energía está basada...

Страница 36: ...para los establecimientos con licencia para alimentos La luz verde de higienizado indica que la opción Sani Rinse ha finalizado con éxito SmartWash Pots Pans Normal Wash Aumenta la temperatura del lavado principal de 105 F 41 C a 120 F 49 C y el enjuague final de 140 F 60 C a 155 F 68 C 25 35 0 2 8 0 10 6 Heated Dry Secado con calor Enciende el elemento calefactor después que se termina el ciclo d...

Страница 37: ...ienciadelalavavajillas Opción Control Lock Bloqueo de control Use la opción de Control Lock para evitar el uso no intencional de la lavavajillas entre un ciclo y otro Cuando la luz de LOCK ON Bloqueo está encendida todos los botones están desactivados La puerta de la lavavajillas puede abrirse y cerrarse mientras los controles están bloqueados Para activar el bloqueo Oprima y sostenga HEATED DRY S...

Страница 38: ... mango hueco No Los mangos de algunos cuchillos están fijados a la hoja con adhesivos que pueden aflojarse al ser lavados en la lavavajillas Peltre latón bronce y cobre No Las temperaturas altas del agua y el detergente pueden decolorar o picar el acabado Plásticos desechables No No pueden resistir las temperaturas altas del agua y los detergentes Plásticos Sí Consulte siempre las recomendaciones ...

Страница 39: ...ales exigen que se instale una purga de aire del desagüe entre una lavavajillas empotrada y el sistema de desagüe de la casa Revise la purga de aire del desagüe cuando su lavavajillas no esté desaguando bien La purga de aire del desagüe está por lo general ubicada encima del fregadero o en la cubierta cerca de la lavavajillas Para pedir una purga de aire del desagüe llame al 1 800 4 MY HOME Pida l...

Страница 40: ... con calor agregará hora Pruebe con el ciclo de 1 Hour Wash Lavado de 1 hora Antes de comenzar el ciclo haga correr agua caliente de un grifo que esté cerca de la lavavajillas LA LAVAVAJILLAS NO SECA NOTA Los objetos de plástico y los artículos con superficies antiadherentes son difíciles de secar ya que tienen una superficie porosa que tiende a retener las gotas de agua Puede ser necesario secar ...

Страница 41: ... apagada No use detergente Es posible que la lavavajillas no esté desaguando como es debido vea QUEDA AGUA EN LA TINA NO DESAGUA en Solución de problemas RUIDOS NOTAS Se pueden escuchar periódicamente sonidos de gorgoteo a lo largo del ciclo mientras se desagua la lavavajillas Puede escucharse periódicamente el silbido normal de la válvula de agua Puede escucharse un sonido normal de chasquido cua...

Страница 42: ...lo menos 120 F 49 C Pruebe usar las opciones de Hi Temp Temperatura alta y Sani Rinse Enjuague sanitario Para quitar las manchas haga correr un enjuague con vinagre en la lavavajillas Lave y enjuague la vajilla que esté afectada y cárguela en la lavavajillas Quite todos los objetos metálicos y cubiertos Ponga 2 tazas 500 mL de vinagre blanco en una taza medidora de vidrio en la canasta inferior Ha...

Страница 43: ...ien Sears autorisés ce qui signifie que quelqu un de confiance prendra soin de votre produit Appels de service illimités et service national aussi souvent que vous en avez besoin et quand vous en avez besoin Garantie Anti citron remplacement de votre produit couvert si plus de quatre pannes se produisent en deçà de douze mois Remplacement du produit si votre produit couvert ne peut être réparé Vér...

Страница 44: ...CATION SEARS NE PAIERA PAS POUR 1 Les pièces courantes qui peuvent s user suite à une utilisation normale notamment les filtres courroies ampoules et sacs 2 L intervention d un technicien pour montrer à l utilisateur comment installer utiliser et entretenir correctement le produit 3 L intervention d un technicien pour nettoyer ou entretenir ce produit 4 L endommagement ou les défauts du produit si...

Страница 45: ... rinçage recommandés pour lave vaisselle et les garder hors de la portée des enfants Lorsque vous chargez le lave vaisselle 1 Placer les objets coupants de façon qu ils ne puissent endommager le joint de la porte et 2 Placer les couteaux le manche vers le haut de façon à ne pas vous couper Ne pas laver d articles en plastique à moins qu ils ne soient marqués Peut aller au lave vaisselle ou l équiv...

Страница 46: ... codes et règlements locaux AVERTISSEMENT La connexion incorrecte du conducteur pour relier les appareils à la terre peut causer le risque de choc électrique Vérifier avec un électricien compétent ou un représentant de service si vous avez des doutes si le lave vaisselle est correctement relié à la terre Ne pas modifier la fiche fournie avec le lave vaisselle si elle n entre pas dans la prise fair...

Страница 47: ...e chaque côté Bras d aspersion central Tiges rabattables Évent actif Distributeur d agent de rinçage minimisation de la formation de taches et optimisation du séchage Bras d aspersion inférieur Dispositif de protection contre le débordement Tableau de commande Panier à couverts Agrafes de retenue sur certains modèles Le système d aspersion TurboZoneTM avec jets rotatifs projette l eau dans tous le...

Страница 48: ...utilisés au cours du programme pour la détection des souillures ils déterminent la taille de la charge et la quantité de souillures ce qui permet d optimiser la consommation d énergie et d eau Les capteurs sont également calibrés automatiquement durant la vie du lave vaisselle ce qui maintient le niveau de la performance de nettoyage sur la base des caractéristiques de l eau utilisée USE RINSE AID...

Страница 49: ...rinçage empêche également l eau de former des gouttelettes qui pourraient laisser des taches ou des traces sur la vaisselle après le séchage Remplissage du distributeur Le distributeur peut contenir 5 oz 150 mL d agent de rinçage Dans la plupart des situations cette quantité suffira pour 1 à 3 mois 1 Placer le bouton à la position REFILL remplissage et ôter le bouton 2 Verser l agent de rinçage da...

Страница 50: ...iser les ouvertures du couvercle du panier à couverts pour séparer les divers articles 3 Employer l option TURBOZONE en plaçant les articles les plus souillés tournés vers le bas et vers l arrière Surface souillée orientée vers les jets TURBOZONE 4 Orienter les articles creux tasses et verres de telle manière que l eau puisse circuler ceci optimisera la performance de séchage Articles creux inclin...

Страница 51: ...ouvoir placer plus facilement des articles de grande taille dans le panier supérieur ou dans le panier inférieur Des dispositifs de réglage sont situés de chaque côté du panier supérieur Soulever le panier supérieur pour pouvoir placer des articles d une hauteur de 9 22 cm dans le panier supérieur et des articles d une hauteur de 13 33 cm dans le panier inférieur ou abaisser le panier supérieur po...

Страница 52: ... ce que le côté externe se dégage Glisser l attache vers l intérieur du bord de la glissière pour enlever l attache 3 Après avoir enlevé les deux attaches retirer le panier Pour replacer le panier supérieur 1 Placer les roulettes de chaque côté du panier dans les glissières du panier et pousser le panier jusqu au fond 2 Aligner le côté ouvert de l attache avec le bord interne de la glissière du pa...

Страница 53: ...e soit pas bloqué par des articles de grande taille comme une tôle à biscuits ou planche à découper placée sur le côté gauche du panier à l avant Voir la section Mise en marche Familiarisation rapide Charge de 10 articles Charge de 12 articles Chargement TURBOZONE IMPORTANT Pour l obtention de la meilleure performance une seule rangée d articles devrait faire face aux jets TURBOZONE Pour utiliser ...

Страница 54: ...u on place la rangée de tiges de séparation horizontalement rabattre la rangée de tiges de séparation seulement vers l avant du lave vaisselle Chargement des couverts Employer la configuration de chargement suggérée voir l illustration pour obtenir un lavage optimum des couverts Placer les articles dans les ouvertures du couvercle du panier à couverts pour qu ils soient séparés ce qui permettra un...

Страница 55: ...illées de résidus de cuisson Utiliser l option TURBOZONE pour obtenir le nettoyage le plus efficace sur les résidus de cuisson Léger à moyen 93 144 6 93 26 24 Intense Saleté cuite sur les ustensiles 105 153 6 93 7 83 26 24 26 64 Normal Wash lavage normal Avec ce programme la machine détecte le niveau de souillure de l eau et exécute les ajustements appropriés pour la consommation d eau et d énergi...

Страница 56: ...er la fin de l assainissement SmartWash Casseroles et ustensiles Lavage normal Augmentation de la température de l eau pour le lavage principal de 105 F 41 C à 120 F 49 C augmentation de la température de l eau pour le rinçage final de 140 F 60 C à 155 F 68 C 25 35 0 2 8 0 10 6 Heated Dry séchage avec chaleur Ce programme commande l alimentation de l élément chauffant après la fin du processus de ...

Страница 57: ...ge des commandes Utiliser la fonction de verrouillage des commandes pour éviter l utilisation involontaire du lave vaisselle entre les programmes Lorsque le témoin LOCK ON est illuminé tous les boutons de la console de commande sont désactivés Il est possible d ouvrir et de refermer la porte du lave vaisselle lorsque les commandes sont désactivées Désactivation des commandes Appuyer pendant 3 seco...

Страница 58: ...uteaux à manche creux Non Le manche de certains couteaux est fixé sur la lame avec un adhésif qui peut se dégrader lors du lavage au lave vaisselle Étain laiton bronze et cuivre Non Une température élevée et certains détergents peuvent susciter un changement de couleur ou une attaque de la finition Plastiques jetables Non Ces matériaux ne peuvent résister à une température élevée et au détergent P...

Страница 59: ...s codes de plomberie en vigueur exigent l ajout d un anti siphon entre le lave vaisselle et la canalisation d acheminement à l égout dans la résidence S il semble que l évacuation de l eau de vaisselle ne se fait pas parfaitement vérifier l état et la propreté du dispositif anti siphon Le dispositif anti siphon est généralement situé au sommet de l évier ou sur le plan de travail à proximité du la...

Страница 60: ...us de temps à chauffer de l eau plus froide Certaines options allongeront la durée du programme Voir la section Informations sur les programmes et options L option de séchage avec chaleur ajoute une demi heure au programme Essayer le programme de lavage d une heure Ouvrir l alimentation en eau chaude du robinet situé près du lave vaisselle avant de débuter le programme LE LAVE VAISSELLE NE SÈCHE P...

Страница 61: ... Rack Only panier supérieur uniquement sur certains modèles pour les chargements partiels Lancer un rinçage au vinaigre en plaçant 2 tasses 500 mL de vinaigre blanc dans une tasse à mesurer verticale en verre dans le panier inférieur Lancer un programme normal avec l option de séchage avec chaleur désactivée Ne pas utiliser de détergent Le lave vaisselle peut ne pas se vidanger correctement voir L...

Страница 62: ...est due à une réaction chimique voir ci dessous S assurer que la température de l eau entrante est d au moins 120 F 49 C Essayer d utiliser les options Hi Temp haute température et Sani Rinse rinçage sanitaire Pour retirer les taches lancer un rinçage au vinaigre dans le lave vaisselle Nettoyer et rincer la vaisselle abîmée et la charger de nouveau dans le lave vaisselle Retirer tous les couverts ...

Страница 63: ...63 ...
Страница 64: ... Trademark SM Service Mark of Sears Brands LLC Marca registrada TM Marca de comercio SM Marca de servicio de Sears Brands LLC Marque déposée TM Marque de commerce SM Marque de service de Sears Brands LLC 6 09 Printed in U S A Impreso en EE UU Imprimé aux É U ...

Отзывы: