Kenmore 405.24303410 Скачать руководство пользователя страница 3

MICROWAVE OVEN SAFETY

Table of Contents / Tabl

MICROWAVE OVEN SAFETY...................................................1

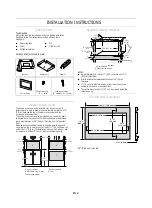
INSTALLATION INSTRUCTIONS

Tools and Part........................................................................2

Location Requirements .........................................................2

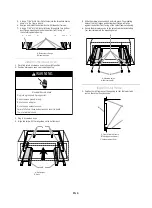
Required Cutout Dimensions.................................................2

Trim Kit Frame Dimensions....................................................2

Electrical Requirements ..........................................................3

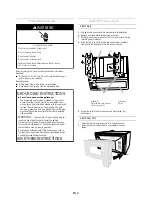
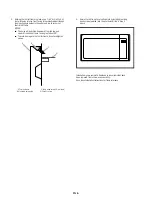
Prepare Microwave Oven .....................................................3

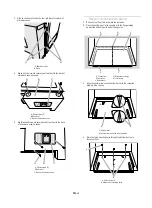
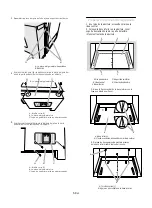
Prepare Cutout/Cabinet Opening .......................................4

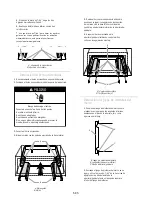
Install the Microwave Oven..................................................5

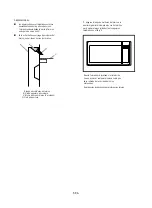
Install Trim Kit Frame..........................................................5-6

You can be killed or seriously injured if you don't immediately 


You


can be killed or seriously injured if you don't follow 

All safety messages will tell you what the potential hazard is, tell you how to reduce the chance of injury, and tell you what can
happen if the instructions are not followed.

Your safety and the safety of others are very important.

We have provided many important safety messages in this manual and on your appliance. Always read and obey all safety messages. 

This is the safety alert symbol.
This symbol alerts you to potential hazards that can kill or hurt you and others.
All safety messages will follow the safety alert symbol and either the word “DANGER” or “WARNING.”

These words mean:

follow instructions.

instructions.

DANGER

WARNING

....................


Specifications


KIT  SIZE                  

KIT  MODEL


NUMBERS/COLOR


30"(76.2cm)


405.24303410/Stainless


405.24309410/Black


.

    .............................................2


The Built

in  Kits  

can  

be  

installed  

on


Kenmore


Elite


Microwave


oven


model

405.


The  

Built

in  Kits can  be  

installed  

over  

any electric  

or  

gas)  

built

in  

wall  

oven, up


to  30" (76.2cm)  

(

.

a de contenidos

SEGURIDAD DEL HORNO MICROONDAS

INSTRUCCIONES DE INSTALACIÓN.................................................2

Herramientas y piezas...........................................................................2 

Requerimientos de ubicación................................................................2

Dimensiones de abertura requeridas...................................................2

Dimensiones del juego de molduras del marco.................................2

Requerimientos eléctricos......................................................................3

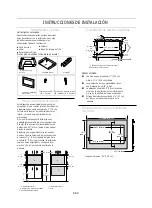
Preparación del horno microondas.....................................................3 

Preparación del espacio de la abertura/gabinete............................4 

Instalación del horno microondas......................................................5

Instalación del juego de molduras del marco

.................

...............................5-6

1

EN-1

 Steel

74159310/405.74153310/

405.75153310.

„

„

Содержание 405.24303410

Страница 1: ...w sears com www kmart com English Español Asistencia al Cliente Modelo s 1 800 842 1289 Models Kenmore Elite Microwave Oven Built in Trim Kit Horno De Microondas Black Negro 405 24303410 Stainless Steel Acero Inoxidable 405 24309410 Installation Instruction Instrucciones de Instalacion Marco Del Incrustado ...

Страница 2: ......

Страница 3: ...sages This is the safety alert symbol This symbol alerts you to potential hazards that can kill or hurt you and others All safety messages will follow the safety alert symbol and either the word DANGER or WARNING These words mean follow instructions instructions DANGER WARNING Specifications KIT SIZE KIT MODEL NUMBERS COLOR 30 76 2cm 405 24303410 Stainless 405 24309410 Black 2 The Built inKits can...

Страница 4: ...installation above a built in oven and a clearance of at least 2 5 1 cm above the cutout opening Required Cutout Dimensions NOTES Height dimension is critical 17 43 2 cm minimum 17 43 5 cm maximum Width and depth measurements have 1 16 2 mm tolerance 3 7 6 cm minimum dimension is from lower oven cutout ceiling to microwave oven cutout floor Trim kit frame extends 1 2 7 cm above and below the cutou...

Страница 5: ...owave oven must be grounded In the event of an electrical short circuit grounding reduces the risk of electric shock by providing an escape wire for the electric current The microwave oven is equipped with a cord having a grounding wire with a grounding plug The plug must be plugged into an outlet that is properly installed and grounded WARNING Improper use of the grounding plug can result in a ri...

Страница 6: ...three mounting holes through the bottom duct onto the cutout floor A Bottom duct B Center arrows aligned with centerline A Short screws 3 B Bottom duct mounting holes A B A B 3 Slide two tabs into the slots on the right side of the back of microwave oven 4 Use two short screws to secure top of rear duct to the back of microwave oven as shown 5 Use three short screws to secure back of rear duct to ...

Страница 7: ...nd prong Do not use an adapter Do not use an extension cord Failure to follow these instructions can result in death fire or electrical shock WARNING A B shown in the figure above duct flange mounting holes on the bottom front facing of a Carefully 5 Slide the microwave oven back and into place The mounting holes of the rail flanges and bottom duct flange will align against the bottom front facing...

Страница 8: ...void damage to the trim kit frame do not overtighten screws 3 Secure trim kit frame to cutout cabinet by installing four long wood screws painted into the pilot holes drilled in Step 2 above Installation is now complete Replace any loose items that have been removed from microwave oven cavity Save these Installation Instructions for future reference A Trim kit frame B Mounting hole guide C Long wo...

Страница 9: ...mensajes de seguridad especificarán cuál es el peligro potencial cómo reducir la posibilidad de resultar lastimado y qué puede ocurrir si no se siguen las instrucciones Especificaciones TAMAÑO DEL JUEGO 30 76 2cm NÚMEROS COLORES DEL MODELO DEL JUEGO 405 24303410 Acero Inoxidable 405 24309410 Negro Los juegos empotrados pueden instalarse sobre los modelos de hornos microondas Kenmore Elite Los jueg...

Страница 10: ... 3 7 6 cm para realizar la instalación sobre un horno empotrado y un espacio de al menos 2 5 1 cm por sobre la abertura de la abertura Dimensiones de recorte requeridas OBSERVACIONES La altura es muy importante 17 43 2 cm mínimo 17 43 5 cm máximo Las medidas de ancho y profundidad tienen una tolerancia de 1 16 2 mm La dimensión mínima de 3 7 6 cm es desde el cielo de la abertura del horno inferior...

Страница 11: ... eléctrico es muy corto haga que un técnico o eléctrico calificado instale un tomacorriente cerca del horno GUARDE ESTAS INSTRUCCIONES Preparación del horno microondas 1 Desconecte el horno microondas antes de proceder con la instalación 2 Retire todos los elementos sueltos que se encuentren al interior del horno 3 Gire suavemente el horno microondas sobre su parte superior con la puerta mirando h...

Страница 12: ...e posterior del horno como puede ver adjunto A Tornillo corto 2 B La placa del guía del aire C La parte posterior del horno de microondas Usar tres tornillos para fijar la placadel guía del aire a la parte A Tornillo corto 3 B La placa del guía del aire C La parte posterior del horno de microondas posterior del horno como puede ver adjunto 3 Alinee la flecha central de la base inferior con la líne...

Страница 13: ...iones de las bridas de montaje del ducto en la parte inferior frente al Use una broca de 7 64 para hacer los agujeros 5 Deslice el horno microondas hacia atrás para ponerlo en su lugar Los agujeros de los soportes de los rieles y de la base inferior se alinearán contra la parte delantera inferior de la abertura del gabinete 6 Asegure el horno microondas a la abertura gabinete instalando cuatro tor...

Страница 14: ...ego de molduras del marco a la abertura gabinete instalando los cuatro tornillos para madera largos pintados en los agujeros taladrados en el Paso 2 De esta forma habrá terminado la instalación Vuelva a colocar cualquier elemento suelto que haya retirado de la cavidad del horno microondas Guarde estas instrucciones para referencias futuras A Juego de molduras del marco B Guía de agujero de montaje...

Страница 15: ......

Страница 16: ... which vary from state to state Sears Brands Management Corporation Hoffman Estates IL 60179 FOR ONE YEAR from the date of sale this product is warranted against defects in material or workmanship when it is installed operated and maintained according to all supplied instructions WITH PROOF OF SALE return a defective product to the retailer from which it was purchased for free replacement POR UN A...

Отзывы: