background image

EN

2.4 

instAlling the mig/mAg welding gun

After mounting the wire spool, connect the welding gun cable to the connector (3) in the 

front of the feeder. 
Remember that you need to use suitable wire liner and feed rolls for the welding wire you are 

using.  Check also, that the correct groove is used in the feed rolls. If you need to change the 

feed rolls or select different groove, look the instructions in chapter 3.5.
Before feeding the wire into the gun, release the wire from spool and cut off the bent length. 

Be careful not to let the wire unwind from the spool. Check that the end of the wire has no 

sharp edges, which may damage the wire guide tube and the contact tip of the welding gun. 

NOTE!  

When feeding the welding wire into the gun, be sure that you are not pointing the gun at 

anyone and that there isn’t anything in front of the gun. The cut wire can be very sharp.

to feed the wire from the spool to the welding gun, do the following: 

1. 

Draw some loose wire from the wire spool and feed it through the back guide to the feed 

rolls. Do not release pressure of feed rolls!

2. 

Locate the Wire inch button inside the feeder and push the button down to start the 

wire inching. Let the wire go through the feed rolls and enter the wire liner.

3. 

Keep the wire inch button pressed, until the wire comes through the contact tip. 

Check once again that the wire is still properly in the grooves of both feed roll pairs. Now the 

Kemppi ArcFeed is ready to weld.

NOTE!  

When welding gun trigger is pressed, the welding current is connected to the wire. To avoid 

accidents and electric shock, it is not recommended to use gun trigger for wire inching. 

3. 

mAChine settings

3.1 

setting the mAximum wire Feed speed

The maximum wire feed speed of Kemppi ArcFeed is by default 18 m/min. This is enough 

for most welding work. However, if you need higher speed, you can raise it to 25 m/min by 

replacing the gear wheel D28 with a larger one, model D40.  

NOTE!  

After changing the gear wheel, you must also set the right jumper setting on the control card 

of the feeder.

to change the gear wheel, do the following: 

1

2

4

5

2

3

6

3

6

6

A

rcF

eed 200, 300, 300P

, 300R

C / © Kemppi O

y / 1117

Содержание ArcFeed 200

Страница 1: ... Norsk Brugsanvisning Dansk Gebrauchsanweisung Deutsch Gebruiksaanwijzing Nederlands Manuel d utilisation Français Manual de instrucciones Español Instrukcja obsługi Polski Инструкции по эксплуатации По русски 操作手册 中文 EN FI SV NO DA DE NL FR ES PL RU ZH ArcFeed 200 300 300P 300RC ...

Страница 2: ......

Страница 3: ...Operating manual English ArcFeed 200 300 300P 300RC Kemppi Oy 1117 ...

Страница 4: ...Using the machine 10 4 1 Using the control panel functions 10 4 1 1 Switching the machine on and off 10 4 1 2 Selecting the CC or CV mode 10 4 1 3 Selecting the welding gun operating mode 11 4 1 4 Changing the wire feed speed adjustment scale 12 4 1 5 Using the power source remote control only 300 RC 12 4 2 Using the inside controls 13 4 2 1 Burn back time 13 4 2 2 Gas test 13 4 2 3 Wire inch 13 4...

Страница 5: ...ssions Kemppi reserves the right to change the specification of the product described at any time without prior notice Do not copy record reproduce or transmit the contents of this guide without prior permission from Kemppi 1 2 About voltage sensing technology The voltage sensing wire feeder uses the welding voltage to generate the energy required for controlling the wire feeder s operations Befor...

Страница 6: ...designed for MMA welding The recommended power sources to be used with Kemppi ArcFeed are Kemppi Master 5001 and Kemppi Master MLS 3500 Front view 1 2 4 3 1 Main switch 2 Control panel 3 Welding cable connection 4 Locking latch Back view 8 A 1 2 3 4 1 Shielding gas connection 2 Fuse 3 Earthing cable connection 4 Power source connection 4 ArcFeed 200 300 300P 300RC Kemppi Oy 1117 ...

Страница 7: ... material filler material and shielding gas The Kemppi ArcFeed is optimized for use with 1 2mm rutile flux cored or solid wire but the following wires can be used Flux cored wires 1 2 2 0 mm or up to 2 4 mm with the 300P model Innershield wires 1 6 2 0 mm or up to 2 4 mm with the 300P model Solid wires 1 0 1 6 mm In Kemppi ArcFeed 200 you can use 200mm wire spools In models 300 300P and 300RC you ...

Страница 8: ...he wire spool and feed it through the back guide to the feed rolls Do not release pressure of feed rolls 2 Locate the Wire inch button inside the feeder and push the button down to start the wire inching Let the wire go through the feed rolls and enter the wire liner 3 Keep the wire inch button pressed until the wire comes through the contact tip Check once again that the wire is still properly in...

Страница 9: ...rolls 1 The pressure adjustment knob is located at the end of the locking lever 1 With the adjustment knob you can adjust the pressure of the feed rolls so that the wire runs smoothly into the wire liner and brakes a little when coming out of the contact tip Make sure that the pressure is hard enough to avoid wire from slipping in the feed rolls but not too hard because then it might flatten the w...

Страница 10: ...h the welding cable and earthing cable from one pole to the other at the power source After that the wire feeder recognizes the new polarity and indicates it with the control panel led 3 5 Changing the feed rolls There are different feed rolls for different welding wires Also each feed roll has two grooves for different wire sizes The Kemppi ArcFeed is equipped with standard feed rolls which are e...

Страница 11: ...ollowing Each feed roll has two grooves for different filler wire diameters When changing the feed rolls select the groove according to the wire you are using 1 1 Move the feed roll selector plates from one side to another Choose the correct groove by moving the groove selector plate 1 from one side to another in feed roll as shown in the left hand picture above Move also the gear wheel selector p...

Страница 12: ... 4T 3 CC CV mode selector 4 Selector of the wire feed speed scale 5 Control knob 6 Polarity indicator light 7 LCD display 4 1 1 Switching the machine on and off To turn on the machine set the main switch 1 to position ON The LCD display of the control panel lights up and the machine is ready for use 4 1 2 Selecting the CC or CV mode With the CC CV switch you can choose between constant current CC ...

Страница 13: ...de the display shows the welding voltage and wire feed speed WFS The adjustment range of the wire feed speed depends on the size of the wire drive roll With the small drive roll the WFS can be 0 18 m min and with the large drive roll it can be 0 25 m min To adjust the welding values in CV mode do the following 1 Estimate the welding values to be used in the welding task 2 At the power source selec...

Страница 14: ... the adjustment scale 0 9 max 9 m minute If you want to use rough adjustment select the adjustment scale 0 18 max 18 m minute 4 1 5 Using the power source remote control only 300 RC ArcFeed 300RC model is equipped with a power source remote control function It allows you to adjust the power source current level straight from the work site Remote control can be used in constant current CC mode only...

Страница 15: ...re without turning on the welding current This feature can be used for example when feeding in the new wire 4 2 4 Post gas time Post gas time 4 control knob lets you adjust the length of the post welding gas flow This feature combined with the burn back time provides a smooth finish of the weld 4 3 Hanging the device The Kemppi ArcFeed 200 wire feeder should never be hanged by its handle Use a spe...

Страница 16: ...vice agent will inspect and clean your machine ensuring that all power connections are tight and secure Power connections can become loose and oxidised with frequent and high changes in temperature NOTE Disconnect the machine from the mains power supply before handling electric cables 5 3 Disposal of the machine Do not dispose of electrical equipment with normal waste In observance of European Dir...

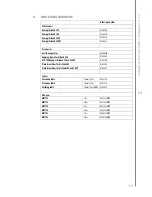
Страница 17: ...H 1000 hanger ArcFeed 300 and 300P 6185100 Protection slides for ArcFeed 200 6185286 Protection slides for ArcFeed 300 and 300P 6185287 Cables Extension cable 70 mm 25 m 6183725 Extension cable 70 mm 10 m 6183710 Earthing cable 16 mm 5m SKM25 6184015 MIG guns MMT 32 3 m 6253213MMT MMT 32 4 5 m 6253214MMT MMT 35 3 m 6253513MMT MMT 35 4 5 m 6253514MMT MMT 42 3 m 6254213MMT MMT 42 4 5 m 6254214MMT 15...

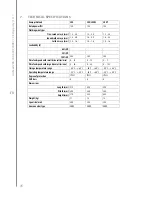
Страница 18: ... Wire feed speed with small drive roll m min 0 18 0 18 0 9 Wire feed speed with large drive roll m min 0 25 0 25 0 12 5 Storage temperature range 40 C 60 C 40 C 60 C 40 C 60 C Operating temperature range 20 C 40 C 20 C 40 C 20 C 40 C Degree of protection IP23S IP23S IP23S EMC class A A A Dimensions Length mm 510 590 590 Width mm 200 240 240 Height mm 310 445 445 Weight kg 11 15 15 Spool size mm 20...

Страница 19: ...EN 17 ArcFeed 200 300 300P 300RC Kemppi Oy 1117 ...

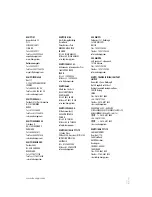
Страница 20: ...5 sales fr kemppi com KEMPPI GmbH Otto Hahn Straße 14 D 35510 BUTZBACH DEUTSCHLAND Tel 49 6033 88 020 Telefax 49 6033 72 528 sales de kemppi com KEMPPI SPÓŁKA Z O O Ul Borzymowska 32 03 565WARSZAWA POLAND Tel 48 22 7816162 Telefax 48 22 7816505 info pl kemppi com KEMPPI AUSTRALIA PTY LTD 13 Cullen Place P O Box 5256 Greystanes NSW 2145 SMITHFIELD NSW 2164 AUSTRALIA Tel 61 2 9605 9500 Telefax 61 2 ...

Отзывы: