

58
59
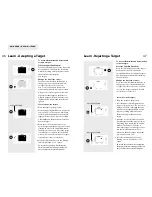
Volume is the level of sound emitted by
the detector when a target is detected.
A high Volume will give a great
difference between a small and large
target, but may be dangerous to your
hearing if a large target is found.
The Explorer SE is factory preset at
maximum Volume. This is usually
appropriate with either the detector’s
built-in speaker or headphones. If the
Volume is too loud in the headphones,
use the Volume control.
Headphones allow you to discern subtle
variations in audio response and lessen
exposure to adverse conditions (i.e.
wind) which may distort sound from
the speaker. Headphones also minimize
disturbance from your treasure hunting
for other people in the area.
Lower Volume settings and using
headphones will extend battery life.
MAX LIMIT
The
MAX LIMIT
is the overriding Volume.
It sets the maximum Volume of target
signals.
The sound produced by a distant target
starts softly. As you get closer, the
Volume level increases rapidly until it
reaches the maximum level that has
been set.
To adjust the MAX LIMIT:
Press the shift buttons next to the
MAX
LIMIT
slider control.
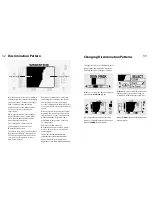
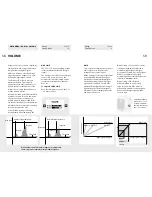
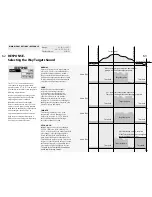
VOLUME
Target #1
Target #2
Audible Target Response
Target #1
Target #2
Audible Target Response
Max Limit
Threshold
Threshold
Max Limit
When Volume and Threshold settings are used together,
there is a greater control over target audio response.
MAIN MENU > AUDIO > VOLUME
Range: 0
to
10
Factory Preset:
10
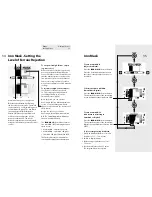
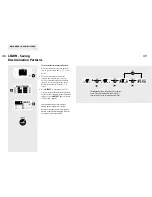
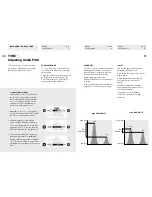
GAIN
This controls the amplification of target
audio responses in respect to the
strength of the original signal.
With a setting of 1 the target signal will
be unamplified. Weak target signals
will sound soft, medium target signals
will sound medium and strong target
signals will sound loud. There will be
greater differentiation between target
signal strengths. The weakest signals
will produce an accordingly faint audio
and may not be heard.
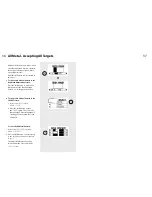
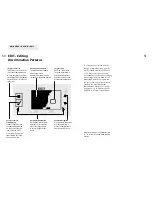
With a setting of 5, the audio response
is being partially amplified. Weak to
medium strength signals will give
proportional volume, but strong signals
will not sound much louder than
medium signals because the Volume has
reached its maximum limit.
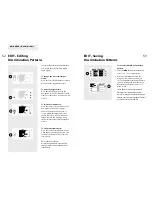
With a setting of 10, all signals
will be amplified to a very strong
audio response. It will be harder to
differentiate medium to strong signals,
but even weak target signals will be
easier to hear.
Target Signal Strength
Max Limit
Gain=1
Target Signal Strength
Max Limit
Weak
Strong
Medium
Range: 1
to
10
Factory Preset:
8
It is also possible to
access the
VOLUME
screen menu from
the icon shortcut of
the
LEARN
screen.
So
u
n
d L
o
udnes
s
So
u
n
d L
o
udnes
s
Gain=5
Gain=10
Содержание Explorer SE
Страница 1: ......