Keith McMillen Instruments QuNeo Скачать руководство пользователя страница 25

Q

u

N

eo

 e

diTor

25

Q

u

N

eo

The Global Sensitivity dial adjusts the sensitivity of the sensors. The higher the sensitivity, the 

easier it is to get pressure and velocity in the higher value ranges.  The lower the sensitivity, the 

more difficult (or impossible) it will be to get the pressure and velocity to the higher value ranges. 

The Sensitivity dial is global for all controls of that sensor type. For example, if you adjust the 

global sensitivity of one Pad you are adjusting the sensitivity of all Pads, however it will not affect 

the sensitivity of the sliders.

l

efT

/r

iGhT

 b

uTToNs

 - led

s

 T

ab

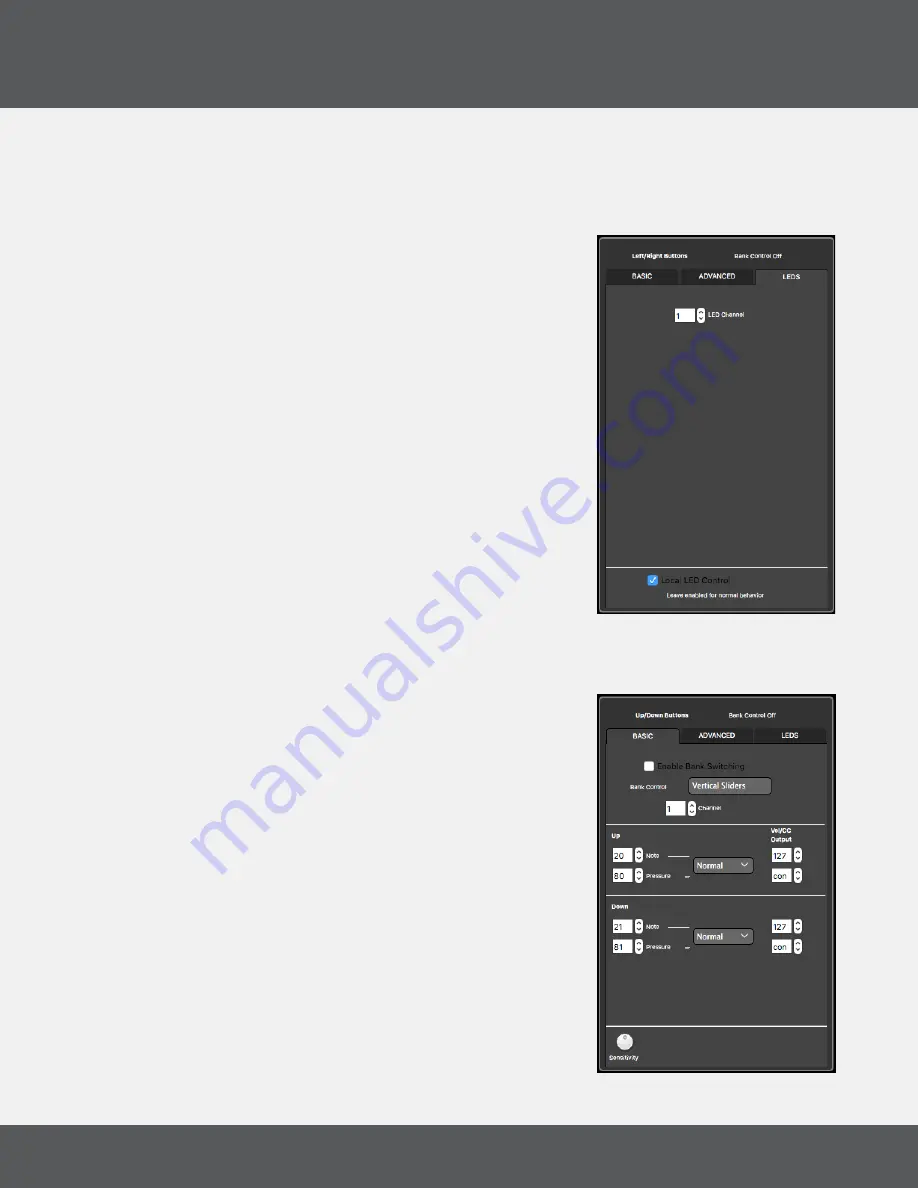
The LEDs tab is where you set which MIDI Channel the Up/

Down button LEDs will listen to for Remote LED Control. 

This parameter is global for all Up/Down buttons. For more 

information see Section 2.6.2 Remote LED Control.
Uncheck the box marked “Local LED Control” to disable 

Local LED behavior.

e

diTiNG

 u

p

/d

oWN

 b

uTToNs

The Up/Down buttons are positioned on either side of the Long Slider. 

u

p

/d

oWN

 b

uTToNs

 - b

asiC

 T

ab

If the “Enable Bank Switching” box is checked, these 

button pairs act as bank controls for the Rotaries, Vertical 

Sliders, Long Slider, or Pad notes. The banks will be indicated 

by the LEDs of the 2 buttons.
For information about how the LEDs indicate the banks, see 

the Banks chapter of this manual.
If Bank Switching is disabled, each button can output an 

assigned Note or Pressure CC#.  To disable a source, set the 

number box below 0 to “off” (-1).
Set the MIDI Channel with the “Channel” number box.
Each sensor has a corresponding drop down menu to select 

“Normal” or “Toggle” behavior. “Normal” sensors will 

engage while pushed (momentary). Sensors set to “Toggle” 

will alternate on and off with each push.
To the right of the toggle menu are number boxes for 

setting Velocity and Pressure values. By default these  

boxes are set to “var” for “Variable Velocity” and “con” for 

Содержание QuNeo

Страница 1: ...QuNeo Users Manual v2 0...

Страница 2: ...ller Mapping Assistant 10 Mapping Pads in CoMA Mode 10 Mapping Sliders in CoMA Mode 11 Mapping Rotaries in CoMA Mode 11 Mapping Buttons in CoMA Mode 11 1 6 LED Behavior 11 Local LED Control 11 Remote...

Страница 3: ...s LEDs Tab 23 Editing Transport Buttons 23 Transport Buttons Basic Tab 23 Transport Buttons LEDs Tab 24 Editing Left Right Buttons 24 Left Right Buttons Basic Tab 24 Left Right Buttons LEDs Tab 25 Edi...

Страница 4: ...Getting Started...

Страница 5: ...elocity The 16 square pads provide 128 levels of velocity response X Y location and continuous pressure for each pad Each rotary sensor measures direction pressure and location In this manual you will...

Страница 6: ...QuNeo Hardware...

Страница 7: ...with MIDI Expander To connect QuNeo to a hardware MIDI device via our MIDI Expander sold separately 1 Use a USB A to Mini cable to connect the QuNeo to the USB Expand port on the MIDI Expander 2 Conne...

Страница 8: ...se Note Pressure Location and Direction Location and Direction may not be enabled simultaneously The Rotaries can also be set up to have banks See the Banks chapter for more information Transport Butt...

Страница 9: ...the slider the width will not change again until the second finger returns to the slider Direction Moving a finger around a rotary will cause the direction CC value to output If finger movement is cl...

Страница 10: ...Preset Selection mode The Mode button will flash blue and the pad for the current preset will be illuminated red 2 Press a pad to load the corresponding preset The selected pad will briefly blink gre...

Страница 11: ...he button To output the Pressure CC press and hold the button for 1 second If buttons are assigned to bank switching they will not output their own data in CoMA mode but instead control the banks for...

Страница 12: ...his works great for VU metering Refer to the MIDI Input diagram to look up which CC corresponds to which slider Long Slider LEDs LEDs will light up at a point determined by the value sent to CC 5 on C...

Страница 13: ...QuNeo Editor...

Страница 14: ...ructions Mac 1 Double click on the dmg file to open the disk image 2 Drag the QuNeo directory into the Applications Alias 3 The QuNeo program folder will now appear in Applications Installer Instructi...

Страница 15: ...g presets are found in the bottom right side of the window 2 5 Preset Management Select presets from the menu name them in the text box and save or revert them with the Save Preset and Revert buttons...

Страница 16: ...will be off and everything else will be set to their default values allowing the user to start from scratch Revert Current Preset to Factory reloads the original preset into the current preset slot R...

Страница 17: ...IDI routing software For Windows users this allows you to route QuNexus MIDI to a DAW or soft synth using a virtual MIDI port bypassing the Windows limitation where multiple applications cannot share...

Страница 18: ...click another pad to edit them together you cannot shift click to edit a Pad with a Horizontal Slider or Rotary Editing Pads Pads Basic Tab At the top of the Basic Tab is a number box for selecting a...

Страница 19: ...number boxes set a value to transposition each of the 4 banks Note Changing Pad Banks will not affect the CCs of the other Pad sources X axis Y axis Pressure etc The Corner Isolation parameter adjusts...

Страница 20: ...e Pad Edit Pane LED tab is where you set the MIDI Channel for each of the Pad s three Remote LED behaviors For more information see Section 2 6 2 Remote LED Control Uncheck the box marked Local LED Co...

Страница 21: ...the distance between two fingers held down on the Long Slider Sliders Advanced Tab The On Thresh sets the pressure value at which a Note On message is sent Example If set to 10 the Slider pressure ha...

Страница 22: ...sensor was struck and a continuous CC value corresponding to the pressure exerted on the sensor Setting a numerical value in the number box will override the default behavior and output just that val...

Страница 23: ...yellow LED is the stop button and the triangular button with the green LED is the play button Transport Buttons Basic Tab At the top of the Basic Tab is a number box for selecting a MIDI Channel for...

Страница 24: ...nks see the Banks chapter of this manual If Bank Switching is disabled each button can output an assigned Note or Pressure CC To disable a source set the number box below 0 to off 1 Set the MIDI Chann...

Страница 25: ...marked Local LED Control to disable Local LED behavior Editing Up Down Buttons The Up Down buttons are positioned on either side of the Long Slider Up Down Buttons Basic Tab If the Enable Bank Switchi...

Страница 26: ...own buttons For more information see Section 2 6 2 Remote LED Control Uncheck the box marked Local LED Control to disable Local LED behavior Editing Rhombus Button The Rhombus button is positioned und...

Страница 27: ...more difficult or impossible it will be to get the pressure and velocity to the higher value ranges The Sensitivity dial is global for all controls of that sensor type For example if you adjust the g...

Страница 28: ...Appendices...

Страница 29: ...up as the preset increases So the pad notes on preset 1 are shown below from C1 D 2 preset 2 are from E2 G3 preset 3 are from G 3 B4 and preset 4 are from C5 D 6 These presets are in Drum Mode and do...

Страница 30: ...A9 B9 DJ FX Select A10 B10 DJ FX Amount QuNeo Preset 2 A11 B11 Set Cue Point 1 A12 B12 Set Cue Point 2 A13 B13 Set Cue Point 3 A14 B14 Set Cue Point 4 QuNeo Preset 3 A15 B15 DJ FX On Off For more inf...

Страница 31: ...Remote Control Surface contains a variety of Modes Modes remap the 8x8 Grid and non Global Buttons into various functions for Ableton Live Modes include Clip Launch Step Sequencer and Note Mode When...

Страница 32: ...ently playing or recording clip corresponding to the correct track A4 STOP ALL CLIPS Push to stop all playing and recording clips in the session A5 TRACK ACTIVATOR Activate this button to hear the tra...

Страница 33: ...slots D2 Impulse These Pads are assigned to Impulses 8 Sample cells This image shows what MIDI data will output for each sensor in the Ableton Live Drum Rack preset In this preset the Pads use Drum M...

Страница 34: ...gic Template This image shows what MIDI data will output for each sensor in the Logic preset The Pads are in Drum Mode This preset doesn t use banks Velocity response is fixed at 127 for the buttons b...

Страница 35: ...le from QuNeo In addition this preset takes advantage of the modifier functions creating a Shift button on QuNeo that allows for sample playback extended mixing and more in depth FX control The image...

Страница 36: ...are Installer This image shows what MIDI data will output for each sensor in the Traktor DJ Mixxx preset The top 2 rows of Pads are in Grid Mode and the bottom 2 rows of Pads are in Drum Mode This pre...

Страница 37: ...the Reason preset In this preset the Pads use Drum Mode Banks are enabled for the Horizontal Sliders the Vertical Sliders and the Rotaries Rotaries are set to use Location instead of Direction Pass Th...

Страница 38: ...MIDI data will output for each sensor in the Battery preset In this preset the Pads use Drum Mode in the left 2 columns and grid mode in the right 2 columns Banks are not enabled Rotaries are set to...

Страница 39: ...se the Rotaries to control the mod wheel and the tuning The Vertical Sliders control the VCO waveforms and pulse width The image below shows what each sensor controls in the Korg iMS 20 synthesizer Th...

Страница 40: ...ur has nothing set as there are a maximum of three effects per track The left rotary is mapped to filter cutoff frequency and the right rotary is mapped to filter resonance The long slider controls a...

Страница 41: ...Troubleshooting...

Страница 42: ...plug directly into the computer s USB port The reverse holds true as well if experiencing connectivity issues while not using a USB hub try with a hub if one is available to you Try resetting the devi...

Страница 43: ...est at support keithmcmillen com outlining the problems you re experiencing The more detailed you are in describing your problem information about your computer the software you re running the circums...

Страница 44: ...Safety Precautions...

Страница 45: ...ing QuNeo Explosive Atmospheres Do not use QuNeo in any area with a potentially explosive atmosphere such as a fueling area or in areas where the air contains chemicals or particles such as grain dust...

Отзывы: