background image

9

Fig. 3 Schematic diagram of power switch position

2. Instructions for Use of Disinfection Robot APP

2.1 Introduction of functions

The basic disinfection process is as follows: First, the user selects the disinfection mode. Second,
the user selects the route to destination or moving point. Next, the robot will go to each destination
one by one after departure; Upon arrival at destination (or route area), the robot will send a voice
prompt, then turn on its disinfection equipment, and conduct continuous disinfection task for a
given period of time; After completion of disinfection, the robot will automatically return to the
origin place.

2.2 Disinfection mode

The robot has three modes of disinfection:

On-the-way mode: open the nozzle for spraying disinfection along the route.

Fixed-point mode: operate ultraviolet disinfection for one single room.

Dual mode: UV and spraying sanitization functions are activated at the same time for
disinfection a single room.

Under the on-the-way mode, the user may select one or more routes (maximum 4 routes for the
current version). Please press on the power switch to start the robot; when the robot arrives to the
starting point of the first route, it starts spraying disinfection and continues this operation along the
way back and forth. Meanwhile, the robot will send a voice prompt every 2 minutes until the
disinfection process for pre-set number of cycles is completed. After that, the robot continues to
spray on the next route or returns to the original point. Manual operation is required for this mode.

Содержание PEANUT

Страница 1: ...PEANUT Disinfection Robot Product Manual...

Страница 2: ...nts of the manual whether in part or in whole nor spread it in any way electronic photocopying and recording etc for lucrative purpose The product specifications and information specified herein are f...

Страница 3: ...Dear users Thanks for choose PEANUT Disinfection Robot Before using your robot please read this manual carefully and follow the instructions herein to gradually understand and use your PEANUT robot K...

Страница 4: ...the following contents 1 About Robot Give a short description on the basic functional characteristics of the robot and show the structure of the robot in detail 2 Operating Steps Give a description o...

Страница 5: ...Structure of Robot 6 Operating steps Use robot 8 Installation 8 Power on 8 Charging 11 Filling Disinfectant 12 Description on state of indicator light 12 Emergency treatment 13 Handling robot 14 Appe...

Страница 6: ...view Side view Rear view Fig 1 Structure diagram of PEANUT Disinfection Robot Note The above figure is for reference only The appearance and color of specific products shall be subject to the actual p...

Страница 7: ...ed herein is Disinfection Service Robot Model No M2 Main Structure of Robot Fig 1 shows the main structure of PEANUT Disinfection Robot The robot chassis has a structure of two driving wheels and four...

Страница 8: ...7 Fig 2 Structure diagram of charging port...

Страница 9: ...ch as redecorating moving the robot to a new place for operation or rearranging indoor items please call our Customer Service at 400 9651 808 to rebuild the map Power on 1 Power on off The power switc...

Страница 10: ...three modes of disinfection On the way mode open the nozzle for spraying disinfection along the route Fixed point mode operate ultraviolet disinfection for one single room Dual mode UV and spraying s...

Страница 11: ...isinfection time is over After that the robot continues disinfection operation on the next point or returns to the original point Please keep away from the robot under the fixed point mode and dual mo...

Страница 12: ...r will not unlock when the robot pauses then the user cannot push the robot to move Charging 1 Robot Autonomous Intelligent Recharge The robot has the function of intelligent autonomous recharge The r...

Страница 13: ...outer silica gel cover of the liquid filling port Description on state of indicator light Indicator light state Meaning Blue breathing light slow blinking The robot is in standby state The spraying de...

Страница 14: ...are shown in fig 5 Fig 5 Partial enlarged detail after opening the emergency stop button cover The emergency stop button is located at the back of the robot i e the position indicated by reference No...

Страница 15: ...layer with your hands when handling Please keep the robot upright all the time when handling Fig 6 Schematic diagram for handling the robot Note The laser layer gap is the only force bearing part of...

Страница 16: ...g point to start navigation again 2 The top camera stereo vision or laser layer gap is covered please ensure that the above modules are not covered 3 Robot radar failure please check the rotation of t...

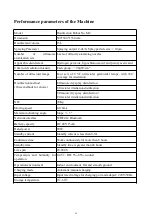
Страница 17: ...ds for choice Ultrasonic dry spray disinfection Ultraviolet irradiation disinfection Ultrasonic dry spray disinfection Ultraviolet irradiation disinfection N W 70Kg Moving speed 0 0 8m s Maximum climb...

Страница 18: ...jects on the ground such as decoration waste glass nails etc to avoid damage to the chassis of the machine Do not place any non transportable objects including children and pets on stationary or runni...

Страница 19: ...s radiator etc Do not wipe or clean the charging port contact piece with wet cloth or wet hands Please do not abandon the discarded batteries at will It is recommended to send these batteries to the p...

Страница 20: ...ranty period Robot 1 year Non warranty terms The warranty service is only applicable to the products under normal use Products damaged by users and the following clauses are not covered by our warrant...

Страница 21: ...n com Keenon Robotics Co Ltd 400 9651 808 pr keenon com 11 F Bldg 56 City of Elite No 1000 Jinhai Rd Pudong New Area Shanghai WeChat Subscription Number Keenon WeChat Subscription Number for After sal...

Отзывы: