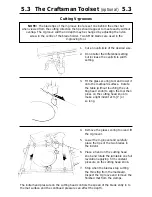
KEENCUT OVAL 6 Скачать руководство пользователя страница 18

Blades
The Oval 6 has been designed to use standard craft knife blades:-

Material

Operation

use blade...

Regular matboard

Cutting all except very small ovals/circles

SM02

Regular matboard

Cutting very small ovals/circles

SM03

Thick matboard and foamcore

Cutting all sizes of oval/circle

SM03

All materials

Cutting V-grooves

SM02

Replacement blades and glass cutting wheels are available through your Keencut distributor or from Keencut direct.

Cleaning and Lubrication

●  

Clean the Oval 6 frequently with a damp or dry cloth and keep it covered when not in use.  

Dirt can spoil your work

●  

Do not use solvents, they can harm the paint finish,  remove silicone lubrication and effect plastic components.

●  

Lubrication.  Use lubricant spray, apply it with a pad or cloth.  Wipe off any excess liquid with a clean cloth.

●  

Do not use oil, grease or all-purpose penetrating oils and sprays.  Silicone spray may be used on the operating 

disc under the table if ever required.

Fault Finding

Fault 

Causes and Suggestions

Start/Finish mark

-  Hand Pressure applied to the cutting head before the turntable 

had rotated to align the cutter

-  Pressure applied to the cutting head too suddenly
-  Blade depth not correct

Cutting needing more than two

-  Change Blade

revolutions  on regular matboard

-  Apply more pressure

Poor finish on the bevel

-  Blunt or broken blade
-  Insufficient hand pressure on the cutting head

Excessive blade wear or tip

-  Glass cutting surface scored

breakages

-  Blade depth incorrect

A double cut around part of 

-  Blade depth incorrect

the bevel

-  Inconsistent pressure on the blade
-  Not enough pressure on the cutting head during cutting

Extreme lazy ovals (not vertical)

-  Turntable rotating in the wrong direction
-  Slide block wrongly set and adjusted (see ‘Cutting small ovals’)

Ovals or circles not centred 

-  Scales not accurately set or adjusted on the clamp bars or

in matboard

turntable edge.

V-groove not meeting up after

-  Blade tips need resetting to meet exactly when viewed from the direction

one revolution

of cut.  Please note that the blades are set one behind the other when 
viewed from below.

The 

Dexter No. 3
blade is also

suitable.

SM02

Glass 

cutting wheel

SM03

6.1

Looking After Your Oval 6

6.1

Maintenance and Blades

Содержание OVAL 6

Страница 1: ...OVAL 6 INSTRUCTION MANUAL Keencut the world s finest cutting machines...

Страница 2: ...ircles 5 5 Cutting glass ovals circles Cont d 6 Looking After Your Oval 6 6 1 Maintenance Blades Introduction Thank you for choosing a Keencut Oval 6 Every effort has been made to bring you a superbly...

Страница 3: ...w x 4 11 M6 washer x 4 12 M6 screws x 2 13 M6 spring washer x 2 14 Blades 15 5mm Hexagon wrench 16 Plastic feet x 6 1 Main Base 2 Beam 3 Turntable 4 Cutting Head 5 LH clamp bar 6 RH clamp bar 7 Bevel...

Страница 4: ...screws firmly using the 5mm hexagon wrench 3 Fit the Cutting Head to the Beam by sliding it onto the bracket until the edge of the aluminium block aligns with the centre of the Lazy oval scale as sho...

Страница 5: ...t supplied with the machine Cutting on to a glass surface is the most safe reliable and economical method A self healing mat can be used but the surface will deteriorate rapidly when bevel cutting A m...

Страница 6: ...1 Find the two Sliding Nuts in one of the long edges of the Table 2 Fit the two Clampbars to the Turntable using the M8 thumb screws and washers 3 3 Assembly 3 3 Fitting the Clamp Bars...

Страница 7: ...h and length of the oval is set on the differential scale turn the knob counter clockwise by half a turn to release and set to the required dimension lock in position For a circle set the pointer as f...

Страница 8: ...and a piece of regular matboard to set the clearance 2 The clamping system The clamping system consists of two clamp bars each with two corner stops and a toggle clamp For small and medium size mats o...

Страница 9: ...ing head NOTE If the size of the oval does not reflect the sizes set refer to the next section on Calibrating the scales Vertical cutting The vertical blade is of the same type as that used for bevel...

Страница 10: ...o correct the differential scale loosen the two screws and the knob swing the scale until it reads 3 1cm re tighten the screws and the knob 9 Reset the machine to width 8cm difference 3cm Then cut the...

Страница 11: ...table edge scales The centre pointer should exactly indicate the crossed centre lines on the turntable grid when the differential scale is set to cut a circle or the turntable is in the portrait posit...

Страница 12: ...ng head away from the beam 1 3 Loosen the thumbscrew allowing the cutting head to move towards or away from the beam 1 4 Cut another oval in a different part of the board check the setting and repeat...

Страница 13: ...ed line A half round edged wheel A flat edged wheel 3 Fit the embossing tool and lower it onto the matboard surface 4 Do not touch the cutting head knob rotate the turntable by at least 1 4 turn to al...

Страница 14: ...ential settings after producing the embossed indent 2 3 Place a small sheet of thin paper on the mat so that one clean edge is across the embossed line Lower the pen until the tip is on the paper abou...

Страница 15: ...oover 5 Lower the V groover and carefully place the tips of the two blades in the indent 6 Place a hand on the cutting head knob and rotate the turntable one full revolution applying firm constant pre...

Страница 16: ...val shape on the matboard WARNING Wear eye and hand protection when handling glass 4 Measure the scored shape to confirm the accuracy 5 Place the glass blank on the mat board and lower the cutting hea...

Страница 17: ...matboard or a felt surface 9 Press around the score line with the thumb or tap it to make the cut 10 Starting 1mm 1 16 from the score line score four radial lines to the out side edge 11 Turn the gla...

Страница 18: ...Finish mark Hand Pressure applied to the cutting head before the turntable had rotated to align the cutter Pressure applied to the cutting head too suddenly Blade depth not correct Cutting needing mor...

Отзывы: