background image


33

4.15    CAMBIAR EL IDIOMA DE LOS SUBTITULOS 

En modo de reproducción, pulse el botón SUBTITLE repetidamente para seleccionar el lenguaje del los 
subtítulos disponibles o apagar dicha opción. 
 
NOTA: Ésta opción depende del archivo de video. 
 

4.16


CAMBIAR EL IDIOMA DE REPRODUCCIÓN 

En modo reproducción de video, pulse el botón AUDIO del control remoto repetidamente para 
seleccionar el idioma de reproducción que desee. 
 
NOTA: Ésta opción depende del archivo de video. 


4.17


LISTA DE REPRODUCCIÓN  

Ésta opción le permite introducir el orden deseado de reproducción de los archivos MP3 / WMA. 
1  En modo reproducción, pulse el botón PROG para acceder a la pantalla siguiente: 


2


Utilice los botones de dirección para mover el cursor a la casilla deseada para introducir el nº de 
pista que desee. 

3


Utilice los botones numéricos para introducir el nº de pista que desee imputar en la casilla 
previamente seleccionada. 

4


Utilice los botones de dirección para mover el cursor hacia la casilla REPRO, luego pulse OK para 
reproducir los archivos programados en el orden especificado. Solamente con pulsar el botón PLAY 
puede reproducir los archivos/pistas programadas en el orden especificado. 
a.


Para salir del modo de programación, pulse el botón STOP   

b.


Para borrar los archivos programados en la lista de reproducción, pulse el botón PROG para 
acceder a la pantalla de programación y luego mueva el cursor hasta la casilla DESP y 
finalmente confirme con el botón OK.   

c.


Para cambiar la secuencia programada, mueva el cursor hacia la casilla que desee cambiar e 
introduzca el nº de pista que desee reproducir.   


4.18


FUNCIÓN ID3 

En modo reproducción MP3 /WMA se mostrará en la pantalla la información del nombre del archivo: 
nombre de la carpeta que lo contiene, nombre de la pista, artista y álbum siempre y cuando el archivo 
MP3 que se esté reproduciendo contenga información ID3 TAG en la versión 1.0/2.0. 


4.19


OPERACIONES CON LA TARJETA SD   

Encienda La unidad e inserte la tarjeta SD o el dispositivo USB dentro de sus respectivas ranuras. En 
caso de la tarjeta SD deberá abatir el panel frontal para poder introducirla y volver a colocarlo. Una vez 
dentro la unidad le mostrará el menú principal (ROOT MENU) del dispositivo que haya insertado. 
Las mecanismo de operación con la tarjeta SD es el mismo que con el del dispositivo USB. 
Cuando desee extraer la tarjeta SD primero apriete hacia dentro y luego podrá extraerla.   


Содержание R-091

Страница 1: ......

Страница 2: ...3 RADIO OPERATION 9 3 1 BAND BUTTON 9 3 2 TUNE SEEK UP DOWN BUTTONS 9 3 3 APS BUTTON 9 3 4 PRESET STATION 9 3 4 PRESET STATION 1 6 BUTTONS 9 3 5 STEREO MONO BUTTON 9 3 6 LOC BUTTON 9 3 7 PTY PROGRAM T...

Страница 3: ...EO SETUP 15 4 20 5 SPEAKER SETUP 15 4 20 6 DIGITAL SETUP 15 5 BLUETOOTH HANDS FREE SYSTEM 16 5 1 ENTER BLUETOOTH MODE 16 5 2 PARING AND CONNECTION 16 5 3 USE THE MOBILEPHONE TO DO CONNECTION OR DISCON...

Страница 4: ...as been driven for a while to cool off the interior 1 2 BATTERY INFORMATION OF REMOTE CONTROL REPLACE BATTERY IN REMOTE CONTROL 1 Before using the remote control for the first time pull the insulating...

Страница 5: ...E BUTTON 15 APS HANG UP BUTTON 16 SEARCH BUTTON 17 RDM BUTTON 18 RPT BUTTON 19 SUBTITLE REDIAL BUTTON 20 SLOW FORWARD BUTTON 21 ST BUTTON 22 ZOOM BUTTON 23 AUDIO BUTTON 24 CLK BUTTON 25 A B BUTTON 26...

Страница 6: ...PAUSE BUTTON 10 2 INT BUTTON 11 3 RPT BUTTON 12 4 RDM BUTTON 13 5 10 BUTTON 14 6 10 BUTTON 15 AV IN JACK 16 USB JACK 17 CARD SLOT 18 RESET BUTTON 19 LED INDICATOR 20 TA AF BUTTON 21 IR REMOTE SENSOR R...

Страница 7: ...for the requirement Of the manual then install the metal sliding housing into the Car according to the diagram PARKING BRAKE PARKING BRAKE SWITCH INSIDE THE CAR TO METALIC BODY OR CHASSIS OF THE CAR...

Страница 8: ...OL knob on the front panel or press the or button on the remote control to directly adjust the volume level 2 4 TO MUTE SOUND Press the MUTE button on the remote control to turn on off MUTE mode Brief...

Страница 9: ...nterface 2 12 TO DO TURN ON OFF TFT DISPLAY Press and hold the SEL button to turn off the TFT display Press any button on the unit or remote control to turn on 2 13 TO DO SETUP In setup mode use VOL K...

Страница 10: ...eset station from the M1 When the field strength level is more than the threshold level of the stop level the radio holds at that preset number for few seconds with releasing mute and then searches ag...

Страница 11: ...f the AF switching or the checking time is very short it is almost inaudible in case of normal program When AF flash on LCD it will search for the stronger RDS station If AF and TP flash on LCD it can...

Страница 12: ...d or backward 4 5 SELECT CHAPTER WITH NUMBER BUTTONS During playback press one of the 1 9 to directly select and play the 1st to 9th track If you want to play chapter with serial number bigger than 9...

Страница 13: ...4 10 1 ONE ALL REPEAT During playback press the RPT button to select REP ONE REP DIR REP ALL or OFF 4 10 2 A B REPEAT Press the A B button if you want to repeat a specific segment on a song or a movie...

Страница 14: ...ton to move cursor onto PLAY item then press the OK button to play the programmed chapters in programmed order only pressing the PLAY button also can play the programmed chapters tracks in programmed...

Страница 15: ...item is for matching TV screen size 4 3 PS Choose the item when connecting a TV set with 4 3 screen When playing the pictures with 16 9 size the left and right parts of the video will be cut out and...

Страница 16: ...choose the item when outputting audio signal with 5 1 channels it will output the left and right channels of signal when outputting audio signal with 2 channels it will output the common 2 channels of...

Страница 17: ...DISCONNECTION Use the mobile phone to do connection or disconnection In the connection status find the paired and connected Bluetooth Device then press the disconnection button to do disconnection In...

Страница 18: ...authorized by us For the sake of your safety please do not open the cover and repair the player by yourself if that it may cause electric shock NO PICTURE SOUND AND INDICATION Ensure that the power sw...

Страница 19: ...e produit ou son emballage signifie que ce produit ne doit pas tre jet avec le reste de vos ordures m nag res Vous avez pour responsabilit de jeter cet quipement usag en l emmenant dans un point de ra...

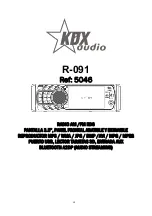
Страница 20: ...19 R 091 Ref 5046 RADIO AM FM RDS PANTALLA 3 5 PANEL FRONTAL ABATIBLE Y EXTRAIBLE REPRODUCTOR MP3 WMA JPG BMP AVI MPG MPEG PUERTO USB LECTOR TARJETAS SD ENTRADA AUX BLUETOOTH A2DP AUDIO STREAMING...

Страница 21: ...1 BOT N BAND BANDA 28 3 2 BOTONES TUNE SEEK UP DOWN 28 3 3 BOT N APS BUTTON 28 3 4 MEMORIA DE EMISORAS PRESELECCIONADAS 1 6 28 3 5 BOT N STEREO MONO BUTTON 28 3 6 BOT N LOC 28 3 7 BOT N PTY TIPO DE PR...

Страница 22: ...ALES 35 5 SISTEMA MANOS LIBRES BLUETOOTH 36 5 1 ACCEDER AL MODO BLUETOOTH 36 5 2 ENLAZAR DISPOSITIVO MOVIL 36 5 3 USO DEL TEL FONO M VIL PARA CONECTAR DESCONECTAR 36 5 4 ESTADO DE CONEXI N 36 5 5 MARC...

Страница 23: ...o voltaje No permite que los cables de los altavoces se unan entre s cuando la unidad est encendida de lo contrario podr a quemar el amplificador de potencia No instale el panel frontal extra ble ante...

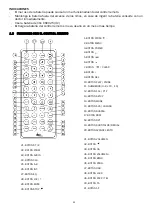
Страница 24: ...TR S 2 BOT N MEN 3 BOT N POWER 4 BOT N 5 BOT N 6 BOT N 7 BOT N CLEAR 8 BOT N 9 BOT N SEL 10 BOT N PLAY PAUSE 11 NUMBEROS 0 9 10 10 12 BOT N 10 PTY 13 BOT N SETUP 14 BOT N MODE 15 BOT N APS COLGAR 16 B...

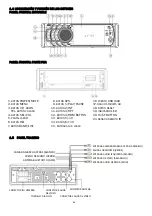
Страница 25: ...CONECTOR ISO HEMBRA CONECTOR SALIDA DE VIDEO TORNILLO FIJACION FRENO DE MANO VERDE ANTENA BLUETOOTH GRIS 1 BOT N POWER MUTE 2 BOT N MENU 3 BOT N UP DOWN TEL BOT N COLGAR 4 BOT N SEL VOL 5 PANTALLA LC...

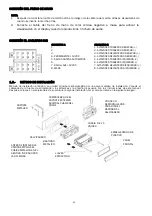
Страница 26: ...OCES TRASEROS IZQUIERDO 6 ALTAVOCES TRASEROS IZQUIERDO 7 ALTAVOCES DELANTEROS IZQUIERDO 8 ALTAVOCES DELANTEROS IZQUIERDO PANEL FRONTAL EMBELLECEDOR DE PLASTICO UTILICE UN DESTORNILLADOR PARA FIJAR EL...

Страница 27: ...anel frontal o pulse o en el control remoto para ajustar el volumen 2 4 ENMUDECER Y RESTABLECER EL SONIDO DE LA UNIDAD Pulse el bot n MUTE del control remoto para enmudecer o restablecer el sonido de...

Страница 28: ...MEN del control remoto para acceder al men de la unidad 2 12 ENECENDER APAGAR EL DISPLAY TFT Pulse y mantenga pulsado el bot n SEL para apagar el display TFT Pulse cualquier bot n del panel frontal o...

Страница 29: ...FM y 2x 6 emisoras AM Pulse brevemente el bot n APS del panel frontal o del control remoto para que la radio busque cada presinton a desde la M1 memoria 1 NOTA en la banda FM FM1 FM2 FM3 es escaneada...

Страница 30: ...tra AF en el display podr cambiar entre las siguientes funciones pulsando el bot n AF brevemente durante 2 segundos o AF no se visualiza en el display funci n AF desactivada o AF se visualiza en el di...

Страница 31: ...hivo autom ticamente En modo reproducci n pulse el bot n STOP del control remoto dos veces para parar la reproducci n luego podr extraer el dispositivo USB del puerto USB y la tarjeta SD de la ranura...

Страница 32: ...B SD 1 En modo reproducci n pulse repetidamente el bot n RETURN del control remoto para volver al MENU USB SD Con el icono de la derecha accede a los archivos JPG con el del medio accede a los archivo...

Страница 33: ...damente 2 Para cancelar la funci n repetir A B y volver al modo de reproducci n normal pulse el bot n A B 3 veces NOTA Los puntos A y B deben estar dentro de una misma pista o archive de video 4 11 RE...

Страница 34: ...Y puede reproducir los archivos pistas programadas en el orden especificado a Para salir del modo de programaci n pulse el bot n STOP b Para borrar los archivos programados en la lista de reproducci n...

Страница 35: ...ntalla a reproducir sea de 4 3 Al reproducir im genes con formato 16 9 los laterales derecho e izquierdo de las im genes se cortar n y se mostrar la pantalla completa 4 3 LB Elija sta opci n cuando el...

Страница 36: ...los 3 siguientes los efectos de sonido cuando no exista un altavoz central o subwoofer IZQ DER STEREO VSS IZQ DER Elija sta opci n cuando reproduzca un archivo con Efecto PRO LOGIC Dolby stereo effect...

Страница 37: ...ono est enlazado la pantalla mostrar LINK OK 5 3 USO DEL TEL FONO M VIL PARA CONECTAR DESCONECTAR En modo de conexi n acceda al MENU BT para localizar el tel fono enlazado y pulse el bot n DISCONNECTI...

Страница 38: ...th de su tel fono m vil soporta AVRCP las funciones de MUTE EQ LOUD y SEL son los mismos que en su dispositivo m vil no hay avance ni retroceso r pido para los botones y Acceda al men BT MUSIC para re...

Страница 39: ...I SE OYE Compruebe la buena conexi n de video entre el reproductor y la entrada de video de la unidad Compruebe que ha conectado la entrada auxiliar de AV Compruebe que el conector de video no est da...

Страница 40: ...MHz SECCI N AM Frecuencia 522KHz 1620KHz S Los equipos el ctricos y electr nicos contienen materiales componentes y sustancias que pueden ser perjudiciales para su salud y para el medio ambiente si el...

Страница 41: ......

Отзывы: