background image

ZHE JIANG KAYO MOTOR CO., LTD

WWW.KAYOMOTO.COM

31

3.5 Wheel

Lift the front wheel with the tool in
the horizontal position, make sure
that the bodyof vehicle has no
force on the wheel, shake the front
wheel from side to side, and check
whether the connection of the
front wheel is firm. Check if the
front wheels shakes, if there is any
shakes,please

Check the tightening bolts on the
rocker arm, axle, and rim. If there is

still shaking, check the rocker shaft
bushing, the ball cap and replace
them.

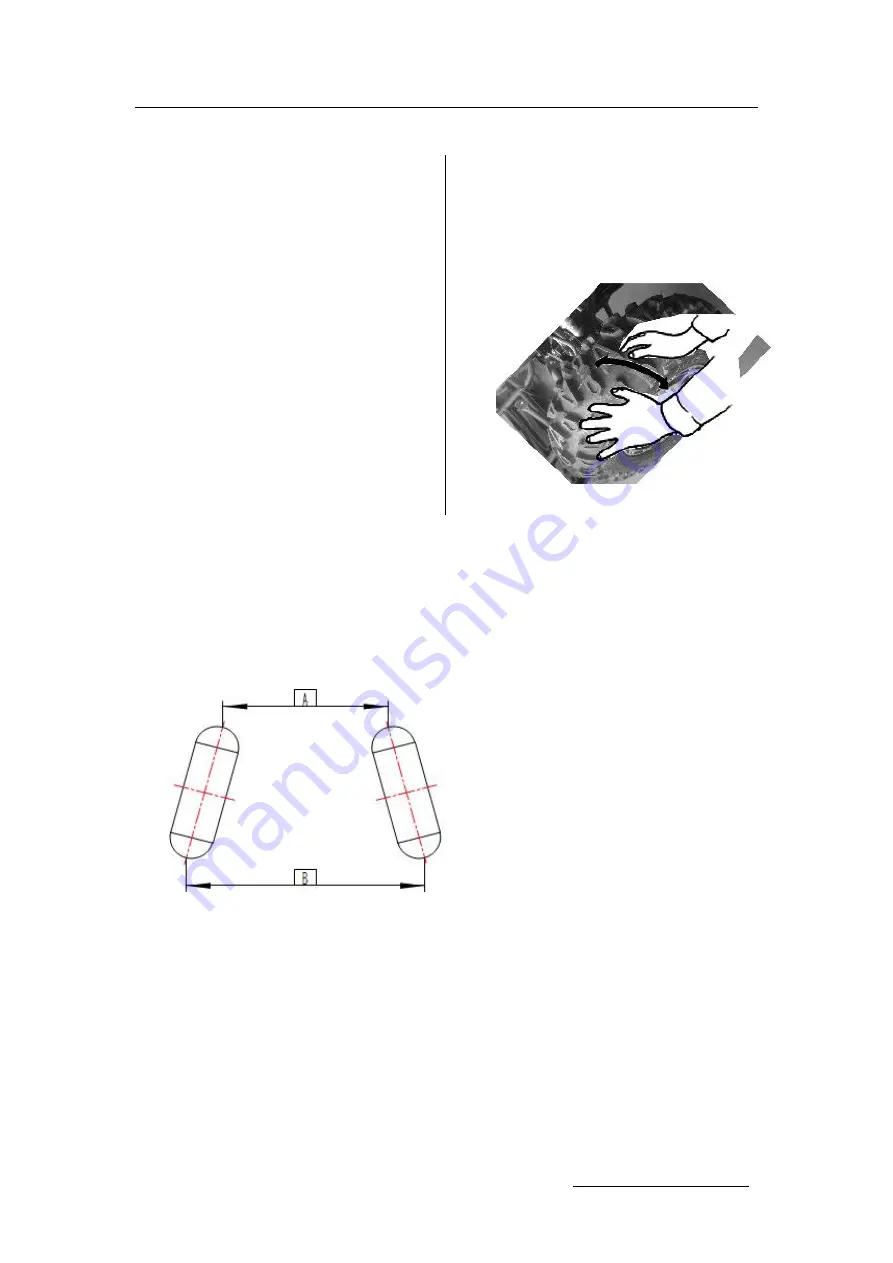
Front bundle of the wheel

Stop the vehicle in a horizontal position and measure the size of front bundle of
the wheel.
The front of the wheel relative to the direction of driving of the vehicle is A, the
rear of the wheel is B, and the size of front bundle is B-A=4~10mm

When the front bundle of vehicle is not in this range, adjust the steering stem
and the front bundle to 4~10mm then lock.
Note: When the size of front bundle of the vehicle is adjusted, drive the vehicle
slowly and make sure that the handlebar can correctly restrict the driving
direction of the vehicle

.

Pressure of wheel

Содержание HY110AT

Страница 1: ...ZHE JIANG KAYO MOTOR CO LTD WWW KAYOMOTO COM 1 AT110 model Maintenance Manual ...

Страница 2: ...hooting methods and maintenance technical data of AT110 model ATV four wheel all terrain vehicle in detail with detailed graphic data attached to guide the operation Please carefully read this manual and conduct inspection and repair in accordance with the standard operating practices which can effectively extend the service life of each part improve the performance of the engine and the reliabili...

Страница 3: ...3 Check and adjust regularly Chapter 4 External Components of the Engine Chapter5 Engine ZHE JIANG KAYO MOTOR CO LTD Note Please understand that the contents in this maintenance manual which subject to change due to vehicle improvement upgrading will not notify again The actual condition of the vehicle shall prevail in the maintenance ...

Страница 4: ...ution Indicates concern for minor hazards However it is important to note that the hazards and warnings contained in this maintenance manual cannot cover all potential hazards in the process of engine use and maintenance Therefore in addition to the danger and warning regulations maintenance personnel must also have basic mechanical safety knowledge If the operator is not sure to complete the enti...

Страница 5: ...the rear wheel clutch or other rotating parts and movable parts clamp hands and clothes at any time during maintenance 7 When two or more people work together they must continuously greet each other to ensure safety Disassembly and assembly Note 1 Components lubricants and lipids must be made from genuine parts of Kayo brand or recommended parts designated by Kayo 2 After the vehicle is disassembl...

Страница 6: ...tion 14 When installing elastic baffle one side with chamfer should be turned out Do not use loose retainers Rotate the elastic baffle after assembly and make sure the baffle is installed in the groove 15 After assembly please check whether the fasteners are tightened and working properly 16 Brake fluid gasoline and oil will corrode the coating surface plastic parts rubber parts etc Special care s...

Страница 7: ...ing time of the engine is 20 hours and the specifications are as follows 0 10 hours avoid continuous operation in the state of 1 2 throttle opening and change speed at the same time it is not recommended to operate in a fixed throttle position for a long time After working for 1 hour stop the engine to cool down for 5 to 10 minutes to avoid rapid acceleration 10 20 hours avoid long operation when ...

Страница 8: ...T 3 NAME ATV 110cc Sport ATV 4 COMPANY Zhejiang Kayo Motor Co Ltd 1 Dimension L W H mm 1380 880 930 2 Height of Handle bar mm 930 3 Width of Handle bar mm 730 4 Height of Vehicle Tail mm 700 5 Seat Height mm 635 6 Ground Clearance mm 90 7 Wheel Base mm 900 8 Front wheel base 700 3 2 Main dimension parameters 1 ...

Страница 9: ...Flat suction plunger type JINGKE PZ22 EPA 14 Fuel Tank Capacity 2L 15 Clutch Dry automatic clutch 16 Variable speed mode 1 1 Foot shifting with shift protection 17 Shift Gear One forward gear one reverse gear 18 Shift mode sequence R N D 19 Deceleration ratio Forward Gear D Reverse Gear R Primary Deceleration ratio Clutch hub gear primary transmission tooth Single stage deceleration ratio Forward ...

Страница 10: ...rding to outside temperature Oil pump rotor Internal and external rotor 0 07 mm 0 15mm 0 2mm Clearance between outer rotor 0 03 mm 0 10mm 0 12mm Oil pump rotor end clearance 0 023 mm 0 055mm 0 12 mm Oil pressure 1500r min 90 时 200 kPa 400kPa Generally 240 kPa 6000r min 90 600 kPa 700kPa Generally 600 kPa Intake system see engine part Cooling device no Wheel front and rear are the same Item Standar...

Страница 11: ...on coil Primary 150V Pulse generator 2V Light Instrument Switch Item Standard Relay Chip Fuse 15A Light Front Lelt Right Light 12V 3W 2 Rear light brake light LED Shift Gear Indication Light LED Valve Cylinder head See Engine Section Cylinder Piston Piston Ring Crank Link See Engine Section 1 5 Fastener tightening torque Note When you install thread you must manually bring 2 3 thread Tightening to...

Страница 12: ...ad adhesive 9 Front Dics brake mounting M6 10 9 Grade 15 20 10 Disc brake pump Mounting M8 10 9Grade 29 35 11 Front Brake Tee Installation M8 8 8 18 25 12 Rear Axle Rear Axle Mounting M12 1 25 8 8 55 65 13 Big Nut M27 1 5 80 90 14 Chain bolt M6 8 8 8 12 15 Steering Clip locking bolt Inside hexagonal corners M8 10 9 18 25 16 Steering column locking M8 8 8 18 25 17 Lower Pressure block mounting bolt...

Страница 13: ...n 1 6 Lubricating grease sealant No Smear Position Function Grease 1 Upper and lower rocker arm dust cover Lubrication XHP222 2 Upper and lower rocker ball head seat 3 Steering column base 4 Left and right steering knuckle joint with wheel hub 5 Rear fork mounting shaft 6 Rear flat fork inner liner 7 Rear axle lining pipe 8 Rear axle bearing oil seal 9 Steering column clamp block Note The handle b...

Страница 14: ...ZHE JIANG KAYO MOTOR CO LTD WWW KAYOMOTO COM 14 Main Cable Front brake tubing Throttle Cable Rear brake tubing Choke cable ...

Страница 15: ...nector Functional switch connector Switch lock connector Reverse display connector Neutral display connector Emergency flameout switch connector Brake cable connector Power anode Power cathode Magneto connector Gear display connector Rectifier regulator connector ...

Страница 16: ...ZHE JIANG KAYO MOTOR CO LTD WWW KAYOMOTO COM 16 Ignition Coil CDI Rectifier Regulator Rear lamp ...

Страница 17: ...r only describes the disassembly and assembly If the problem of cable tubing and cable alignment is involved in the process of disassembly and assembly please refer to the cable layout chart 2 2 Mounting torque M8 bolt 18 25N m TM6 Large headed bolt 7 11 N m M6 bolt 8 12 N m 2 3 Dismantling and assembling of head cover handle bar seat cushion whole vehicle plastic parts front and rear fender rear ...

Страница 18: ...ug of the brake wire in turn 3 Release the handle bolt of the disc brake with the tool and remove the brake handle 4 the front brake dismantling the rear brake 5 Pull out the air door line according to the graphic direction then remove the choke cable 6 Screw the accelerator cap bolts with tools and remove the throttle cable 7 Remove the pressing bolts remove the upper block and remove the handle ...

Страница 19: ...ring diagram 2 3 3 CUSHION ASSEMBLE DISASSEMBLE 1 Press the tail of the cushion and pull the seat hook at the same time 2 Lift up the back of the cushion and pull the cushion back ASSEMBLE Follow the reverse sequence and reverse direction of the disassembly After installation pay attention to checking whether the cushion is installed in place and stable Note The front hook of the seat cushion must...

Страница 20: ...lectric lock plug the neutral indicator lamp plug the reverse indicator lamp plug the left and right headlight plug Remove the fixed bolts 1 2 3 4 5 6 7 8 9 10 in turn Note 2 4 6 8 10 on the other side of the vehicle Unscrew the oil tank cover and remove the whole vehicle plastic parts Note During the maintenance process the handle bar must be removed first when dismantling the vehicle plastic par...

Страница 21: ...onnection 2 3 6 Front Rear Fender Dismantling of Left right front fender 1 Remove the mounting bolts of the left fender in turn 2 Remove the left front fenders Assemble Installation is done in reverse order Note If bolts nuts and rubber pads are damaged please replace new parts of the same specification in time Assemble disassemble of the front right fender is same with front left fender Dismantli...

Страница 22: ...ng bolt 1 2 3 4 5 6 7 8 the mounting bolts are symmetrical on the vehicle body 2 Remove the vehicle body Assemble Installation is done in reverse order Note If bolts nuts and rubber pads are damaged please replace new parts of the same specification in time 2 3 8 Left Right Guard Plate Disassemble of the left guard plate 1 Remove the mounting bolts 1 2 3 and 4 of the left guard plate Push the left...

Страница 23: ...specification in time Dismantling of the right guard plate are same with the left guard plate 2 3 9 Front Vehicle Body Disassemble Note Dismantling the handle bar when removing the vehicle body 1 Remove the front body mounting bolts 1 2 3 4 and unscrew the oil tank cap 2 Release the electric lock plug front and left headlight connector and take out the front vehicle body 1 2 3 4 ...

Страница 24: ...sher are damaged please replace the new parts of the same specification in time 2 Inspect headlamp connector electric lock connector reverse indicator connector and neutral indicator connector after installation to prevent loosening and misconnection 2 3 10 Left right footrest plastic parts Disassembly of left plastic parts 1 2 fuel tank cap 3 4 ...

Страница 25: ...e If bolts nuts and rubber flat washer are damaged please replace new parts of the same specification in time The right plastic part is same with the left plastic part when dismantled 2 3 11 Right Left pedal Disassemble of left pedal 1 Remove the mounting bolts 1 2 3 4 and 5 of the pedal Go down the left foot pedal Assemble According to the reverse order of disassembly 1 2 3 1 2 4 5 ...

Страница 26: ...f the muffler and the engine is still very high and when it touches the skin it will cause burns If the engine must be repaired when it has just stopped long sleeved overalls and gloves must be worn for operation Gasoline is very easy to cause fire and fireworks are strictly prohibited in the workplace We should not only pay attention to open fires but also pay special attention to electrical spar...

Страница 27: ...t I A I A Engine tightness I I Engine suspension I I Air cleaner C R Spark plug I I R Fuel system Carburetor I I L Driving wheel and driven wheel I C Clutch I Inspection and maintenance items Period of maintenance Judging Standard Maintenance Parts Inspection Item Daily Half year Year Steering Device Handle Bar Operation Flexibility Steering System Damage Installation conditions Shaking of Ball pi...

Страница 28: ...aking damage Function Transmission Device chain Transmission lubrication and tightness Chain swinging up and down 20mm Flywheel Rear sprocket Transmission lubrication and tightness of fastening bolts If the sprocket and chain are seriously worn please replace the new parts in time Electrical Device Ignition device Spark plug condition Ignition period Battery Terminal connection status Electric cir...

Страница 29: ...ng If you feel the shaking check if the steering stem is shaking or other components are shaking and then make the corresponding maintenance If the steering stem is shaking increase the locking force of the lock nut of steering stem or disassemble it for repair Stop the car in a horizontal position and slowly turn the steering stem to the left and then right to confirm whether the rotation is flex...

Страница 30: ...he DOT4 brake fluid above the lower limit position Note Do not mix dust and water when fill the brake fluid To prevent chemical changes use the brake fluid which is specified number Brake fluid will damage the surface of plastic and rubber parts Please do not splash it on such parts Wear of brake discs and brake frection plates hoof blocks It is normal for the brake frection plates hoof blocks and...

Страница 31: ... rocker shaft bushing the ball cap and replace them Front bundle of the wheel Stop the vehicle in a horizontal position and measure the size of front bundle of the wheel The front of the wheel relative to the direction of driving of the vehicle is A the rear of the wheel is B and the size of front bundle is B A 4 10mm When the front bundle of vehicle is not in this range adjust the steering stem a...

Страница 32: ... driving feel will be deteriorated also will cause adverse effects such as eccentric wear of the tire Pattern of tire Check the pattern of the tire If the height is less than 3mm please replace the new tire in time The inspection of rear wheel is the same as the front wheel 3 6 Suspension system Stop the vehicle in a horizontal position and press the vehicle several times according to position of ...

Страница 33: ...ge the gear position and check whether the gear shift is flexible and comfortable If the gear shift is not comfortable the angle of shift lever can be adjusted appropriately Fuel device When checking the fuel system the plastic parts need to be removed from the vehicle Gear shift ...

Страница 34: ...formation and replace it with new one if it is damaged 3 8 Check of Throttle Check the normal flexible moving of throttle button Press the throttle several times as the direction shown to check the flexible degree of the throttle in normal circumstances the throttle has no stuck phenomenon The throttle clearance is 3 5mm Adjustment the clearance when the throttle clearance is not within the specif...

Страница 35: ...a screwdriver Note For beginners the speed limit device should be tightened After the technology reaches a certain level the speed limit device can be used to adjust the throttle opening angle In addition 25mm is the limit length of the speed limit thread The EPA model must limit the adjust of throttle After the factory adjusts it the bolt is broken and changed to an unadjustable state Option of f...

Страница 36: ... must be protected well with package When the engine is removed in order to protect the environment using the corresponding container to fill with engine oil and fuel oil When installing the engine oil should be replenished as required The following operations may not remove the engine from the vehicle Oil pump Carburetor air filter Cylinder head cover starter motor cylinder cover cylinder body ca...

Страница 37: ... explosion after the gasoline evaporates so work should be carried out in a well ventilated area Disassembly Remove the plastic parts of the vehicle loosen the oil pipe 1 at the oil switch remove the bolt 2 in the oil switch remove the oil switch remove the mounting bolt of fuel tank and then remove the fuel tank 4 3 Intake system Disassembly Loosen the air filter clamp loosen the exhaust pipe and...

Страница 38: ...groove of the tube joint Installation In the reverse order of disassembly The exhaust pipe needs to be inserted into the joint head and the clamp must be installed in the groove of the tube joint 4 4 Exhaust system Disassembly Loosen the connection clamp of the muffler and exhaust pipe remove the mounting bolt of muffler and then remove the muffler air filter clamp clamp Mounting bolt ...

Страница 39: ...ation and replace with the new ones when they are broken If the self lock nut is damaged replace it with a new one immediately 4 5 Disassembly and installation of engine Disassembly Note The foot pedal must be removed first then remove the engine from the frame 1 Remove the side cover 1 of engine first then remove the chain 2 Remove the ground wire gear display wire magneto motor wire starter moto...

Страница 40: ... engine 4 Remove the engine from the right side of the vehicle Installation In reverse order of disassembly 5 Engine 5 1 Maintenance Unit conversion table in this book item Unit conversion pressure 1kgf cm2 98 0665kPa 1kPa 1000Pa 1mmHg 133 322Pa 0 133322kPa torque 1kgf m 9 80665N m volume 1mL 1cm3 1cc 1L 1000cm3 high pressure cap shift lever B o l t l u g ...

Страница 41: ... more experienced senior technician General precautions Warning The correct maintenance process is very important for the safety of the maintenance personnel and the reliability and safety of the engine When two or more people work together they should pay attention to each other When starting the engine indoors make sure that the exhaust gas is discharged to the outside when using poisonous or fl...

Страница 42: ...nd engine oil in the threads 5 2 Introduce of fuel oil and engine oil Fuel oil use gasoline with 93 or above Engine oil SAE15W 40 engine oil for 4 stroke motorcycle quality grade is SG grade or above according to API classification if there is no SAE15W 40 engine oil according to the ambient temperature of the engine Select the right oil as shown on the right 5 3 Engine running in Theenginehasmany...

Страница 43: ...y change the speed of the vehicle or operate under a unfixed throttle position when the throttle state 50 after 1 hour of operation let the engine cool for 5 to 10 minutes avoid the sudden acceleration the throttle change should be slowly 10 to 20 hours Avoid opeartion for longer periods when the throttle state is more than3 4 Do not use the full throttle state Code place of engine Displacement in...

Страница 44: ...000km Filter media Clean Clean Clean Clean Timing chain Check Adjust Adjust Adjust Carburetor idle speed Adjust Adjust Adjust Adjust Drive chain Adjust and lubricate per 5000km Battery Charge Charge Charge Charge Brake disc Check Adjust Adjust Replace Brake system Adjust Adjust Clean Clean Brake light switch Adjust Adjust Adjust Adjust Illuminating system Check Check Adjust Adjust Clutch Adjust Ad...

Страница 45: ...JIANG KAYO MOTOR CO LTD WWW KAYOMOTO COM 45 Right view of the 125 engine is shown in the figure Left view of the 125 engine is shown in the figure Remove the locknut of cylinder head from its holding place ...

Страница 46: ...OTOR CO LTD WWW KAYOMOTO COM 46 Remove cylinder head Check the state of paper pad Replace if necessary Dismantle the fixing bolt of left cover Remove left cover and inspect the paper pad for damage Replace if necessary ...

Страница 47: ...mantle the fixing bolt of right cover Remove the right cover of cylinder head Inspect the gasket for damage and replace if necessary Remove inlet exhaust valve cap Check the state of seal ring of valve cap and replace if worn or if reuse is questionable ...

Страница 48: ...ZHE JIANG KAYO MOTOR CO LTD WWW KAYOMOTO COM 48 Remove the fixing bolt of timing driven sprocket Remove the connecting bolt of cylinder head Remove cylinder head assembly ...

Страница 49: ...r wear and damage Replace if necessary Check whether there is excessive carbon deposit in combustion chamber Clean and replace if necessary Remove the cylinder head Pour gasoline into inlet exhaust pipe to inspect the seal condition Grind the valve and valve seat if there is gasoline leak into the combustion chamber ...

Страница 50: ...t exhaust valve spring and check the state Replace if necessary Inspect the oil seal of inlet exhaust valve for damage Replace if necessary Remove the spark plug to clean the carbon Deposit and dust Check the spark plug gap and set it to 0 6 to 0 7 if necessary ...

Страница 51: ...between the cylinder head and cylinder The engine starts hard or fails to start Insufficient engine output Engine speed changes during idle run Grind the cylinder head end surface or replace the cylinder head There are pits ablation or pock marks damages on the working surface of valve seat Air leakage between the valve and valve seat due to improper tightness The engine starts hard or fails to st...

Страница 52: ...starts hard or fails to star Remove the carbon deposit between the electrodes Excessive carbon deposit or oil dirt in the spark plug Weak or no sparking from the spark plug electrodes The engine starts hard or fails to start Insufficient engine output Engine speed changes during idle run Remove the carbon deposit or oil dirt The spark plug insulator is damaged Weak or no sparking from the spark pl...

Страница 53: ...gasket and dowel pin to check for wear and damage Replace if necessary Dismantle the fixing bolt of timing chain of guide wheel Remove the guide wheel of timing chain to inspect for wear and damage Replace if necessary Dismantle connecting bolt of cylinder block Remove the cylinder block Remove the circlip of piston pin ...

Страница 54: ...TO COM 54 Remove the piston of piston pin to check whether it is damaged Replace if necessary Inspect the paper pad for worn or damage Replace if necessary Check whether there is residual gasket on cylinder Clean with gasoline if necessary ...

Страница 55: ... cylinder inner wall Replace if worn or if reuse is questionable Check whether the internal diameter has exceed the limit value Measure the diameter form upper middle and lower position The limit value is 50 05mm Replace the cylinder block if it has beyond this value ...

Страница 56: ...the cylinder and cylinder head The engine starts hard or fails to start Insufficient engine output poor idle speed and high fuel consumption Grind the cylinder end surface or replace the cylinder body The cylinder is badly worn The fitting clearance between the cylinder and position position ring is too wide The engine starts hard or fails to start Insufficient engine output Poor engine idle speed...

Страница 57: ...crankcase half Check whether the oil seal of starting shaft and seal edge of gearshift lever are worn Replace if necessary Check the state of right crankcase cover and replace if necessary Left view of right crankcase half is shown in fig and check whether bearing of main shaft and countershaft are worn Replace if necessary ...

Страница 58: ...if necessary Left view of left crankcase is shown below and check whether the oil seal of countershaft and oil seal edge of gearshift lever are worn Replace if necessary Right view of right crankcase half is shown in fig and check whether bearing of main shaft and countershaft are worn Replace if necessary Dismantle fixing bolt of left crankcase cover ...

Страница 59: ...TD WWW KAYOMOTO COM 59 Remove the neutral indicator and check the state Replace if necessary Dismantle the fixing bolt of magneto stator and remove the stator Check the condition of left crankcase cover and replace if necessary ...

Страница 60: ...ket The threaded hole of oil drain plug screw is ineffective Oil leakage from the threaded hole of plug screw Repair of replace the crankcase The threaded holes of cylinder bolt are ineffective Cylinder head retaining nut is impossible to screw up firmly resulting in air leakage between the cylinder head and cylinder The engine starts hard or fails to start Insufficient engine output Engine speed ...

Страница 61: ...e cover The gasket of right crankcase is broken Oil leakage between the case cover and the case Replace the gasket Left crankcase cover The left crankcase cover is worn or cracked Oil leakage form the case cover Repair or replace the case cover The gasket of left crankcase is broken Oil leakage between the case cover and the case Replace the gasket 5 4 4 Maintenance of Crankshaft Connecting Rod Di...

Страница 62: ...Take care not to forget the washer of mainshaft and countershaft when removing the left crankcase Remove the paper pad to inspect for wear and damage Replace if necessary Remove the connecting rod assembly Inspect connecting rod bearing for wear and damage Replace if necessary ...

Страница 63: ...r of piston pin using a micrometer Replace the piston pin if the value is over the maintenance limit value Check the axial and radial jumping of connecting rod bearing Replace the conrod if the jumping islarge Check the side gap between piston ring and piston groove using a feeler gauge Replace the piston if the gap is too wide ...

Страница 64: ...move if necessary Check the state of piston and replace if worn or if reuse is questionable Measure diameter of piston skirt Replace it if the value is beyond the maintenance limit value Assemble the piston ring according to the fignne and check whether piston ring is damaged or the elasticity is weaken Replace if necessary ...

Страница 65: ...surface of piston skirt The piston and ring groove are over worn Excessive fitting clearance between the piston and the cylinder The engine starts hard or fails to start Insufficient engine output Thick blue and white fume form the exhaust muffler pipe Replace the piston The piston pin hole is over worn Excessive fitting clearance between the piston ring and the hole Striking sound of the piston p...

Страница 66: ...g The piston ring gap is not staggered Thick blue and white fume form the exhaust muffler pipe Refixing the piston ring set Piston pin The piston pin is over worn The fitting clearance between the piston pin and the hole is too wide Striking sound of the piston pin and of the cylinder Replace the piston pin Connecting rod The connecting rod small end hole is over worn The fitting clearance between...

Страница 67: ... gear is over worn of damage Abnormal sound during sprocket driving Replace the timing sprocket 5 5 Maintenance of Mechanism 5 5 1 Disassemble assemble and maintain valve mechanism Remove rocker arm shaft Remove the rocker arm of inlet exhaust valve and check the state ...

Страница 68: ...p of inlet and exhaust valve Remove inlet vale stem and exhaust valve stem take care and don t miss the valve clip Measure length of valve spring to check whether the spring is damaged or worn Replace if necessary Remove the spring of inlet and exhaust valve to inspect for wear and damage Note when assemble the valve spring make sure its dense end downward ...

Страница 69: ...er clipper Replace the valve stem if the valve is beyond the maintenance limit valve Measure the width of valve contact surface to check whether the contact surface is rough or abnormal Replace the valve stem if the valve is large than 1 5mm Check whether the valve stem is distored Replace if necessary ...

Страница 70: ...y Check the gap of rocker arm shaft and rocker arm Replace the rocker arm shaft and rocker arm if the gap is large Check the external diameter of rocker arm using a micrometer Replace the rocker arm shaft if the valve is beyond the maintenance limit valve Remove the guide wheel of timing chain to inspect for wear and damage Replace if necessary ...

Страница 71: ... and check the state Replace if worn or if reuse is questionable Remove the timing tensioner arm to inspect for wear and damage Replace if necessary Remove the oil tube and spring and check the state Replace if necessary Remove the small timing chain and check the state Replace if necessary ...

Страница 72: ...ust valve clearance of front cylinder Turn magnetic rotor counterclockwise to make piston locate at top dead center and make T mark aimed to the mark of left crankcase cover Check whether the O mark on cam sprocket is aimed to the gap of cylinder head Readjust if necessary Set the valve clearance of rear cylinder to 0 05mm 0 06mm ...

Страница 73: ...ut Replace the camshaft The bearing of the camshaft is over worn or damaged The axial or radial clearance of the bearing is too wide Ineffective bearing swiveling or abnormal sound during swiveling 轴承的轴向或径 Abnormal sound heard during camshaft transmission Replace he camshaft Rocker arm The working surface is scratched or over worn Valve striking sound Replace the rocker arm The rocker arm shaft ho...

Страница 74: ...fit the valve and the valve seat tightly The engine starts hard or fails to start Insufficient engine output Engine speed changes during idle run Remove the carbon deposit The working surface is over worn or has pits pock marks ablation or damage It is impossible to fit the valve and the valve seat tightly The engine starts hard or fails to start Insufficient engine output Engine speed changes dur...

Страница 75: ... to close the valve completely The engine starts hard or fails to star Replace the valve Valve spring The spring is ineffective or fractured It is impossible to fit the valve and the valve seat tightly The engine starts hard or fails to star Sound of the cylinder head Replace the valve spring ...

Страница 76: ...arburetor Remove and clean throttle cap Clean the carburetor as follows Remove the dirt and clean inner oil way Dismantle the fixing bolt of float chamber cap Remove the float chamber cap Remove the water and debris in the cap if necessary Check the state of seal ring and replace if it is aging Remove the float needle valve to inspect for wear and damage Replace if necessary ...

Страница 77: ...e if necessary Check the state of float case and replace as necessary Adjust the height of float case by moving the float up or down Take out the main jet to check whether the jet hole is clogged Clean if necessary Remove the main nozzle to check whether small hole is clogged Clean with compressed air if necessary ...

Страница 78: ...buretor as the following Standard Tighten mixture screw and turn it one And a half turns clockwise Measure height of float case to check whether it is distorted or there is oil in the case If height is incorrect which indicates carburetor leaks or the oil supply is insufficient Adjust the oil needle to the third tier If the clip rises concentration of mixture becomes dilute and if falls it becomes...

Страница 79: ...e air cleaner please refer to the followingtable Description Damage form Trouble Cause Correction Air filter Too much dust on the filter core The engine starts hard or fails to start Insufficient engine output poor performance of engine during idle run Excessive fuel consumption The exhaust muffler pipe Clean the filter core The filter core is fractured or chapped Engine air suction noise is too l...

Страница 80: ... Dismantle suspension bolt of muffler to check whether the suspension support is damaged Repair or or replace if necessary Remove the muffler to inspect for broken and damage Replace or repair if necessary Remove the washer of muffler to inspect for damage Replace if necessary ...

Страница 81: ...f air pump for tightness Tighten if necessary Dismantle the fixing bolt of air pump and check the state of air pump Description Damage form Trouble Cause Correction Exhaust pipe gasket The gasket is broken Exhaust pipe leakage Engine exhaust noise is too loud Replace exhaust pipe gasket Exhaust muffler enclosure broken The muffler enclosure is broken Engine exhaust noise is too loud Replace exhaus...

Страница 82: ...e if necessary For the troubleshooting of environment protection valve please refer to the followingtable Maintenance of environment protection valve Parts Damage form Trouble Cause Correction air pump air pump broken or plugged defective air pump Emission fails to meet the standard Replace air cleaner air cleaner damaged or plugged defective air cleaner Emission fails to meet the standard Replace...

Страница 83: ...move the file display And check for wear and damage Replace them when necessary connecting hose connecting hose get loose noise is too big Emission fails to meet the standard Replace Gasket large noise from secondary inlet air leaks form secondary inlet Emission fails to meet the standard Replace muffler exhaust too much carbon deposit on muffler exhaust Poor combustion Emission fails to meet the ...

Страница 84: ...G KAYO MOTOR CO LTD WWW KAYOMOTO COM 84 Remove the cover of left crankcase Remove the gasket and check the condition If it is worn please replace it Remove the fixing bolt of magnetic stator and bolt of trigger ...

Страница 85: ...85 Check the status of stator with a multimeter If it is worn please replace with the new one Disassemble the fixing nut of rotor Remove the rotor with special tools Remove the rotor and check if the rotor is demagnetized Replace it when necessary ...

Страница 86: ...t of overrunning clutch Remove the clutch Check for wear and damage to the clutch seats rollers and springs Replace it when necessary Check the wear and damage of the drive sprocket and drive gear replace it when necessary Disassemble the pressing plate of start sprocket ...

Страница 87: ...e the tension strip of the clutch and check its condition If the tension strip is found to be worn or problems in use replace it Remove the circlip of the sprocket of starter Remove the drive sprocket and chains Remove the fixing bolt of electric starter ...

Страница 88: ... 88 Remove the electric starter Check the electric starter for damage Replace it when necessary Remove the disc of oil separation and check the condition Replace it when necessary Check the edges of the oil seal for wear Replace it when necessary ...

Страница 89: ...ription Damage form Trouble Cause Correction Starter motor Carbon brush is over worn The carbon brush spring is Starter motor has insufficient rotation force or it is out of work Replace carbon brush fractured or has insufficient elastic force Starter motor has insufficient rotation force Replace carbon brush spring Armature commentator surface is fouled Starter motor has insufficient rotation for...

Страница 90: ...ce against the Commentator with fine abrasive Paper Make the cuton the mica Plate between each commentator Piece with broken saw bit 0 5 0 8mm deeper than the commentator surface Remove the chip and Burr between each commentator Armature commentator surface is ablation or over worn Starter motor has insufficient rotation force or is out of work Replace starter motor ...

Отзывы: