background image

–  31  –

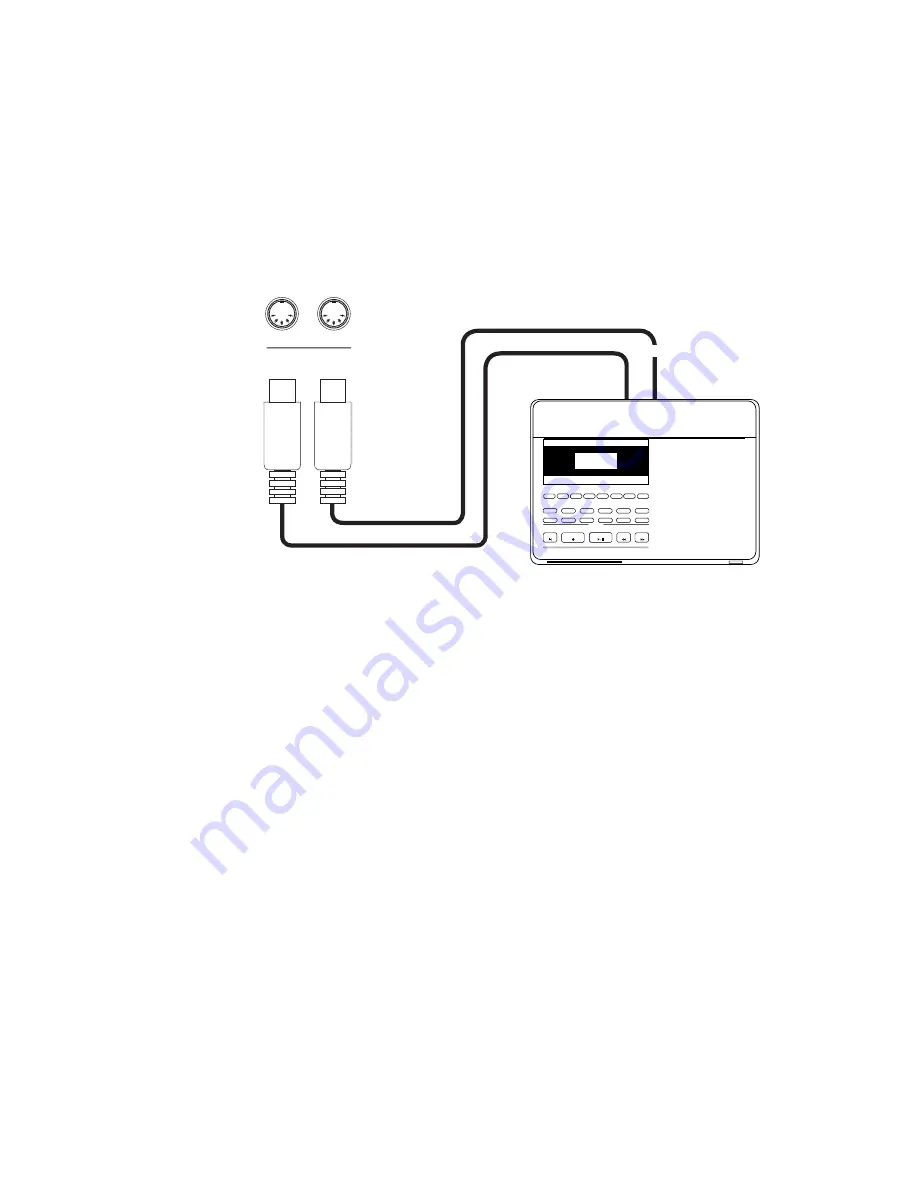
MIDI IN

IN

OUT

MIDI

MIDI OUT

MIDI cable

CP67

MIDI Sequencer

(2) Connection to an external sequencer

When connected as shown in the illustration, you can record songs played
on the CP67 with a sequencer, and use the CP67’s tones controlled by the
CP67’s MULTI-TIMBRAL MODE function (which is ON at all times) to
create a multi-layer MIDI recording.

Содержание CP67

Страница 1: ...Digital Piano CP67 Owner s Manual ...

Страница 2: ...spose 15 4 Touch Response 15 5 Demonstration Song 16 6 Metronome 16 Digital Recording Functions 1 Easy Recording 18 2 Playing Back A Song 18 3 Advanced Recording Playback Functions 18 4 Deleting A Song Track 20 Concert Magic 1 Selecting A Song 21 2 Listening To The Song 21 3 Performing A Song 22 4 Concert Magic Song Arrangement Types 22 5 Concert Magic Sonf Demo 24 Function Mode 1 Tuning 25 2 Temp...

Страница 3: ...e user to remove the power cord plug from the AC outlet Examples of Picture Symbols 120V 240V 230V Indicates a potential hazard that could result in death or serious injury if the product is handled incorrectly Read all the instructions before using the product WARNING When using electric products basic precautions should always be followed including the following CAUTION RISK OF ELECTRIC SHOCK DO...

Страница 4: ...amount of sand or dust is present Areas where the product is exposed to excessive vibrations When you close the keyboard cover close it gently Indicates a potential hazard that could result in injury or damage to the product or other The product is not completely disconnected from the power supply even when the power switch is turned off If the product will not be used for a long time unplug the A...

Страница 5: ...found to comply with the limits for a Class B digital device pursuant to Part 15 of the FCC Rules These limits are designed to provide reasonable protection against harmful interference in a residential installation This equipment generates uses and can radiate radio frequency energy and if not installed and used in accordance with the instructions may cause harmful interference to radio communica...

Страница 6: ...oard B 1 pc Pedal Board C 1 pc Screw D M6 x 25 4 pcs Screw E ø4 x 16 6 pcs Screw F ø4 x 25 2 pcs Adjuster G 1 pc Cord Clamp H 1 pc Headphone Hook Set 1 set 1 Insert the Adjuster G on the Pedal Unit 2 Untie the pedal cable on the bottom of the Pedal Board C 3 Slide the metal bracket located at the end of Pedal Board C on to screws a and b of Side Panel A Install tighten screw E then tighten screws ...

Страница 7: ...he unit could fall from the stand causing damage or personal injury Bottom View H 8 Insert the pedal connection cord that comes from Pedal Board C into the piano s pedal jack and fasten with cord clamps 9 Turn the adjuster installed on the bottom of the Pedal Unit down until it makes firm contact with the floor If the floor is carpeted place a spiked furniture cup under the adjuster so that it mak...

Страница 8: ... selected style METRONOME BUTTONS F This button is used to start stop the metronome ACC BUTTON G This button is used to turn the auto accompaniment style function on off SYNC BUTTON H When active the accompaniment style will start as soon as you play a note or chord on the keyboard START STOP BUTTON I This button is used to start and stop the accompaniment style INTRO ENDING BUTTON J This button i...

Страница 9: ...nce of the two sounds used in Dual mode Also adjusts the volume of the accompaniment style SOUND BUTTONS P These buttons are used to select the desired sound RECORDER BUTTONS Q The PLAY STOP button is used to play back and stop a recorded song The REC button is used to start recording a song You can record and play back up to three songs FUNCTION BUTTONS R These buttons are used to select a touch ...

Страница 10: ...EDAL b Depressing this pedal softens the sound and also reduces its volume SOSTENUTO PEDAL c Depressing this pedal after playing the keyboard and before releasing the keys sustains the sound of only the keys just played SUSTAIN PEDAL d Depressing this pedal sustains the sound even after you remove your hands from the keyboard a b c d ...

Страница 11: ...are used to connect stereo outputs from other audio equipment or electronic instruments to the CP piano s speakers MIDI JACKS g These jacks are used to connect the CP piano with external MIDI devices PEDAL JACK h Connect the pedal cord from the pedal board to this jack HEADPHONES JACKS i These jacks are used to connect up to two headphones to the CP67 e f g i h ...

Страница 12: ...riation sound assigned to the SOUND SELECT button You can also select any preset sounds by using the VALUE buttons while the variation number is shown on the LED display 4 Play Experiment by playing the different sounds 5 Dual Another feature of the CP piano is the ability to layer two preset sounds together to create a more complex sound For example piano layered with strings e piano with brass s...

Страница 13: ...VALUE buttons while holding down the REVERB button The reverb is ON when the LED of the REVERB button is lit Pressing the REVERB button once again turns the reverb OFF When the power is turned on the reverb function is automatically activated 7 Effects Adding an effect to the sound enhances tonal quality and improves acoustical realism There are twelve types of effect in the CP67 They are Chorus 1...

Страница 14: ...wn in the LED display when the style is running If the tempo is not shown in the LED display touching the VALUE buttons will activate the LED display to show the tempo 4 Turn on the accompaniment When the ACC button is pressed the CP piano will play a complete accompaniment style In addition the keyboard will be split into two sections upper and lower keyboard When the ACC button is turned OFF onl...

Страница 15: ...ay shows you a number telling you how many half steps up or down you have transposed the piano 5 for example represents a transposition that is 5 half steps lower 0 indicates no transposition The piano can be transposed up to 12 half steps higher or 12 half steps lower Pressing TRANSPOSE button again turns the transpose function off The TRANSPOSE function remembers the current setting as long as t...

Страница 16: ...start The LED display shows the demo song number When the first demo song is finished the CP piano will play all the other demo songs one at a time in order If you would like to listen to a particular demo song use the VALUE buttons to select your desired song To stop the demo press the DEMO button again at any time 6 METRONOME Rhythm is one of the most important elements when learning music It is...

Страница 17: ...begin counting The display shows the time signature Use the VALUE buttons to select your desired time signature You will see the time signature currently selected in the display To stop the metronome press the BEAT button again You can use either the TEMPO or BEAT button to turn the metronome on and off Choose the appropriate button depending on whether you re adjusting the tempo or changing the t...

Страница 18: ...which it was recorded Press the PLAY STOP button once again to stop the playback If you do not press the PLAY STOPbutton playback will automatically stop when the song is finished You can adjust the tempo of playback by using the VALUE buttons 3 ADVANCED RECORDING PLAYBACK FUNCTIONS RECORDING MORE SONGS The CP piano can record and store a maximum of 3 songs Please follow the steps below to save yo...

Страница 19: ...piano will automatically start the recording You can also start recording by pressing the PLAY STOP button Press the PLAY STOP button after you have finished recording Now to play back the left hand part press the PLAY STOP button The left hand part you have recorded Track 1 of Song No 3 will be played back You can practice the right hand part along with the recorded part You can adjust the tempo ...

Страница 20: ...ELETING A SONG TRACK This function allows you to delete songs that were not recorded correctly or songs that you do not want to listen to any more Simultaneously hold down the PLAY STOP and REC buttons The LEDs will light to show you where songs have been recorded While holding down both the PLAY STOP and REC buttons press the SONG button that corresponds to the song you want to delete While still...

Страница 21: ...y Concert Magic from the moment they sit down at the CP piano Now let s see how Concert Magic works 1 SELECTING A SONG The 40 Concert Magic songs are assigned to each of the 40 white keys classified in six groups by song category such as Children s Songs American Classics Christmas Songs All of the song titles are listed on page 33 To select a song press the key to which your desired song is assig...

Страница 22: ...ink it is too late to learn the keyboard Concert Magic is a good first step for them to begin with With Concert Magic your CP piano can be enjoyed by anyone in the family even those who have never touched a musical instrument in their life 4 CONCERT MAGIC SONG ARRANGEMENT TYPES After playing for a while with Concert Magic you may think that it s too easy and there is very little to learn While it ...

Страница 23: ...ngs range in difficulty from moderately difficult to difficult To perform them tap out the rhythm of both the melody and the accompaniment notes on any of the keys on your piano keyboard like Waltz of The Flowers shown below It may take some practice to get them just right A good way to learn these songs is to listen to them first and then try to tap out the rhythms that you hear In the song list ...

Страница 24: ...ert Magic songs in order Random Play Press the CONCERT MAGIC button and then press the DEMO button The CP piano will play back all of the Concert Magic songs in random order Category Play Press the piano key to which the desired song is assigned while holding down the DEMO buttons The CP piano will play back the selected song and then play the rest of the songs in the same song category one after ...

Страница 25: ...r that represents the pitch for A in Hz Hertz The range of adjustment is from 427 0 to 453 0 Hz displayed as 27 0 53 0 The factory preset value is set to the modern standardA 440 0 Hz displayed as 40 0 Use the VALUE buttons to raise or lower the pitch 2 TEMPERAMENT The CP piano offers not only equal temperament the modern standard but also immediate access to temperaments popular during the Renais...

Страница 26: ...PERAMENT Minor This temperament which eliminates dissonances for thirds and fifths is still popular for choral music because of its perfect harmony You need to be aware what key you are playing in with this temperament Any key modulation will result in dissonances When you play music in a particular key you need to match the key of the temperament as well When playing in a major key select Pure Ma...

Страница 27: ...rd is in pure consonance EQUAL TEMPERAMENT This is the most popular piano temperament The hearing ability of a human is uneven and is not as accurate with high frequency and low frequency as it is with the middle range This temperament s tuning is stretched to compensate for this so the sound will be heard naturally to the ears This Stretched equal temperament is a practical variation of the unstr...

Страница 28: ...the piano s keyboard will still transmit to an external MIDI instrument or personal computer Press the STRING button while in the function mode The LED display shows you On or Off The initial value is On Use the VALUE buttons to turn local control On and Off 6 CHANNEL MUTE This function determines which MIDI channels are activated to receive MIDI information You can activate or deactivate each of ...

Страница 29: ...transmitted by the sound select buttons Using this function you can send any number from 1 to 128 Press the BRASS W WIND button while in the function mode The display alternatively shows PG Program and a program change number Use the VALUE buttons to change the number To send the program change number press both VALUE buttons simultaneously ...

Страница 30: ...is equipped with two MIDI jacks for exchanging data MIDI IN and MIDI OUT Each uses a special cable with a DIN connector MIDI IN For receiving note program change and other data MIDI OUT For sending note program change and other data MIDI EXAMPLES 1 Connection to another MIDI compatible keyboard or sound generator module When connected as shown in the illustration data on how the digital piano is p...

Страница 31: ...ction to an external sequencer When connected as shown in the illustration you can record songs played on the CP67 with a sequencer and use the CP67 s tones controlled by the CP67 s MULTI TIMBRAL MODE function which is ON at all times to create a multi layer MIDI recording ...

Страница 32: ...ord 2 Drawbar Organ 3 Music Box 3 Church Organ STRING VOCAL SYNTH 1 String Ensemble 1 Choir Ahs 2 Slow Strings 2 New Age Pad 3 Violin 3 Atmosphere BRASS W WIND SPECIALTY 1 Solo Trumpet 1 Nylon Acoustic Guitar 2 Flute 2 Accordion 3 Clarinet 3 Banjo BIG BAND SWING 50 S 1 50 S 2 60 S 1 60 S 2 LATIN POP BALLAD MARCH COUNTRY 1 COUNTRY 2 WALTZ 1 WALTZ 2 C PIANO CLASSIC PIANO BROADWAY STYLE LIST ...

Страница 33: ...rican Classics 15 Battle Hymn Of The Republic MP 16 Yankee Doodle MP 17 Danny Boy EB 18 Clementine MP 19 Auld Lang Syne MP 20 Oh Susanna MP 21 Camptown Races MP 22 When The Saints Go Marching In EB 23 The Entertainer SK Classical Selections 24 William Tell Overture SK 25 Andante Haydn MP 26 Für Elise EB 27 Clair De Lune SK 28 Skater s Waltz SK 29 Blue Danube Waltz SK 30 Gavotte Gossec SK 31 Waltz ...

Страница 34: ...6 rhythms with variations Start Stop Intro Ending Sync Fill In ACC 1 2 Play mode Digital Recorder 3 Songs 2 Tracks 7 000 Notes Other Functions Metronome Transpose Tuning MIDI Functions 3 Demo Songs 40 Concert Magic Songs Pedals 3 Soft Sostenuto Sustain Jacks Headphones x 2 Pedal MIDI IN OUT LINE IN L R LINE OUT L MONO R Output Power 16 W x 2 Speakers 16 cm x 2 Power Consumption 50 W Dimensions 139...

Страница 35: ...pedal O Damper pedal 65 x O Portament 66 O Center pedal O Sosutenuto pedal 67 O Left pedal O Soft pedal 69 x O Hold 2 71 x O Resonance 72 x O Release 73 x O Attack 74 x O Cutoff 75 x O Decay 76 x O Vibrato Speed 77 x O Vibrato Depth 78 x O Vibrato Delay 84 x O Portament Control 91 O O Reverb Send Level 93 O O Chorus Send Level 98 99 x O NRPN LSB MSB 100 101 x O RPN LSB MSB Program Change O O True ...

Страница 36: ...CP67 Owner s Manual OM987E C0512 Printed in Indonesia ...

Отзывы: