background image

4

RECORDER

Page

23

…

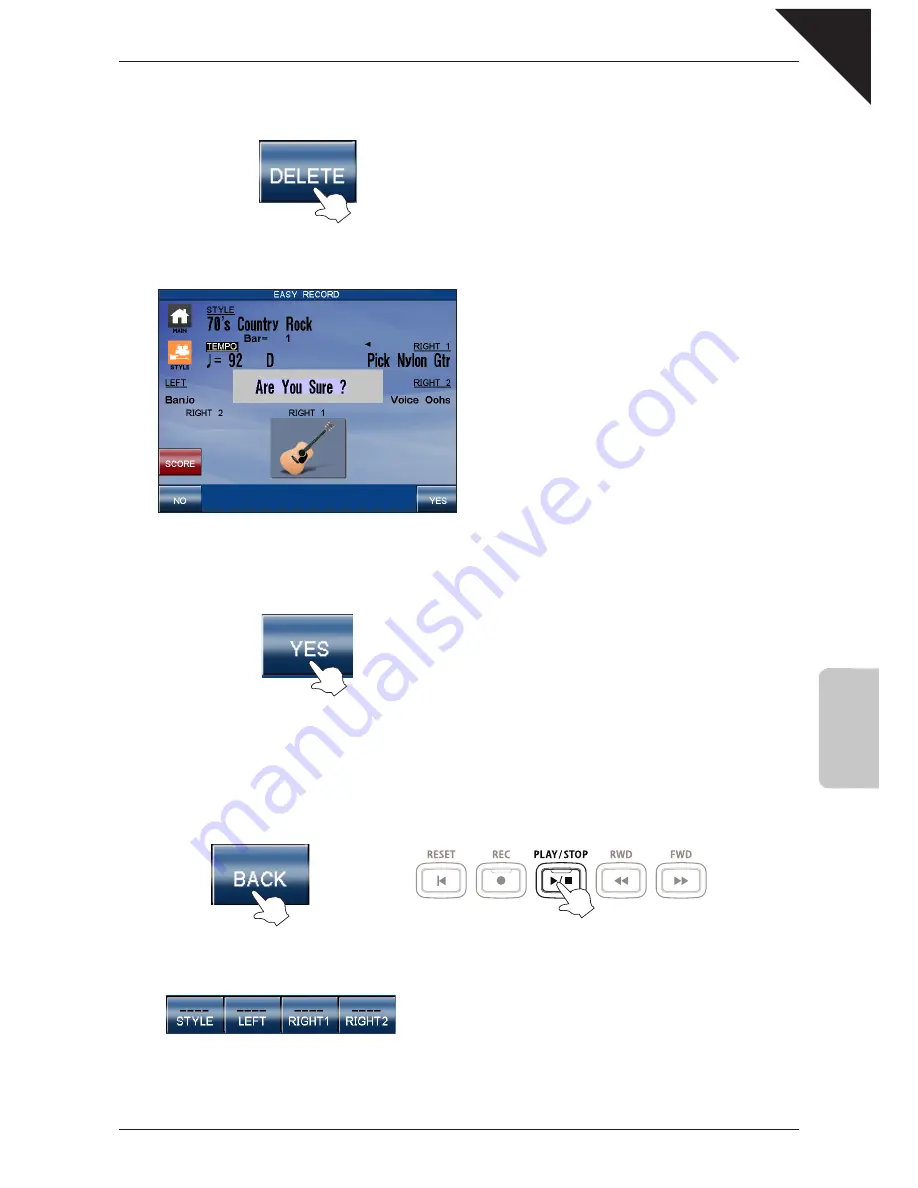
 Step 3

Touch the 

DELETE

 button.

The recorder song will stop playing and a confirmation message will be shown in the middle of the screen.

Step 4

Touch the 

YES

 button.

The recorder memory will be cleared.

Let’s confirm this point by once again by attempting to play the recorder song.

Step 5

Touch the 

BACK

 button, then press the 

PLAY/STOP

 panel button.

No song will be heard, thus confirming that the recorder memory has been cleared.

In addition, the part buttons shown at the bottom of the screen will be empty lines.

¨

Содержание Concert Performer CP3

Страница 1: ...1 OVERVIEW OF CONTROLS 2 SOUNDS 3 STYLES 4 RECORDER 5 USB USAGE Quick Start Guide...

Страница 2: ......

Страница 3: ...song Deleting saving and loading a song Saving and loading a song to from USB memory Playing MP3 audio les from USB memory Saving MP3 audio les to USB memory TABLE OF CONTENTS 1 OVERVIEW OF CONTROLS 4...

Страница 4: ...tons on the middle and bottom rows are typical used to adjust parameters and settings within these main functions Finally many of the buttons also contain an LED indicator which will turn on or off wh...

Страница 5: ...button panel will use the verb press E g Touch the PAGE X button on the LCD display Press the RIGHT 1 panel button If no panel buttons are pressed and the LCD display is not touched while showing diff...

Страница 6: ...buttons to the left of the display associated with selecting and adjusting registrations accompaniment styles and buttons to the right of the display used to select and adjust instrument sounds Step 1...

Страница 7: ...the PIANO panel button A selection of acoustic piano electric piano and keyboard instrument sounds will be shown in the LCD display Initially all sounds within a category will be available for select...

Страница 8: ...ting period or to prevent the MAIN screen from returning automatically please refer to the Display Control instructions in the main CP3 owner s manual THE RIGHT 2 PART COMBINING WITH RIGHT 1 The CP3 a...

Страница 9: ...few seconds to return to the MAIN screen Warm Strings will be written in large letters to indicate that the Warm Strings sound is selected and that the part is active Step 6 Play the keyboard The beau...

Страница 10: ...with the RIGHT 1 and RIGHT 2 parts let s continue this introduction of the part controls by experimenting with the LEFT SPLIT part The LEFT SPLIT part allows a third instrument sound to be assigned to...

Страница 11: ...utton Step 2 Press a key on the keyboard This key will be used as the new SPLIT POINT de ning the length of the LEFT SPLIT part and the RIGHT 1 and RIGHT 2 parts As we have seen assigning instrument s...

Страница 12: ...LE Step 1 Press the STYLES panel button The STYLE mode screen will be shown in the LCD display Step 2 Touch the STYLE SELECT icon at the bottom of the screen A screen of style category buttons will be...

Страница 13: ...ional percussion beats added to each phrase Step 7 Touch one of the four on screen FILL IN buttons The LED indicator for the touched FILL IN button will turn on brie y Additional patterns will be adde...

Страница 14: ...paniment split point can be changed by touching the left right arrows on either side By default the on screen 1 Finger button will be selected indicating that the chord sequence of the accompaniment s...

Страница 15: ...gion of the keyboard The Piano Bossa accompaniment will start to play in the key of C with a 2 bar introduction passage When One Finger mode is active it is possible to change the key of the accompani...

Страница 16: ...nds and tempo allowing you to play the piece immediately In the follow steps we will use the Song Stylist to select and play the John Denver song Take Me Home Country Roads however please feel free to...

Страница 17: ...utomatically when the accompaniment starts Step 5 Press the second top most C key in the bass split region of the keyboard The backing accompaniment to Take Me Home Country Roads will begin with an in...

Страница 18: ...nd the LED indicator for the REC panel button will start to ash indicating that the recorder function is in Ready mode When the EASY RECORD screen is selected buttons to control the style and individu...

Страница 19: ...the recorder will continue to capture notes from the keyboard In order to stop the recording we must also press the PLAY STOP panel button Step 6 Press the PLAY STOP panel button The LED indicator fo...

Страница 20: ...el button LED indicator for the PLAY STOP panel button will turn on indicating that a song is currently playing The recorded song will start to play Step 2 Press the RWD and or FWD panel buttons to re...

Страница 21: ...ailable after the instrument is turned off it must be saved to the internal song memory Step 1 Touch the MORE button in the bottom left of the LCD display The part buttons shown at the bottom of the s...

Страница 22: ...allowing a new song to be recorded from scratch Note that this is not the same as deleting a song from the internal song memory the two memories operate independently of one another As mentioned previ...

Страница 23: ...ouch the YES button The recorder memory will be cleared Let s con rm this point by once again by attempting to play the recorder song Step 5 Touch the BACK button then press the PLAY STOP panel button...

Страница 24: ...arizing ourselves with loading songs from the internal memory back into the recorder memory Step 1 Press the PLAY STOP panel button No song will be heard however the EASY RECORDER screen will be shown...

Страница 25: ...he internal song memory into the recorder memory Step 5 Press the PLAY STOP panel button LED indicator for the PLAY STOP panel button will turn on indicating that a song is currently playing The recor...

Страница 26: ...s as MP3 les for emailing to friends and family or listening to on an smartphone tablet etc SAVING A SONG TO USB MEMORY While we have already learned how to save and load songs to and from the CP s in...

Страница 27: ...e song format used by Kawai Concert Performer instruments SMF The Standard MIDI File format compatible with most MIDI instruments Stylist The Internal format plus additional Registration settings Sele...

Страница 28: ...OM USB MEMORY The following steps will explain how to load your performances from USB memory In order to properly test this function please clear the temporary recorder memory by repeating the DELETIN...

Страница 29: ...evice Directories stored on the device will be represented by a D icon beside the directory name Step 3 Touch the country roads song saved in the previous topic The USB LOAD SONG screen will be shown...

Страница 30: ...audio les stored on USB memory to be played back directly through the instrument s speaker system This feature is particularly useful when attempting to learn the chords or melody to a new piece or wh...

Страница 31: ...LIST screen will be shown in the LCD display listing MP3 les currently stored on the connected USB memory device Step 3 Touch the desired MP3 audio le The AUDIO PLAY screen will be shown in the LCD d...

Страница 32: ...nue to play The MAIN screen will be shown in the LCD display allowing instruments sounds to be changed etc To return to the AUDIO PLAY screen press the USB button once again Playback of the MP3 audio...

Страница 33: ...ng them to be emailed to friends and family or played back on other devices such as an iPod Step 1 Connect a USB memory device to the USB port then press the USB panel button The LED indicator for the...

Страница 34: ...DIO RECORD screen will be shown in the LCD display This screen is similar to the MAIN screen and allows sounds and styles to be adjusted before creating the recording Step 4 Touch the button The audio...

Страница 35: ...ton The audio recorder will stop recording and a new digital audio le will be saved to the USB memory device Exit the Audio Recorder and return to the Audio Player to check that the new digital audio...

Страница 36: ...pe that this introductory step by step guide has allowed you to familiarize yourself with some important features of the instrument while also providing a glimpse of the power of this incredible instr...

Страница 37: ...Page 37 USER NOTES...

Страница 38: ...Page 38 USER NOTES...

Страница 39: ......

Страница 40: ...CP3 Quick Start Guide KPSZ 0700 OW1083E J1406 Printed in Indonesia Copyright 2014 Kawai Musical Instruments Mfg Co Ltd All Rights Reserved 818084 R100...

Отзывы: