manualshive.com logo in svg
background image

Page

21

4

FUNCTION MODE

2) TOUCH

When playing a piano, the volume of the sound produced increases in direct relation to how hard each key is struck.  The 

TOUCH function allows different touch sensitivities for the keyboard to be selected, other than the standard touch of an 

acoustic piano. The sensitivity can be changed to one of four different settings: Light, Normal, Heavy or Constant.
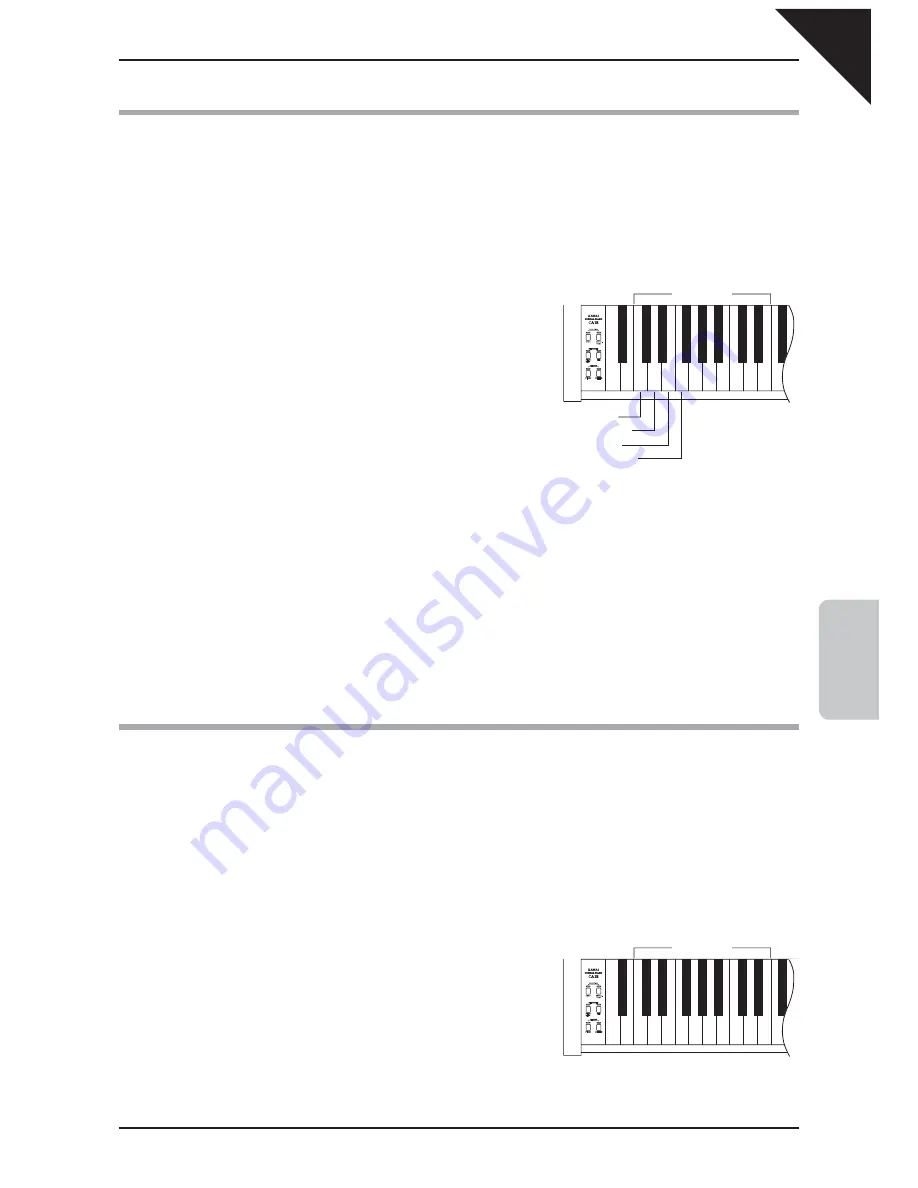
…

 Step 1

Press and hold the DEMO and METRONOME buttons simultaneously, then press the key assigned to the 
TOUCH function.

…

 Step 2

While still holding down the DEMO and METRONOME buttons, 
press one of the following keys:

¡

 Key1: LIGHT

For those still developing fi nger strength, such as a child, a louder 

sound is produced even when the piano is played with a soft touch.

¡

 Key2: NORMAL

The standard setting, reproducing the touch sensitivity of an acoustic 

piano. This touch type is selected automatically when the CA18 

digital piano is turned on.

¡

 Key3: HEAVY

Perfect for those with strong fi ngers or for practicing with a hard touch.

¡

 Key4: CONSTANT

This setting is suitable for sounds that have a fi xed dynamic range, such as Harpsichord.  A constant volume is 

produced regardless of how hard the keys are struck.

„

 The touch type is automatically set to NORMAL when the CA18 digital piano is turned on.

3) TUNING

The TUNING function allows the piano’s pitch to be fi nely adjusted, and may prove useful when playing with other 

instruments.

The factory default value is set to the modern standard A = 440.0 Hz and can be adjusted in 0.5 Hz increments.

…

 Step 1

Press and hold the DEMO and METRONOME buttons simultaneously, then press the key assigned to the 
TUNING function.

A tuning tone will be played.

…

 Step 2

While still holding down the DEMO and METRONOME buttons, 
press the ‘- (off)’ or ‘+ (on)’ keys to lower or raise the tuning pitch 
by 0.5 Hz, or enter the desired tuning pitch as a three digit 
number using the number keys.

„

 For example, to set the tuning pitch to A = 441.5 Hz, fi rst press the keys ‘4’, ‘4’, and ‘1’, then press the ‘+ (on)’ key.

  Alternatively, fi rst press the keys ‘4’, ‘4’, and ‘2’, then press the ‘- (off)’ key.

number keys

Key1: LIGHT

Key2: NORMAL

Key3: HEAVY

Key4: CONSTANT


1 2 3 4 5 6 7 8 9 0

 -  +
 off  on

number keys


1 2 3 4 5 6 7 8 9 0

 -  +
 off  on

CA18̲EN.indd   21

2008/10/17   19:21:49

Содержание CA18

Страница 1: ...1 PART NAMES AND FUNCTIONS 2 GETTING STARTED 3 RECORDER 4 FUNCTION MODE 5 APPENDICES Owner s Manual...

Страница 2: ......

Страница 3: ...e information to help performers make full use of the instrument s capabilities Please read all sections carefully and keep this manual handy for future reference Important Safety Instructions 4 1 PAR...

Страница 4: ...se instructions 3 Heed all warnings 4 Follow all instructions 5 Do not use this apparatus near water 6 Clean only with dry cloth 7 Do not block any ventilation openings Install in accordance with the...

Страница 5: ...periods of time at high volume levels Doing so may result in hearing problems It is a good practice to have the instrument near the AC outlet and the power cord plug in a position so that it can read...

Страница 6: ...may result in breakdown or short circuit The product shall not be exposed to dripping or splashing No objects filled with liquids such as vases shall be placed on the product Take care not to allow an...

Страница 7: ...ent into an outlet on a different electrical circuit from the receiver Consult the dealer or an experienced radio TV technician for help Canadian Radio Interference Regulations This instrument complie...

Страница 8: ...marked String Ensemble Concert Grand is aligned with the lowest key The underside of the function label is sticky allowing this information to be attached to the CA18 digital piano for greater conven...

Страница 9: ...Sostenuto pedal is depressed will not be sustained after the keys are released Soft pedal Depressing this pedal softens the sound and reduces its volume Sostenuto pedal Soft pedal Sustain pedal z POW...

Страница 10: ...the MASTER VOLUME slider The MASTERVOLUME slider controls the volume level of the speakers and connected headphones Set the volume to a comfortable listening level the middle is often a good starting...

Страница 11: ...tion book Song Name Composer Tambourin J P Pameau The Harmonious Blacksmith G F Handel Menuett BWV Anh 114 J S Bach Menuett BWV Anh 115 J S Bach Menuett BWV Anh 116 J S Bach Le Coucou L C Daquin Gavot...

Страница 12: ...nce again Harpsichord Church Organ Classic E Piano String Ensemble Press a white key Hold down the button Hold down the button Polonaise No 6 HeroIque Polonaise No 3 Militaire Fantaisie Impromptu Noct...

Страница 13: ...indicator for the PIANO button will start to ash Selecting Other sounds Press and hold the OTHERS button then press one of the lowest 4 white keys to select the desired sound The LED indicator for th...

Страница 14: ...ly to cycle through the 4 non piano sounds until the desired sound is selected When pressed once String Ensemble indicator ON When pressed twice Classic E Piano indicator ashes When pressed 3 times Ch...

Страница 15: ...o be used as a damper pedal for the player sitting on the left keys in the Lower section ENTERING FOUR HANDS MODE Step 1 Press and hold the PIANO button then press the OTHERS button The piano Keyboard...

Страница 16: ...The metronome beat time signature can be changed to one of seven different beats 1 4 2 4 3 4 4 4 5 4 3 8 and 6 8 The volume level of the metronome can also be adjusted Step 1 Press and hold the METRON...

Страница 17: ...empo press and hold the METRONOME button and input either a two digit or three digit tempo value The speci ed value will be set when the METRONOME button is released Example To set the metronome tempo...

Страница 18: ...icators for the REC and PLAY STOP buttons will be turned on The recording can also be started by pressing the PLAY STOP button instead of pressing a key allowing a blank bar to be inserted at the begi...

Страница 19: ...to start recording the previously recorded song will be overwritten by the new song 3 ERASING A SONG The CA18 digital piano must be turned off in order to erase the recorded song Step 1 Press the POW...

Страница 20: ...ons press the off or on keys to change the value for the selected function While holding down the DEMO and METRONOME buttons it is possible to select other functions changing each value successively S...

Страница 21: ...with a hard touch Key4 CONSTANT This setting is suitable for sounds that have a xed dynamic range such as Harpsichord A constant volume is produced regardless of how hard the keys are struck The touc...

Страница 22: ...RB function Step 2 While still holding down the DEMO and METRONOME buttons press one of the following keys to select the Reverb type Key 1 ROOM Key 2 STAGE Key 3 HALL The reverberation sound increases...

Страница 23: ...ld the DEMO and METRONOME buttons simultaneously then press the key assigned to the DAMPER EFFECT function Step 2 While still holding down the DEMO and METRONOME buttons press one of the following key...

Страница 24: ...PPENDICES 1 CONNECTING TO OTHER DEVICES 1 HEADPHONE JACKS Used to connect up to two pairs of headphones to the CA18 digital piano 2 PEDAL JACK Used to connect the pedal board to the CA18 digital piano...

Страница 25: ...ith ve screws G on either side Ensure that the bolts are fastened tightly Use the correct side panel for the left side and the right side of the unit Ensure that the pedal cable is not caught between...

Страница 26: ...r Board D and L Metal Fitting with Bolt E 6 Insert the pedal connection cord that comes from Pedal Board C into the piano s pedal jack and fasten with cord clamps 7 Fix the headphone hook to the locat...

Страница 27: ...gs TouchType Normal Light Heavy Constant Reverb Room Stage Hall Damper Effect Recorder The total memory capacity of the recorder is approximately 7 500 notes 1 song 1 track Metronome Beat 1 4 2 4 3 4...

Страница 28: ......

Страница 29: ......

Страница 30: ...CA18 Owner s Manual KPSZ 0268 816421 OW1026E S0810 Printed in Indonesia Copyright 2008 KAWAI Musical Instruments Mfg Co Ltd All Rights Reserved...

Отзывы: