27
4
PC requirements
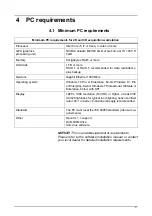
4.1 Minimum PC requirements
NOTICE! This is an abbreviated list of requirements.
Please refer to the software installation manual or contact
your local dealer for detailed installation requirements.
Minimum PC requirements for 2D and 3D acquisition workstation
Processor
Intel Core i5, i7 or Xeon, 4-cores or more
GPU (graphics
processing unit)
NVIDIA Quadro M2000 4GB or GeForce GTX 1050 Ti
4GB
Memory
8 Gigabytes RAM, or more
Hard disk
1 TB or more
RAID 1 or RAID 5 recommended for data redundancy,
plus backup
Network
Gigabit Ethernet 1000 Mb/s
Operating system
Windows 10 Pro or Enterprise, 64-bit, Windows 8.1 Pro
or Enterprise, 64-bit, Windows 7 Professional, Ultimate or
Enterprise, 64-bit, with SP1
Display
1920 x 1080 resolution (Full HD) or higher, at least 300
cd/m2 brightness for typical room lighting, native contrast
ratio 100:1 or better, 8-bit panel strongly recommended.
Standard
The PC must meet the IEC 60950 standard (minimum re-
quirements)
Other
OpenCL 1.1 support
DVD-ROM drive
Anti-virus software
Содержание ORTHOPANTOMOGRAPH OP 3D Pro
Страница 1: ...ORTHOPANTOMOGRAPH OP 3D Pro 3D Dental X Ray System Installation Manual ENGLISH 216363 rev 1 0 805 5080...
Страница 2: ......
Страница 4: ......
Страница 8: ...iv rev...
Страница 18: ...1 Introduction 10...
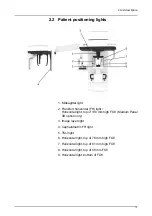
Страница 22: ...2 Unit description 14 Panoramic lights 1 Midsagittal light 2 FH light 1 Image layer 2 TMJ light...
Страница 27: ...2 Unit description 19 2 6 Unit movements Panoramic unit movements R C J D...
Страница 29: ...2 Unit description 21...
Страница 30: ...2 Unit description 22...
Страница 38: ...4 PC requirements 30...
Страница 54: ...5 Installing the unit 46 4 Fasten the covers...
Страница 67: ...5 Installing the unit 59 C C D D Top cover of the column E E...
Страница 104: ...7 Cephalometric calibration and alignment 96...
Страница 111: ...7 Cephalometric calibration and alignment 103 3 Tighten the locking nut...
Страница 117: ...7 Cephalometric calibration and alignment 109...
Страница 128: ...8 Special procedures 120 6 Remove the arm from the column 4 nuts 7 Disassemble the arm...
Страница 132: ...8 Special procedures 124 right handed assembly Prism assembly for the left handed cephalostat...
Страница 158: ...8 Special procedures 150...
Страница 165: ...9 OP 3D Pro Pre sales check list 157 9 11 Notes comments...
Страница 166: ...9 OP 3D Pro Pre sales check list 158 9 12 Dimensions 463...
Страница 167: ...9 OP 3D Pro Pre sales check list 159 9 13 Dimensions with cephalostat...
Страница 168: ...9 OP 3D Pro Pre sales check list 160...

