2
3D Medium panel, H x W (optional)
•
50 x 50 mm Field of View
•
61 x 78 mm Field of View
•
78 x 78 mm Field of View
•
78 x 150 mm Field of View
•
130 x 150 mm Field of View (optional)
NOTICE! The FOV heights are maximum values measured
at the center of the FOV, the measured heights at the
edges of the FOV are smaller.
1.2 Intended use
The unit is intended for dental radiographic examination of
teeth, jaw and TMJ areas by producing conventional 2D x-
ray images as well as x-ray projection images of an
examined volume for the reconstruction of a 3D view.
The unit is also intended for carpus imaging in assisting
cephalometric analyses (Not in USA).
CAUTION! USA only: Federal law restricts this device to
sale by or on the order of a dentist or other qualified
professional.
1.3 Associated documentation
•
OP 3D Pro User manual
•
OP 3D Pro
Service
manual
•
CLINIVIEW software user manual
•
CLINIVIEW software installation manual
•
The user manual supplied with the 3D imaging
software
•
The installation manual supplied with the 3D
imaging software
1.4 References
The following instructions are delivered with in the
OP 3D Pro installation manual:
•
Firmware update instructions
Содержание ORTHOPANTOMOGRAPH OP 3D Pro
Страница 1: ...ORTHOPANTOMOGRAPH OP 3D Pro 3D Dental X Ray System Installation Manual ENGLISH 216363 rev 1 0 805 5080...
Страница 2: ......
Страница 4: ......
Страница 8: ...iv rev...
Страница 18: ...1 Introduction 10...
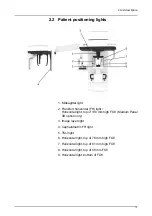
Страница 22: ...2 Unit description 14 Panoramic lights 1 Midsagittal light 2 FH light 1 Image layer 2 TMJ light...
Страница 27: ...2 Unit description 19 2 6 Unit movements Panoramic unit movements R C J D...
Страница 29: ...2 Unit description 21...
Страница 30: ...2 Unit description 22...
Страница 38: ...4 PC requirements 30...
Страница 54: ...5 Installing the unit 46 4 Fasten the covers...
Страница 67: ...5 Installing the unit 59 C C D D Top cover of the column E E...
Страница 104: ...7 Cephalometric calibration and alignment 96...
Страница 111: ...7 Cephalometric calibration and alignment 103 3 Tighten the locking nut...
Страница 117: ...7 Cephalometric calibration and alignment 109...
Страница 128: ...8 Special procedures 120 6 Remove the arm from the column 4 nuts 7 Disassemble the arm...
Страница 132: ...8 Special procedures 124 right handed assembly Prism assembly for the left handed cephalostat...
Страница 158: ...8 Special procedures 150...
Страница 165: ...9 OP 3D Pro Pre sales check list 157 9 11 Notes comments...
Страница 166: ...9 OP 3D Pro Pre sales check list 158 9 12 Dimensions 463...
Страница 167: ...9 OP 3D Pro Pre sales check list 159 9 13 Dimensions with cephalostat...
Страница 168: ...9 OP 3D Pro Pre sales check list 160...

