background image

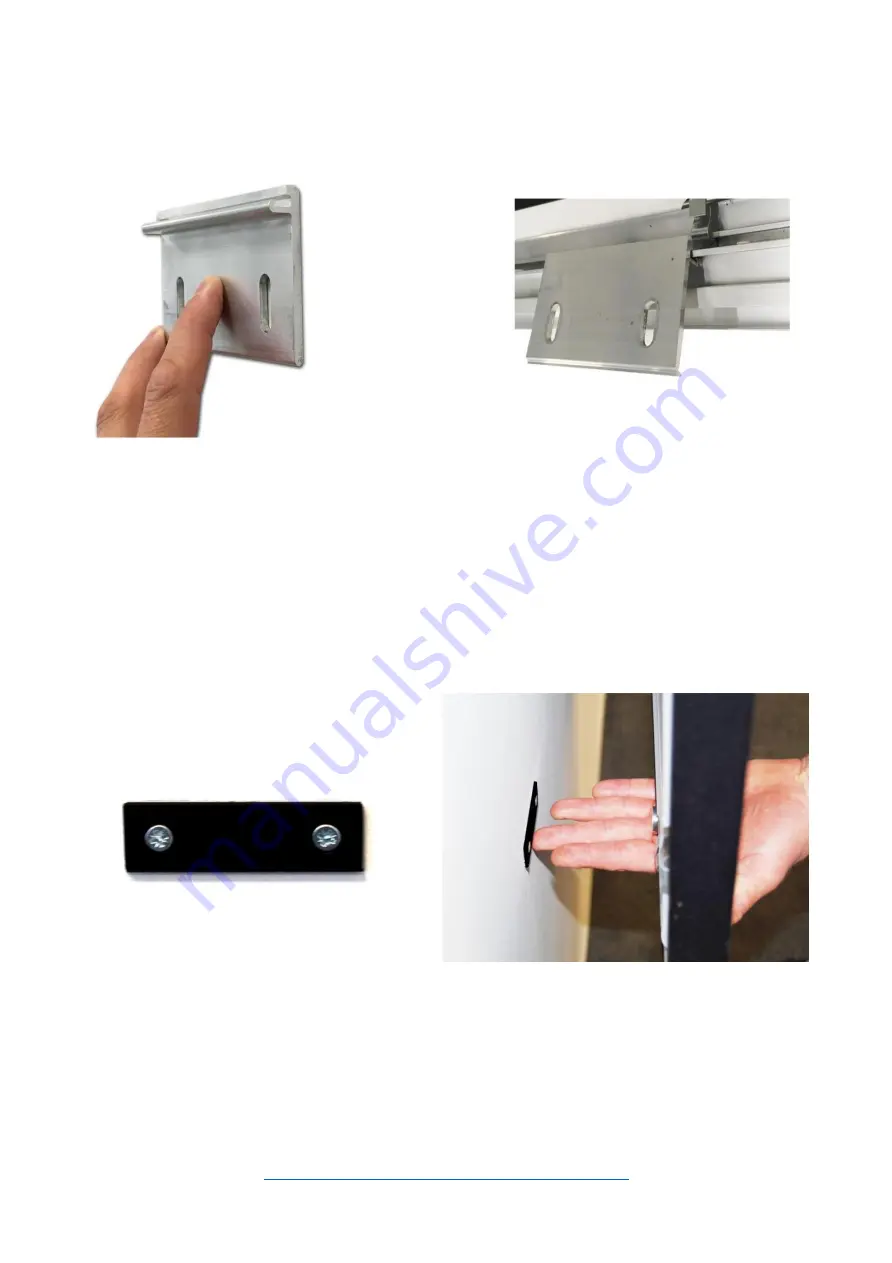
10. Attach the mount brackets (Fig. 21) to the wall, remembering that the hanging screen frame will be about 67 
mm above the top edge of the bracket. Mounted brackets must be within 30 cm of the ends of the screen frame. 
The screen profile after hanging is locked on the bracket, as shown in the illustration (Fig. 22). 


After hanging on the brackets, it is possible to move the screen horizontally (to the left, to the right). 


Fig. 21


Fig.22 


11

.

 The set includes two wall mount holders, designed to eliminate the distance from the bottom corners of the 

screen to the wall (Fig. 22) 


Advice! 

Pull the suspended frame of the screen at  the bottom and fix the holder


(Fig. 22) to  the magnet  with 

(Fig. 16)


Press the screen as much as possible to the wall. Then circle the shape of the holder on the wall, it will 

serve as a pattern for attaching it (Fig. 23). 


Fig.22


Fig.23 


w


w   w   .   k   a   u   b   e   r   .   e   u 

-8- 

Содержание Frame LED Active

Страница 1: ...PROJECTION SCREEN INSTALLATION GUIDE FRAME LED ACTIVE ...

Страница 2: ...w w w k a u b e r e u 2 ...

Страница 3: ... residual moisture 3 A properly mounted screen must be absolutely levelled 4 DIMENSIONAL TOLERANCE Projection surface 0 5 of the nominal size components 5mm Package contents Quantity Frame screen frame elements 4 pcs Mounting angle 8 pcs M6x8 screw A screw 64 pcs Washer 6 6 64 pcs M6x12 set screw B screw 10 pcs Magnet included with the screw 2 pcs Surface fixing hooks 22 pcs Wall mount bracket 2 p...

Страница 4: ... into the frame profile as shown in Fig 2 Fig 1 Fig 2 2 Insert the second frame to create a right angle then fix the angle to the screen frame using the included A screws Fig 3 Adjust the screen profiles to obtain a right angle and tighten the A screws Fig 4 Fig 3 Fig 4 w w w k a u b e r e u 4 ...

Страница 5: ... fix the black frame profile in the next stage Fig 5 Fig 6 4 After assembling the frame unfold the projection surface so that the traces of surface sealing are visible at the top Straighten the surface Fig 7 Fig 7 5 Slowly slide the steel rods attached to the set Fig 8 into the sealed pockets of the surface Then place the fixing hooks in the frame element Fig 9 Fig 8 Fig 9 w w w k a u b e r e u 5 ...

Страница 6: ...ten the surface to the frame according to Fig 10 to Fig 13 Fig 10 Fig 11 Fig 12 Fig 13 7 Put the black profile on the outside of the frame Fig 14 Fig 15 then fasten with the A screw Fig 14 Fig 15 w w w k a u b e r e u 6 ...

Страница 7: ...ers stick the first stripe of LED strip Fig 19 The second band of the LED strip should be stuck starting from the same corner of the screen but in the opposite direction One LED strip should cover the two sides of our screen Fig 20 the excess strip should be cut off Write down the number of LEDs on each side information will be necessary in the configuration of active backlight Fig 18 Fig 19 Fig 2...

Страница 8: ...e brackets it is possible to move the screen horizontally to the left to the right Fig 21 Fig 22 11 The set includes two wall mount holders designed to eliminate the distance from the bottom corners of the screen to the wall Fig 22 Advice Pull the suspended frame of the screen at the bottom and fix the holder Fig 22 to the magnet with Fig 16 Press the screen as much as possible to the wall Then ci...

Страница 9: ...ng LED strips voltage and HDMI cable to the DreamScreen device Fig 24 Fig 24 13 To set up active lighting you will need the DreamScreen app which you should download from the App Store or Google Play w w w k a u b e r e u 9 ...

Страница 10: ...e device may flash DreamScreen w w w k a u b e r e u 10 Select your WiFi network from the drop down menu Add new device to the WiFi network Select your device then go forward by clicking Continue Enter the password to the WiFi network Select your WiFi network from the drop down menu Connect to the WiFi network of the DreamScreen device Add new device to the WiFi network Enter the password to the W...

Страница 11: ... display groups and added devices Groups designed by the user Group title Devices in the group Unlock to edit the name and devices of the group Add new device Edit the group name LED light intensity HDMI source Audio Jack music source Name of selected device Settings Operation mode HDMI music source ...

Страница 12: ...ps settings Examples 120 LEDs on one output starting at the top left corner Maximum 240 LEDs on two LED strips starting at the bottom left corner Video settings Adjusting RGB channel Setting LED fading reaction Setting RGB tone Brighter colors will be more distinctive It can be switched off or activated in three modes Low Medium High Detecting panoramic screen Light intensity settings regardless o...

Страница 13: ...s LEDs backlight active zones Backlight intensity CEC commands activation to change active HDMI output CEC commands activation between the projector and selected source Activation of automatic sleep mode after the projector is switched off Activation of automatic switching off the LED strip by the projector Delay of LED light in relation to the displayed image maximum 60 frames ...

Страница 14: ...ICATIONS Case dimension FRAME A width of the surface B height of the surface Thank you for choosing the KAUBER screen We invite you to purchase other KAUBER products w w w k a u b e r e u 14 C A 50mm D B 50mm ...

Отзывы: