background image

6

ASSEMBLY

Assembly requires two persons.

Place all parts of the elliptical exerciser in a cleared area and remove the

packing materials. Do not dispose of the packing materials until assembly is completed.  

Assembly requires 

The following tools (not included) are required for assembly: a phillips screwdriver                 , two
adjustable wrenches                , and a rubber mallet                  . You will also need the included allen
wrenches             , pedal wrench                , and grease packet.

2

32

33

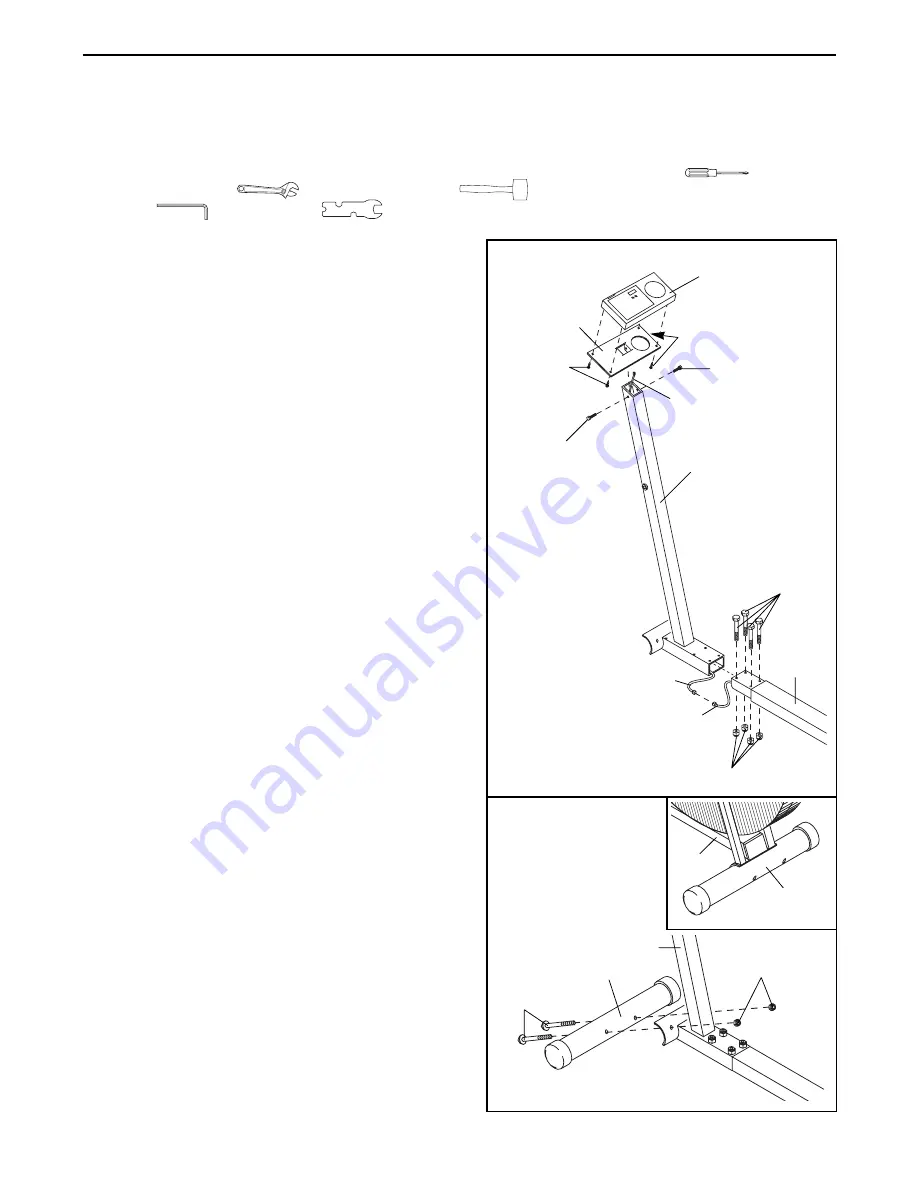
1. Feed the Wire Extension (59) through the Console

Plate (21). Attach the Console Plate to the Upright
(33) with two M6 x 25mm Button Head Bolts (22).

Plug the Wire Extension (59) into the socket on the
back of the Console (27). Attach the Console to the
Console Plate (21) with four Console Screws (10).

Connect the Wire Extension (59) to the Reed Switch
Wire (60). 

Slide the Upright (33) and the Frame (43) together.

Be careful not to pinch the Wire Extension (59)
and the Reed Switch Wire (60).

Attach the Upright

to the Frame with four M10 x 62mm Bolts (18) and
four M10 Nylon Locknuts (17). 

Firmly tighten the

Bolts and Nylon Locknuts. If the joint between
the Frame and Upright flexes during use, the
Bolts and Nylon Locknuts are not tight enough.

2. Attach the Front Stabilizer (32) to the Upright (33)

with two M10 x 75mm Button Head Bolts (23) and
two M10 Nylon Locknuts (17).

See the inset drawing. Attach the Rear Stabilizer
(65) to the Frame (43) in the same manner.

1

18

59

60

43

43

17

33

21

10

10

27

22

22

59

23

17

65

Содержание Total Body WLEL42070

Страница 1: ...l No WLEL42071 Serial No Serial Number Decal QUESTIONS If you have questions or if there are missing or damaged parts please call direct to our toll free Customer Hot Line The trained technicians on our Customer Hot Line will provide immediate assistance free of charge to you CUSTOMER HOT LINE 1 800 999 3756 Mon ÐFri 6 a m Ð6 p m MST USERÕS MANUAL ...

Страница 2: ...isuse improper or abnormal usage or repairs not provided by an ICON authorized service center to products used for commercial or rental pur poses or to products used as store display models No other warranty beyond that specifically set forth above is authorized by ICON ICON is not responsible or liable for indirect special or consequential damages arising out of or in con nection with the use or ...

Страница 3: ...st position when mounting and dis mounting When you stop exercising allow the pedals to slowly come to a stop 9 Keep your back straight when using the elliptical exerciser Do not arch your back 10 If you feel pain or dizziness while exercis ing stop immediately and begin cooling down 11 The elliptical exerciser is intended for in home use only Do not use it in any commer cial rental or institution...

Страница 4: ...se the TOTAL BODY elliptical exerciser If you have additional questions please call our Customer Service Department toll free at 1 800 999 3756 Monday through Friday 6 a m until 6 p m Mountain Time excluding holidays To help us assist you please note the product model number and serial number before calling The model number is WLEL42071 The serial number can be found on a decal attached to the TOT...

Страница 5: ... dash indicates the quantity needed for assembly Some small parts may have been pre attached If a part is not in the parts bag check to see if it has been pre attached M10 Nylon Locknut 17 Ñ8 5 8Ó Axle Cap 11 Ñ4 1 2 Nylon Locknut 15 Ñ2 Pedal Shaft 14 Ñ2 Bushing 12 Ñ12 Weld Cover 13 Ñ2 Console Screw 10 Ñ4 M10 x 75mm Button Head Bolt 23 Ð4 M6 x 25mm Button Head Bolt 22 Ð2 M10 x 62mm Bolt 18 Ð4 M4 x ...

Страница 6: ...into the socket on the back of the Console 27 Attach the Console to the Console Plate 21 with four Console Screws 10 Connect the Wire Extension 59 to the Reed Switch Wire 60 Slide the Upright 33 and the Frame 43 together Be careful not to pinch the Wire Extension 59 and the Reed Switch Wire 60 Attach the Upright to the Frame with four M10 x 62mm Bolts 18 and four M10 Nylon Locknuts 17 Firmly tight...

Страница 7: ...crews 19 Be sure to hold the Pedal firmly against the Left Pedal Arm when you thread the Screws into the Pedal Make sure that there are four Bushings 12 in the Left Pedal Arm 35 Apply a small amount of grease to the axle on the Left Handlebar 29 Slide the indi cated end of the Pedal Arm onto the axle on the Left Handlebar Tap a 5 8Ó Axle Cap 11 onto the axle Apply a small amount of grease to a Ped...

Страница 8: ...sole show how the target pace will change during each program see the drawing above Each graph is divided into ten columns and each column represents a two minute time period The bars in each column show what the target pace will be during that two minute period For example in the first column of the Interval graph there is one bar This shows that during the first two minutes of the Interval progr...

Страница 9: ...nd the manual mode Begin your workout If you selected the manual mode go to step 4 If you selected one of the pacer programs two columns of bars will appear in the display The left column will show one bar showing that the target pace is 40 strides per minute The right column will show your actual pace Adjust your pace until only one bar appears in the right column As the program progresses the ta...

Страница 10: ...from the electronic monitor Keep the monitor out of direct sunlight or the display may be damaged Remove the batteries when storing the elliptical exerciser CONSOLE TROUBLE SHOOTING If the console does not function properly the batteries should be replaced See assembly step 5 on page 7 for instructions In addition make sure that the sensor wire is connected to the wire on the monitor See assembly ...

Страница 11: ...arm If the chain needs to be adjusted see step 3 3 Loosen both M8 Flange Nuts 9 To tighten the chain turn the M6 Nuts 45 clockwise to loosen the chain turn the M6 Nuts counterclockwise Make sure that the Fan 31 is straight and tight en the M8 Flange Nuts Reattach the reattach the left shield the rear shields and the crank arm HOW TO REMOVE THE SHIELDS To adjust the reed switch you must remove the ...

Страница 12: ...e stored fat calories for energy If your goal is to burn fat it may be helpful to use the Fat Burn program to help you to reach your goal See pages 8 and 9 Aerobic Exercise If your goal is to strengthen your cardiovascular sys tem your exercise must be Òaerobic Ó Aerobic exercise is activity that requires large amounts of oxygen for prolonged periods of time This increases the demand on the heart ...

Страница 13: ...tching of the achilles tendons bend your back leg as well Stretches Calves achilles tendons and ankles 4 Quadriceps Stretch With one hand against a wall for balance reach back and grasp one foot with your other hand Bring your heel as close to your buttocks as possible Hold for 15 counts then relax Repeat 3 times for each leg Stretches Quadriceps and hip muscles 5 Inner Thigh Stretch Sit with the ...

Страница 14: ... 25 3 M4 x 25mm Screw 26 4 Stabilizer Cap 27 1 Console 28 1 Battery Cover 29 1 Left Handlebar 30 1 Right Handlebar 31 1 Fan 32 1 Front Stabilizer 33 1 Upright 34 1 Handlebar Axle 35 1 Left Pedal Arm 36 2 Pedal Key No Qty Description 37 1 Left Shield 38 1 Right Shield 39 2 Rear Shield 40 2 Crank Arm 41 1 Crank Axle 42 4 38mm x 50mm Cap 43 1 Frame 44 2 M6 Washer 45 2 M6 Nut 46 2 M6 Eye Bolt 47 1 Ree...

Страница 15: ...3 12 11 19 35 36 12 14 15 59 60 17 50 51 40 53 55 57 47 58 19 48 43 46 63 49 52 58 57 56 41 40 51 50 19 15 44 45 19 19 19 19 19 19 23 65 26 26 17 12 14 19 19 20 38 62 36 12 11 9 7 4 8 1 25 3 1 31 1 5 6 16 9 22 54 42 42 42 42 39 2 2 61 64 19 15 EXPLODED DRAWINGÑModel No WLEL42071 R0198A ...

Страница 16: ...day through Friday 6 a m until 6 p m Mountain Time excluding holidays To help us assist you please be prepared to give the following information when calling The MODEL NUMBER of the product WLEL42071 The NAME of the product KATHY IRELANDª TOTAL BODY elliptical exerciser The SERIAL NUMBER of the product see the front cover of this manual The KEY NUMBER and DESCRIPTION of the part s from page 14 of ...

Отзывы: