background image

34

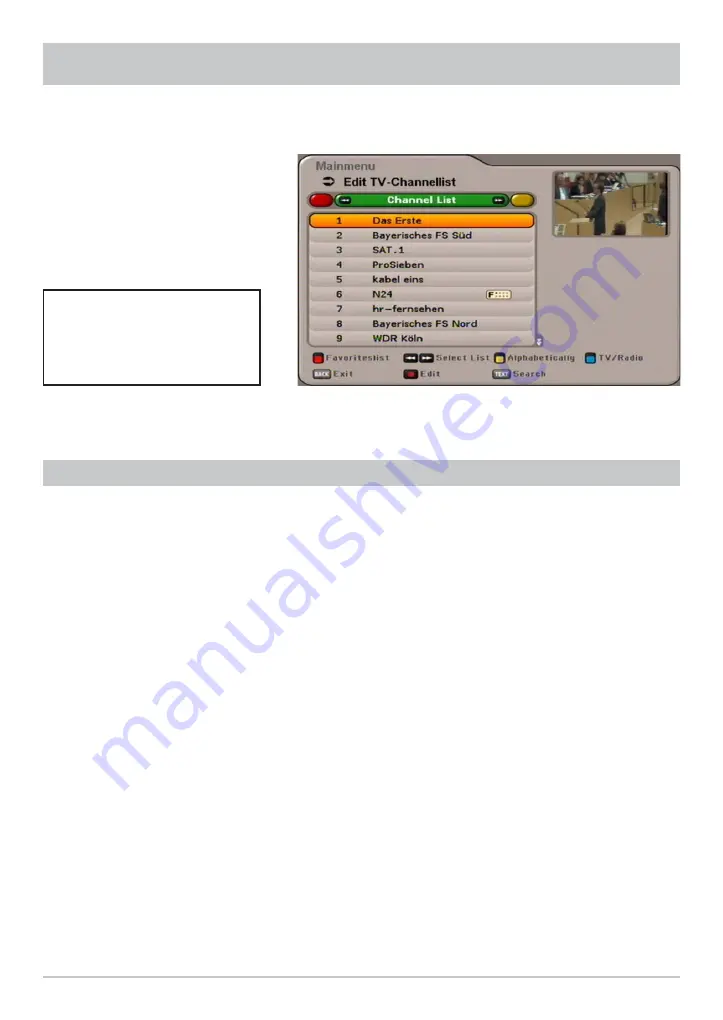
EDIT TV-CHANNELLIST

Select the “Edit TV-Channellist” menu using the 

 button, the 

 buttons on the main menu 

and 

.

When the menu is opened, the standard setting is for the receiver to show the channel list with all 
channels available (overall list).

SELECTION OF THE LIST/CHANNELS TO BE EDITED

Press the 

&

 (blue) button to switch between the TV and radio channel lists. Radio channels are edited 

in the same way as TV channels.

Editing favourite lists is explained as a separate item.

Selection options:

&

 (blue) button 

Switch between radio and TV channels

$

 (green) button 

Calling up the channel lists

%

 (yellow) button 

Open the channel lists, sorted alphabetically

 button   

Search for a speci

fi

 c channel (input the search expression using the numeric 


pad on the remote control, see also the sections “Operating Instructions” 


“Alphanumeric 

Entries”)

The channel list chosen is generally that sorted by categories (overall, favourites and alphabetic) using 

the 

 buttons (the standard list called up is the “Overall” channel list). Selection of channels in 

the list is performed using the cursor buttons (

@

). The 

 buttons allow you to select individual 

channels, and the 

 buttons allow you to scroll from page to page of the currently selected list.

Also note the bars at the bottom 
of the on-screen display! These 
provide information on what 
to do next.

Содержание UFC 662sw

Страница 1: ...Operating manual DVB cable receiver UFC 662sw...

Страница 2: ...alist terms that cannot be translated we have added a short glossary at the end of the manual The power switch is an environmentally friendly feature If you will not be using your receiver for an exte...

Страница 3: ...by the receiver Once the receiver is in standby mode it can be fully switched off at any time at the power switch at the front of the unit Do not switch the receiver off at the power switch when it i...

Страница 4: ...OSD 22 CHANNEL MESSAGES 22 CHANNEL INFORMATION 22 SELECT AUDIO TRACK 23 ERROR REPORTING 23 CHANNEL LIST TV RADIO 23 EPG ELECTRONIC PROGRAMME GUIDE 25 CALLING UP THE EPG 25 CURRENT VIEW 26 PREVIEW VIEW...

Страница 5: ...CHANNEL SEARCH 42 ADVANCED CHANNEL SEARCH 43 PARENTAL CONTROL 45 LOCK MAINMENU 45 LOCK SET TOP BOX 45 DEFINE NEW PIN CODE 45 SETTINGS 46 FIRST INSTALLATION 47 REGION 47 TV SETTINGS TV VIDEO AND AUDIO...

Страница 6: ...network and PC If the mains voltage is too high there is a risk of fire Moisture direct sunlight heat naked flames Protect the unit against moisture dripping and splashed water do not place any fille...

Страница 7: ...sure that any repairs to your unit are carried out by qualified personnel Opening the unit and attempting to repair it yourself voids all warranty claims Improper work on the unit may jeopardise the e...

Страница 8: ...ocesses the picture optimally for flat screen TV sets Features are for instance Kathrein EPG guided first installation with country setting electric audio output for Dolby Digital AC 3 a video cinch o...

Страница 9: ...a stream AC 3 Scart socket programmable for composite colour and RGB signal output Cinch sockets for AV signal Videotext decoder with 800 page memory capacity and Videotext generation only via Scart A...

Страница 10: ...lectrical digital data stream output SPDIF Sony Philips Digital Interface Format for Dolby Digital AC 3 audio 6 Audio outputs L R cinch sockets 7 HDMI Output 8 RJ 11 data interface connection port for...

Страница 11: ...ormation printed on it includes the following the exact designation e g UFC 662sw the part number and the serial number of the unit You do not need this information in order to operate the unit If how...

Страница 12: ...12 Scart Scart Digitalton AC 3 elektrisch Infrarot Empf nger optional CONNECTION EXAMPLE CONNECTION AND SETUP Dolby Digital system Infra red receiver optional Digital audio AC 3 electrical HiFi system...

Страница 13: ...or Scart connection For system reasons the same video signals are to be found at the TV Scart socket as at the video cinch output Use a Scart cable to connect the cable receiver TV Scart socket to the...

Страница 14: ...ently not used red Recording in EPG editing in channel list Power on stand by Videotext Teletext OPT yellow Open channel options sound subtitles selection TV R blue Switch between TV radio Access Chan...

Страница 15: ...ection and Set Up sections First switch your TV set on and select the AV channel slot Switch on your receiver at the power switch at the front of the unit The following display appears Select the menu...

Страница 16: ...on is however active only if you select the setting On for Logical Channel Number in the next line Press the buttons to access the next line Use the buttons here to select whether the channels that ar...

Страница 17: ...esolution appropriate to your TV set Available options Auto automatic format choice 576p 720p or 1080i Press the green button to move to the next menu The following display appears Execute Channel sea...

Страница 18: ...this to On the networking of the transmission channels enables additional transmission channels that have not yet been saved to be located They are then saved and searched for new channels in the same...

Страница 19: ...re self explanatory Note the bar at the bottom of the on screen display This provides information on what to do next Press the button to open the main menu and use the buttons to select the sub menus...

Страница 20: ...20 MENU OVERVIEW OPERATING INSTRUCTIONS Mainmenu Open the menu by pressing the button...

Страница 21: ...ght for entry of favourites names or search expressions by selecting numerals for the desired letters digits You can write with upper or lower case letters button Use the numeric pad to select the des...

Страница 22: ...letext available encrypted channel Time Display of start time for current and next programmes Press twice to view information on the current channel if transmitted by the channel provider Use the butt...

Страница 23: ...e selected channel list TV Channel or Radio Channel displayed Press the blue button to switch between the TV and radio channel lists Weak or no signal indicates that an error has occurred in the recep...

Страница 24: ...tter Use the buttons to make the selection Search function Press the button to start the search The numeric pad buttons allow you to input the desired search expression for the channel that is sought...

Страница 25: ...te and time Current picture on the selected channel Day of the week and period of time in which the highlighted programme is showing Date and time of the selected programme with category duration and...

Страница 26: ...using the cursor buttons The buttons allow you to select individual channels programmes and the buttons allow you to scroll from page to page of the currently selected list Pressing the or button exi...

Страница 27: ...on the desired programme Using the buttons you can scroll through the channels in their sequence in the overall channel list You remain however within the Preview view at all times The button allows y...

Страница 28: ...programme is displayed in its own window By pressing the button if available you can open further additional information on the selected programme The buttons enable you to display the additional info...

Страница 29: ...ing and finishing times together with the recording date must be input manually Use the buttons to select the desired recording mode The following recording mode options are available Once The recordi...

Страница 30: ...ding length When all settings have been made press the button to save the recording settings You can view the recording in the recording list view of the EPG see item Timer list DAILY RECORDING Use th...

Страница 31: ...tons to select the desired recording length When all settings have been made press the button to save the recording settings You can view the recording in the Plan recording view of the EPG see item T...

Страница 32: ...ton The Timer list view shows you all the recordings that are scheduled The buttons allow the recordings to be sorted into once or repeated recordings The cursor buttons The cursor buttons allow you t...

Страница 33: ...to display even when the signal is encrypted When the search is finished the Teletext being broadcast by the relevant encrypted provider appears You have several options for opening the desired pages...

Страница 34: ...Calling up the channel lists yellow button Open the channel lists sorted alphabetically button Search for a specific channel input the search expression using the numeric pad on the remote control se...

Страница 35: ...el will be skipped when zapping through the channels Lock Channel can be viewed only by entering a PIN To Favorite A channel can be assigned to any Favourites List Start Blockselection Several channel...

Страница 36: ...ction Channel Search The channel you previously selected will be deleted from the favourite lists also MOVE CHANNELS Use the buttons to select the channel to be moved from the current channel list use...

Страница 37: ...el list The F shows that it is a favourite channel the black dot in the yellow field shows in which of the eight favourites lists the channel can be found See the item Edit favourite lists for informa...

Страница 38: ...entering a PIN Rename favourites list The favourites list can be renamed Start Blockselection Several channels can be selected at the same time and edited together REMOVE FROM FAVOURITES LIST Use the...

Страница 39: ...hich you can enter the desired name alphanumerically using the numeric pad on the remote control See also the section Operating Instructions Alphanumeric Entries START BLOCKSELECTION HIGHLIGHTING SEVE...

Страница 40: ...a specific channel you must input select the search parameters yourself Use the buttons to select the desired type of search and confirm your selection using the button AUTOMATIC CHANNEL SEARCH Also...

Страница 41: ...bar Transmission channel being searched SEARCH CHANNELS CHANNEL SEARCH Newly found channels are identified with the designation New after the channel name After completion of the search you will see t...

Страница 42: ...If you set this to On the networking of the transmission channels enables additional transmission channels that have not yet been saved to be located They are then saved and searched for new channels...

Страница 43: ...xit the menu The channel list is called up on to the TV screen by pressing the button see also section On Screen Displays Channel List TV Radio After completion of the search you will see the followin...

Страница 44: ...se the buttons to select whether you wish to search free and scrambled or only free channels Network Search Use the buttons On Off to select whether a network search should be performed If you set thi...

Страница 45: ...ked If the receiver is locked it can be operated only by entering the four digit PIN code after it has been switched on factory setting 0000 Press the button to exit the menu again After entering the...

Страница 46: ...using the button the buttons in the main menu and The individual menus are selected using the buttons and called up using the button Use the buttons to select the further options If there is another s...

Страница 47: ...to access the next line Use the buttons here to select whether the channels that are found during a channel search should be sorted in accordance with the channel list saved for the previously selecte...

Страница 48: ...n use the buttons to select the type of screen display depending on the setting of your TV format TV format 4 3 Pan Scan or Letterbox TV format 16 9 automatically or always 16 9 PICTURE FORMAT SETTING...

Страница 49: ...Not assigned Programme Guide Normal Select Favoritelists Select Options TV Radio Not assigned Programme Guide Use the buttons to select the time after which you want the on screen channel message disp...

Страница 50: ...etting Press the button to exit the menu again UTC Always follow the operating instructions from your Pay TV provider and the instructions supplied with the Smartcard and the CA module Smartcards and...

Страница 51: ...structions supplied with the Smartcard and the CA module To remove the CA module pull the CA module back out of the Common Interface The screenshots below depend on the specific module and card and so...

Страница 52: ...During this activation period the CA module and card must be in the slot and the receiver must be turned on a set to the booked Pay TV channel Follow the instructions from the pay TV provider If your...

Страница 53: ...Reset and to call them up press the button The following display appears You are now prompted to enter the PIN code factory default setting 0000 After entering the PIN using the number pad you are sh...

Страница 54: ...ding Record the cable receiver must be switched on or the timers must be pre programmed see EPG Recording timer section RECORDING Connecting a video recorder PVR to the TV Scart socket allows you only...

Страница 55: ...hannel list button The channel up button switches to the next channel up in the currently selected channel list Because there are no numbered buttons no password PIN protected functions can be display...

Страница 56: ...MPEG 1 and 2 layer 1 and 2 Sampling rate kHz 32 44 1 48 S N dB 53 Power Supply Mains voltage external power supply V AC Hz 230 50 DC V 12 Power consumption max typ operation standby W 15 11 1 Connect...

Страница 57: ...X X Blanking signal 16 X X Video earth 17 X X Blanking signal earth 18 X X Video output FBAS Y 19 X X Video input 20 X Connector shield 21 X X The Scart sockets are switchable between VHS and S VHS T...

Страница 58: ...he error rate of data transmission Additional bits are inserted into the data stream so that error correction algorithms can be used on reception The FEC error rate corresponds to the Viterbi rate HDM...

Страница 59: ...number of symbols received per second Timer function Clock function for pre programmed switch on and off times VCR PVR connection Connection for an external recorder such as a video or DVD recorder V...

Страница 60: ...ol A selection of troubleshooting tips is offered below Problem Cause Remedy A No signal warning appears on some or all channels Antenna signal is absent or is defective Check the cable connection bet...

Отзывы: