background image

24

VACUUM CLEANER

FORNO MICROONDE

INFORMATION FOR USERS OF DOMESTIC APPLIANCES

This marking indicates that this product should not be disposed with other household 

wastes throughout the EU. To prevent possible harm to the environment or human health from 
uncontrolled waste disposal, recycle it responsibly to promote the sustainable reuse of material 
resources. To return your used device, please use the return and collection systems or contact 
the retailer where the product was purchased. They can take this product for environmental safe 
recycling.

5. Do not allow the control panel to become wet. Clean with a 

soft, damp cloth. When cleaning the control panel, leave the oven 

door open to prevent oven from accidentally turning on. 

6. If steam accumulates inside or around the outside of the oven 

door, wipe with a soft cloth. It is normal and may occur when the 

microwave oven is working under high humidity conditions. 

7. It is occasionally necessary to remove the glass tray for 

cleaning. Wash the tray in warm sudsy water or in a dishwasher. 

8. The roller ring and oven floor should be cleaned regularly to 

avoid excessive noise. Simply wipe the bottom surface of the 

oven with a damp cloth and mild detergent. The roller ring may 

be washed in mild sudsy water or dishwasher. When removing 

the roller ring from cavity floor for cleaning, be sure to replace in 

the proper position. 

9. Remove odours from your oven by combining a cup of water 

with the juice and peel of one lemon in a deep microwaveable 

bowl, microwave for 5 minutes. Wipe thoroughly and dry with a 

soft cloth. 

10. When it becomes necessary to replace the oven light, please 

consult a dealer to have it replaced. 

11. The oven should be cleaned regularly, and any food deposits 

removed. Failure to maintain the oven in a clean condition could 

lead to deterioration of the surface that could adversely affect the 

life of the appliance and possibly result in a hazard. 

Содержание GAL000001NOC

Страница 1: ...CROWAVE OVEN MIKROWELLENHERD FOUR MICRO ONDES HORNO DE MICROONDAS INSTRUCTION MANUAL BEDIENUNGSANLEITUNG MANUEL D INSTRUCTION MANUAL DE INSTRUCCIONES MANUALE DI ISTRUZIONI GAL000001NOC FORNO A MICROON...

Страница 2: ...Guarnizioni della porta e superfici di tenuta 4 Il forno non deve essere regolato o riparato da nessuno ad eccezione del personale di servizio qualificato IMPORTANTI ISTRUZIONI PER LA SICUREZZA 1 Leg...

Страница 3: ...rischio di incendio del materiale Non riscaldare il cibo eccessivamente Non riscaldare o utilizzare materiali infiammabili all interno del forno o nelle immediate vicinanze I vapori possono creare un...

Страница 4: ...are ustioni 15 Gli utensili di cottura possono diventare caldi a causa del trasferimento di calore dal cibo riscaldato L uso di presine consigliato per maneggiare gli utensili 16 Utilizzare solamente...

Страница 5: ...Uniformit cottura Sistema a piatto girevole Peso netto Circa 9 4Kg INSTALLAZIONE 1 Assicurarsi che tutti materiali di imballaggio siano stati rimossi 2 ATTENZIONE Controllare il forno per assicurarsi...

Страница 6: ...di facile accesso in modo che si possa disconnettere il forno in caso di emergenza 9 Non utilizzare il forno all aperto RADIO INTERFERENZE L uso del forno a microonde pu generare interferenze alla rad...

Страница 7: ...ento elettrico consultare un elettricista qualificato o una persona esperta 2 N il produttore n il rivenditore pu accettare alcuna responsabilit per i danni al forno o lesioni personali derivanti dall...

Страница 8: ...correttamente verificare la presa con un altro apparecchio 3 Verificare che il pannello di controllo sia programmato correttamente ed il timer impostato 4 Verificare che lo sportello sia chiuso corret...

Страница 9: ...ngoli 5 Sottili strisce di alluminio possono essere utilizzate per prevenire la cottura eccessiva delle zone esposte Fare attenzione a non usarne troppe e mantenere una distanza 2 5 centimetri tra pel...

Страница 10: ...ida Onde 8 Piatto in vetro PANNELLO DI CONTROLLO Il pannello di controllo composto da due manopole il timer e il selettore di potenza Manopola selezione potenza Usare questa manopola per selezionare i...

Страница 11: ...otare la manopola potenza per selezionare un livello di potenza o una funzione di cottura 3 Ruotare Ia manopola timer per selezionare il tempo di cottura NOTA Appena la manopola timer viene ruotata il...

Страница 12: ...rano all interno del forno l acqua non deve penetrare nelle aperture di ventilazione 4 Pulire frequentemente la porta e la finestra su entrambi i lati le guarnizioni della porta e le parti adiacenti c...

Страница 13: ...EL DISPOSITIVO ELETTRICO ED ELETTRONICO A FINE VITA Informazione agli utenti per il corretto smaltimento del prodotto ai sensi della Direttiva Europea 2002 96 CE e del D lgs N 151 2005 Caro consumator...

Страница 14: ...t be adjusted or repaired by anyone except properly qualified service personnel IMPORTANT SAFETY INSTRUCTIONS To reduce the risk of burns electric shocks fire injuries to persons or exposure to excess...

Страница 15: ...se flammable materials into or in close proximity of the microwave Vapours may cause fire or explosion hazards Do not use the device to dry food or materials fabrics paper spices herbs wood flowers fr...

Страница 16: ...ther than a qualified person to carry out any service or repair operation which involves the removal of any cover which gives protection against exposure to microwave energy 18 This product is a Group...

Страница 17: ...side the cavity or on the door If there is any damage do not operate the oven and contact qualified service personnel 3 Do not place the oven where heat moisture or high humidity are generated or near...

Страница 18: ...receiver 5 Plug the microwave oven into a different outlet so that microwave oven and receiver are on different branch circuits MICROWAVE COOKING PRINCIPLES 1 Arrange food carefully placing the thick...

Страница 19: ...t is properly installed and grounded ln the event of an electrical short circuit grounding reduces risk of electric shock by providing an escape wire for the electric current It is recommended that a...

Страница 20: ...e oblong ones are recommended as food in corners tends to overcook 5 Narrow strips of aluminium foil may be used to prevent overcooking of exposed areas Be careful don t use too much and keep a distan...

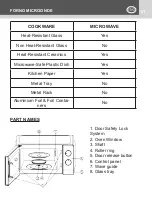
Страница 21: ...ass No Heat Resistant Ceramics Yes Microwave Safe Plastic Dish Yes Kitchen Paper Yes Metal Tray No Metal Rack No Aluminium Foil Foil Contai ners No PART NAMES 1 Door Safety Lock System 2 Oven Window 3...

Страница 22: ...p to start a cooking session TIMER KNOB Set the desired cooking time up to 30 minutes easily turning the knob MICROWAVE COOKING For pure microwave cooking there are five power levels Choose the one th...

Страница 23: ...s push the door release button CLEANING AND CARE 1 Turn off the oven and remove the power plug from the wall socket before cleaning 2 Keep the inside of the oven clean When food stains or spilled liqu...

Страница 24: ...e microwave oven is working under high humidity conditions 7 It is occasionally necessary to remove the glass tray for cleaning Wash the tray in warm sudsy water or in a dishwasher 8 The roller ring a...

Страница 25: ...25 FORNO MICROONDE...

Страница 26: ...ogen b Scharniere und Verriegelungen abgebrochen oder lose c T rdichtungen und Dichtfl chen Das Ger t darf nur von entsprechend ausgebildetem Servicepersonal gewartet und repariert werden WICHTIGE SIC...

Страница 27: ...hweite von Kindern unter 8 Jahren 7 Reinigungs und Wartungsarbeiten d rfen nicht von Kindern vorgenommen werden es sei denn sie sind lter als 8 Jahren und werden beaufsichtigt 8 Um das Risiko eines Br...

Страница 28: ...zess in der Mikrowelle beendet ist 13 Durchl chern Sie vor dem Kochen in Mikrowelle die harte Schale von Lebensmitteln wie Kartoffeln K rbissen pfeln und Waln ssen 14 Der Inhalt von Babyflaschen und B...

Страница 29: ...0W Mikrowelle Mikrowellenleistungsabgabe 700W Arbeitsfrequenz 2450MHz Au enabmessung 243mm H x446mm B x336mm T Garraumabmessung 202mm H x301mm B x311mm T Fassungsverm gen 20 Liter Strahlungsverteilung...

Страница 30: ...r und Dreheinsatz 7 Vergewissern Sie sich dass das Netzkabel unbesch digt ist und nicht unter dem Ger t oder ber scharfe Kanten oder hei e Fl chen verl uft 8 Die Steckdose muss gut zug nglich sein dam...

Страница 31: ...t cke wie Braten sollten mindestens einmal gewendet werden 5 Ordnen Sie Speisen wie z B Hackb llchen nach der H lfte der Garzeit von oben nach unten und von der Mitte des Tellers nach au en neu HINWEI...

Страница 32: ...rt wurde und der Timer eingestellt ist 4 Vergewissern Sie sich dass die T r sicher durch das Sperrsystem verschlossen ist Ansonsten gelangt keine Mikrowellenenergie in das Ger t WENN KEINE DER OBEN AU...

Страница 33: ...alten kann die zur Funkenbildung und oder zu Br nden f hren k nnen 4 Benutzen Sie kein quadratischen oder rechteckigen sondern vorzugsweise runden ovalen Teller da die in den Ecken befindlichen Speise...

Страница 34: ...Timer und dem Leistungswahlschalter Leistungswahlschalter Benutzen Sie diesen Knopf um eine Kochleistungsstufe zu w hlen Diese Einstellung sollte als erstes vorgenommen werden K CHENGESCHIRR UTENSILI...

Страница 35: ...nnen Die Leistungsstufe steigt wenn Sie den Knopf im Uhrzeigersinn drehen Die Leistungsstufen k nnen wie folgt klassifiziert werden BETRIEB Einstellen eines Garvorganges 1 Geben Sie die Speisen in de...

Страница 36: ...die T r und das Fenster von beiden Seiten sowie die T rdichtungen und angrenzende Bereiche mit einem feuchten Tuch um Spritzer zu entfernen Verwenden Sie keine Scheuermittel 5 Wenn Sie das Bedienfeld...

Страница 37: ...und der Schale einer Zitrone in eine tiefe mikrowellengeeignete Sch ssel und erhitzen Sie diese f r f nf Minuten in der Mikrowelle Mit einem weichen Tuch gr ndlich trockenreiben 10 F r eine eventuell...

Страница 38: ...a porte pli e b aux charni res ou aux verrous cass s ou desserr s c aux joints de la porte et aux surfaces de fermeture 4 Le four ne peut tre ajust ou r par que par un technicien d entretien qualifi I...

Страница 39: ...8 ans 7 Le nettoyage et l entretien ne doivent pas tre effectu s par des enfants sauf s ils ont au moins 8 ans et s ils sont sous surveillance 8 Pour r duire les risques de feu dans la cavit du four L...

Страница 40: ...ne peau paisse comme les pommes de terre les courges les pommes et les marrons avant de les cuire 14 Le contenu des biberons d enfants doit tre remu ou secou et la temp rature doit tre v rifi e pour v...

Страница 41: ...0Hz Puissance d entr e nominale 1100W Micro ondes Puissance de sortie nominale Micro ondes 700W Fr quence micro ondes 2450 Mhz Dimensions externes 243mm H x446mm P x336mm L Dimensions de la cavit du f...

Страница 42: ...surez vous que le c ble d alimentation n est pas endommag et qu il ne passe pas sous le four ou sur une surface chaude ou tranchante 8 La prise lectrique doit tre facilement accessible pour l enlever...

Страница 43: ...ou aux informations concernant le raccordement lectrique consultez un PRINCIPES DE CUISSON AU FOUR MICRO ONDES 1 Placez les aliments avec soin Placez les zones les plus paisses l ext rieur de l assie...

Страница 44: ...hez le de la prise murale attendez 10 secondes et branchez le en toute s curit 2 V rifiez qu il n y a pas un fusible qui a t saut ou un disjoncteur disjonct Si ce n est pas le cas testez la prise lect...

Страница 45: ...nants fabriqu s partir de papier recycl dans le four micro ondes car ils peuvent contenir de petits fragments m talliques qui peuvent causer des tincelles et ou des incendies 4 Des plats ronds ou oval...

Страница 46: ...Guide d ondes 8 Plateau en verre PANNEAU DE CONTR LE L e panneau de contr le contient deux boutons de s lection Le premier est une minuterie l autre un bouton de s lection de puissance S LECTEUR PUISS...

Страница 47: ...ssance Action pour choisir une puissance de cuisson ou une fonction de cuisson 3 Utilisez la minuterie pour choisir le temps de cuisson NOTE Le four commence la cuisson d s que le bouton de la minuter...

Страница 48: ...eurs du four ne laissez jamais p n trer de l eau dans les ouvertures de ventilation 4 Nettoyez fr quemment la porte et la fen tre de chaque c t les joints de la porte et les parties adjacentes avec un...

Страница 49: ...suyez avec un linge doux 9 Lorsqu il est n cessaire de remplacer la lampe du four consultez l Assistance technique pour le faire 10 Le four doit tre r guli rement nettoy et il faut en enlever tout d p...

Страница 50: ...a que no se abolle b Bisagras y pestillos que no se rompan o se aflojen c Junta de las puertas 4 El horno no deber a ser arreglado ni reparado por nadie m s que por personal debidamente cualificado IM...

Страница 51: ...que tengan menos de 8 a os 7 La limpieza y el mantenimiento no deben ser realizados por ni os a menos que tengan al menos 8 a os y est n supervisados 8 Para reducir el riesgo de incendio en la cavidad...

Страница 52: ...los alimentos con piel gruesa como las patatas los calabacines enteros las manzanas y las casta as antes de cocinarlos 14 El contenido de los biberones y potitos deber a agitarse o batirse y deber co...

Страница 53: ...inal 230V 50Hz Salida de potencia nominal 1100W microondas Potencia de salida nominal Microondas 700W Frecuencia de funcionamiento 2450MHz Tama o externo 243mm H x446mm W x336mm D Tama o interno 202mm...

Страница 54: ...ese de que el cable del alimentaci n el ctrica no est da ado y no haya quedado debajo del horno ni cuelgue sobre cualquier superficie caliente o puntiaguda 8 La toma de corriente debe estar accesible...

Страница 55: ...o de descarga el ctrica Nota 1 Si tiene cualquier duda sobre las instrucciones el ctricas o de PRINCIPIOS DE COCCI N CON MICROONDAS 1 Disponga los alimentos con cuidado Coloque las partes m s gruesas...

Страница 56: ...a red con seguridad Si no es as saque el enchufe de la toma de corriente espere 10 segundos y vuelva a enchufarlo de forma segura 2 Compruebe que no se hayan fundido los fusibles del circuito ni que s...

Страница 57: ...asiado 5 Pueden utilizarse tiras estrechas de aluminio para evitar que las reas expuestas queden demasiado cocidas Pero tenga cuidado de no usar demasiado y mantenga una distancia de 2 5 cm entre el a...

Страница 58: ...operadores de funci n Uno es un temporizador y el otro ajusta la potencia SELECTOR DE POTENCIA Utilice este bot n operador para elegir un nivel de potencia de cocci n Es el primer paso para iniciar U...

Страница 59: ...100 Alto 2 85 Medio alto 3 66 Medio 4 48 Medio Bajo 5 40 Descongelar 6 17 Bajo una sesi n de cocci n SELECTOR TEMPORIZADOR Ofrece programaci n temporizada hasta 30 minutos por sesi n de cocci n FUNCIO...

Страница 60: ...r a permitir que se filtrase agua en las aberturas de ventilaci n 4 Limpie frecuentemente la puerta y la ventana a ambos lados el sellado de la puerta y las partes adyacentes con un trapo h medo para...

Страница 61: ...e de volverlo a colocar en su posici n correcta 9 Elimine los olores de su horno mezclando en una taza de agua el zumo y la c scara de un lim n y luego vertiendo la mezcla en un cuenco profundo apto p...

Страница 62: ...01NOC Manuale d istruzione Instruction manual Bedienungsanleitung Mode d emploi Manual de instrucciones Importato da imported by import de importado de importiert aus KASANOVA S p A Viale Monterosa 91...

Отзывы: