Karma Leon F Kameleon Скачать руководство пользователя страница 21


13 


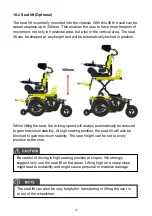
10.2 Seat lift (Optional) 


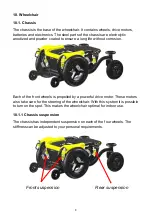
The seat lift is centrally mounted into the chassis. With this lift the seat can be 
raised stepless up to 300mm. This enables the user to have more freedom of 
movement, not only in horizontal area, but also in the vertical area. The seat 
lift can be stopped at any height and will be automatically locked in position. 


Whilst lifting the seat, the driving speed will always automatically be reduced 
to gain maximum stability. At high seating position, the seat tilt will also be 
blocked to gain maximum stability. The seat height can be set to every 
position by the user. 


Be careful of driving in high seating position at slopes. We strongly 
suggest only use the seat lift on flat areas. Lifting high on a steep slope 
might lead to instability and might cause personal or material damage. 

The seat lift can also be very helpful for transferring or lifting the user in 
or out of the wheelchair. 

300mm 

Содержание Leon F Kameleon

Страница 1: ...User manual Leon F Kameleon...

Страница 2: ......

Страница 3: ...8 10 1 Chassis _____________________________________________ 8 10 1 1 Chassis suspension ________________________________ 8 10 1 2 Anti tippers _______________________________________ 9 10 1 3 Lights...

Страница 4: ..._______ 28 11 1 1 Spring setting ____________________________________ 28 11 2 Seat adjustments _____________________________________ 30 11 2 1 Seat width_______________________________________ 30 11 2...

Страница 5: ...52 12 3 13 Control system temperature base bar _______________ 52 12 3 14 Wheelchair lock _________________________________ 52 12 4 Buttons _____________________________________________ 55 12 4 1 On...

Страница 6: ...slopes driving on uphill slopes _____________________ 68 14 9 Driving on sideways slopes______________________________ 69 14 10 Obstacle climbing ____________________________________ 70 14 11 Use in p...

Страница 7: ..._____________ 103 20 2 Short term storage ___________________________________ 103 20 3 Long term storage____________________________________ 104 20 4 tools_____________________________________________...

Страница 8: ...23 1 Diagnostics R Net LCD________________________________ 116 24 Technical specifications_____________________________________ 117 25 accessories ______________________________________________ 122...

Страница 9: ...Shiang Chia Yi 621 Taiwan www karma com tw European representative Karma Mobility S L C Periodista Francisco Caranto a Dubert 23 Bajo 33209 Gij n Asturias Spain phone 34 984 390 907 karma karmamobilit...

Страница 10: ...2 3 Declaration of conformity Leon F Kameleon Series...

Страница 11: ...uct we strongly recommend you read this manual carefully and always keep it with your product This way you are always able to find additional information when needed Karma runs the policy of continuou...

Страница 12: ...nd type of the product stands for indoor and outdoor use Class B stands for the date of production this icon stands for the maximum driving speed this icon stands for the maximum slope to drive on thi...

Страница 13: ...ovide additional information which might be good to know Please take notice if this information Before using the wheelchair you should read this manual to get familiar with this product Make sure the...

Страница 14: ...guarantee does not apply to components susceptible to wear such as bearings cables carbon brushes circuit breakers covers footplates light bulbs pads side guards upholsteries wheels and similar parts...

Страница 15: ...to cope with many terrain differences This combined with the compact size of the product and the excellent speed range and battery capacity making the wheelchair suitable for both indoor and outdoor u...

Страница 16: ...thout corrosion Each of the front wheels is propelled by a powerful drive motor These motors also take care for the steering of the wheelchair With this system it is possible to turn on the spot This...

Страница 17: ...ights to make sure you can have a safe drive in the dark The orange reflectors on both sides and the red reflectors in the rear also make you visible for other people as well The lights fulfill the Eu...

Страница 18: ...specification of the batteries see the chapter technical specifications The maintenance free batteries can be reached from the front side The batteries are placed in a box with a handle for easy chang...

Страница 19: ...on the wheelchair This situation happens typically when the wheelchair is climbing up a hill that is steeper than what is restricted Should the circuit breaker pop up you need Before reconnecting the...

Страница 20: ...rotect the rear end against damage when bumping into a wall It protects both the wall and the wheelchair Rear end bumper wheels If the main fuse has blown do not replace the fuse immediately First con...

Страница 21: ...he seat the driving speed will always automatically be reduced to gain maximum stability At high seating position the seat tilt will also be blocked to gain maximum stability The seat height can be se...

Страница 22: ...achieve a right center of gravity positioning of the seat on the chassis Quick release locking bolts To unlock the seat pull both locking bolts outwards 1 and pull the seat backwards 2 Then lift the...

Страница 23: ...dular seating elements can be chosen within the Kameleon seat system depending on the functional limitations of the user By that the seat can perfectly be assembled for each specific user Kameleon sea...

Страница 24: ...The seat depth can be adjusted left and right side independently in steps of 20mm Seat pan straight Seat pan spread setting The seat pan can also be put into a spread position where both left and righ...

Страница 25: ...seat The wedge can also be cut or grinded to reset the shape by therapists or dealers to create a perfect fit and seat support Seat pan with left side added wedge Seat with wedge and cushion This add...

Страница 26: ...n angle the driving speed will be reduced This is to reduce the risk of danger whilst driving at high speed Always drive carefully on slopes The angle of the slope has great influence on the total sta...

Страница 27: ...ackbone can be extended in height which is in order to grow with the user The backrest panels can be stepless adjusted in width and height Vertical movement is made possible by the vertical slots If t...

Страница 28: ...d the upper body when reclining The amount of shear reduction can be adjusted If a fixed backrest is used the backrest may come as fixed mount without shear reduction It can be added afterwards as an...

Страница 29: ...tance between both left and right armrest is stepless adjustable to adapt to the width of the seat Width adjustment of armrests There are two options in armrest mount 1 Fixed armrest mounted to the ba...

Страница 30: ...t with footplate Footplate flipped up Height angle adjustment Bumper wheels and mounting slots By untightening the mounting block Q reversely the dynamic range of legrest length can be shortened or ex...

Страница 31: ...st stretched When stretching the legrest it always checks if there is no obstructions close to the wheelchair especially in the front of the wheelchair When stretching the legrest the wheelchair will...

Страница 32: ...er Another option is a rotation block to rotate the headrest to the left or right Multi adjustable headrest Standard headrest The standard headrest has a smaller headrest pad but is still adjustable i...

Страница 33: ...Knee support panels Optional The PU knee support panels K can be added to give more side supports in the front area of the seat cushion 10 4 12 Upholstered lateral supports Optional The upholstered l...

Страница 34: ...of positioning belts are available Fixed seat position belt Automatic retraction position belt Positioning belts shall not be used as a car safety belt If transported in a car the user needs to wear b...

Страница 35: ...trol Optional Desktop control driving position Desktop control flipped up The desktop control enables the user to have a center mounted build in joystick module The table can be flipped up sideways fo...

Страница 36: ...damper unit Rear spring damper unit Leon F wheelchair chassis has two spring damper units in the front one for each wheel and two spring damper units in the rear The spring damper unit can be set at...

Страница 37: ...easure the spring setting in the front and rear The best way is to measure the distance D between both rings where the spring is clamped in mm Make sure that the spring settings of left and right side...

Страница 38: ...rease the seat width the seat frame can be slide in and out to the required width in steps of 12 5 mm on each side Please notice the following steps to increase the seat width step 1 take off the seat...

Страница 39: ...e the following steps step 1 take off the seat cushion and the seat wedges if mounted step 2 loosen the screws A using an 4mm Allan key of each seat panel step 3 slide the seat plates left and right s...

Страница 40: ...the front T shaped panel mounted The T shaped panel can be ordered independently as an option if the seat is set to a widest seat size If the seat size is set to a bigger size you might need to order...

Страница 41: ...rt To adjust the seat spread please take the following steps step 1 loosen the two bolts B in the rear edges of the seat slightly and don t take them out step 2 loosen the two nuts H in the front side...

Страница 42: ...mount the outside knee supports simply use the two bolts I and position the panel flat on the side of the seat plates into one of the mounting holes To mount the inner knee supports also use the two b...

Страница 43: ...s M slightly then the support can be moved step 3 Now move the hip support into the required position step 4 Once it is positioned right thighten all four bolts again When adjusting the hip supports c...

Страница 44: ...range of hand nuts H slightly step 3 now you can pull up the yellow front backbone panel G to the required height step 4 tighten all the hand nuts to secure the desired height C D H G In some occasio...

Страница 45: ...2 move the backrest panel into the desired width and height position step 3 tighten the hand nuts of each specific backrest panel step 4 repeat the same procedure for all the backrest panels To stet t...

Страница 46: ...o adjust the depth and width loosen the two bolts M slightly then the support can be moved step 3 Now move the lateral support into the required position step 4 Once it is positioned right thighten al...

Страница 47: ...into the desired height and tighten all the bolts step 3 to set the legrest into an extreme short setting we can disassemble the footplate bracket Q and turn it 180 degrees to mount it back again Sett...

Страница 48: ...ment screws into the clockwise direction step 2 to increase the angle turn the both adjustment screws into counterclockwise direction The adjustment can be done stepless to perfectly align the footpla...

Страница 49: ...moved By loosening both rotation points of the armrest it is possible to move the armrest up and down into the required height step 2 tighten all the bolts A to lock the position of the armrest Setti...

Страница 50: ...le setting Setting armrest depth step 1 loosen up the four bolts E step 2 slide the armrest pad into the requested position step 3 tighten the four bolts to secure the armrest pad position D A E A The...

Страница 51: ...o the required position step 4 tighten all the bolts firmly to secure the headrest position step 5 put the rubber covers back into the joints E A F A Be aware that if the bolts are loosened too much t...

Страница 52: ...d into the required position step 3 tighten the bolt G to secure the headrest position Headrest shape settings step 1 unzip the zipper Z on the bottom of the headrest pad and take the cover off step 2...

Страница 53: ...to avoid sliding of the seat belt along the seat rail A sliding seat belt might result in poor seating position of the user The positioning belt should not be used as a safely belt If the wheelchair i...

Страница 54: ...g of the wheelchair is automatically blocked 12 2 Joystick The primary function of the joystick is to control the speed and direction of the wheelchair The further you push the joystick from the cente...

Страница 55: ...The bar is divided into three color zones Green orange and red If only the LED are left it means the batteries will be almost empty and need to be charged Beside the color you also have different LED...

Страница 56: ...are now The name of the profile can be programmed to your wishes by your local supplier The wheelchair can have up to 8 different driving profiles Each profile is set to a certain environment you want...

Страница 57: ...tandard setting km h 12 3 6 Speed bar main screen This speed bar displays the current maximum speed setting It contains 5 steps in speed These steps can be selected using the speed buttons explained i...

Страница 58: ...r screens which show information The most common screen messages are explained in the next chapters 12 3 9 Additional options main screen Additional screens can show the additional options of the elec...

Страница 59: ...short time before the R net enters into a sleep state 12 3 10 4 Joystick deflected message This message is show if the wheelchair is started up and the joystick is not in its zero position If you let...

Страница 60: ...3 Control system temperature base bar This symbol is displayed when the control system has intentionally reduced its own power to protect itself against heat damage 12 3 14 Wheelchair lock The wheelch...

Страница 61: ...reverse until the control system beeps Release the joystick there will be a long beep The wheelchair is now locked The following screen will be displayed in the control box To unlock the wheelchair I...

Страница 62: ...key To lock the wheelchair with the key lock Insert and remove the supplied PGDT key into the charger socket The wheelchair is now locked To unlock the wheelchair Insert and remove the supplied PGDT k...

Страница 63: ...wheelchair unless there is an emergency If you do you may shorten the life of the wheelchair drive components 12 4 2 Horn button The horn will sound while this button is depressed 12 4 3 Speed decreas...

Страница 64: ...e displayed when the button is pressed 12 4 7 Hazard Warning Button and LED This button activates and de activates the wheelchair s hazard lights Depress the button to turn the hazards on and depress...

Страница 65: ...such as a buddy button To change the Profile whilst driving simply press the button If the control system is set to latched drive or actuator control operation then the polarity of the jack input is r...

Страница 66: ...ld or pull on the cable Always grip the connector when connecting and disconnecting When the control system is first switched on after a connection or system component change the Timer will be display...

Страница 67: ...to move in that direction The secondary purpose of the joystick is to navigate through men menu of the wheelchair By moving the joystick forward or backward you can scroll up or down through the menu...

Страница 68: ...y accessible for maintenance or replacement Position and access of the maintenance free batteries Be careful when using metal objects close to the batteries A short circuit might easily create strong...

Страница 69: ...electronics itself is completely protected again short circuit and overload If the fuse is blown please contact your local authorized supplier He should check the wheelchair first before replacing the...

Страница 70: ...62 14 Using the wheelchair 14 1 General warnings and advices Please read this section of the manual very carefully as it contains issues related to safety and possible hazards...

Страница 71: ...attery terminal caps having passed V 0 UL94 test Before attempting to sit in or exit the powered wheelchair turn the power OFF A warning not to operate the wheelchair if it is behaving abnormally or e...

Страница 72: ...direct zone of the moving parts Some parts of the wheelchair can reach high temperatures when exposed to direct sun Please be careful with touching especially the plastic parts under these circumstanc...

Страница 73: ...ersons or animals are in the near surrounding because running over e g feet will lead to serious injury as a result of the high weight of the electrical wheelchair When using the seat lift and or the...

Страница 74: ...llision or when the wheelchair is otherwise visual damaged Check the tire pressure and refill the tires if necessary every four weeks Check the tires at the same time for wear and damage Replace if ne...

Страница 75: ...ir driving downhill is different than on level surfaces Max acceptable downhill slope Never drive downhill on slopes bigger than 6 This might result into uncontrollable behavior of the wheelchair This...

Страница 76: ...of the seat in height and angle or the position of the backrest has great influence on the stability of the wheelchair when driving on slopes Make sure the seat is in the optimal driving position to a...

Страница 77: ...in height and angle or the position of the backrest has great influence on the stability of the wheelchair if driving on slopes Make sure the seat is in the optimal driving position to avoid tipping...

Страница 78: ...n driving down of it If your wheelchair has powered seat tilt you can use the seat tilt for more stability whilst driving of the pavement The position of the seat in height or the position of the back...

Страница 79: ...rive slowly to a safe place turn off your wheelchair and try to extinguish the radiation source When it is unavoidable to use the wheelchair under these circumstances be prepared for any unexpected an...

Страница 80: ...limb you use to operate the joystick should be supported for example by the wheelchair armrest Do not use the joystick as the sole support for your hand or limb the wheelchair movements and bumps coul...

Страница 81: ...ou are inexperienced One popular technique is to simply point the joystick in the direction you want to go The wheelchair will move in the direction you push the joystick Always think about driving as...

Страница 82: ...g the menu on the joystick module To enter the seat function menu push the button Mode on the joystick module You will leave the drive mode The stopping distance on slopes can be significantly greater...

Страница 83: ...al function build in like the blue tooth mouse function you can control this using the menu and joystick To enter the blue tooth mouse menu push the button Mode on the joystick module You will leave t...

Страница 84: ...n freewheel mode and can be pushed To lock the brakes move the lever in to the lock position on both motors Always make sure that when positioned on slopes the brakes are attached no Freewheel If the...

Страница 85: ...discharge the batteries Normally the amount of cycles is between 300 and 700 times To make your maintenance free batteries last longer do not allow them to become completely discharged Always recharge...

Страница 86: ...y The wheelchair will stop and give an error warning saying low battery voltage If the batteries should be drained completely it is important that you charge them up again as soon as possible since a...

Страница 87: ...1 amperes This charger will fully charge the batteries within 8 hours For more detailed information about the charger and its functions we refer to the manual which comes with the charger In some occa...

Страница 88: ...air does drive with the charger plugged in contact your local authorized supplier In some occasions it might be the case that your local supplier will deliver the wheelchair with a different brand cha...

Страница 89: ...station makes it much easier to lock down the wheelchair for occupied transportation It can be used also for wheelchair users who want to drive the car by themselves The system is self locking and can...

Страница 90: ...sis with Dahl Docking plate mounted For detailed information about the Dahl Docking system please visit the homepage www dahlengineering dk To fit the Dahl docking plate Karma has created a special ki...

Страница 91: ...ting it Step 2 loosen the 4 locking bolts of the battery box The Dahl Docking station is only allowed to build into a vehicle by trained and authorized staff of a registered car adaptation company For...

Страница 92: ...3 pull out the batterey box and disconnect main battery cable Step 4 place the mounting plate inside the chassis on the bottom Step 5 tighten the two bolts into the mounting holes to fix the mounting...

Страница 93: ...ation Docking station in the vehicle The mounting of the Dahl docking station into your vehicle shall only be executed by an authorized car adaptation company They will get the right support and infor...

Страница 94: ...s only allowed to build into a vehicle by trained and authorized staff of a registered car adaptation company For ordering the Dahl Docking and its accessories please contact Dahl Engineering in Denma...

Страница 95: ...87 Dahl docking station mounted on the floor Docking station and docking plate on chassis...

Страница 96: ...instruction in chapter 19 1 5 If the wheelchair is not centered correctly it might not be possible to lock in top the docking station In that case retry by driving a bit backwards and re center the wh...

Страница 97: ...cking station manually the red lever needs to be pulled to the right This retracts the locking bolt manually so the wheelchair can be released out of the docking station After pushing the release butt...

Страница 98: ...he angle for the pelvis part 2 of the safety belt must be in angle of 30 75 with the horizontal plane See picture below Also the side angle should stay between the vertical planes to maximum of 15 ang...

Страница 99: ...91 Optimal angles for a safety belt used by the wheelchair user The shoulder part 1 of the safety belt should be positioned according to the figure below Shoulder safety belt positioning...

Страница 100: ...92 Picture of improper belt fit Picture of proper belt fit...

Страница 101: ...93...

Страница 102: ...driving Check that the wheelchair is properly fastened and that the parking brakes are engaged The wheelchair can be locked into position by using fastening straps through the brackets in the front an...

Страница 103: ...ing the wheelchair If a user is transported in his wheelchair he or she should wear an extra car safety belt which is attached to the vehicle like all the car safety belts When shipped by boat please...

Страница 104: ...horizontal plane This is to have maximum effect in vertical and horizontal direction The straps must be connected to the vehicle at suitable anchor points Make sure that the tire pressure is at the re...

Страница 105: ...milar system or a system that is equally specified It is very important to use the safety belt in the right angles according to the wheelchair user The angle for the pelvis part 2 of the safety belt m...

Страница 106: ...98 optimal angles for a safety belt used by the wheelchair user The shoulder part 1 of the safety belt should be positioned according to the figure below shoulder safety belt positioning...

Страница 107: ...99...

Страница 108: ...100 picture of improper belt fit picture of proper belt fit...

Страница 109: ...the rebound of an impact this to reduce the risk of a whiplash Recommended position of the backrest legrest and headrest We strongly advise you to remove the table or table control before transportat...

Страница 110: ...rline may provide When transported by air the wheelchair will be put with other goods in a confined space Therefore it is important to take preventive action to minimize transport damage to the wheelc...

Страница 111: ...ons and user prescriptions When the wheelchair is not used over a longer period recharge the batteries every four weeks to keep the batteries in good condition If the batteries are not charged regular...

Страница 112: ...hold their energy for a longer period When re using the wheelchair the batteries will be installed and fully charged Ask your local authorized supplier to store and maintain the batteries if they are...

Страница 113: ...to an increased risk of accident All alterations to and interventions in the wheelchair s vital systems must be performed by an authorized service engineer In case of doubt always contact an authorize...

Страница 114: ...cture repair Since the wheelchair is rather heavy it is recommended to let your authorized supplier repair eventual tire punctures First lift the wheelchair so that the punctured tire is free from the...

Страница 115: ...d supplier for information 20 6 1 Upholstery cloth 3D mesh For normal cleaning wash the upholstery with hand warm water and a mild nonabrasive soap Use a soft cloth or brush Before the surface dries w...

Страница 116: ...rly When the brakes are released it should not be possible to drive the wheelchair Never use aggressive chemical cleaner or cleaning fluids These will damage the surface and structure of the material...

Страница 117: ...ion always be done by a qualified technician To replace the batteries please refer to the photos below of the batteries equipped on the Leon series and follow the below instructions to remove and load...

Страница 118: ...front of the wheelchair and lift it off Removing the cover bolts Step 2 remove the four battery box locking bolts at the rear end of the chassis side Removing the locking bolts step 3 pull the battey...

Страница 119: ...e the new batteries and place in the battery box step 7 connect the cables on to the poles step 8 place the battery box in front of the chassis step 9 connect the cables to the main power cable oif th...

Страница 120: ...into chassis and slowly slide in inside step 11 fixate the battery box by attaching the four locking bolts at the rear of the chassis step 12 place the front cover back and secure it with the two bolt...

Страница 121: ...for chemical waste If you have any question in the above procedures if you are not capable of replacing the batteries by yourself or you don t feel comfortable doing it please contact your local auth...

Страница 122: ...gly recommend you contact your local authorized supplier to take care of the disposal of your wheelchair Batteries are classified as chemical waist and need to be disposed according to the local regul...

Страница 123: ...de has been activated restart wheelchair using the on off button the wheelchair stops whist being driven a cable connection of the R net system has come loose check all R net connections and restart m...

Страница 124: ...r s electrical system Switch off the wheelchair and leave it off for a few minutes Then restart the wheelchair If the fault persists you must switch off the wheelchair and contact your service contact...

Страница 125: ...117 24 Technical specifications Length L 1010 mm without legrest Width W 620 mm Height H 760 mm top backrest frame 620 mm 1010 mm 760 mm...

Страница 126: ...ed height mm 760 820 Total mass kg 167 50Ah 196 80Ah Total mass without batteries kg 136 142 Mass of the heaviest part kg 116 Static stability downhill X 11 Static stability uphill X 10 Static stabili...

Страница 127: ...x 260 x 220 Seating System SIZE 1 SIZE 2 Minimum Maximum Minimum Maximum Seat plane angle X 3 3 Seat angle adjustment Power tilt X 3 42 3 42 Effective seat depth mm 275 410 330 470 Effective seat wid...

Страница 128: ...structions on the Karma website The actual product specifications differ from the data in the table by 1 cm 0 5 kg The actual product specifications may vary according to different configurations Karm...

Страница 129: ...Manual X 89 172 89 172 Leg to seat angle adjustment Power X 84 140 84 140 Footrest length mm 200 420 200 420 Armrest height mm 120 215 230 325 The actual product specifications differ from the data i...

Страница 130: ...s A good 25 accessories Accessories for Karma power wheelchairs are subject to continuous development Every day we design new accessories to improve the flexibility of our products Contact your local...

Страница 131: ...123 NOTES...

Страница 132: ...s needs and desires in mind When it comes to user experiences we strive to be more caring empathetic and approachable Through our dedication and our mindfulness we look forward to bringing more confid...

Страница 133: ......

Страница 134: ......

Страница 135: ......

Страница 136: ...110400001023 Release Date Jun 2021 V 02...

Отзывы: