background image

7

6

ENGLISH


Before arranging any connection, make sure that the power  


cord is unplugged from the mains power socket. All operations 


should be carried out without power.

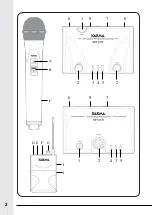
1.  Check that the batteries in the transmitters are charged and if necessary replace 

them, by removing the small cover (C/J). If you use bodypack transmitters, put the 

microphone plug into the socket (D).

2. 

Position correctly the receiving base and connect it to mixers or amplifiers via 

the socket (7).  Make sure that the antennas (6) are lifted. 

3. 

Rotate the volume control (2) anti-clockwise and position it on the minimum value.

4.  Connect the adaptor (included) to the back socket (9) and then to the 230V 

domestic power source.

5.  After switching on the other devices of your audio system, press the power button 

(1) on the base.

6.  Use the microphones’ on/off switches (B/F) to activate them.  The switches have 

3 positions: off/mute/on.   In position “off” the microphone is off.  In position “mute” 

the led (A/E) will flash once as a test: in this position the microphone is on and 

transmits the signal to the recivers, but the microphone capsule is not enabled.  

In position “on” the capsule is activated and the voice transmitted. If the batteries’ 

charge is not enough the led (A/E) will light on.  In this case replace immediately 

the batteries.

7.  If you use a bodypack transmitter, after switching it on, you can adjust the level of 

the volume sent to the receiver via the rotating control (G).  The back clip (I) allows 

to fasten it to your belt for easy carriage.

8.  Adjust as you wish the receiver’s volume(2), by rotating the knob clockwise.

9.  At the receiver’s turning on the led (4) will light on.  When you turn on the 

microphone, the RF led (3) will light on to indicate the connection between the 

transmitter and the receiver.  By putting the switches (B/F) of the transmitters in 

ON position and speaking in the microphone, the AF led (5 - present only in model 

SET 6170) will light on and flash to indicate reception of the audio signal.

10.  CAUTION:

 if the AF led (5) flashes, but you can’t hear the voicee, check that the 

connections are correct and that the fixtures for signal amplifications are all on

Содержание 6170

Страница 1: ...t a l i a n a i t Manuale di istruzioni Instruction manual I E SET 6170 SET 6170LAV SET 6172 SET 6172PL SET 6172LAV Radiomicrofono VHF VHF Wireless microphone Doppio radiomicrofono VHF Double VHF Wir...

Страница 2: ...2 1 6 6 6 9 9 7 7 1 D E F G C B A I J 2 4 3 3 4 5 3 2 2...

Страница 3: ...guriamo che rimarrete soddisfatti dell acquisto e Vi ringraziamo nuovamente per la fiducia riposta nel nostro marchio Precauzioni ed avvertenze Conservare il manuale per future consultazioni e allegat...

Страница 4: ...ifica dell integrit del led in questa posizione il microfono acceso e trasmette il segnale portante alla base ricevente ma la capsula microfonica disattivata In posizione on la capsula viene attivata...

Страница 5: ...or short circuits never expose the fixture to rain or moisture Do not operate the product in an ambient temperature higher than 35 In the event of a serious operating problem stop using the product i...

Страница 6: ...once as a test in this position the microphone is on and transmits the signal to the recivers but the microphone capsule is not enabled In position on the capsule is activated and the voice transmitte...

Страница 7: ...lly friendly way and helps to avoid possible negative effects on health and environment promoting the recycling of the materials of which the device is composed Illegal disposal of the product by the...

Страница 8: ...sso 4 La garanzia non prevede la sostituzione del prodotto 5 Sono escluse dalla garanzia le parti esterne le batterie le manopole gli interruttori e le parti asportabili o consumabili 6 Le spese di tr...

Страница 9: ...ZIA GUARANTEE CERTIFICATE CERTIFICATO DI GARANZIA GUARANTEE CERTIFICATE MODULO DI REGISTRAZIONE REGISTRATION MODULE MODULO DI REGISTRAZIONE REGISTRATION MODULE COPIA DA INVIARE A COPIA DA CONSERVARE S...

Страница 10: ...CEIPT INVOICE NUMBER N SCONTRINO O FATTURA RECEIPT INVOICE NUMBER TIMBRO E FIRMA DEL RIVENDITORE DEALER S STAMP AND SIGNATURE TIMBRO E FIRMA DEL RIVENDITORE DEALER S STAMP AND SIGNATURE ACQUISTATO DA...

Страница 11: ...alle frequenze ed ai livelli di potenza RF autorizzati nella vostra regione per i prodotti radiomicrofonici Karma Italiana Srl EU DECLARATION OF CONFORMITY Hereby KARMA ITALIANA SRL declares that the...

Страница 12: ...5 dBuV Dimensions 150 x 115 x 32 mm Weight 0 5 Kg MICROFONI Alimentazione 2 batterie da 1 5V tipo AA Non Incluse Current drain inferiore a 100mA Frequenza VHF A 173 8 Mhz B 174 1 Mhz C 174 5 Mhz D 175...

Отзывы: