Karel IPV10 Скачать руководство пользователя страница 31

TECHNICAL REFERENCE & INSTALLATION GUIDE 


22


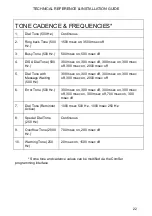
* Some tone and cadence values can be modified via the ComSer 

programming interface. 

TONE CADENCE & FREQUENCIES*


1.    Dial Tone (500 Hz.) 

Continuous 

2. 

Ring back Tone (500 
Hz.) 

1500 msec on, 3500 msec off 

3. 

Busy Tone (500 Hz.) 

500 msec on, 500 msec off 

4. 

DISA Dial Tone (500 
Hz.) 

300 msec on, 300 msec off, 300 msec on, 300 msec 
off, 300 msec on, 2000 msec off 

5. 

Dial Tone with 
Message Waiting 
(500 Hz.) 

300 msec on, 300 msec off, 300 msec on, 300 msec 
off, 300 msec on, 2000 msec off 

6. 

Error Tone (500 Hz.) 

300 msec on, 300 msec off, 300 msec on, 300 msec 
off, 300 msec on, 300 msec off, 700 msec on, 300 
msec off 

7. 

Dial Tone (Reminder 
Active) 

1000 msec 500 Hz., 1000 msec 250 Hz.  

8. 

Special Dial Tone 
(250 Hz.) 

Continuous 

9. 

Overflow Tone (2000 
Hz.) 

700 msec on, 200 msec off 

10. 

Warning Tone (250 
Hz) 

20 msec on, 1500 msec off 

Содержание IPV10

Страница 1: ...IP PBX TECHNICAL REFERENCE INSTALLATION GUIDE 05 06 2012...

Страница 2: ...TECHNICAL REFERENCE INSTALLATION GUIDE II...

Страница 3: ...s must not be opened by unauthorized persons in any way The cover of the exchange cabinet should always be kept closed All the ground connections on the covers must be fixed and checked before closing...

Страница 4: ...on against harmful interference in a residential installation This equipment generates uses and can radiate radio frequency energy and if not installed and used in accordance with the instructions may...

Страница 5: ...procedures that could affect the operation of the equipment If this happens the telephone company will provide advance notice in order for you to make necessary modifications to maintain uninterrupted...

Страница 6: ...an incoming call In most but not all areas the sum of RENs should not exceed five 5 0 To be certain of the number of devices that may be connected to a line as determined by the total RENs contact th...

Страница 7: ...tc for cleaning purposes Do not mount your system on mobile surfaces or near radiators or heat sources When you want to chance the location of the system consult authorized service When you need to ca...

Страница 8: ...AB IPV10 Tech Ref and User Guide Ver AAB 05 06 2012 For the development and enhancement of the features of the products specified in this document KAREL reserves the right to make changes without prio...

Страница 9: ...E ETHERNET CABLE 6 CONNECTION TO AN ELECTRIC SOCKET 6 IPV10 EXCHANGE WALL INSTALLATION 7 MANAGEMENT OF THE IPV10 10 ADMINISTRATOR LOGIN 10 SOFTWARE STRUCTURE 11 THE IPV10 S OPERATING SYSTEM 11 IP EXTE...

Страница 10: ...During Handling and Transportation Please Pay Attention to the Following Do not expose your product to any impacts during handling Remove the product from its box carefully Store all accessories in t...

Страница 11: ...by any unauthorized service staff External physical impacts and direct breakage damages incurred by the product Destruction or removal of the product s batch number Any liquid being spilt on the produ...

Страница 12: ...ric shock or fire Never allow unattended children to touch the device Keep all packaging materials away from children The device s handset is magnetic Pay attention to any small metal objects for exam...

Страница 13: ...face DISA HARDWARE FEATURES EXTERNAL APPEARANCE The Front Face LED Definition Power Green Led Indicates that the power connection is normal Run Green Led Indicates that the server system is running no...

Страница 14: ...port is ringing LED Dual Green and Red quick There is a Call on the FXS port Back PARTS LIST ON DELIVERY One IPV10 server unit One power source One Internet cable Some telephone cables RJ 11 Note Ple...

Страница 15: ...Ethernet port and connect the other end of the cable to a hub switch router LAN or WAN After connecting check the LED light a yellow light indicates that the connection is in progress a green light i...

Страница 16: ...o remove the front cover of IPV10 Exchange in order to hang it on the wall Remove the screws located underneath the box for this purpose Move the cover upwards using a screwdriver from its lower side...

Страница 17: ...the box with its front cover removed to a wall 1 Use IPV10 Exchange Installation Template to determine the location of the terminal on the wall and to mark the location of the holes The length of the...

Страница 18: ...mm from the head side of the screws will remain unscrewed 3 Figure below device hang on the wall by hitting hanger holes and screw heads If necessary screws can be tighten 4 Install the front cover In...

Страница 19: ...TRATOR LOGIN An IPV10 system has many software features These services have been designed in a flexible manner to order to satisfy all users various expectations All services can be programmed via the...

Страница 20: ...ince Linux is an open source operating system applications such as Unified Messaging and Call Center tools that have been developed for the same environment can easily be adapted for use with a PBX Th...

Страница 21: ...n a simpler and more reliable structure perfect for a small or medium sized system System software updates do not require any changing of chips There are two options when considering updates to system...

Страница 22: ...orities IP EXTENSIONS AND LINE SERVICES One of the most important features of the IPV10 IP Telephone PBX is the provision of integrated support for IP Extensions and IP Lines A maximum of 20 IP Extens...

Страница 23: ...IP Dect extensions can also obtain services from the system similar to that provided to standard SIP extensions WiFi phones are IP phones which connect via special IP switches named direct wireless a...

Страница 24: ...nto the License Settings field on the ComSer interface NUMBERING PLAN When the installation of a IPV10 IP Telephone PBX of the required capacity is completed and the device is initially run it automat...

Страница 25: ...local computer via the ComSer web server Previously saved backups had to be restored to the system via the Database Converter However older configurations can still be used with these newer versions A...

Страница 26: ...TECHNICAL REFERENCE INSTALLATION GUIDE 17 The following window of the ComSer programming interface appears...

Страница 27: ...ard CPU module Stand by Power Consumption 1W EXP20 Stand by Power Consumption 0 5W Max Power Consumption 20W 5 Dialing Dual Tone Multi Frequency Dialing DTMF 140 msec analog lines Digital info 6 Diali...

Страница 28: ...NCE INSTALLATION GUIDE 19 CONNECTIONS 1 Connectors Lines and Extensions RJ11 type Ethernet RJ45 type 2 External Connections Standard Telephones 2 wire PC 10baseT Straight Cable 3 CRL Call Record Listi...

Страница 29: ...5 Wait Time between Two Consecutive Dials by the Auto dialer 175 _ 5 msn 6 Cross Talk Attenuation Better than 70 dB 7 Maximum number of telephone sets per extension 2 Telephone Sets for analog extens...

Страница 30: ...d support Yes 4 Out of band RF2833 support INFO support 5 Telephone Standard SIP softphone IP phones SIP compatible WiFi wireless phones support 802 11g protocol 6 Web server support Yes 7 System Mana...

Страница 31: ...sec on 300 msec off 300 msec on 300 msec off 300 msec on 2000 msec off 5 Dial Tone with Message Waiting 500 Hz 300 msec on 300 msec off 300 msec on 300 msec off 300 msec on 2000 msec off 6 Error Tone...

Страница 32: ...09 Hz 1336 Hz 1477 Hz Low 697 Hz 1 2 3 Frequency 770 Hz 4 5 6 Assembly 852 Hz 7 8 9 9 dBm 941 Hz 0 The Nominal Frequencies of the IPV10 may deviate by 2 5 from the values listed above RING CADENCES 1...

Отзывы: