background image


38


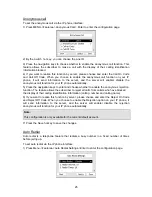
3) Press View hot key to open and read the specific message. 

To reply the SMS via Phone interface: 

1) After retrieving the specific message, press Reply hot key, use the 2aB hot key to change 
the Input Method. 


2) (Optional) If multiple lines are configured on your phone, select from which line 

messages are to be retrieved from the list using the navigation keys and Messages appear 
first to last in sent order. 

3) Press Send hot key, you are required to choose an account which is used to send out the 
message and the number you want to send to. 

4) Press Send hot key to send out the message, or Back hot key to return to the previous 
menu. 

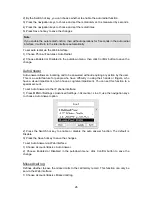
To edit a new message via the Phone interface: 

1) Press Menu->Messages->Text Message->New Message to enter. Or you can also press 
the Left navigation key directly to enter the New Message interfaces. 

2) Edit the new message, use the 2aB hot key to change the input method. 

3) (Optional) If multiple lines are configured on your phone, select from which line messages 
are to be retrieved from the list using the navigation keys and Messages appear first to last in 
sent order. 

4) Press Send hot key to send out the message, or Back hot key to return to the previous 
menu. 

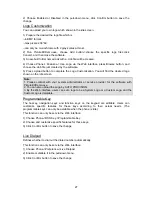
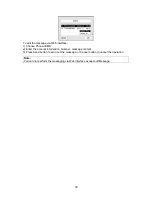
To delete the message via the phone interface: 

1) After retrieving the specific message, press Delete hot key. 

2) You are prompted to confirm the delete operation, press Ok hot key to delete the 
message, or Cancel hot key to return to previous menu. 


Содержание IP116

Страница 1: ......

Страница 2: ...IP TELEPHONE USER GUIDE DECEMBER 2011...

Страница 3: ...II...

Страница 4: ...rves the right to make modifications in product features mentioned in this document for development and improvement purposes without prior notice Individual products may possess characteristics differ...

Страница 5: ...s outlets and connection components that are specific to telephones 5 Do not make any connection other than the extension connection of the KAREL telephone system 6 There is no part that you can repai...

Страница 6: ...V IP116...

Страница 7: ...ec Selection 20 CONTACT MANAGEMENT 20 Edit Add Delete Contact 20 Import Export Contact list 22 Remote Phone Book 23 OTHER SETTINGS 24 Key as Send 24 Hot Line 24 Anonymous call 25 Auto Redial 25 Auto A...

Страница 8: ...eset to Factory 45 Firmware Update 46 Decryption 48 System Log Export 48 PCAP Trace Export 48 802 1X 49 DSS keys Configuration 49 BLF 50 Line 50 Speed Dial 50 Intercom 51 URL Record 51 Xml Browser 52...

Страница 9: ...1 GETTING STARTED PACKING LIST The following components are included in your package Enterprise IP Phone Phone Stand Power Adapter...

Страница 10: ...uded CD Content Check this list before installation to ensure that you have received each item If you are missing any items contact your IP phone reseller ASSEMBLING THE PHONE This section introduce h...

Страница 11: ...the packing list Please contact your distributor for more information 3 Connect Network and Power There are two ways for network and power source connections You can either connect the phone to the A...

Страница 12: ...f not please contact with your internet administrator or service provider for more details Configuring via Web Page Press OK button on the keypad of the phone to enter the status page and find out the...

Страница 13: ...following parameters Field Description Register Status It shows the register status of the phone Account Active You can choose on off to enable disable the account respectively Label It is showed on...

Страница 14: ...iguring via Web Page for the parameter details OVERVIEW KEYPAD INSTRUCTION You can check the following list which introduces the IP phone s keypad in details Power Indication LED It will show the powe...

Страница 15: ...ontrol keys to perform the following actions depending on your phone type Adjust the volume of the handset headset speaker ring tone and signal tone Allows for hands free communication during calls Pr...

Страница 16: ...dy red Some part s is seizing the line Blinking green 300ms Some part s is ring back Blinking red 300ms Some part s is ringing Steady orange Some part s is on the phone Blinking Orange 500ms Some part...

Страница 17: ...ng green There is an incoming call to the monitored account Fast blinking green The monitored account is on an conversation Off It is not active as BLF Table 5 Power Indication LED LED Status Descript...

Страница 18: ...isconnected Account register failed Account registering Account register successful Missed calls Call in Call out Input Method all letters and numbers Input Method numbers Input Method multi lingual l...

Страница 19: ...er interfaces to operate the phone and change settings some however are only possible via a phone or web user interface Please refer to the following table for differences Phone Options Phone UI Web U...

Страница 20: ...ssword SIP Account User Option Account Active Label Display Name Register Name User Name Account Password SIP Server Register Status Server Option Registrar Server Registrar Port Outbound Proxy Server...

Страница 21: ...efer to the relating parts for more details User and Administrator Mode Your phone can be used in user or administrator mode Administrator mode is the default setting with full configuration rights Th...

Страница 22: ...admin choose Status directly to check the status Language The default Phone interface language is English The Web interface language depends on your computer Operation System It will automatically ma...

Страница 23: ...Time and Date via the Phone interface 1 Press MENU Settings Basic Settings Time Date 2 If SNTP Settings is chosen the phone will automatically get the time from the specific NTP Server Use the naviga...

Страница 24: ...ht Saving Time Settings via the Web interface 1 Choose Phone Preference Daylight Saving Time to do the relating changes 2 Choose Enable option then you can set the Daylight Saving Time automatically 3...

Страница 25: ...e Switch hot key to highlight the one you want to lock 4 Press Save hot key to active the change or Back hot key to return to the previous screen 5 The icon will be displayed on the top right corner o...

Страница 26: ...me 3 Press OK hot key to save the contrast change or Back hot key to cancel To adjust the volume when you are in an active call When Handset Headset Hands free mode is activated press the Volume Adjus...

Страница 27: ...3 Press OK hot key to save the contrast change or Back hot key to cancel You can also adjust the ring tone volume by the following way When the phone is in idle status press the volume adjustment bar...

Страница 28: ...Please contact your System Administrator for more details about the codecs To enable disable the codecs 1 Choose Account Codecs 2 Use the navigation keys to highlight the desired one in the Enabled D...

Страница 29: ...face 1 Press Directory Contacts Enter 2 Use the navigation key to highlight the one you want to delete press Option hot key and scroll to Detail Delete press OK hot key 3 Make the desired changes pres...

Страница 30: ...to confirm the change or press Cancel hot key to return to the Directory interface 3 You can check the blacklist by pressing Directory Blacklist Enter to enter the configuration interface to do the d...

Страница 31: ...ill check and download the latest information released on the server in time and display on the terminal for the user To set the Remote Phone Book via Web interface 1 Choose Contacts Remote Phone Book...

Страница 32: ...ight the specific one in the pull down menu then click confirm button to save the change Hot Line To set the hot line number via the IP phone interface 1 Press MENU Features Hot Line Enter to enter th...

Страница 33: ...n keys to enter and choose whether to enable the anonymous rejection function The feature allows the subscriber to reject all calls from callers who have blocked the display of their calling identific...

Страница 34: ...d without requiring any action by the user This is a useful feature for people who have difficulty in using their hands or fingers who have a visual impairment or who have a cognitive impairment You c...

Страница 35: ...t with your system administrator or service provider for the software with PictureEXDemo exe 2 You can also upload the Logo by AUTO PROVISION 3 By the Web interface users can set a logo to be a System...

Страница 36: ...or the country area code if you want to set the dial plan 2 For the ID of the hidden page please consult your system administrator Dial Now Dial now enables you to define the specific length of any nu...

Страница 37: ...IP phone 1 Choose Phone Dial Plan Block Out 2 Enter the phone number and click Add button to save the changes or choose the specific one in the list click Del button to delete the record 3 You can se...

Страница 38: ...ct hot key to confirm 3 Press the six line keys on the keypad to active the chosen account Then 1 Dial the number you want to call or 2 Press the Directory hot key use the navigation button to highlig...

Страница 39: ...ll prompt to display Incoming Call xxx Press Answer hot key to answer the call or Reject hot key to refuse it During the conversation you can alternate between Headset Handset and Speaker mode by pres...

Страница 40: ...usy No Answer Incoming calls are forwarded when the phone is not answered after a specific period To configure Forward option via phone interface 1 Press the following hot keys Menu Features Enter Cal...

Страница 41: ...age 2 Intercom Allow To set whether to answer the incoming intercom calls 3 Intercom Mute To set whether to mute the incoming intercom calls automatically 4 Intercom Tone To set whether to play ring t...

Страница 42: ...t play a melody or message to the other party while waiting Other calls can be received and made while having a call on hold To hold retrieve a call 1 Press the HOLD button or Hold hot key to put your...

Страница 43: ...ion A press TRAN Button or Transfer hot key to put B on hold then A can dial the third telephone number C or press Directory soft key to enter the contact list then choose a record and press the Trans...

Страница 44: ...u will hear a dial tone Dial the number to conference in or press Directory soft key to enter the contact list then choose a contact to conference in then press the Send hot key 3 When the call is ans...

Страница 45: ...e the new voicemail via the Phone interface 1 Press the Voicemail hot key directly 2 You may be prompted to enter the password which is needed to connect to your VoIP telephony system It depends on yo...

Страница 46: ...he previous menu To edit a new message via the Phone interface 1 Press Menu Messages Text Message New Message to enter Or you can also press the Left navigation key directly to enter the New Message i...

Страница 47: ...ce 1 Choose Phone SMS 2 Enter the account information Number message content 3 Press Send button to send out the message or Cancel button to cancel the operation Note You can not perform the messaging...

Страница 48: ...e parameter allows you configuring the proxy to send responses back to a particular address and port The default is disabled SIP Session Timer This document defines an extension to the Session Initiat...

Страница 49: ...e mode then the two Fast Ethernet ports will be transparent As Router If you select the Router mode the SIP phone will work as a router IP address User could configure the PC port IP address Enable DH...

Страница 50: ...ield about the VLAN Setting Field Name Description QoS When the network capacity is insufficient QoS could provide priority to users by setting the value Local RTP Port Define the port for voice trans...

Страница 51: ...ettings 2 Enter the password required scroll to Network option press Enter hot key select Webserver Type option then press Enter hot key again 3 Press the navigation keys or Switch hot key to choose t...

Страница 52: ...dmin in sequence To change the administrator password via Phone interface 1 Press the Menu hot key scroll to Settings press Enter hot key use the navigation keys to highlight Advance Settings 2 You ar...

Страница 53: ...vice To reset to factory via phone interface 1 Press the hot keys Menu scroll to Settings press Enter hot key use the navigation keys to highlight Advance Settings 2 You are prompted to enter the requ...

Страница 54: ...e updating the phone s firmware please contact your system administrator You can only update the firmware via Web interface To update the firmware manually via Web interface 1 Choose Upgrade Basic Bro...

Страница 55: ...ymore The procedure can be only conducted in Administrator Mode 2 If the updating is failed you can re plug the power adaptor and press the Speakerkey for 3 seconds the IP phone will enter the account...

Страница 56: ...k your system administrator for the decrypt password Set AES Key via phone interface 1 Go to MENU Settings Advanced Settings Set AES Key 2 Enter the Common AES and the MAC oriented option 3 Press the...

Страница 57: ...P This IP phone can support 802 1X For the details please consult your system administrator DSS keys Configuration The phone has 10 DSS keys which are able to set up to 27 functions per key The follow...

Страница 58: ...e incoming call on 212 Line You can set these keys as line keys to active up to the three user accounts To assign the key as Line Choose Phone DSS Key Memoru or Line Key choose one of the link key you...

Страница 59: ...pability 1 The URL Record function can only be active when there is only one call under the conversation When you are on a conversation pressing the DSS key to start the recording process 2 Enable the...

Страница 60: ...uests to a web server To assign the key as URL 1 Choose Phone DSS Key Memory Key choose one of the keys you want to make the assignment there is a pull down menu in the Type field and choose URL from...

Страница 61: ...en in the Mode field open the pull down menu and choose Forward from the list 2 Enter the extension number you want to forward to in the Extension field 3 Press Confirm button to save the changes Tran...

Страница 62: ...ose Phone DSS Key Memory or Line Key choose one of the key you want to make the assignment there is a pull down menu in the Type field choose KeyEvent from the list then in the Mode field open the pul...

Страница 63: ...et back to the previous mode by pressing the key again If the current mode is handset or headset users can press the speaker button to open or close the group listening function To assign the key as G...

Страница 64: ...enu in the Type field choose KeyEvent from the list then in the Mode field open the pull down menu and choose Public Hold from the list 2 Press Confirm button to save the changes Private Hold The key...

Страница 65: ...S Key Memory Key or Line Key choose one of the keys you want to make the assignment there is a pull down menu in the Type field choose KeyEvent from the list then in the Mode field open the pull down...

Страница 66: ...s 2 Enter the frequency and time period in ms as the following format Frequency Time Period for example 400 200 3 Press Confirm button to save the changes Cancel to cancel the changes Note 1 Please co...

Страница 67: ...Text To set group name For example family 3 Internal Ringer File To choose a special ring tone for the group 4 Click the Confirm button to save the changes TROUBLE SHOOTING I can not register to the s...

Страница 68: ...key to answer the incoming call How to refuse incoming calls during a call You can turn off the function of call waiting and then our phone will refuse all the incoming calls when you are in a convers...

Страница 69: ......
Отзывы: