

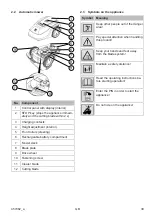


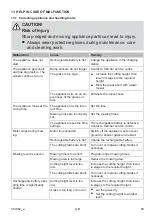


457462_a
51
GB
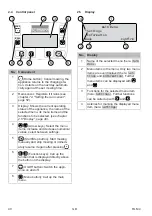
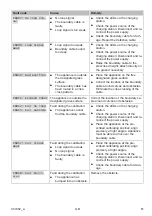
Starting the calibration movement
1.
Check that there are no obstacles in the ex-
pected movement area of the appliance. The
appliance must be able to move over the
boundary cable with both front wheels. Re-
move any obstacles if necessary.
2. Start the appliance with
START
STOP
. The following is
shown on the display:
■
! Caution ! Starting Motors
■
Calibration , Phase [1]
During the calibration movement
To determine the signal strength inside the
boundary cable, the appliance first moves twice
straight beyond the boundary cable and then into
the charging station and comes to a stop there.
■
The
Calibration completed
message is
shown on the display.
■
The rechargeable battery is being charged.
NOTE
The appliance must come to a stop
when it moves into the charging station.
If the appliance does not touch the con-
tacts when it moves into the charging
station, it moves further along the
boundary cable. If the appliance moves
through the charging station, the calibra-
tion procedure has failed. In this case,
the charging station must be better
aligned and the calibration procedure re-
peated.
After the calibration movement
The preset current mowing duration is displayed.
For all further settings, refer to see
chapter 7
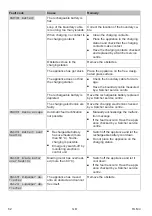
6
OPERATION
6.1
Starting the appliance manually
1.
Switch on the appliance with
ON
OFF
.
For unscheduled edge mowing: see
chapter
7.6 "Edge mowing with a manual start",
page 53
.
2.
Start the appliance manually with
START
STOP
.
6.2
Cancelling mowing
■
Press
on the appliance.
The appliance moves automatically into the
charging station. It deletes the mowing plan
of the current day and starts again the next
day for the set time.
■
Press
START
STOP
on the appliance.
The mowing is interrupted for half an hour.
■
Press
ON
OFF
on the appliance.
The appliance is switched off.
NOTE
In dangerous situations, the appliance
can be stopped with the STOP but-
ton (08/2).
6.3
Mowing the secondary area (01/NF)
1.
Lift the appliance and place in the secondary
area by hand.
2.
Switch on the appliance with
ON
OFF
.
3.
Call up the main menu with
.
4.
or
* Settings
5.
or
* Sub zone mowing
6.
Select the mowing time with
or
.
7.
Start the appliance manually with
START
STOP
.
Depending on the setting: The appliance mows
for the set time period and then switches off or
mows until the rechargeable battery is flat.
After mowing the secondary area, place the ap-
pliance in the charging station again by hand.
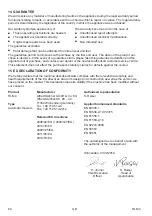
7
SETTINGS
7.1
Calling up the setting – General
1.
Call up the main menu with
.
Note:
The asterisk * in front of the menu item
indicates that it has just been selected.
2.
or
* Settings
3.
Select the required menu item with
or
and accept with
.
4.
Make the settings.
Note:
The menu items are described in the
following sections.
5.
Return to the main menu with
.
Содержание RLM 4
Страница 427: ...457462_a 427 RU 1 1 1...
Страница 432: ...432 RLM 4 RU 2 7 5 3 3 1 2 7 4 6 5 8 1 2 3 4 5 6 7 8 8 2 8 100 45 C K rcher K rcher 3 30 11 2 449 K rcher...
Страница 433: ...457462_a 433 RU 2 9 0 3 3 1 CE 500 2 45 24 45 24 0 45 C 0 55 C 3 2...
Страница 434: ...434 RLM 4 RU 3 3 3 3 1 PIN PUK PIN PIN PIN 3 PUK 24 PIN PUK PIN PUK 3 3 2...
Страница 435: ...457462_a 435 RU 24 45 EGMF 3 4 3 4 1 16 3 4 2...
Страница 436: ...436 RLM 4 RU 3 4 3 3 4 4...
Страница 437: ...457462_a 437 RU 3 4 5 4 4 1 1 2 K rcher 3 2 1 428 4 2 01 01 1 01 01 h n 01 01 HF 01 NF 01 X0 01 X3 4 3 1 2...
Страница 447: ...457462_a 447 RU 9 1 1 ON OFF 2 3 4 9 3 448 1 2 9 2 1 2 K rcher K rcher 1 2 K rcher 1 1 2 K rcher...
Страница 448: ...448 RLM 4 RU 9 3 K rcher 1 ON OFF 2 3 4 5 180 6 180 K rcher 10 1 START STOP 2 ON OFF 3...
Страница 449: ...457462_a 449 RU 11 11 1 30 1 5 1 08 441 2 9 1 447 3 11 2 1 2 3 4 1 2 3 4 08 4 5 11 3 1 12...
Страница 450: ...450 RLM 4 RU 2012 19 EC Hg Cd Pb Hg 0 0005 Cd 0 002 Pb 0 004 2006 66 EC 1 2 3 1 1 2 2 3 3 4...
Страница 451: ...457462_a 451 RU 13 13 1 K rcher K rcher...
Страница 452: ...452 RLM 4 RU K rcher K rcher K rcher K rcher 13 2 CN001 Tilt sensor CN002 Lift sensor...
Страница 459: ...457462_a 459 UA 1 1 1...
Страница 464: ...464 RLM 4 UA 2 7 5 3 3 1 2 7 4 6 5 8 1 2 3 4 5 6 7 8 8 2 8 100 45 C K rcher K rcher 3 30 p 11 2 480 K rcher 2 9...
Страница 465: ...457462_a 465 UA 0 3 3 1 CE 500 2 45 24 45 24 0 45 C 0 55 C 3 2 3 3 3 3 1 PIN PUK PIN PIN PIN 3 PUK...
Страница 466: ...466 RLM 4 UA 24 PIN PUK PIN PUK 3 3 2 24 45 EGMF...
Страница 467: ...457462_a 467 UA 3 4 3 4 1 16 3 4 2 3 4 3 3 4 4...
Страница 468: ...468 RLM 4 UA 3 4 5 4 4 1 1 2 K rcher 3 p 2 1 460 4 2 01 01 1 01 01 h n 01 01 HF 01 NF...
Страница 478: ...478 RLM 4 UA 9 1 1 ON OFF 2 3 4 p 9 3 479 1 2 9 2 1 2 K rcher K rcher 1 2 K rcher 1 1 2 K rcher...
Страница 480: ...480 RLM 4 UA 11 2 1 2 3 4 1 2 3 4 08 4 5 11 3 1 12 ElektroG 2012 19 C...
Страница 481: ...457462_a 481 UA BattG Hg Cd Pb Hg 0 0005 Cd 0 002 Pb 0 004 2006 66 C 1 2 3 1 1 2 2 3 3 4...
Страница 482: ...482 RLM 4 UA 13 13 1 K rcher K rcher...
Страница 483: ...457462_a 483 UA K rcher K rcher K rcher K rcher 13 2 CN001 Tilt sensor CN002 Lift sensor CN005 Bumper deflected...
Страница 488: ...https www kaercher com dealersearch...


