– 2
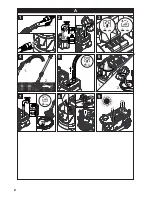
Illustration
1 Connect spray/suction hose to the el-
bow,
Connect spray/suction hose to the ap-
pliance
2 Prepare cleaning solution,
Fill up the fresh water tank
3 Select operating mode
4 Cleaning
5 Empty the fresh water tank
6 Empty wastewater container
7 Fill fresh water tank (without detergent),
Flush appliance
8 Clean lint trap,
Clean fresh water sieve
9 Allow appliance to dry
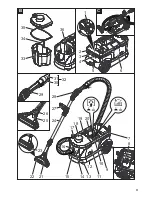
Illustration
1 Hand nozzle for upholstery cleaning
(Puzzi 10/1 only)
2 Cable hook
3 Adapter for accessories (homebase)
4 Holder for accessories
5 Power cord
6 Quick start instructions
7 Fresh water tank
8 Fresh water sieve
9 Switch for spraying
10 Switch for vacuuming
11 Casing
12 Nameplate
13 Steering roller
14 Spray hose connection
15 Socket for additional brush washing
head PW 30/1 (Puzzi 10/2 Adv only)
16 Suction hose connection
17 Container for defoaming agent (Puzzi
10/2 Adv only)
18 Cover
19 Storage compartment for detergent
tabs (Puzzi 10/2 Adv only)
20 Carrying handle of the appliance
21 Floor nozzle for carpet cleaning
22 Carpet adapter
23 Unlocking device of the floor nozzle
24 Suction pipe
25 Nozzle mouth piece
26 Union joint
27 Handle
28 Bender
29 Lever on the manifold
30 Spray hose
31 Suction hose
32 Spray/suction hose
33 Dirt water reservoir, detachable
34 Carrying handle of the wastewater con-
tainer
35 Seal on the lid
36 Fluff filter
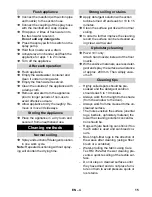
Check high power cable, extension ca-
bles and hoses for damage every time
before use.
Attach the suction pipe to the floor noz-
zle and hand-tighten the union nut on
the floor nozzle.
If required, slide the handle onto the
suction pipe and hand-tighten it in the
desired position.
Place the elbow over the suction pipe
and tighten the union joint on the elbow
fingertight.
Insert the suction hose into the suction
hose connection on the appliance.
Attach the coupling of the spray hose to
the spray hose connection of the appli-
ance and snap in place.
Connect the suction hose to the elbow.
Connect the coupling of the spray hose
with the manifold and snap in place.
몇
Warning
Health risk, risk of damage. Observe all in-
dications on the detergent used.
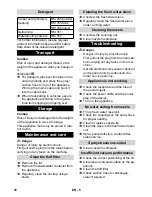
Mix fresh water and detergent in a clean
container (use the concentration rec-
ommended for the detergent).
Dissolve detergent in the water.
Overview
Quick start instructions
Device elements
Start up
Attaching the Accessories
Prepare cleaning solution
13
EN
Содержание Puzzi 10/1
Страница 2: ...1 2 3 4 5 7 1 2 CHEM MAX 50 C MAX 6 8 9 CHEM MAX 2L 1 2 A 2...
Страница 89: ...3 50 C MAX Puzzi 10 1 Puzzi 10 2 Adv Puzzi 10 2 Adv PW 30 1 Puzzi 10 2 89 EL...
Страница 90: ...4 2 1 2 10 15 90 EL...
Страница 91: ...5 Puzzi 10 1 200 mm 5 10 Care Tex RM 762 RM 760 RM 760 RM 764 RM 761 RM 762 91 EL...
Страница 92: ...6 www kaercher com 92 EL...
Страница 104: ...3 50 C MAX Puzzi 10 1 Puzzi 10 2 Adv Puzzi 10 2 Adv PW 30 1 Puzzi 10 2 Adv 104 RU...
Страница 105: ...4 2 1 2 105 RU...
Страница 106: ...5 10 15 Puzzi 10 1 200 5 10 Care Tex RM 762 RM 760 RM 760 RM 764 RM 761 RM 762 106 RU...
Страница 107: ...6 107 RU...
Страница 108: ...7 www kaercher com Service 30190 3 0 1 9 0 30190 09 2 013 108 RU...
Страница 174: ...3 50 C MAX Puzzi 10 1 Puzzi 10 2 Adv Puzzi 10 2 Adv PW 30 1 Puzzi 10 2 Adv 174 BG...
Страница 175: ...4 2 1 2 10 15 175 BG...
Страница 176: ...5 Puzzi 10 1 200 mm 5 10 Care Tex RM 762 RM 760 RM 760 RM 764 RM 761 RM 762 T o 176 BG...
Страница 177: ...6 www kaercher com 177 BG...
Страница 203: ...3 50 C MAX Puzzi 10 1 Puzzi 10 2 Adv Puzzi 10 2 Adv PW 30 1 Puzzi 10 2 Adv 203 UK...
Страница 204: ...4 2 1 2 204 UK...
Страница 205: ...5 10 15 Puzzi 10 1 200 5 10 Care Tex RM 762 RM 760 RM 760 RM 764 RM 761 RM 762 205 UK...
Страница 206: ...6 206 UK...
Страница 207: ...7 www kaercher com 207 UK...
Страница 212: ...Puzzi 10 1 212...
Страница 213: ...Puzzi 10 1 213...
Страница 214: ...Puzzi 10 2 Adv 214...
Страница 215: ...Puzzi 10 2 Adv 215...
Страница 216: ...http www kaercher com dealersearch...


