


– 7
The battery pack is equipped with a display that pro-
vides continuous information on the charging state, the
progress of charging and the remaining battery life. In
addition, any error messages occurring will also be
shown.
Depending on the device used, the display rotates when
the battery pack is inserted.
Note
To ensure that the charge level indicator works correct-
ly, the battery pack must be discharged during initial use
until the device is switched off.
Note
New battery packs are only pre-charged and must be
completely charged prior to the initial use.
The display is activated during the first charging pro-
cess.
몇
CAUTION
Risk of injury, risk of damage due to exploding battery!
Only charge the battery packs with the appropriate
charger.
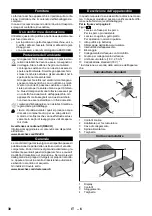
Illustration
Push the battery pack into the battery adapter of
the charger.
Plug the plug-in power supply into the socket.
–
The charging process begins automatically.
–
The display shows the remaining charging time of
the battery pack in minutes during the charging pro-
cess.
–
The charging process ends once the battery pack
display reads 100%.
Note
If the display does not show anything when the battery
pack is in the charger, the battery capacity is fully de-
pleted or very low. As soon as the battery pack has
been sufficiently charged, the display shows the re-
maining charging time.
If the display does not show anything even after a
long period of time, the battery pack is defective
and must be replaced.
Remove the battery adapter from the battery pack
after charging.
Pull the plug-in power supply from the socket.
Note
New battery packs reach their full capacity after approx.
5 charging and discharging cycles.
Charge batteries that have not been used for a long time
before use.
The performance of the battery pack is reduced at tem-
peratures below 0°C.
The capacity of the battery pack may be reduced if
stored at temperatures over 20°C.
몇
CAUTION
Risk of personal injury or damage! Ensure that the bat-
tery pack properly snaps into place.
Illustration
Insert the battery pack into the intake of the device.
Illustration
Insert the desired spray lance and lock it by turning
it 90°.
For connection values, see type plate/technical data.
Observe regulations of water supplier.
Illustration
Screw the coupling element to the water connec-
tion on the appliance.
Use a 1/2 inch water hose (not included in the
scope of delivery) with a commercially available
coupling.
Attach the water supply hose to the coupling on the
water connection.
Connect the water supply hose to the water supply.
Completely open the water tap.
Display
Display
Meaning
Battery in storage
Charging state of the battery
pack while not in use.
Battery in use
Remaining battery life of the
battery pack while in use.
Battery charging
Remaining charging time of the
battery pack during charging.
Battery pack fully charged.
Error display
Battery pack temperature out-
side the permitted values or
disabled due to short-circuit
(see Help in case of malfunc-
tions).
Battery pack defective and dis-
abled for safety. Do not use the
battery pack anymore and dis-
pose of it properly.
Start up
Charging the battery pack
Inserting the battery pack
Attaching the spray lance
Water supply
15
EN
Содержание KHB 5 Battery
Страница 2: ...2...
Страница 91: ...3 EL 3 EL 6 EL 6 EL 6 EL 6 EL 7 EL 8 EL 8 EL 9 EL 9 EL 9 EL 9 EL 10 EL 11 E EL 11 91 EL...
Страница 92: ...4 EN 12729 BA 0 C 92 EL...
Страница 93: ...5 Karcher 93 EL...
Страница 94: ...6 K RCHER REACH www kaercher com REACH www kaercher com dealersearch 1 II 94 EL...
Страница 95: ...7 2 1 2 3 4 5 6 7 8 9 18 V 2 5 Ah 10 18 V 1 2 3 4 5 1 2 3 4 95 EL...
Страница 96: ...8 100 5 0 C 20 C 90 1 2 2 2 Karcher 96 EL...
Страница 97: ...9 20 C Display 97 EL...
Страница 98: ...10 www kaercher com 18 V 36 V www kaercher com 30 0 70 21 98 EL...
Страница 108: ...3 RU 3 RU 6 RU 6 RU 6 RU 6 RU 7 RU 8 RU 8 RU 9 RU 9 RU 9 RU 9 RU 10 RU 11 U RU 11 108 RU...
Страница 109: ...4 EN 12729 BA 109 RU...
Страница 110: ...5 0 C K RCHER 110 RU...
Страница 111: ...6 K RCHER REACH www kaercher com REACH 1 II 111 RU...
Страница 112: ...7 www kaercher com dealersearch 2 1 C 2 3 4 5 6 7 8 C 9 18 2 5 10 18 1 2 3 4 5 1 2 3 4 112 RU...
Страница 113: ...8 100 5 0 C 20 C 90 1 2 2 2 K rcher 113 RU...
Страница 114: ...9 20 C 114 RU...
Страница 115: ...10 www kaercher com 18 36 Handheld www kaercher com 30 0 70 21 115 RU...
Страница 181: ...3 BG 3 BG 6 BG 6 BG 6 BG 6 BG 7 BG 8 BG 8 T o BG 9 BG 9 BG 9 BG 9 BG 10 BG 11 EC BG 11 181 BG...
Страница 182: ...4 EN 12729 BA 0 C 182 BG...
Страница 183: ...5 K RCHER 183 BG...
Страница 184: ...6 K RCHER REACH www kaercher com REACH www kaercher com dealersearch 1 II 184 BG...
Страница 185: ...7 2 1 2 3 4 5 6 7 8 9 18 V 2 5 Ah 10 18 V 1 2 3 4 5 1 2 3 4 185 BG...
Страница 186: ...8 100 5 0 C 20 C 90 1 2 2 2 K rcher 186 BG...
Страница 187: ...9 20 C T o 187 BG...
Страница 188: ...10 www kaercher com 18 V 36 V Handheld www kaercher com 30 0 70 21 188 BG...
Страница 214: ...3 UK 3 UK 6 UK 6 UK 6 UK 6 UK 7 UK 8 UK 8 UK 9 UK 9 UK 9 UK 9 UK 10 UK 11 UK 11 214 UK...
Страница 215: ...4 EN 12729 BA 0 C 215 UK...
Страница 216: ...5 K RCHER 216 UK...
Страница 217: ...6 K RCHER REACH www kaercher com REACH www kaercher com dealersearch 1 II 217 UK...
Страница 218: ...7 2 1 2 3 4 5 6 7 8 9 18 2 5 10 18 1 2 3 4 5 1 2 3 4 218 UK...
Страница 219: ...8 100 5 0 C 20 C 90 1 2 2 2 K rcher 219 UK...
Страница 220: ...9 20 C 220 UK...
Страница 221: ...10 www kaercher com 18 36 Handheld www kaercher com 30 0 70 21 221 UK...
Страница 223: ......


