Kärcher FC 3 Cordless Скачать руководство пользователя страница 5

English

 5

Store the device indoors in a cool,
dry place.

Only carry the device by the carry-
ing handle.

The device must not be used for the
intake of sharp or large objects (e.g.
shards, pebbles, toy parts).

Do not use the device for cleaning
of carpets or carpeted floors.

Do not use the device over the floor
vents of convector heaters. The de-
vice is not able to take in the water
discharged when used above
vents.

Do not overfill the tank. Do not ex-
ceed the maximum filling level.

Only switch on the device when the
fresh water tank and waste water
tank are fitted.

Do not let the device operate in the
same spot too long, as this may
damage the floor.

DANGER

Pointer to immediate danger, which 
leads to severe injuries or death.

WARNING

Pointer to a possibly dangerous situa-
tion, which can lead to severe injuries
or death.

CAUTION

Pointer to a possibly dangerous situa-
tion, which can lead to minor injuries.

ATTENTION

Pointer to a possibly dangerous situa-
tion, which can lead to property dam-
age.

Appliance type:

1.055-305.0

Use the following adaptor:

PROP 65 WARNING

This product may contain one 

or more chemicals known to 

the state of California to cause 

cancer and birth defects or oth-

er reproductive harm.

Wash hands after handling.

SAVE THESE 

INSTRUCTIONS

Safety Alert Symbols

Symbols on the machine

DANGER

The device contains electrical compo-
nents and must therefore never be 
held under running water or immersed 
in a container containing water - even 
for cleaning the device.
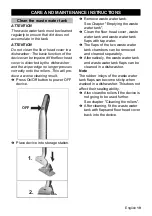
ATTENTION

Please adhere to the following 
procedure for filling the fresh 
water tank during cleaning 
work: 

1.

First empty the waste water 
tank.

2.

Then fill the fresh water tank.

PS02

Содержание FC 3 Cordless

Страница 1: ...FC 3 Cordless FC 3 Cordless Premium OPERATOR MANUAL Floor Cleaner 2 MANUAL DE USUARIO Limpiador de piso 27 MANUEL D UTILISATION Nettoyant pour sols 52 59688440 2020 01...

Страница 2: ...ANUAL 2 IMPORTANT SAFETY INSTRUCTIONS 3 READ ALL INSTRUCTIONS BEFORE USING THIS APPLIANCE 3 SAVE THESE INSTRUCTIONS 5 MODEL OVERVIEW 8 ASSEMBLY INSTRUCTIONS 9 OPERATING INSTRUCTIONS 10 CARE AND MAINTE...

Страница 3: ...cord around sharp edges or corners Do not run appliance over battery charger out put cord Keep battery charger out put cord away from heated surfac es Repairs must only be performed by an authorized...

Страница 4: ...temperatures outside of the speci fied range may demage the battery and increase the risk of fire Store and use the charger in dry rooms only Do not expose a battery pack or ap pliance to fire or exce...

Страница 5: ...ING Pointer to a possibly dangerous situa tion which can lead to severe injuries or death CAUTION Pointer to a possibly dangerous situa tion which can lead to minor injuries ATTENTION Pointer to a pos...

Страница 6: ...ed with the operator in the opera tor s native language by the purchaser owner making sure that the operator comprehends its contents Owner and or user must study and maintain for future reference the...

Страница 7: ...rating time with full charge up to 20 min Charging time for emp ty battery 4 h Charger initial voltage 9 5 V Output current charger 0 6 A Performance data Roller revolutions per minute 500 rpm Filling...

Страница 8: ...essed grip 6 Charging socket 7 Waste water tank 8 Recessed grip cleaning roller 9 Cleaning rollers 10 Floor head cover 11 Floor head cover lock 12 Battery indicator 13 Charger with charging cable 14 S...

Страница 9: ...o ensure that the power ca ble lies fully in the guide rail before fit ting the handle bar Insert handle into the basic unit as far as it goes until you hear it click The handle must sit snugly into t...

Страница 10: ...uch as untreated cork floors moisture ingress is possible which may damage the floor Clean the floor by moving the appli ance back and forth at a similar speed as if you were vacuum clean ing If the f...

Страница 11: ...ower outlet The LED indicator lights display the battery s current charging state All 3 LED indicator lights flash from bottom to top when charging a com pletely empty battery The lowermost LED lights...

Страница 12: ...ng socket ATTENTION Store device in storage station when not in use A lack of stability can cause device to tip over leaking fluid and causing floor damage Store device in storage station when not in...

Страница 13: ...t exceed MAX fill line 2 K RCHER detergents can be add ed to fresh water tank as required See chapter Using detergents Close tank lock Insert the fresh water container into the device The fresh water...

Страница 14: ...h sever al times until the rollers are suffi ciently moistened 3 LEDs illuminated 3 3 battery run time full run time 2 LEDs illuminated 2 3 battery run time 1 LEDs illuminated 1 3 battery run time The...

Страница 15: ...flaps over the two waste water tank chambers Empty the waste water tank Clean the floor head cover and waste water tank with tap water de pending on the degree of soiling The flaps of the two waste wa...

Страница 16: ...lease the latch The waste water tank and floor head cover must sit firmly in and on the device ATTENTION Store device in storage station when not in use A lack of stability can cause device to tip ove...

Страница 17: ...storage station Empty both fresh and waste water tanks Empty waste water tank See Chapter Emptying waste wa ter tank Clean the waste water tank floor head cover and cleaning rollers See chapter Clean...

Страница 18: ...rollers to dry in the air e g on the parking station do not place wet rollers in closed cupboards to dry Move device using the handle and store in the storage station Place the wet rollers on the sto...

Страница 19: ...Emptying the waste water tank Clean the floor head cover waste water tank and waste water tank flaps with tap water The flaps of the two waste water tank chambers can be removed and cleaned separatel...

Страница 20: ...This will pro duce a worse cleaning result Press On Off button to power OFF device Place device into storage station 1 Actuate the floor head cover latch 2 Remove the floor head cover Rinse off the fl...

Страница 21: ...the cleaning rollers from the recessed grip Clean the cleaning rollers under running water or Wash rollers in washing machine up to 140 F 60 C ATTENTION Do not use any soft detergents when cleaning i...

Страница 22: ...of non approved detergents can damage the appliance and will void the warranty Note Add K RCHER detergent as required When dosing detergent follow the manufacturer s instructions To prevent foaming f...

Страница 23: ...e too hot during use e g when operating in high ambient temperatures Take a break and let the device cool down If the device also switches off Take a break and let the device cool down The device can...

Страница 24: ...is normal and does not impair functionality Further meas ures are only necessary when there is excessive foam formation e g streaks of foam on the floor Incorrect detergent or incorrect dosage Use on...

Страница 25: ...fit it back in place Floor head cover not installed correctly Check that the floor head cover is correctly seated For this remove the cover and then fit it back in place The rollers are worn out Repla...

Страница 26: ...your local recycling center for information on where to drop off the spent battery RBRC is a reg istered trademark of the Rechargeable Battery Recycling Corporation Note The battery of the appliance...

Страница 27: ...AS INSTRUCCIONES ANTES DE UTILIZAR EL PRODUCTO 28 CONSERVE ESTAS INSTRUCCIONES 30 VISTA GENERAL DEL MODELO 33 INSTRUCCIONES DE MONTAJE 34 INSTRUCCIONES DE FUNCIONAMIENTO 35 INSTRUCCIONES DE CONSERVACI...

Страница 28: ...car gador de bater as no utilice el ca ble de la salida del cargador de ba ter as como asa no deje que el ca ble de la salida del cargador de bater as quede atrapado al cerrar una puerta ni tire del...

Страница 29: ...o modificadas pueden presentar un comporta miento impredecible pudiendo de rivarse de su uso un incendio una explosi n o el riesgo de da os Utilice nicamente el cargador es pecificado por el fabrican...

Страница 30: ...as o piezas de juguetes No utilice este dispositivo para lim piar alfombras o suelos enmoque tados No utilice este dispositivo por enci ma de los orificios de ventilaci n del suelo de calentadores po...

Страница 31: ...ebe prestarse especial atenci n y te ner muy claras las advertencias Si el operador no habla bien el espa ol el propietario comprador debe res ponsabilizarse de leer y comentar las instrucciones y las...

Страница 32: ...0 60Hz Grado de protecci n IPX4 Aparato Clase de protecci n III Clase de protecci n del cargador II Potencia nominal del aparato 40 W rea de tensi n de la ba ter a 7 2 V Tipo de bater a Iones de litio...

Страница 33: ...ga 7 Dep sito de agua sucia 8 Ranura de rodillo de limpieza 9 Rodillos de limpieza 10 Cubierta del cabezal para limpieza de suelos 11 Bloqueo de la cubierta del cabezal para limpieza de suelos 12 Indi...

Страница 34: ...e el cable de corriente est continuamente en el riel gu a antes de montar la pro longaci n del asa Introduzca la empu adura en la unidad b sica hasta que escuche un clic El asidero debe estar firmemen...

Страница 35: ...delante y hacia atr s a una velocidad semejan te a la utilizada durante la aspiraci n En caso de un alto nivel de sucie dad deslizar el equipo lentamente sobre el suelo No es necesario ejercer presi n...

Страница 36: ...control LED mues tran el estado de carga actual de la bater a Al cargar la bater a completamente descargada parpadean los 3 pilo tos de control LED sucesivamente de abajo a arriba Cuando se alcanza 1...

Страница 37: ...enamiento cuando no lo est uti lizando De no colocarse en una super ficie estable el dispositivo podr a vol carse y derramar el l quido lo que es tropear a el suelo Guarde el dispositivo en la estaci...

Страница 38: ...n el dep sito de agua limpia se pueden a adir detergentes K R CHER en funci n de las necesida des Consulte el cap tulo Uso de deter gentes Cerrar la tapa del dep sito Colocar el dep sito de agua limpi...

Страница 39: ...sta que los rodillos est n suficiente mente h medos 3 LED encendidos 3 3 capacidad de carga de las acumuladores tiempo de marcha completo 2 LED encendidos 2 3 capacidad de carga de las acumuladores 1...

Страница 40: ...las chapaletas sobre las dos c maras del dep sito de agua su cia Vaciado del dep sito de agua su cia En funci n del grado de suciedad limpiar la cubierta del cabezal para limpieza de suelos y el dep s...

Страница 41: ...ccionar el bloqueo de la cubierta del cabezal para limpieza de suelos y colocar la cubierta en el cabezal para limpieza de suelos A conti nuaci n soltar el bloqueo El dep sito de agua sucia y la cu bi...

Страница 42: ...el l quido lo que es tropear a el suelo Presione el bot n on off para apa gar el dispositivo Coloque el dispositivo en la esta ci n de almacenamiento CUIDADO Tras finalizar los trabajos limpiar el equ...

Страница 43: ...cap tulo Limpieza de los rodillos CUIDADO Para evitar malos olores vac e y acla re los dep sitos de agua limpia y de agua sucia antes de almacenar el dis positivo Dejar secar al aire los rodillos moj...

Страница 44: ...bierta del cabezal para limpieza de suelos el dep sito de agua sucia y las chapaletas del de p sito de agua sucia con agua del grifo Las chapaletas de ambas c maras del dep sito de agua sucia pueden r...

Страница 45: ...ff para apa gar el dispositivo Coloque el dispositivo en la esta ci n de almacenamiento 1 Accionar el bloqueo de la cubierta del cabezal para limpieza de sue los 2 Retirar la cubierta del cabezal para...

Страница 46: ...o efecto de limpieza Los rodillos de limpieza no pueden me terse en la secadora Despu s de la limpieza introducir los rodillos en la estaci n de parada y dejarlos secar al aire Es posible minimizar el...

Страница 47: ...ilizaci n de una fuente de alimen taci n err nea o defectuosa Utilizar la fuente de alimentaci n original sustituir la fuente de ali mentaci n defectuosa Los tres LED se iluminan sucesiva mente en cic...

Страница 48: ...rectamente Para ello retirar la cubierta y volverla a colocar Nota La formaci n leve de espuma en el ca bezal para limpieza de suelos durante el servicio es normal y no perjudica al funcionamiento Sol...

Страница 49: ...nan los restos de detergente del suelo Los rodillos se bloquean Retirar los rodillos y comprobar si se ha atascado en los rodillos alg n objeto Comprobar si los rodillos est n gi rados hasta el tope e...

Страница 50: ...empu adura del dispo sitivo una vez se encuentre montada La empu adura solo se podr extraer en caso de que se vaya a enviar para realizar tareas de mantenimiento Introduzca un destornillador en un ng...

Страница 51: ...je lo cal para informarse de los lugares en los que puede entregar la bater a gas tada RBRC es una marca registra da de la Corporaci n de Reciclaje de Bater as Reciclables Nota La bater a del equipo n...

Страница 52: ...S CURIT IMPORTANTES 53 LIRE TOUTES LES INSTRUCTIONS AVANT D UTILISER LE PRODUIT 53 CONSERVER CES CONSIGNES 55 G N RALIT S 58 INSTRUCTIONS DE MONTAGE 59 MODE D EMPLOI 60 INSTRUCTIONS D ENTRETIEN ET DE...

Страница 53: ...tacter notre groupe de service la client le en composant le 1 800 537 4129 S lectionnez les instructions pour les services de garantie Ne pas tirer ou porter l appareil par le cordon du chargeur batte...

Страница 54: ...s du liquide peut tre projet de l accumulateur viter tout contact En cas de contact accidentel rincer l eau En cas de contact du liquide avec les yeux consulter un m de cin Le liquide projet de l accu...

Страница 55: ...lles ou d autres substances similaires Veiller galement ne pas aspirer ces substances Utiliser l appareil exclusivement sur des sols durs scell s p ex parquet vernis carrelage maill linol um Stocker l...

Страница 56: ...st adapt pour le net toyage du PVC du linol um du carrelage de la pierre du parquet huil et cir du stratifi et de tous les rev tements de sol scell s Toute utilisation sortant du cadre don n est consi...

Страница 57: ...en voyer par courriel un agent du ser vice apr s vente Tous les autres infor mations sont disponibles sous www kaercher com us www kaercher com ca Appeler 01 800 024 13 13 pour obte nir de l aide ou v...

Страница 58: ...argeur 7 R servoir d eau sale 8 Poign e encastr e rouleau de net toyage 9 Rouleaux de nettoyage 10 Cache de la t te de lavage 11 Verrouillage du cache de la t te de lavage 12 Indicateur de batterie 13...

Страница 59: ...imenta tion soit pos en continu dans le rail de guidage avant le montage de la poi gn e Ins rer la poign e assez loin dans l appareil de base jusqu l audition d un clic La barre de la poign e doit tre...

Страница 60: ...et ar ri re de l appareil une vitesse si milaire celle d un aspirateur En cas d encrassement plus impor tant faire glisser lentement l appa reil sur le sol Il n est pas n cessaire d exercer une pressi...

Страница 61: ...iquent l tat de chargement actuel de la batterie Pendant le chargement de la batte rie compl tement d charg e les 3 t moins de contr le LED clignotent successivement de bas en haut Pendant la recharge...

Страница 62: ...l appareil dans la station de rangement lorsqu il n est pas utilis Saisir le r servoir d eau propre par la poign e encastr e et le sortir de l appareil Ouvrir le verrouillage du r servoir et le tourne...

Страница 63: ...Maintenir la poi gn e pour emp cher l appareil d avan cer de lui m me ATTENTION Ne pas utiliser l appareil sans eau S assurer avant le fonctionnement que le r servoir d eau propre est rempli et que le...

Страница 64: ...LED inf rieure clignote plus vite pendant 60 secondes ATTENTION Avant de remplir le r servoir d eau propre vider le bac d eau sale pour viter tout d bordement Voir le chapitre Remplissage du r servoir...

Страница 65: ...mparti ments du bac d eau sale peuvent tre retir s et nettoy s s par ment Remettre les clapets les deux com partiments du bac d eau sale en place et les fermer Placer le bac d eau sale dans la t te de...

Страница 66: ...ppareil Placer l appareil dans la station de rangement ATTENTION Nettoyer l appareil l issue du travail Appuyer sur la touche on off pour COUPER l appareil Placer l appareil dans la station de rangeme...

Страница 67: ...eau douce et le bac d eau sale avant le rangement Laisser s cher les rouleaux humides l air p ex sur la station de parking pour les faire s cher ne pas placer les rouleaux humides dans des armoires fe...

Страница 68: ...e Nettoyer le cache de la t te de la vage le bac d eau sale et les cla pets du bac d eau sale avec de l eau du robinet Les clapets sur les deux comparti ments du bac d eau sale peuvent tre retir s et...

Страница 69: ...nettoyage se d grade Appuyer sur la touche on off pour COUPER l appareil Placer l appareil dans la station de rangement 1 Actionner le verrouillage du cache de la t te de lavage 2 D poser le cache de...

Страница 70: ...la poign e encastr e Nettoyer les rouleaux de nettoyage sous l eau courante ou Laver les rouleaux la machine jus qu 140 F 60 C ATTENTION Ne pas utiliser d adoucisseur en cas de nettoyage dans la mach...

Страница 71: ...peut endommager le dispositif et an nule la garantie Remarque Ajouter des K RCHER d tergents conform ment au besoin Pour doser le d tergent suivre les instructions du fabricant Pour viter la formatio...

Страница 72: ...t toutes les secondes L appareil chauffe trop pendant l application p ex lors d une utili sation des temp ratures am biantes lev es Faire une pause et laisser refroidir l appareil Si l appareil se cou...

Страница 73: ...ssage des sols pendant le fonctionnement est normale et n en gendre aucun dysfonctionnement Des mesures compl mentaires doivent tre prises uniquement en cas de for mation excessive de mousse p ex band...

Страница 74: ...V rifiersile cachedelat tedelavage est bien en place Pour ce faire reti rer le cache et le remettre en place Le cache de la t te de lavage n est pas mont correctement V rifier si le cache de la t te d...

Страница 75: ...us pouvez galement contacter votre centre de recyclage lo cal pour savoir o d poser les batte ries us es RBRC est une marque d pos e de la Rechargeable Battery Recycling Corporation Soci t de re cycla...

Страница 76: ......

Отзывы: