background image

32 of 36 

KP2200 User Manual Version 1.2-EN 


 Installing the Driver for USB VCOM Mode 

 
The  scanned  can  be  configured  to  be  used  in  USB  Virtual  COM  on  Windows  XP,  7,  8/8.1,  10  Operarting  System.    On  this 

chapter it is described the prodedure to install the Windows driver  for the KP2200 Scanner. 
 
The  default configuration of the KP2200 is USB HID. When plugged on PC the operating system will setup a default keyboard 
emulator driver. 
In order to switch in USB Virtual COM follow the next steps:  


1.


Unplug the Kaptur device from your PC 

2.


Unzip 

Kaptur USB Virtual COM Drivers V1.0.zip

 folder 

3.


Launch 

dpinst_x86.exe

 or 

dpinst_amd64.exe

 according to the version of the Operating System you are currently 

using (right-click on 

This PC

 → 

Properties

 → 

System

 → 

System type

) and follow the on-screen installation procedure 


If  you  are  using  Windows  8/8.1  or  10,  you  must  disable  the  digital  signature  check  option  of  your 
Operating System before the launch of the executable (this will require a reboot). See Disable Digital 
Signature Check chapter 


4.


Plug  the  Kaptur  device  to  your  PC  and  scan  the  Enable  USB  Virtual  COM  QR  code  in  order  to  switch  to  serial 
emulation. The driver just installed will automatically setup your device in few moments 

 
In  you  are  experiencing  other  kind  problems  during  the  driver  installation,  please  try  to  install 

VCP_V1.4.0_Setup.exe


instead. 
 

Feel free to contact the support for every issue encountered during this procedure. 


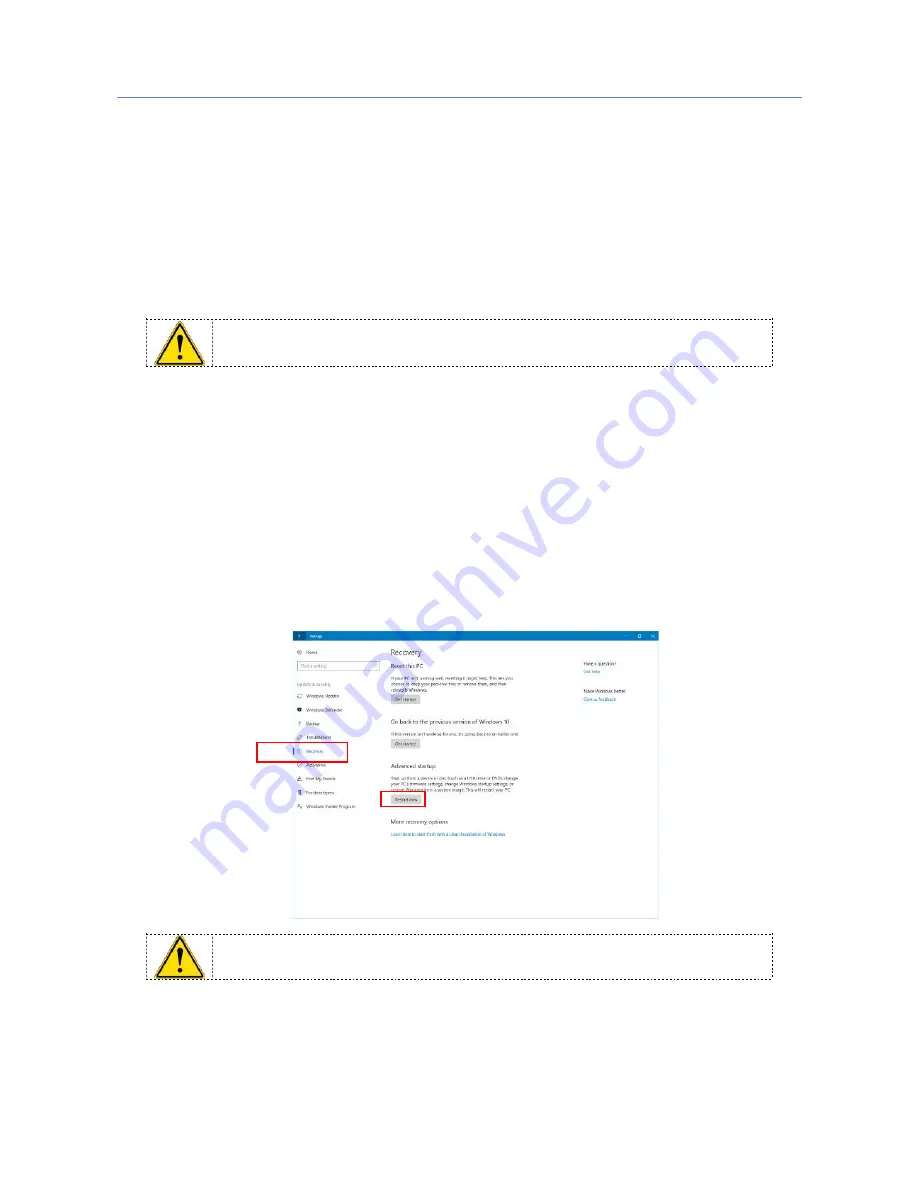
Disable digital signature check 

 
In 

Start

 → 

Settings

 → 

Update & security

 → 

Recovery

 click 

Restart now

 from the 

Advanced startup

 section. 


The computer will restart. 

Содержание KP2200

Страница 1: ...KP2200 User Manual Version 1 2 EN www kaptur id com KP2200 Imager Barcode Scanner User Manual...

Страница 2: ...ght to change the contents and the form of this document as well as to modify the product specifications at any time The information contained in this document is property of Trovi Technology to whom...

Страница 3: ...er on alert 10 LED indication 10 Beeper indication 10 USB interface 10 USB device type 10 Keyboard layout 10 Inter character delay 10 Scan mode 10 Trigger Mode 10 Continuos Mode 10 Decode illumination...

Страница 4: ...21 Codeblock F 21 Straight 21 Telepen 22 Maxicode 22 Code32 22 More setting for 2D Symbologies 23 Setting the output of the Chinese content 2D code 23 ASCII Table 24 ASCII Code Value 25 Restore facto...

Страница 5: ...r return it to the dealer Do not dispose of these products in unsorted municipal refuse Return the product to an authorized collection center to avoid damage to the environment or human health caused...

Страница 6: ...exadecimal numbers are indicated with an H suffix example or in form 0x Example 2A3BH or 0x2A3B Symbology used in the definitions table Symbol Text Definition Symbol Text Description I Input X Output...

Страница 7: ...l Serial number Detailed and complete description of the malfunction Your company s information The reference person within your company In response to your mail you will receive an RMA number Returne...

Страница 8: ...EN Getting Started Packaging Information Inside the standard packaging you will find A Barcode Reader a flexible stand optional the Quick Guide Part of the scanner Use a piece of dry and soft cloth wh...

Страница 9: ...itch On the Computer If installation is correct the LED will lights Up and the Buzzer will emit a beep Disconnect Scanner from Computer 1 Switch Off the computer and unplug the USB Cabe Restore factor...

Страница 10: ...e scanner supports different national keyboard layouts Commonly an appropriate encoding system must be selected Please refer to Settings to configure and for details Inter character delay This delay i...

Страница 11: ...terface configuration The scanner has been configured in factory with the USB HID enabled If it is necessary to change the interface scan one of the below codes USB HID interface To configure the scan...

Страница 12: ...ding the below programming code US Keyboard Default French Keyboard Hungarian Keyboard Italian Keyboard Japan Keyboard Spanish Keyboard Czech Keyboard Germany Keyboard Inter character delay This delay...

Страница 13: ...is pass in front of the reader In this configuration is not necessary press the trigger to read a code Presentation Mode In this configuration the scan start reading in continuos mode when the trigge...

Страница 14: ...ng Lighting Illuminating light enabed when the tigger button is pressed Default Illuminating light always ON Illuminating light always OFF Aim RED Aiming light enabed when the tigger button is pressed...

Страница 15: ...ere to the chatper relative chapter In order to add the Prefix or Suffix procede as indicate below 1 Scan the barcode Modify Prefix or Modify Suffix 2 Check the ASCII table and get the ASCII Code for...

Страница 16: ...efault Configuration the scanned doesn t sent out it also if programmed Be sure to enable Prefix after have programmed it Configure Suffix Enable Suffix Disable Suffix Default Modify Suffix If Suffix...

Страница 17: ...l Version 1 2 EN 17 of 36 Select Terminator It is possible to add a terminator at the and of the trasmission of the code readed The selection can be None Return CR TAB Return Line Feed CR LF None CR D...

Страница 18: ...o disable the 2D Symbologies Is it possible to Enable Disable in block all the supported Barcodes After have disabled all the barcode it is possible enable the single standard reading the relative cod...

Страница 19: ...Code 93 Enable Default Code 93 Disabled Codebar Codebar Enable Default Codebar Disabled QR Code QR Code Enable Default QR Code Disabled Interleaved 2 of 5 Interleaved 2 of 5 Enable Default Interleave...

Страница 20: ...2 of 5 Disabled Code 11 Code 11 Enable Default Code 11 Disabled MSI MSI Enable Default MSI Disabled MSI Enable Check Digit MSI Disable Check Digit Default GS1 Databar GS1 Databar Enable Default GS1 Da...

Страница 21: ...17 Disabled AZTEC Aztec Enable Default Aztec Disabled Hanhix Hanhix Enable Default Hanhix Disabled MicroPDF MicroPDF Enable Default MicroPDF Disabled Trioptic Trioptic Enable Default Trioptic Disabled...

Страница 22: ...User Manual Version 1 2 EN Straight Enable Default Straight Disabled Telepen Telepen Enable Default Telepen Disabled Maxicode Maxicode Enable Default Maxicode Disabled Code32 Code 32 Enable Default C...

Страница 23: ...Can be used in Notepad txt document Unicode Format Can be used in Word and QQ and micro mail and other commonly used chat box input tool Note Most of the software is generally compatible with the GBK...

Страница 24: ...d t 5 ENQ NAK 5 E U e u 6 ACK SYN 6 F V f v 7 BEL ETB 7 G W g w 8 BS CAN 8 H X h x 9 HT EM 9 I Y i y A LF SUB J Z j z B VT ESC K k C FF FS L l D CR GS M m E SO RS N n F SI US O _ o DEL To have the rig...

Страница 25: ...KP2200 User Manual Version 1 2 EN 25 of 36 ASCII Code Value 0 A 1 B 2 C 3 D 4 E 5 F 6 7 8 9...

Страница 26: ...00 User Manual Version 1 2 EN Restore factory default setting To reset the parameter to factory refault Use this code carefully and only if you are not sure how is configured the scanner RESET TO FACT...

Страница 27: ...ISSN Code 39 Code 39 full ASCII Code 32 Trioptic Code 39 Interleaved 2 of 5 Industrial 2 of 5 Discrete 2 of 5 Matrix 2 of 5 Codabar NW7 Code 128 UCC EAN 128 ISBT 128 Code 93 Code 11 USD 8 Indicator Be...

Страница 28: ...igit verification Check digit transmission Min code length UPC A 12 1 UPC E 8 1 EAN 13 13 1 EAN 8 8 1 Code 39 1 Interleaved 2 of 5 6 Codabar 4 Code 128 1 Code 93 1 GS1 DataBar 16 1 GS1 DataBar Truncat...

Страница 29: ...e Be sure the scanner is programmed to read the type of bar code you are scanning Distance between scanner and bar code is incorrect Move the scanner closer to or further from the bar code Scanned dat...

Страница 30: ...window may affect scanning accuracy 2 Do not allow any abrasive material to touch thewindow 3 Remove any dirt particles with a dampcloth 4 Wipe the window using a tissue moistened withwater 5 Do not...

Страница 31: ...and on the working station with right screw for the material of the working station ex Wood Ensure the flexible stand is fixed and stable Screws are not included 3 Adhesive tape mounting Peel the pape...

Страница 32: ...sing right click on This PC Properties System System type and follow the on screen installation procedure If you are using Windows 8 8 1 or 10 you must disable the digital signature check option of yo...

Страница 33: ...KP2200 User Manual Version 1 2 EN 33 of 36 Choose Troubleshoot from the options menu it appears Choose Advanced options from the Troubleshoot menu...

Страница 34: ...34 of 36 KP2200 User Manual Version 1 2 EN Choose Startup Settings from the Advanced options menu Click Restart...

Страница 35: ...system will boot with the digital signature check disabled This will allow installing any unsigned USB Driver After a reboot of the system the digital signature check will be enabled again The drivers...

Страница 36: ...ed 2 of 5 Value 0123456784 CODABAR Value A12345678 B CODE128 Value A12345678B UCC ENA128 Value 0101234567890128 Code 93 Value ABC 1234 GS1 DataBar Value 0100123456784444 GS1 DataBar Limited Value 0101...

Отзывы: