14
FIELD CALIBRATION TEST
The Laser Level leaves the factory fully calibrated. Kapro
recommends that the level is checked regularly, and after
the unit has been dropped or mishandled.
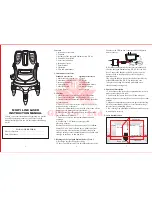
Horizontal Line Calibration Test
1. Set up the Laser Level on a flat, vibration-free
surface or tripod as near as possible to a long wall.
2. Unlock the safety lock by setting the switch to ON.
3. Press the Beam Selector button on the keypad to
generate a horizontal beam on the wall.
4. Make two marks through the laser line on the
wall, one very close to the Laser Level and one as far
away as possible.
5. Lock the safety lock, reposition the Laser Level (at the
same height) as near as possible to the far mark on the
wall. Repeat steps 2 and 3.
6. Measure the height difference between the
laser line and the two marks previously made on the wall.
7. If the two measurements are identical, then the
laser level is calibrated.
Содержание Prolaser 3D All-Lines 883
Страница 1: ...Prolaser 3D All Lines Model No 883 User Manual 4AA 200 60m INCLUDED...
Страница 18: ...18 883 Prolaser 3D All Lines Kapro 883 Prolaser 3D All Lines 4AA 200 60m INCLUDED RU...
Страница 19: ...19 20 21 22 23 24 25 26 27 28 29 30 31 32 33...
Страница 20: ...20 360 360 4 20 60 1 4 5 8 0 2 883 Prolaser 3D All Lines 4 AA...
Страница 21: ...21 883 Prolaser 3D All Lines 2 IEC Prolaser 3D...
Страница 22: ...22 A B C D E 1 4 F 5 8 G H...
Страница 23: ...23 883 Prolaser 3D All Lines 4 AA...
Страница 24: ...24 883 Prolaser 3D All Lines OFF 1 LOCK 2 LOCK LED 1 2...
Страница 25: ...25 ON 3 4 3...
Страница 26: ...26 A B Low Power C Manual Lock D Beam Selector Pulse Mode for use with detector...
Страница 27: ...27 Beam selector 4 4 LED 3...
Страница 28: ...28 20 C 4 F 60 C 140 F...
Страница 29: ...29 Prolaser 883 All Lines...
Страница 30: ...30 Kapro 1 2 3 Output Control 4 5 2 3...
Страница 31: ...31 6 7 1 2 1 3 4 Output Control 5 6...
Страница 33: ...33 No 883...
Страница 34: ...34...
Страница 35: ...35...
Страница 36: ...36 2014 Kapro Industries Ltd...