AR2040
Quick Installation Guide
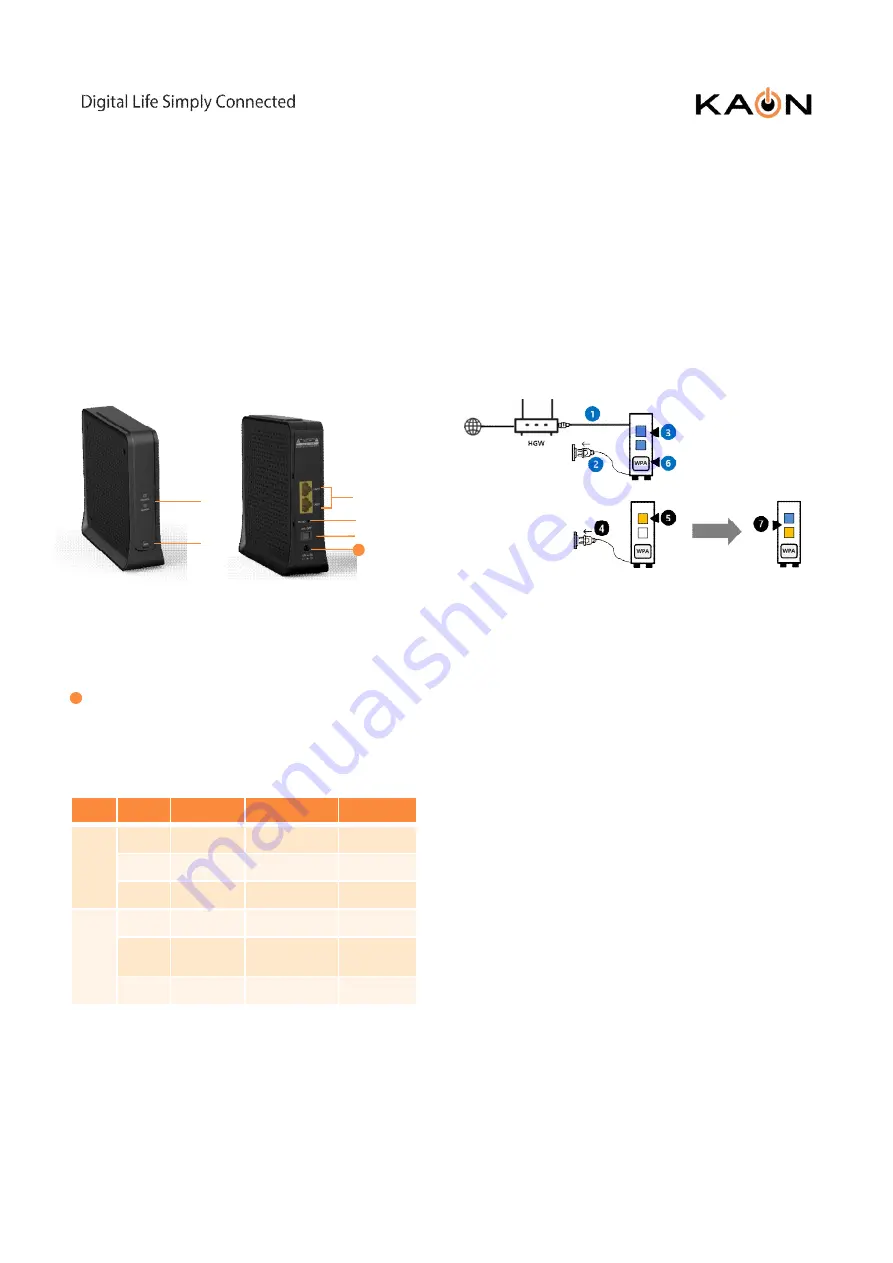
1. AR2040 overview
➊
LED (Power, Signal)
➋
WPS Button
➌
Ethernet Ports
➍
Factory Reset Button (press 5~6 seconds)
➎
Power On/Off Button
Power Connector
➊
➌
➍
➎
LED Scenario
The light on the front side of your AR2040 gives you
information about the AR2040’s operation.
Note : The Signal LED of the AR2040 indicates solid
yellow when it is connected as the slave device,
whereas the Signal LED of the AR2040 indicates
solid blue when it is connected as the master device.
➋
6
6
LED
Color
Blink
On
Off
Power
Red
Reboot
Restore
Yellow
Booting
Complete Booting
Blue
Connect to Internet
Disconnect
Signal
Red
Yellow
Grouping (Slave)
Join
Complete Grouping
(slave)
Complete Join
Blue
Grouping
Complete Grouping
(master)
2. Quick Mesh Setup with WPS
Step 1.
Connect one of the AR2040(Master) to your
gateway with the Ethernet cable.
Step 2.
Plug your AR2040(Master) to a power socket
Step 3.
Check that the Power LED changes to Blue,
Check that the Signal LED changes to Blue.
Step 4.
Place additional AR2040(Slave) at a distance
of around three meters from the working AR2040
connected to your home gateway and plug the
AR2040 into a power socket
Step 5.
Check that the Power LED solid to Yellow.
Step 6.
Press the WPS button on AR2040(Master)
for 2-3 seconds ( In AR2040 where Signal LED is
BLUE)
Step 7.
Check that the Power LED on the satellite
AR2040 changes to Blue. Check that the Signal LED
on the satellite AR2040 turns yellow.
Note: You’ll get the best signal when it is in an
open space like on a shelf or a table.
Step 8.
Place the AR2040 where you need but it
should be position which Signal LED shows solid
yellow.
사내
모든
대외비
문서의
외부
반출을
금지합니다
.
이름
:
이봉철
/
부서
:
네트워크
시스템팀
/
출력시간
:2020-01-17 09:05


