


1.What’sintheBox
KamiDoorbell
Camerax1
ChargingCable
x1
Manualx1
Batteryx1
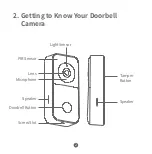
2.GettingtoKnowYourDoorbell
Camera
LightSensor
Lens
Microphone
Speaker
DoorbellButton
ScrewSlot
Speaker
Backplatex3
1
2
Ax2
Bx4
Cx4
ScrewBagx1
ChimeConnectorx1
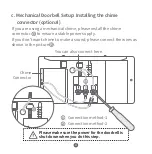
Installation
Hardwarex1
Screwdriverx2
Tamper
Button
PIRSensor
ExtensionWiresx2
Wire
N
uts
x2
Diode
x1