

The
Kam VHF Bodypack V2
uses one of the following VHF frequencies sets
Option 1: 175.0MHz / Option 2: 173.8MHz / Option 3: 174.8MHz / Option 4: 174.5MHz / Option 5: 174.1MHz
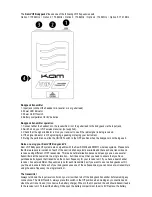
Bodypack transmitter
1. Input jack (connect the headset mic, lavalier mic or guitar lead)
2. Power LED indicator
3. Power On/Off switch
4. Battery compartment for 9V batteries
Bodypack transmitter operation
1. Connect either the headset mic, the lavalier/tie mic or the guitar lead to the bodypack via the input jack.
2. Switch on on your VHF wireless receiver (not supplied).
3. Check that the signal indicator is lit on your receiver to see if the radio signal is being received.
4. If the signal indicator is lit, begin singing, speaking or playing your instrument
5. During the performance, slide the ON/OFF switch to the OFF position when the bodypack is not being used.
Notes on using your Kam VHF Bodypack V2
Kam VHF Bodypack V2 systems are compatible with the Kam KWM6 and KWM11 wireless systems. Please note
that there are several versions of each of these microphone systems available and that each one transmits and
receives using different VHF Frequencies. This is a beneficial situation because it means you can use several
transmitters at the same time in a single location… but it does mean that you need to ensure that you have
purchased a bodypack that transmits on the correct frequency for your receiver unit. If you have a dual channel
receiver, it uses two different frequencies (one for each transmitter) so if you want to use two bodypacks with it,
you'll need to ensure that each of your bodypacks uses one of these frequencies (you cannot use two transmitters
using the same frequency in a single location).
The transmitter
Always turn down the input level controls on your mixer then turn off the bodypack transmitter before making any
connections. The On/Off switch - always place this switch in the Off position when making any connections and
when the unit is not in use (to conserve the battery charge). When in the On position the unit should transmit audio
to the receiver unit. To Insert the battery; Slide open the battery compartment. Insert a 9V. Replace the battery