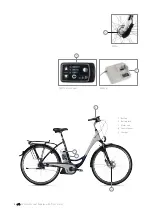
IV User Manual Pedelec with front motor
7
1 Quick start
›
1. Charge the battery completely before riding for
the first time.
Unlocking the battery
›
2. To remove the battery, grip the handle, insert
the key into the lock and turn it anticlockwise. The
battery is now unlocked.
›
3. Tilt the battery sideways and lift it with both
hands out of the holder.
Tilt when removing
›
4. Put the battery in the docking station of the
charger. The battery LEDs light up or flash. You
must fully charge the battery before using it for the
first time.
›
5. Once all LEDs have gone out, take the battery
out of the docking station.
›
6. Reinsert the battery into the holder on the
Pedelec from the left-hand side. Move the battery
outwards at an angle of roughly 45° as you do so,
as you did when you took it out of the holder. Move
the battery into the upright position until the lock-
ing mechanism engages. If the key is still in the
lock, you will need to turn it clockwise and pull it
out to allow the battery to lock in place.
›
7. Make sure that the battery is securely posi-
tioned and that the key is no longer in the lock.
›
8. Push the "Power" button on the control panel
on the handlebar.
Wait for 2 seconds before turn-
ing the pedals
. The drive system requires this time
when no force is applied to the pedals to adjust the
power sensor correctly.
›
9. The intermediate power-assist mode appears
on the display panel of the LED control panel.
Press the "Mode" buttons to select the amount of
assistance: "gentle / LOW", "intermediate / MID" or
"powerful / HIGH“. Press this button once to change
the assist level by one level. You can increase or
reduce the assistance, depending on which "Mode"
button you press.
Always operate one of the brakes before putting one
of your feet on a pedal as the motor pulls your bike
away immediately. This starting assistance is very
convenient, especially when starting on hills. If you
start off in road traffic or on unsurfaced roads without
controlling your speed, you could come off your bike
and seriously injure yourself.
›
10. You can now ride off.
Содержание Derby Cycle Werke GmbH 2011
Страница 2: ...I General User Manual English Derby Cycle Werke GmbH 2011 ...
Страница 68: ...I General User Manual 67 ...
Страница 70: ...II User Manual Fast Pedelec English Derby Cycle Werke GmbH 2011 ...
Страница 75: ...6 II User Manual Fast Pedelec ...
Страница 98: ...III User Manual Pedelec with centre motor English Derby Cycle Werke GmbH 2011 ...
Страница 105: ...8 III User Manual Pedelec with centre motor ...
Страница 126: ...IV User Manual Pedelec with front motor English Derby Cycle Werke GmbH 2011 ...
Страница 148: ...IV User Manual Pedelec with front motor 23 ...
Страница 150: ...V User Manual Impulse Pedelec English Derby Cycle Werke GmbH 2011 ...
Страница 172: ...V User Manual Impulse Pedelec 23 ...
Страница 174: ...VI User Manual Groove Pedelec English Derby Cycle Werke GmbH 2011 ...
Страница 194: ...BionX User Manual BIO_Anleitung_OEM_DERBY_ENGLISCH indd 1 13 05 11 18 25 ...
Страница 215: ...bionxinternational com bionxinternational com Your dealer BIO_Anleitung_OEM_DERBY_ENGLISCH indd 20 13 05 11 18 25 ...


