background image

Maintenance

 
Repair

      Do not attempt to repair or service your instrument unless you are qualified to do so and have the relevant calibration, 
performance test and service information.

Replacing the Fuse

Turn off the power switch, remove the power line cord from the power socket and disconnect the test leads at output terminals 
before replacing the fuse. Replace it only with same type of fuse.

Cleaning

To clean the DC Power Supply, use a soft cloth dampened in a solution of mild detergent and water. Do not spray cleaner 
directly onto the device, since it may leak into the cabinet and cause damage. Do not use chemicals containing benzine, 
benzene, toluene, xylene, acetone, or similar solvents. Do not use abrasive cleaners on any portion of the power supply. 

7

Содержание 3010DF

Страница 1: ......

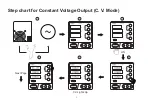
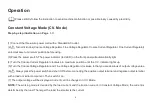
Страница 2: ...Step chart for Constant Voltage Output C V Mode 3 4 5 6 2 1 FUSE Next Page C V Lights Up I ON ...

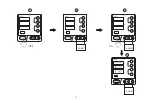
Страница 3: ...7 8 9 10 ON 0 126 II OFF Load Load Load ...

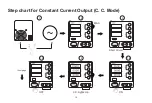
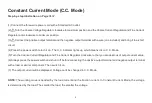
Страница 4: ...Step chart for Constant Current Output C C Mode MAX Short Cirvuit ON C C Lights Up OFF III 1 1 1 2 1 3 1 4 1 5 1 6 FUSE ...

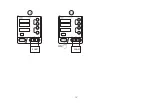
Страница 5: ...Load Load ON IV 1 7 1 8 ...

Страница 6: ...ntroduction Intended use Controls and Indicators Operation Constant Voltage Mode C V Mode Constant Current Mode C C Mode Technical parameters Maintenance Repair Replacing the Fuse Cleaning Three Years Warranty 2 2 3 4 4 5 6 7 7 7 7 8 1 ...

Страница 7: ...erve these operating instructions These operating instructions contain important notes on commissioning and handling Retain these operating instructions for reference Intended use This power supply is DC regulated power supply It can output and display constant voltage and constant current combined with a 5V voltage output with USB interface equipped with cooling fan over temperature protection ov...

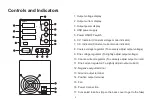
Страница 8: ...ator To coarsely adjust output voltage 9 Fine voltage regulator To slightly adjust output voltage 10 Coarse current regulator To coarsely adjust output current 11 Fine current regulator To slightly adjust output current 12 Negative output terminal 13 Ground output terminal 14 Positive output terminal 15 Fan 16 Power Connection 17 Concealed fuse box Open the back cover to get to the fuse Controls a...

Страница 9: ...will automatically light 4 Turn the Coarse Current Regulator clockwise to maximum position until the C V indicator lights up 5 Turn the Coarse Voltage Regulator and Fine Voltage Regulator clockwise to that you are desirous of output voltage value 6 Always press the power switch and shut it off before connecting the positive output terminal and negative output terminal with a load or similar compon...

Страница 10: ...r switch to turn it on The C C indicator lights up which means it s on C C Mode 5 Turn the Coarse Current Regulator and Fine Current Regulator clockwise to that you are desirous of output current value 6 Always press the power switch and shut it off before connecting the positive output terminal and negative output terminal with a load or similar component Then switch it on 7 The output current wi...

Страница 11: ...git LED display 0 1 1 10 C 40 C Relative humidity 80 20 C 80 C Relative humidity 70 285x128x145mm Technical parameters Rated working conditions Output Current Range Output Voltage Range USB interface Power supply effect Load effect Ripple and noise Display mode Display accuracy Working conditions Storage conditions Dimensions 6 ...

Страница 12: ...and disconnect the test leads at output terminals before replacing the fuse Replace it only with same type of fuse Cleaning To clean the DC Power Supply use a soft cloth dampened in a solution of mild detergent and water Do not spray cleaner directly onto the device since it may leak into the cabinet and cause damage Do not use chemicals containing benzine benzene toluene xylene acetone or similar...

Страница 13: ...roduct has been subject to fair wear and tear The product has not been misused Defective products will be repaired or replaced free of charge or at our discretion if sent together with proof of purchase to our customer service or authorized distributor s For the fasted way of product solution further detail of warranty coverage and warranty repair information send email to support Kaiweets com Con...

Отзывы: