background image

11

12

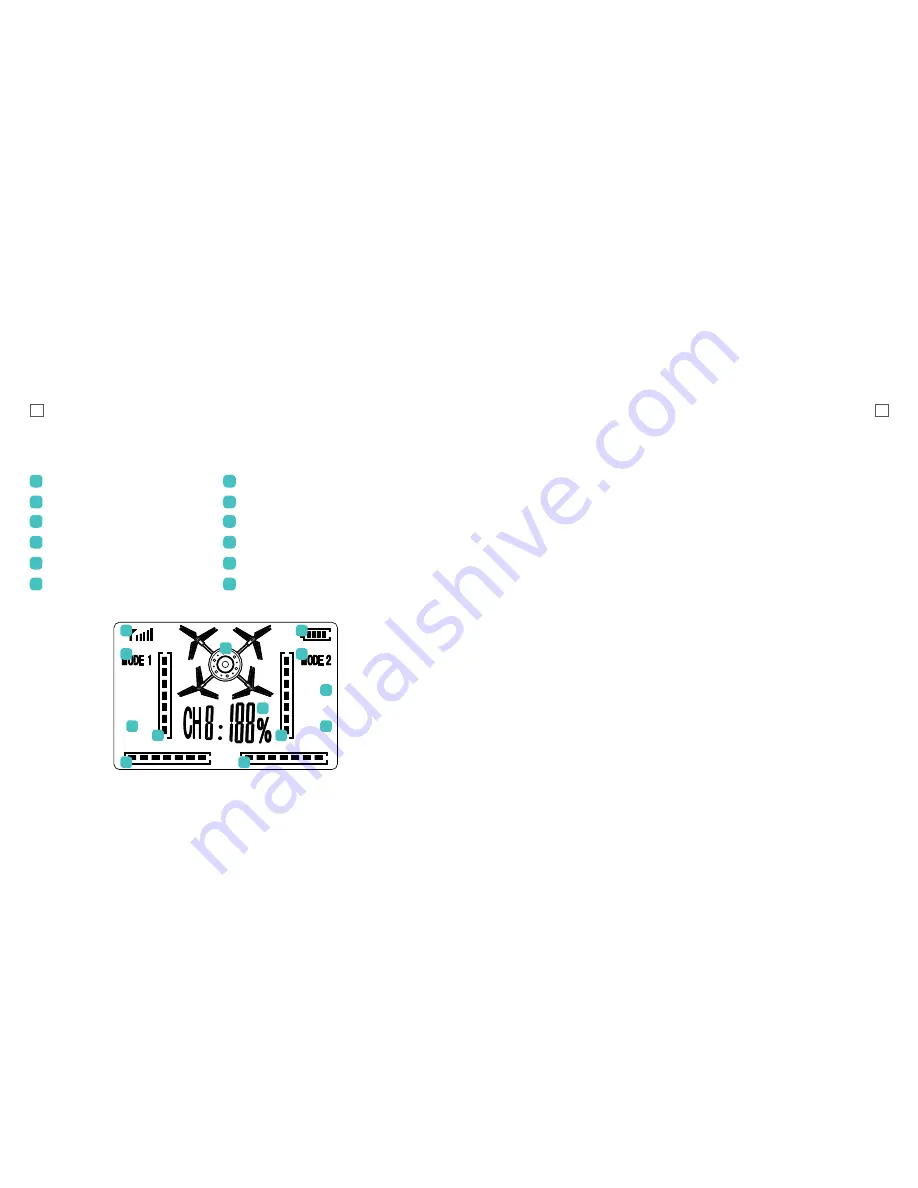
Remote Control Screen

Drone diagram 

Signal strength 

Remote battery level  

Mode

Accelerator fine-tuning level 

Rotation fine-tuning level 

A

G

B

H

C

I

D

J

E

K

F

L

Set Up

Charging

Plug your USB charging cable into a 
powered USB port (wall adaptor not 
included). When connected correctly,  
the USB plug will glow red. Connect your 
Alpha Drone battery to the USB charging 
cable.  When charging correctly, the red 
light should turn off. The red light will 
turn back on once charging is complete 
(to avoid shortening battery life, do not 
remove the battery from charge until 
charge sequence is complete). 

Initial Assembly

Alpha Drone Feet

Insert the feet into the guide holes on 

the underside of the Alpha Drone in the 

allocated position. Push the Alpha Drone 

feet into the underside of the body until 

the feet are secure and flush against the 

body of the Alpha Drone.   

Rotor blade guards 
Insert rotor blade guards into guide holes 
in the allocated position. Use the included 
screwdriver to secure the propeller guards 
to the Alpha Drone, making sure not to 
over-tighten.   

Camera 
Ensure that the camera cable is connected 
to the Alpha Drone and insert the Micro SD 
card* into the allocated slot.  

Battery 
Slide the battery hatch out on the Alpha 
Drone and lift gently to open. With the Alpha 
Drone turned off, insert the battery into the 
opening with the cable end facing outward, 
ready for connection. Plug the battery cable 
into the socket, then close and lock the 
hatch by sliding gently back in place.

*MicroSD Card not included

Pitch fine-tuning level 

Roll fine-tuning level 

Photo indicator 

Video indicator 

Light indicator

Motor power level

A

B

C

D

D

E

H

G

F

I

J

L

K

Содержание Alpha Drone

Страница 1: ...1 ALPHA drone Complete User Guide Alpha Drone ...

Страница 2: ...e Control Screen Set Up Flight Planning Pairing Tips Flight Basics 360 Flip Filming Basics Flight Maintenance FAQ Specifications Support 03 03 05 06 07 09 10 12 13 14 18 20 21 23 24 25 DISCOVER FREEDOM Share your footage with us on social media KBdiscover To view the entire Kaiser Baas product range visit www kaiserbaas com Contents ...

Страница 3: ...wing external substances to come into contact with the Drone e g water oil soil sand or any other material that could enter the Drone and its internal compartments including the battery Damage s or injuries caused by flying in areas such as those with magnetic interference radio interference government regulated no fly zones or airports Any other losses that are not covered by the scope of Kaiser ...

Страница 4: ...animals Be aware of your surroundings and exercise caution when using your drone For more information on this go to http www casa gov au within Australia or your local aviation authority if you are outside of Australia Do not attempt to open the housing of the Alpha Drone battery or the Remote Control Transmitter or attempt to modify it in any way Any unauthorised tampering with the product will v...

Страница 5: ...ards 4 x Spare rotor blades 1 x Drone battery Rotor Blade Guards Feet Lights Camera Rear Profile C E B A D F A A B B D E F G C C 2 x Landing feet 1 x USB battery charger 1 x Screwdriver SD Card slot Battery Hatch Power Switch A A D E B B E F C C F G D ...

Страница 6: ...o 360 flip High Low sensitivity adjustments A B C D E F G H I J K L M N O Left Stick ascend descend rotate left right Right Stick pitch left right roll forward back Pitch fine tuning left right Roll fine tuning up down Rotate fine tuning left right Light control Trimming reset A I B J C K D L E M F N G O H ...

Страница 7: ...on Push the Alpha Drone feet into the underside of the body until the feet are secure and flush against the body of the Alpha Drone Rotor blade guards Insert rotor blade guards into guide holes in the allocated position Use the included screwdriver to secure the propeller guards to the Alpha Drone making sure not to over tighten Camera Ensure that the camera cable is connected to the Alpha Drone a...

Страница 8: ...ck of your surroundings look for hazards above in front and behind you Be especially aware of things like power lines and nearby people and animals If these hazards exist DO NOT deploy your Alpha Drone and consider a new take off location Take off Preparation Pair the Remote Control Transmitter and Alpha Drone Turn on your Alpha Drone and place it on stable ground Ensure the Alpha Drone is facing ...

Страница 9: ... the Remote Control Transmitter should be constant If it is flashing The Left Stick is not in its lowest position Move the Left Stick to the lowest point and wait 3 4 seconds for the red light to turn constant OR the Remote Control Transmitter has not connected to the Alpha Drone try Manoeuvring turning the Remote Control Transmitter off and on again OR the batteries in the Remote Control Transmit...

Страница 10: ...se the overall responsiveness of the thumb sticks on the Remote Control Transmitter The Alpha Drone will start up in the lowest sensitivity level 25 responsiveness advised level for learners Pressing the High Low button once will enter the medium sensitivity level 50 responsiveness The Remote Control Transmitter will beep twice and indicate the sensitivity on the Motor Power indicator Pressing the...

Страница 11: ...ure that the drone is at an adequate height before performing this manoeuvre Advanced Flip Mode The Drone also features an advanced flip mode that will enable it to flip in all directions To use this feature toggle the through the High Low settings until you reach 100 the Remote Control Transmitter will emit 4 consecutive beeps The drone will emit a beeping sound while the throttle has power This ...

Страница 12: ...e a constant green turn off the Alpha Drone remove and re insert the Micro SD card Taking photos When the photo function is triggered the LED camera light will flash red when a photo is successfully taken It will return to green in between shots Shooting video To start recording press the video camera button once When the video function is triggered the LED camera light will flash red To stop reco...

Страница 13: ...eep your finger on the motor cog and gently slide the blade from the centre rod ensure you are still holding the motor cog TIP Only replace one blade at a time to ensure rotor blades stay in the correct position Rotor blades are marked A or B and are either red or black Keep your face and eyes away from the running rotors Keep your face and eyes away from the running rotors TIP The drone will not ...

Страница 14: ... the fine tuning buttons to counter any instability Note The Alpha Drone will become slightly less stable when running low on battery Place the Alpha Drone on level ground Then hold the Triming Reset button for 5 seconds until you hear a beep The trim and calibration have now been reset 4 Footage is jumpy grainy Kaiser Baas recommends that a class 10 SDHC Micro SD card with a capacity of 32GB or l...

Страница 15: ...27 28 Got a question about your Kaiser Baas Drone Live Chat www kaiserbaas com support Email helpdesk kaiserbaas com For further information please visit www kaiserbaas com Kaiser Baas Support ...

Страница 16: ...29 ...

Отзывы: