


19
Hold near the base of the adjuster and slide it up or
down to adjust on your designated position .
Fifth hole which is bigger than the others is the one for
installation.*
*Make sure to change the hole-position slowly and carefully, or the adjuster will
be detached from the fifth hole.
Make sure to hold near the base of
the adjuster when detaching the
adjuster. Do not apply force on or
twist the adjuster as this may
break the adjuster.
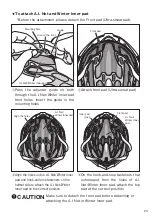
Changing the KBF-1 Adjuster height
(four-levels up and down)
Detach/Attach KBF-1 Adjuster
Fig.1
Fig.2
①Hold the bottom of the
adjuster mounting part and
slide the adjuster to the
fifth installation hole as
indicated in .
So that the mounting part
at the rear will be removed
from the helmet. *move-
ment between the fourth
and fifth hole is a little
tighter. At the same time,
detach the chinstraps from
the slits on the adjuster.
②Hold the base of the
laces guide which
attached on both side
of the helmet, then
remove it from the
mounting holes slowly.
(both left and right
sides).
③Hold the base of the
guide securely and pull
gently. By so doing
with the both side of
the guides, the adjuster
will be removed.
Make sure to hold
near the base of
the adjuster
when adjusting
the height of the
adjuster. Do not
apply force on or
twist the adjuster,
which may break
the adjuster.
●To Detach
Adjustable at
four levels.
The fifth hole
is for
installation.
Fig.3
WARNING
WARNING
❷
❶
❸
❹
Fig.2
Fig.1
Mounting part
Mounting part
Adjuster
Adjuster
Fig.5
Mounting holes
Mounting holes Guide
Guide
Fig.4
Mounting holes
Mounting holes
Guide
Guide
Laces
Laces
Adjuster
Adjuster
Slit
Slit
Fig.3
Shinstrap
Shinstrap
Mounting part
Mounting part
Содержание ZENARD-EX
Страница 2: ...ZENARD EX系 取扱説明書 保存用 ゼナー ド EX JAPANESE ...
Страница 15: ...ZENARD EX INSTRUCTION MANUAL ENGLISH 13 ...