22
Document Number 548.0418 Rev. AX — 02/2019
Kaba Mas
Installation Guide /
DKX
-10 Type II
Cable Mounting
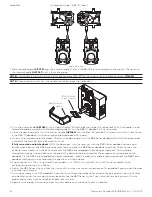
1. Slide the collar piece
(515079)
over the interior handle shaft on the Best 9K lever set and onto the chassis. Then push on
the interior handle
(A89062
) until it locks into place.
NOTE:
Lubricate the working surface that the collar piece (515079) pushes against on the plate assembly
(514053)
.
NOTE:
There are two cutouts on the handle that collar piece should locate in.
(515079) Collar,
Torque Transfer
(A89062) Inside
Handle
2.
Turn the inside handle
(A89062)
until it stops (the Best 9K latch bolt should be fully retracted). With the handle turned
thread the cable assembly into the attached standoff until the
DKX
-10 deadbolt is fully retracted.
3.
Close the door and slowly turn the interior handle
(A89062)
until the Best 9K latch bolt just clears its strike. Check to see
if the
DKX
-10 deadbolt is fully retracted and latched back at this point.
4.
If not fully retracted and latched back: Shorten the cable length until the
DKX
Series deadbolt retracts and latches back
just before the Best 9K latch bolt clears its strike.
If fully retracted and latched back:
With the door open, turn the lever set until the
DKX
Series deadbolt retracts and
latches back. Depress the
DKX
Series bolt reset latch to allow the
DKX
Series deadbolt to extend. Check to see if the
pulley restores clockwise sufficiently to prevent the
DKX
Series deadbolt from being pushed back. (A thin-blade
screwdriver may be inserted between the end of the bolt and the bolt guard for the purpose of pushing back on the
deadbolt.) If the
DKX
Series deadbolt can be pushed back, slightly increase the cable length and recheck the
DKX
Series
deadbolt latching status by following the directions in Step 3 above.
5.
Finger tighten nut. Then using wrench tighten down nut 1/8-1/4 turn max (30-40 in-lb). Do not exceed 50 in-lb,
overtightening may result in failure.
6.
Adjust the
DKX
Series strike so that the throat of the strike has minimum clearance of the deadbolt guard when the
door
is contacting the jamb.
7.
Assuring no load on the DKX deadbolt, from the strike (there should be no touching of the bolt against the strike), mark
and transfer punch the remaining screw locations for the
DKX
Series strike. Then install the remaining screws. Ensure
proper and correct function/location of both lock systems.
8.
Again, ensure proper function of all lock systems before continuation of cover installation.
Содержание DKX-10
Страница 1: ...Installation Guide Kaba Mas DKX 10 Type II Preliminary 04 03 19 ...
Страница 2: ......
Страница 28: ...30 Document Number 548 0418 Rev AX 02 2019 Kaba Mas Installation Guide DKX 10 Type II NOTES ...
Страница 29: ......
Страница 30: ......
Страница 31: ......

