Jydepejsen Sirius Soapstone Скачать руководство пользователя страница 15

Stoking


This wood-burning stove is intermittent, which means that new wood should be added when there is 
a layer of embers in the burning chamber.

 Stoking depends on the heating need and the degree of stoking – 

according to the season.


For optimal combustion, use 3 logs, 30 cm long weighing approx. 0.7 kg. Place them next to each other, on the layer of 
embers from the start-up phase. This ensures a combustion time of approx. 45 minutes.


It is important not to open the door while there are flames in the stove, as this may cause smoke to flow out 

into the room.


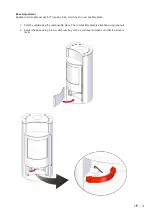
1. Place the air wheel in position 4 (maximum air supply).


2. In order to minimise the low pressure, leave the door ajar for one minute before opening it fully.


3. Open the door slowly.


4. 

Place 3 logs (30 cm long, weighing approx. 0.7 kg) next to each other on the embers.


5. Close the door again.


6. As soon as the wood is ablaze, turn the knob to position 3 or lower. Once the flames are stable and almost 
translucent, the combustion is good.
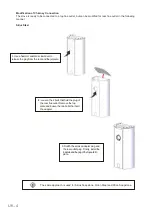
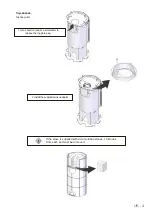
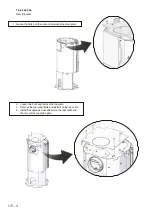
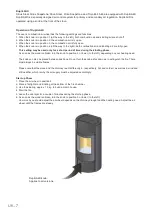


Ash pan


Emptying   the   Ash   Pan


When   the   stove   is   cold,   open   the   cover   

and   remove   the   ash   pan.   Store   and/or   

transport   the   ash   properly   in   a   closed   

steel   container.   Please   note   that   there   

may   be   embers   still   hidden   in   the   ash   

even   after   several   days.


UK - 7

Содержание Sirius Soapstone

Страница 1: ...K Betjeningsvejledning DE Bedienungsanleitung UK User Manual F Manuel d utilisation IT Installazione e istruzioni per l uso NO Bruksanvisning SE Bruksanvisning NL Gebruikshandleiding SIRIUS ORION TROJ...

Страница 2: ...nstallation of a stove to your local authority The owner of the house is personally responsible for ensuring compliance with the mandatory safety requirements and must have the installation approved b...

Страница 3: ...or ask your local authority for advice regarding building regulations Structural Support Check that the wood joists are strong enough to bear the weight of stove and chimney The stove and chimney can...

Страница 4: ...distributor chimney sweep will also be able to tell you exactly which chimney you need Below is an illustration of wall and corner installation with and without insulated flues Distance to combustibl...

Страница 5: ...these is shown in the illustration in this instruction manual You must install your stove according to the required minimum distance to combustible materials Floor foundation wall The stove must be i...

Страница 6: ...rewdriver to release the plug from the rear and the jet plate 3 Switch the smoke adapter plug and the rear outlet plug Finally install the topplateandtheplugofthetopoutletin place The same approach is...

Страница 7: ...and or a screwdriver to release the top plate plug Troja 44 45 46 Top flue outlet 2 Install the supplied smoke adapter If the stove is supplied with accumulation stones 10 stones from each set must b...

Страница 8: ...s and the nuts and dismantle the steel plate 2 Loosen the bolts and remove the top plate 3 Remove the rear outlet plate and install it on the top outlet 4 Install the supplied smoke adapter on the rea...

Страница 9: ...or Troja 44 45 46 which has no combustible plate 1 Start by uninstalling the combustible plate The combustible plate is attached using magnets 2 Adjust the base using a 4 mm Umbraco key Use a spirit l...

Страница 10: ...f air needed for combustion is approx 25 m 3 h The connector has an external diameter of 100 mm In hot areas the duct should be insulated to prevent condensation formation For this purpose use 25 mm m...

Страница 11: ...rear plate Sirius Steel Sirius Soapstone Orion Steel and Orion Soapstone Troja 44 45 46 Use a hammer and or a screwdriver to release the rear plate plug Use a pair of cutting pliers or a screwdriver t...

Страница 12: ...nsequential damages and damages to other property resulting from the use of the stove Non compliance with the operating instructions Glass and soapstone In case of repairs under warranty any costs ass...

Страница 13: ...f the different types of wood which have been stored for 2 years and have residual moisture of 15 17 Wood Kg dry wood per m3 compared to beech oak Hornbeam 640 110 Beech and oak 580 100 Ash 570 98 Map...

Страница 14: ...ling phase As soon as the wood is ablaze turn the knob to position 3 or lower to the left depending on your heating need The knob can also be placed between positions Do not turn the knob as far down...

Страница 15: ...y cause smoke to flow out into the room 1 Place the air wheel in position 4 maximum air supply 2 In order to minimise the low pressure leave the door ajar for one minute before opening it fully 3 Open...

Страница 16: ...ges etc The stove and the chimney must be inspected by a qualified professional at regular intervals in order to ensure the optimal operation of the stove It is prohibited to carry out unauthorised al...

Страница 17: ...all versions 1 Remove the top plate 2 Remove the side plates 3 Remove the rear plate 4 Remove the top baffle plate To install the plates back on follow the above steps in reverse order Unauthorised mo...

Страница 18: ...no 56900040 Unfortunately vermiculite plates cannot be delivered separately They are only available in sets Glass 56900030 Cast iron bottom 56900025 Shaking grate 56650100 Ash pan 56900002 Sealing set...

Страница 19: ...Ahornsvinget 3 7 Nr Felding 7500 Holstebro Denmark Tel 45 9610 1200 salg jydepejsen dk www jydepejsen com...

Отзывы: