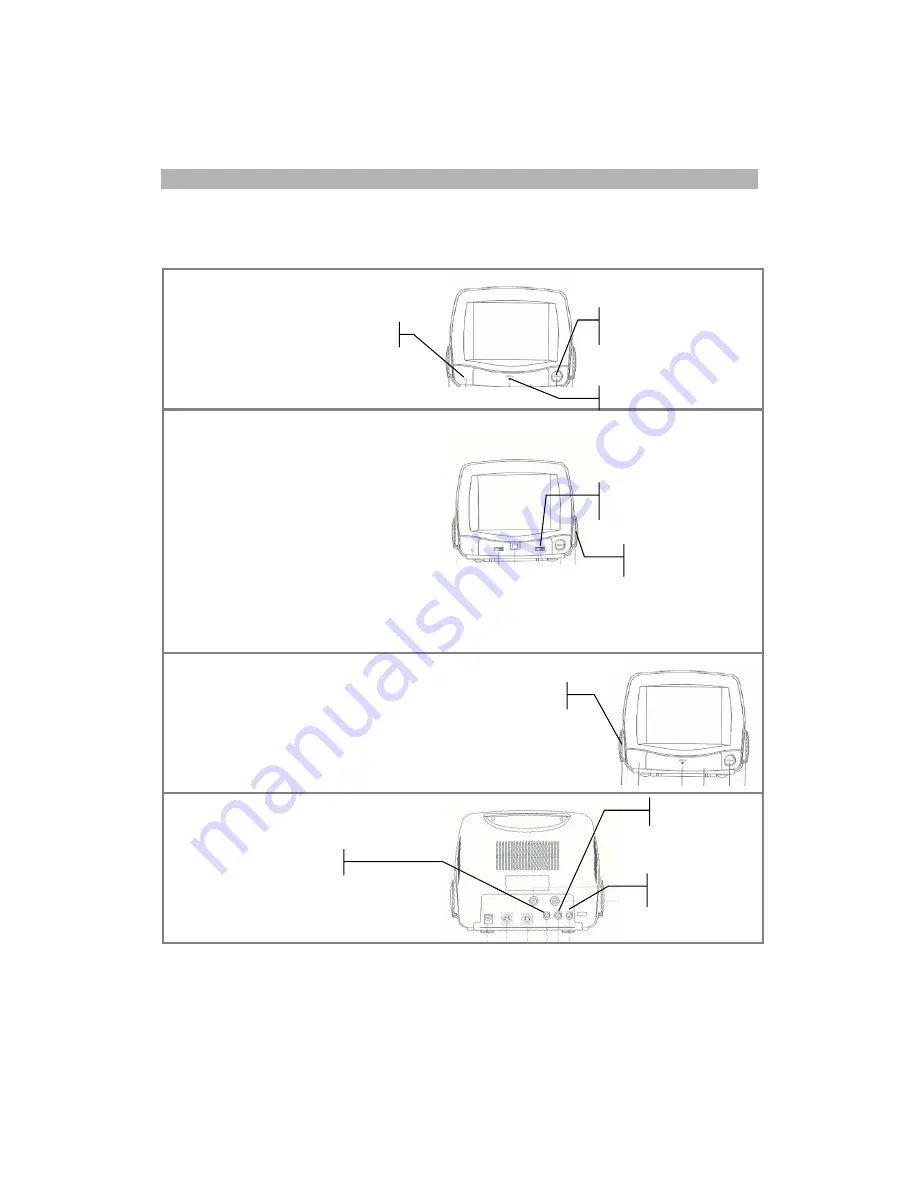
jWIN JV-TV2040 Скачать руководство пользователя страница 8

-8- 


B

ASIC 

O

PERATIONS


These simple steps will enable you to get the best quality sound and image on 
your closed circuit monitor.  


1.


Push the power ON/OFF button. 


The power indicator light comes on. 


2.


Open the control panel. 


3.


Move the function switch to position 

CH1

” or “

CH2

” or 

Auto

Note

:  

ƒ


Use CH1 or CH2 when using 
only 1 camera.  

ƒ


Use Auto when you want to use 2 
cameras and switch views 
according to your time setting. 

ƒ


Select the auto switching time. 

ƒ


Don’t forget to remove the 
camera lens cover. 


4.


Set the volume 

ƒ


To increase volume, turn the 
volume knob (found on the left 
side of the unit) toward you. 

ƒ


To decrease volume, turn the 
volume know away from you.  


5.


Adjust brightness, contrast, and V-
Hold to improve the image. 


Power ON/OFF Button 

Volume Control 

Power Indicator Light 

Brightness Control 

Contrast Control 

V-Hold Control 

CH1/CH2/AUTO switch 

Time Selector 

Control Panel Door 

Содержание JV-TV2040

Страница 1: ...jWIN 5 5 BLACK WHITE SECURITY MONITOR WITH CAMERA...

Страница 2: ...tion 3 Caution 3 Out of the Box 4 Front View 5 Rear View 6 Camera View 6 Putting it all together 7 Basic Operations 8 Set Up for Alternative Audio Video Connections 10 Set Up for VCR Connection 12 Tec...

Страница 3: ...ontents will show you where to find instructions for using each feature While you may not need to read every section in detail at first we recommend you at least look them over briefly and that you sa...

Страница 4: ...a video and audio outputs Built in two camera auto switch Weather resistant camera with lens cover and two screws to secure camera placement High resolution and sensitivity Low energy consumption and...

Страница 5: ...ollowing items are in view Volume Knob Time Selector Knob Power Indicator Power ON OFF Button Control Panel Door Control Panel Open Close Point Press here to open 50 60Hz Switch Function Switch Choose...

Страница 6: ...IEW CAMERA VIEW Audio Out Socket AC DC Power input CH1 CH2 V Hold Control Brightness Control Integrated Microphone Infrared Lights Video Out Socket Contrast Control DIN Connector Camera Bracket Infrar...

Страница 7: ...CH port on the back of the monitor as follows If you are using only 1 camera connect the 60 cable to the CH1 port on the back of the monitor If you are using 2 cameras connect the first 60 cable to th...

Страница 8: ...en you want to use 2 cameras and switch views according to your time setting Select the auto switching time Don t forget to remove the camera lens cover 4 Set the volume To increase volume turn the vo...

Страница 9: ...st the timer to switch or cycle from one view to another every few seconds The Time Control knob is located on the right side of the TV Monitor when you are facing the screen When you look at the knob...

Страница 10: ...tput stations From this example you can determine the set up that best meets your needs Note The signal from the Audio Video Out socket is consistent with that of the monitor The output can be connect...

Страница 11: ...11 TWO CHANNEL INPUT CONNECTION If you wish to use two cameras and observe both views on one monitor the following set up will suit your purposes...

Страница 12: ...owing set up will enable you to do this JVTV 2040 VCR TV A V OUT A V OUT Make sure your TV shows the same image as your JVTV20 monitor MUST BE IN VCR MODE Click the channel changer on the VCR until th...

Страница 13: ...Mass 10 6 x9 3 x8 6 Monitor Power DC15V 1200mA Power consumption 20W Camera Resolution 380 Horizontal TV Lines Signal Noise Ratio 48dB Min Illumination 0 5LUX Integrated Lens 3 6mm View Range 78 Volt...

Отзывы: