JWA Caldwell 75118 Скачать руководство пользователя страница 10

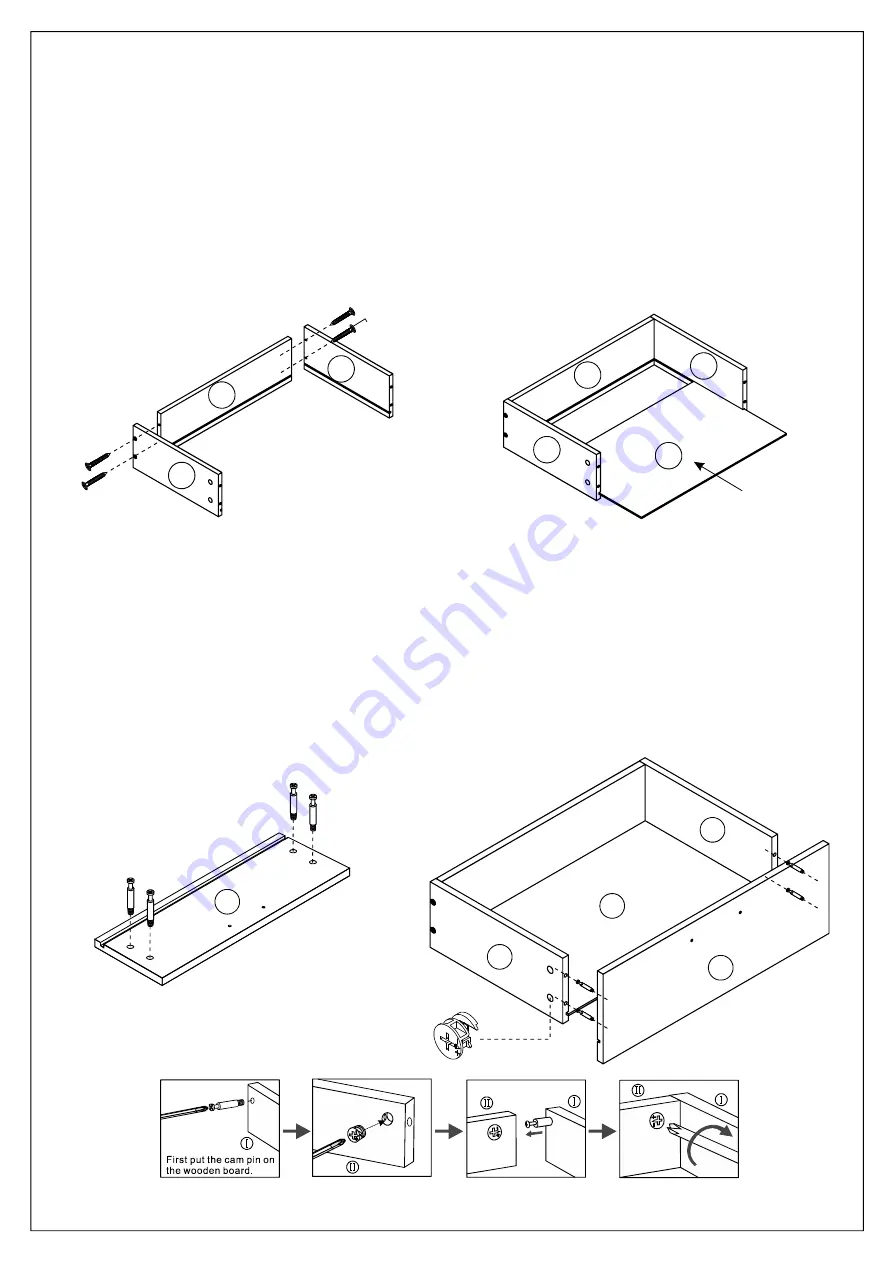
1. Attach panels 14 and 15 to panel 16 with part D.
2. Slide panel 17 along slots of panels 14 and 15.

1. Insert part A into panel 13.
2. Attach panel 13 to panels 14 and 15 with part A.

10

STEP 13:

STEP 14:

14

15

16

17

14

15

16

D

D

D

D

13

A

A

A

A

14

15

17

13

A

A

A

A

A

X3

X3

Содержание Caldwell 75118

Страница 1: ...Buffet CALDWELL ITEM CODE 75118 Imported by JWA Furniture Pty Ltd Qld Brisbane Australia For any assistance with assembly or for missing parts please refer to your receipt 0...

Страница 2: ......

Страница 3: ...pcs M 13 14 4pcs 15 13 14 16 17 X3 7 1 2 8 12 10 6 11 4 12 3 9 Top panel Bottom panel Left panel Left middle panel Right middle panel Right panel Baffle panel Front foot panel Back foot panel Cabinet...

Страница 4: ...1 Separate parts E1 and E2 runners as shown below 4 E1 E2 E1 E2 1 Attach part E1 to panels 4 and 5 with part C C C C C C C C C C C C C C C C C 4 5...

Страница 5: ...1 Insert part A into panel 1 2 Attach panel 7 to panel 1 with part A 5 1 Insert part A into panel 2 2 Attach panels 8 and 9 to panel 2 with part A 8 9 2 2 A A A A A 1 7 A A 1 A...

Страница 6: ...nd B into panel 2 2 Slide panel 11 along slot of panel 2 6 1 Attach panels 4 and 5 to panel 2 with parts A and B 2 Insert parts A and B into panel 1 2 11 2 B B A A B B A A 2 11 5 A A B B A 1 A A B B 4...

Страница 7: ...1 Attach panel 1 to panels 4 and 5 with parts A and B 7 1 Insert parts A and B into panels 4 and 5 STEP 7 STEP 8 1 11 5 A A A B B 4 A A A B B A B 4 5 B B B A A A...

Страница 8: ...nel 10 to panels 4 and 5 with parts A and B 8 1 Insert parts A and B into panel 3 2 Attach panel 3 to panels 1 2 8 9 and 10 with parts A and B STEP 9 STEP 10 A B 10 4 5 10 B B B A A A A B A B 3 2 1 10...

Страница 9: ...nd B into panel 6 2 Attach panel 6 to panels 1 2 8 9 and 10 with parts A and B 1 Attach part K to panel 12 with part C 2 Attach part J to panel 12 with part I STEP 11 STEP 12 I I J C C C C 12 K K X2 A...

Страница 10: ...l 16 with part D 2 Slide panel 17 along slots of panels 14 and 15 1 Insert part A into panel 13 2 Attach panel 13 to panels 14 and 15 with part A 10 STEP 13 STEP 14 14 15 16 17 14 15 16 D D D D 13 A A...

Страница 11: ...1 Attach part E2 to panels 14 and 15 with part C 2 Attach part J to panel 13 with part I 1 Attach part K to panels 3 and 6 with part C 11 STEP 15 STEP 16 13 14 15 C K 12 12 6 3 C C I I J X3...

Страница 12: ...1 Insert part G into panel 11 2 Insert part H to panel 11 with part F 1 Install drawers into the cabinet Ensure runners are correctly aligned 12 STEP 17 STEP 18 H F G G G G 13 13 13 11...

Страница 13: ...Install Tip Kit 1 Attach part M to the back of panel 7 with part C 2 Attach part M to the wall with part L 13 STEP 19 STEP 20 M L C M Assembly complete...

Страница 14: ...14...

Отзывы: