background image

Getting started

13

Getting

star

ted

XV-M565BK/XV-M567GD [UB, US, 3U, 4U, UX] EN
LVT0521 -013A

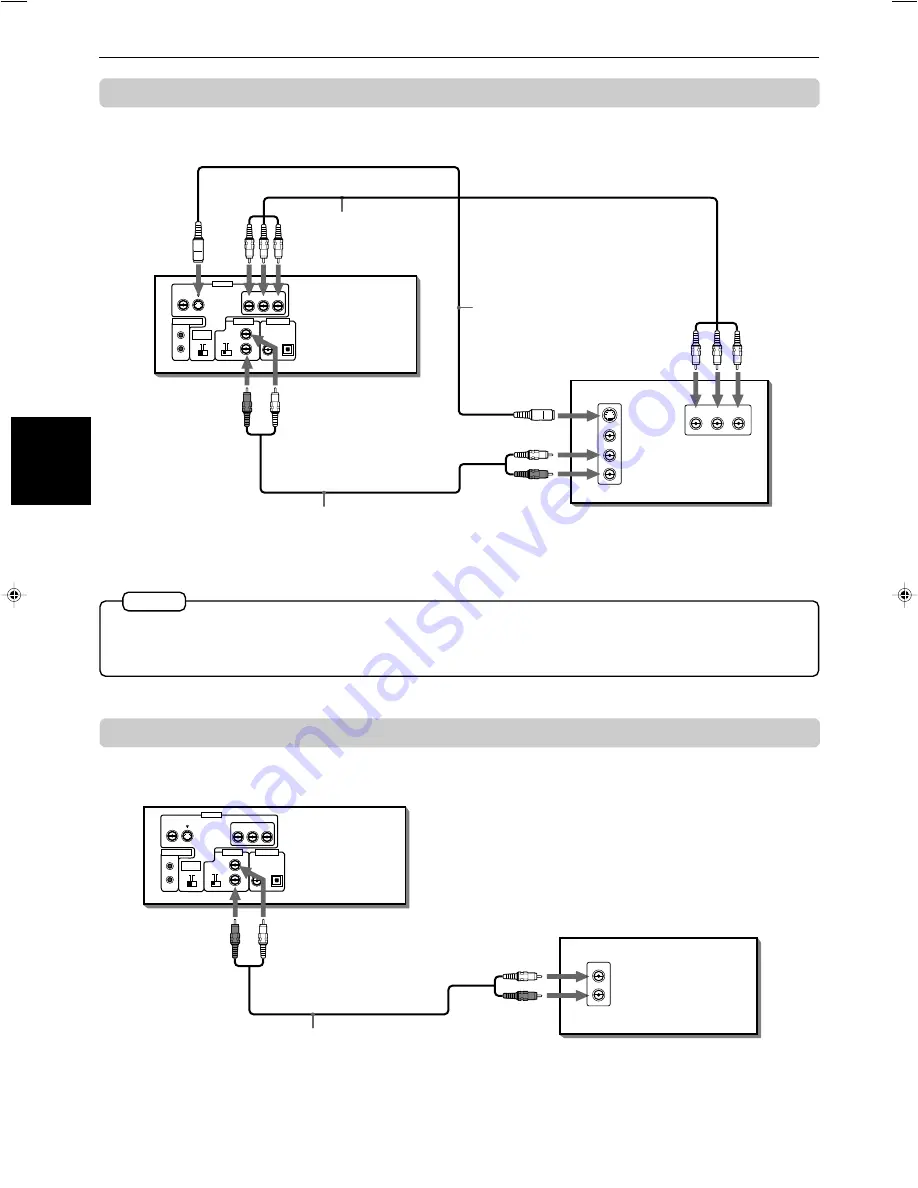
To connect to a TV with the component video input jacks

You can enjoy high picture quality by connecting the unit’s COMPONENT VIDEO OUT jacks to the COMPONENT
VIDEO IN jacks of your TV with the video cables.

• Connect “Y” to “Y,” “P

B

” to ”P

B

,” “P

R

” to “P

R

” correctly.

• When the component video input jacks of the TV is of the BNC type, use an adapter to convert a pin jack to a BNC jack

(optional).

• If you do not connect the unit with the S-video cable, some functions of your TV may not work.

To connect to an audio amplifier or receiver

You can enjoy high-quality audio by connecting the unit's audio output to your amplifier or receiver.

NOTES

VIDEO

AUDIO

RIGHT

LEFT

S-VIDEO

IN

Y

P

B

P

R

IN

OFF

ON

AUDIO OUT

ATTENUATOR

L

R

VIDEO S-VIDEO

Y

P

B

P

R

COMPONENT

AV COMPU LINK

NTSC

PAL

VIDEO OUT

SELECT

VIDEO OUT

OPTICAL

PCM / STREAM

COAXIAL

DIGITAL OUT

Audio cable
(not supplied)

Component video
cable (not supplied)

S-video cable
(supplied)

TV

The unit

White

Red

Red

Green Blue

Red

Green

Blue

Red

White

OFF

ON

AUDIO OUT

ATTENUATOR

L

R

VIDEO S-VIDEO

Y

P

B

P

R

COMPONENT

AV COMPU LINK

NTSC

PAL

VIDEO OUT

SELECT

VIDEO OUT

OPTICAL

PCM / STREAM

COAXIAL

DIGITAL OUT

AUDIO

RIGHT

LEFT

IN

• Connect the unit's AUDIO OUT to any line-level inputs (such as AUX, DVD, CD, etc.) of an audio amplifier or

receiver.

Audio cable
(not supplied)

The unit

Amplifier or receiver

White

Red

White

Red

EN12-16.XV-M565BK[U....]/3

7/4/00, 3:44 PM

13

Содержание XV-M565BK

Страница 1: ...1 TV 2 TV 3 RETURN TV VIDEO DISPLAY ANGLE DISC 2 DISC 3 CHOICE DISC 1 DVD TV 4 5 6 7 8 9 10 10 0 REMOTE CONTROL PLAY B SKIP PAUSE STOP ENTER F SKIP B SEARCH F SEARCH 1 2 3 KARAOKE RESERVE Introduction 1 Preliminary knowledge 4 Getting started 12 Basic operations 17 Advanced operations 21 Karaoke operation 36 Initial settings 43 Additional information 49 INSTRUCTIONS VIDEO CD STANDBY SHUTTLE DOLBY ...

Страница 2: ...cm from the top Back No obstructions in 15 cm from the back Bottom No obstructions place on the level surface CAUTION To reduce the risk of electrical shocks fire etc 1 Do not remove screws covers or cabinet 2 Do not expose this appliance to rain or moisture 1 CLASSIFICATION MARK PLACED ON REAR ENCLOSURE 2 WARNING LABEL PLACED INSIDE THE UNIT IMPORTANT FOR LASER PRODUCTS REPRODUCTION OF LABELS CAU...

Страница 3: ...ame 25 To display still pictures STROBE 25 To playback in slow motion SLOW 26 To zoom a scene ZOOM 26 Changing the playback order To playback in the desired order PROGRAM 27 To playback in random order RANDOM 28 Repeat playback To repeat the current selection or all disc contents REPEAT 28 To repeat a desired part A B REPEAT 29 Selecting a scene angle of DVD VIDEO To select a scene angle from the ...

Страница 4: ... 7 Triple disc trays You can insert up to three discs in the unit and can playback them continuously 7 Multi language subtitles and sound You can select a subtitle or sound language from those recorded on the DVD VIDEO disc 7 Multi disc playback You can enjoy Audio CD discs Video CD and SVCD discs as well as DVD VIDEO discs 7 Operation from the on screen display User friendly on screen displays al...

Страница 5: ...stopped The RANDOM indicator in the display window turns off To playback in random order RANDOM You can play titles or tracks on discs inserted in random order by using the Random function SLOW UP DOWN LEFT CURSOR RIGHT AMP VOL TV VOL TITLE MENU TV ch CANCEL SHIFT 3D PHONIC THEATER POSITION PLAY MODE TV TV 0 RETURN TV VIDEO 10 10 0 REMOTE CONTROL PLAY B SKIP PAUSE STOP ENTER F SKIP B SEARCH F SEAR...

Страница 6: ...near a heating device When you re away When away on travel or otherwise for an extended period of time remove the plug from the wall outlet Do not insert foreign objects into the unit Do not insert wires hairpins coins etc into the unit Do not block the vents Blocking the vents may damage the unit Care of the cabinet When cleaning the unit use a soft cloth and follow the relevant instructions on t...

Страница 7: ... respectively When after opening the DVD1 tray another 0 OPEN CLOSE button is pressed the DVD1 tray is first closed then the other DVD tray selected is opened 6 1 through 3 DISC buttons with indicators 18 Used to start playback of the disc in the tray corresponding with the number indicated on the button these function the same as the DISC 1 through 3 buttons on the remote control unit While playi...

Страница 8: ... button ANGLE ZOOM button TV ch button TV VOL button TV VIDEO THEATER POSITION button RETURN 3D PHONIC button F SKIP F SEARCH button ENTER button 8 PLAY MODE CANCEL button SLOW UP DOWN LEFT CURSOR RIGHT AMP VOL TV VOL TITLE MENU TV ch AUDIO SUBTITLE CANCEL SHIFT 3D PHONIC THEATER POSITION PLAY MODE TV DIGEST STROBE ZOOM TIME TV 0 TV 7 TV 8 TV 9 TV 4 TV 5 TV 6 TV 1 TV 2 TV 3 RETURN TV VIDEO DISPLAY...

Страница 9: ...on while holding down the SHIFT button turns the karaoke function of or off CURSOR 5 UP DOWN 2 LEFT 3 RIGHT buttons Used to select an item form a menu or on screen display or to change the setting of an item in the on screen display Infrared signal emitting window Point this window toward the remote sensor on the front panel when pressing buttons DVD TV button 16 17 Turns the unit on or off standb...

Страница 10: ...UT SELECT VIDEO OUT OPTICAL PCM STREAM COAXIAL DIGITAL OUT 9 AC IN connector 1 VIDEO OUT jack 2 S VIDEO OUT jack 4 COMPONENT VIDEO OUT jacks Y PB PR 5 AV COMPU LINK jacks 6 AUDIO OUT jacks L R 8 DIGITAL OUT jacks COAXIAL OPTICAL 3 VIDEO OUT SELECT NTSC PAL switch 7 ATTENUATOR ON OFF switch 1 VIDEO OUT jack 12 Outputs a composite video signal 2 S VIDEO OUT jack 12 Outputs an S video signal 3 VIDEO ...

Страница 11: ...while holding the SHIFT button brings up the preference display for setting the preferences There are four pages LANGUAGE AUDIO DISPLAY and SYSTEM as shown in the right See page 43 for detailed information PARENTAL LOCK displays When no disc is inserted or a DVD VIDEO disc is stopped pressing the ENTER button while holding down the SHIFT button brings up the PARENTAL LOCK display in which you can ...

Страница 12: ... VIDEO function status display and the disc time display and off For a SVCD Video CD or Audio CD disc pressing the DISPLAY TIME button switches the disc time display on and off ENGLISH ENGLISH 1 2 1 2 1 2 3 1 25 2 25 25 3 3 DISC TITLE CHAP TIME BITRATE Mbps 3 1 00 08 DISC TRACK TIME EACH REMAIN 3 1 25 25 PBC DISC TRACK TIME DVD VIDEO function status Disc time DVD VIDEO Disc time Audio CD SVCD Vide...

Страница 13: ...r To select a number higher than 10 Use the 10 button Examples To select 13 10 3 To select 34 10 10 10 4 To select 40 10 10 10 10 To enter a time or chapter number The method for entering a time for Time search or chapter number for Chapter search is different from above See the corresponding sections in this manual for the details To select a TV channel You can use the buttons for selecting TV ch...

Страница 14: ...D TEXT CD R CD RW Playing back discs listed as Non playable discs in the table above may generate noise and damage speakers This unit can play back audio recorded in CD G CD EXTRA and CD TEXT discs Disc structure A DVD VIDEO disc is comprised of titles while an Audio CD Video CD or SVCD is comprised of tracks Each title may be divided into some chapters For example if a DVD VIDEO disc contains som...

Страница 15: ... unit using the supplied S video cable in addition to the standard video connection to get better picture quality Set the ATTENUATOR switch to OFF normally If you hear audio sound distorted because the sensitivity of the audio input of your TV is too high set the switch to ON The unit is compatible with the PAL and NTSC color systems Set the VIDEO OUT SELECT switch on the rear panel to match the c...

Страница 16: ...dio by connecting the unit s audio output to your amplifier or receiver NOTES VIDEO AUDIO RIGHT LEFT S VIDEO IN Y PB PR IN OFF ON AUDIO OUT ATTENUATOR L R VIDEO S VIDEO Y PB PR COMPONENT AV COMPU LINK NTSC PAL VIDEO OUT SELECT VIDEO OUT OPTICAL PCM STREAM COAXIAL DIGITAL OUT Audio cable not supplied Component video cable not supplied S video cable supplied TV The unit White Red Red Green Blue Red ...

Страница 17: ...k is not used fix the protection cap into the jack Coaxial digital cable not supplied When you connect the unit s DIGITAL OUT to digital audio equipment before using make the DIGITAL AUDIO OUTPUT setting in the AUDIO page of the preference display correctly according to the connected audio equipment If the DIGITAL AUDIO OUTPUT is not set correctly loud noise may be generated from speakers causing ...

Страница 18: ... cover over the compartment and press down lightly The batteries will last about six months with normal use If the functions of the remote control become erratic replace the batteries See below for more information Precautions for the safe use of batteries Observe the following precautions for the safe use of batteries If they are used improperly their life will be shortened they may burst or thei...

Страница 19: ...SC 3 CHOICE DISC 1 DVD TV 4 5 6 7 8 9 10 10 0 REMOTE CONTROL PLAY B SKIP PAUSE STOP ENTER F SKIP B SEARCH F SEARCH 1 2 3 KARAOKE RESERVE TV VIDEO THEATER POSITION Numeric buttons DVD TV to SHIFT 10 1 TV 0 TV TV 1 10 0 THEATER POSITION TV VIDEO TV VOL DVD TV SHIFT TV ch Turns the TV on or off Changes the TV channels Adjusts the TV volume Selects the TV channels For some TVs pressing 10 while holdin...

Страница 20: ...en if you press the or DVD TV button to turn off the unit the unit is not disconnected from the AC power source as long as it is connected to the wall outlet This state is called the standby mode In this state the unit consumes a very small amount of power NOTE Inserting and removing discs 1 Press 0 OPEN CLOSE located on the right of the disc tray you want to open The corresponding disc tray opens...

Страница 21: ...owing sequence and then stops DISC1 DISC2 DISC3 The unit changes the playback disc when the current disc finishes and stops playback Therefore if the current disc is a DVD VIDEO disc or a Video CD disc with PBC function it may not finish playback and the unit may not change the disc and playback the next disc Basic control buttons To stop playback completely Press STOP The unit stops playback To s...

Страница 22: ...b To advance playback rapidly turn the shuttle knob to the right and hold and to reverse play rapidly turn the shuttle knob to the left and hold By releasing the shuttle knob the unit returns to normal playback The playback speed changes according to the amount you turn the shuttle knob To locate the beginning of the scene or song 7 During playback Press 4 or Press 4 to locate the beginning of the...

Страница 23: ...u interrupt playback last time is still in the disc tray Press PLAY The unit starts playback from the position where you interrupted playback last time To clear the resume position memory Carry out one of the following Take out the disc from the tray Press a DISC 1 3 button Press STOP while stopped Turn on the unit by pressing DVD TV on the remote control or on the front panel NOTES If you want to...

Страница 24: ... select a desired item then press ENTER The unit starts playback of the selected item With some discs you can also select items by entering the corresponding number using the numeric buttons which may cause the unit to automatically start playback When appears on the TV screen by pressing TITLE in step 1 The disc does not have a menu listing the titles When appears on the TV screen by pressing MEN...

Страница 25: ...ed For an Audio CD Video CD or SVCD a track is specified The unit starts playback from the beginning of the selection See page 10 for details about how to use the numeric buttons During DVD VIDEO playback if a menu is shown on the TV screen the numeric buttons may be used for selecting an item in the menu When appears on the TV screen The title or track you have specified is not contained in the d...

Страница 26: ... then press ENTER GO TO appears under the menu 3 Use the numeric buttons 0 9 to enter the time You can specify the elapsed time of the current title or track to set the location which you want to playback from You can also locate a desired chapter directly by specifying the chapter number using the numeric buttons during playback except a menu is shown See page 22 When the chapter number is incorr...

Страница 27: ...ning scene of each track appears on the TV screen 2 Use CURSOR 2 3 5 to select the desired scene The selected scene is indicated by If there are more than 9 scenes the digest screen will have more than one page In this case pressing advances to the next page while pressing 4 returns to the previous page Selected time for DVD VIDEO for Audio CD for Video CD SVCD Selected time Selected time GO TO 2 ...

Страница 28: ...ntinuous photographs press PAUSE The unit pauses playback 2 Press AUDIO STROBE while holding down SHIFT Nine continuous still pictures appear on the TV screen When the lower right scene is selected pressing CURSOR 3 advances to the next page if available Similarly when the upper left scene is selected pressing CURSOR 2 returns to the previous page if available When there are more than one digest p...

Страница 29: ... 2 1 DVD SUPER VIDEO CD VIDEO CD CD 1 2 3 4 5 6 7 8 9 10 0 10 STOP PAUSE PLAY SKIP DISC TITLE CHAP RESUME THEATER DVD KARAOKE ON OFF EACH NOTES Pressing and holding PAUSE for more than 1 second also activates the Strobe function If you press AUDIO STROBE while holding down SHIFT during playback nine still pictures also appear but they advance in realtime The sound is muted during slow motion playb...

Страница 30: ...ROGRAM indicator in the display window turns off Note that the program remains To clear the program press STOP while the program table is shown on the TV screen Some DVD VIDEO discs may not be played back correctly in program mode During program playback pressing skip to the next selection of the program Pressing 4 returns to the beginning of the current selection however you cannot skip back to t...

Страница 31: ...back mode so pressing PLAY starts random playback again To quit random playback press STOP again while stopped The RANDOM indicator in the display window turns off To playback in random order RANDOM You can play titles or tracks on discs inserted in random order by using the Random function SLOW UP DOWN LEFT CURSOR RIGHT AMP VOL TV VOL TITLE MENU TV ch CANCEL SHIFT 3D PHONIC THEATER POSITION PLAY ...

Страница 32: ...T1 TITLE REPEAT or CHAPTER REPEAT mode the unit stops playback and quits the mode To quit repeat playback With pointed at REPEAT press ENTER repeatedly until the mode is set to off SLOW UP DOWN LEFT CURSOR RIGHT AMP VOL TV VOL TITLE MENU TV ch AUDIO SUBTITLE CANCEL SHIFT 3D PHONIC THEATER POSITION PLAY MODE TV DIGEST STROBE ZOOM TIME TV 0 TV 7 TV 8 TV 9 TV 4 TV 5 TV 6 TV 1 TV 2 TV 3 RETURN TV VIDE...

Страница 33: ...tep 2 during DVD VIDEO playback You cannot repeat the selected portion because of the disc contents The A B REPEAT function cannot be used during program playback NOTES Selecting a scene angle of DVD VIDEO You can enjoy a variety of scene angles if the DVD VIDEO disc contains multi angle parts where multiple cameras were used to shoot the same scene from different angles At the beginning of multi ...

Страница 34: ...eration above audio is muted NOTES 7 During playback Changing the language and sound For DVD VIDEO discs you can select the subtitle language as well as the audio language sound included on a disc For Video CD and SVCD discs you can select the audio channel s To select the subtitle language SUBTITLE SLOW UP DOWN LEFT CURSOR RIGHT AMP VOL TV VOL TITLE MENU TV ch AUDIO SUBTITLE CANCEL SHIFT 3D PHONI...

Страница 35: ... selected language may be abbreviated on the TV screen See Appendix A Table of languages and their abbreviations at the end of this manual The Subtitle selection display will automatically disappear if you do not change the subtitle for 10 seconds To turn off the Subtitle selection display manually press ENTER When appears on the TV screen You cannot select the subtitle NOTES For Video CD SVCD Eac...

Страница 36: ...ected 3D phonic mode Selecting the picture character You can select the quality of the image from among four options OFF 1 2 and 3 according to the type of programming picture tone or personal preferences To select the picture character THEATER POSITION 7 During playback 1 Press TV VIDEO THEATER POSITION while holding down SHIFT The theater position display appears on the TV screen 2 Select the de...

Страница 37: ...phonic display manually press ENTER With a Video CD or SVCD disc when making the AUDIO setting to L or R for a Video CD disc or L 1 R 1 L 2 or R 2 for an SVCD disc you cannot use the 3D function i e the 3D Phonic mode is fixed to OFF Conversely when the 3D Phonic function is active changing the AUDIO setting to L or R from STEREO cancels the 3D Phonic function The 3D phonic function works correctl...

Страница 38: ... 2 To change the time display mode only for Audio CD or Video CD SVCD without PBC press DISPLAY TIME while holding down SHIFT The time display mode cycles as below 7 While stopped You can check the total disc time and current selected track time of an Audio CD Video CD SVCD only from the front panel display window 1 Press DISPLAY TIME while holding down SHIFT When EACH and REMAIN are indicated the...

Страница 39: ...ng you can easily select the desired song using the numeric buttons When the KARAOKE function is inactive using the numeric button selects a DVD chapter during playback During program or random playback you cannot turn on the KARAOKE function NOTES SLOW UP DOWN LEFT CURSOR RIGHT AMP VOL TV VOL TITLE MENU TV ch AUDIO SUBTITLE CANCEL SHIFT 3D PHONIC THEATER POSITION PLAY MODE TV DIGEST STROBE ZOOM T...

Страница 40: ... on the TV screen and use the DISC and numeric buttons to select the song s you want to reserve To insert a song to be reserved Move to the position where you want to insert a song using CURSOR 2 3 then press the DISC and numeric button to select the song you want to reserve To cancel a reserved song Move to the song you want to cancel using CURSOR 2 3 then press PLAY MODE CANCEL while holding dow...

Страница 41: ...to be played back Example For DVD Multi audio karaoke 1 3 With guide vocal 2 3 Accompaniment only 3 3 1 1 AUDIO L R KARAOKE SOUND NORMAL VOCAL 2 ECHO OFF EFFECT 0 KEY CONTROL To turn off the Karaoke menu Press DISPLAY TIME When appears on the TV screen The disc does not contain multi audio tracks or the disc prohibits the audio selection NOTES 1 3 AUDIO Total number of audio tracks Selected sound ...

Страница 42: ...Y CONTROL 3 Use CURSOR 5 to select MASK Pressing CURSOR 5 cycles the vocal mode as shown below Pressing CURSOR cycles the mode in reverse order NORMAL MASK REPLACE 3 Use CURSOR 5 to select the desired sound to be played back Example 1 A multi sound Karaoke DVD Pressing CURSOR 5 button cycles the sound as follows Pressing CURSOR cycles the sound in reverse order With guide vocal 1 1 With guide voca...

Страница 43: ...ur voice when you stop singing It may be useful for practicing Karaoke NORMAL MASK REPLACE 7 The recorded voice guide vocal is played back only when no sound is fed to the microphone s To turn off the Karaoke menu Press DISPLAY TIME When playing back a disc with the multiplex audio or with multi sound Karaoke the guide vocal is not played back at all With other discs the voice may not be satisfact...

Страница 44: ...ESERVE 1 To turn off the Karaoke menu Press DISPLAY TIME NOTE Adding various effects to the vocal VOCAL EFFECT 7 When the KARAOKE function is active 1 Press DISPLAY TIME The Karaoke menu appears on the TV screen 2 Use CURSOR 2 3 to move to EFFECT 3 Use CURSOR 5 to select the effect Pressing CURSOR 5 button cycles the effect as follows Pressing CURSOR cycles the effect in reverse order OFF CHORUS F...

Страница 45: ...ack NOTES Operating from the remote control unit 7 When the KARAOKE function is active 1 Press DISPLAY TIME The Karaoke menu appears on the TV screen 2 Use CURSOR 2 3 to move to KEY CONTROL 3 Use CURSOR 5 to shift the musical key Pressing CURSOR 5 raises the key Pressing CURSOR drops the key The key shift status appears in the front panel display window and on the TV screen in the same way as it a...

Страница 46: ...ISPLAY and SYSTEM To turn the page move to the desired tab using CURSOR 2 3 2 Move to select the item you want to set by using CURSOR 5 3 Press CURSOR 2 3 to select the setting you want To turn off the preference display press DISC 1 CHOICE while holding down SHIFT or move to EXIT and press ENTER For details about each setting see the following paragraphs AUDIO DISPLAY SYSTEM MENU LANGUAGE ENGLISH...

Страница 47: ...nit does not provide the DTS decoding function When playing a DVD VIDEO or Audio CD disc with DTS use a DTS decoder to get correct signals from your speakers Never use the unit s analog output jacks which output incorrect signals that may damage your speakers If you connect the analog outputs and digital outputs simultaneously be sure to select the source of the amplifier correctly or set the leve...

Страница 48: ...connect a normal TV to the unit When you play a wide picture recorded on a DVD VIDEO disc the picture is displayed with bands across the upper and lower portions of the screen 4 3 PS Pan Scan Conversion When you connect a normal TV to the unit When you play a wide picture recorded on a DVD VIDEO disc a portion of the picture is automatically cut off from the left and right sides of the image Depen...

Страница 49: ...be on or off See page 20 ON Pressing PLAY while stopped or on standby starts playback from the resume point if it is memorized OFF Pressing PLAY while stopped or on standby starts playback from the beginning of the disc AV COMPULINK MODE If you use the AV Compulink system you must set this item correctly Select from the three options DVD1 DVD2 and DVD3 according to the equipment to be connected Se...

Страница 50: ... time you press CURSOR 2 3 the parental level changes as follows 5 Press ENTER moves to PASSWORD 6 Enter your 4 digit password using the numeric buttons 0 to 9 1 is the strictest level means no restriction Discs rated higher than the selected level are restricted Country Code MY 1 EXIT Set Level PASS WORD NEW PASSWORD PRESS 0 9 KEY PARENTAL LOCK Country Code MY 1 EXIT Set Level PASS WORD PRESS KEY...

Страница 51: ... moves to NO automatically and CURSOR 5 do not work NOTE PARENTAL LOCK Temporary Level Change This DISC can t play now PASSWORD YES NO PRESS ENTER EXECUTE To change the settings PARENTAL LOCK You can change the Parental lock settings later 7 While a DVD VIDEO disc is stopped or no disc is inserted 1 Press ENTER while holding down SHIFT The Parental Lock on screen display appears on the TV screen p...

Страница 52: ...setting as follows When connecting to VIDEO 1 input terminal of the television DVD player s AV COMPU LINK setting DVD2 VCR s Remote Control Code B When connecting to VIDEO 2 input terminal of the television DVD player s AV COMPU LINK setting DVD3 VCR s Remote Control Code A If you connect a DVD player to a television and receiver via AV COMPU LINK set the DVD player s AV COMPU LINK setting to DVD1...

Страница 53: ...nstruction manual of a television or VCR However a television or VCR with AV COMPU LINK terminals indicating II or EX can be connected to a DVD player Operation You can enjoy pictures and or sound by just putting a source component which plays back the pictures and or sound such as a DVD player or VCR into play mode You do not have to operate the TV and receiver including not having to perform pow...

Страница 54: ...d on top of one another without their protective cases they can be damaged Do not put discs in a location where they may be exposed to direct sunlight or in a place where the humidity or temperature is high Avoid leaving discs in your car Maintenance of discs If there are fingerprints or other dirt adhering to a disc wipe with a soft dry cloth moving from the center outwards If a disc is difficult...

Страница 55: ... the copyguard function is activated Connection is incorrect Input selection of amplifier is incorrect The audio signal is derived from the unit s DIGITAL OUT Disc is dirty MONITOR TYPE is not correctly set Television is not correctly set Microcomputer malfunction due to lightning or static electricity Moisture condensation caused by a sudden change of temperature or humidity Remedy Plug in secure...

Страница 56: ...1 0 Vp p 75 Ω C Output 286 mVp p 75 Ω Horizontal resolution 500 Lines Signal to noise ratio 65 dB Audio output ANALOG OUT pin jack ATTENUATOR OFF 2 0 Vrms 10 kΩ ATTENUATOR ON 1 0 Vrms 10 kΩ DIGITAL OUT COAXIAL 0 5 Vp p 75 Ω termination OPTICAL 21 to 15 dBm Peak Audio intput MIC1 MIC2 2 mVrms 8 2 kΩ Audio characteristics Frequency response CD sampling frequency 44 1 kHz 2 Hz to 20 kHz DVD sampling ...

Страница 57: ...onesian IS Icelandic IW Hebrew JI Yiddish JW Javanese KA Georgian KK Kazakh KL Greenlandic KM Cambodian KN Kannada KO Korean KOR KS Kashmiri KU Kurdish KY Kirghiz LA Latin LN Lingala LO Laothian LT Lithuanian LV Latvian Lettish MG Malagasy MI Maori MK Macedonian ML Malayalam MN Mongolian MO Moldavian MR Marathi MS Malay MAY MT Maltese MY Burmese NA Nauru NE Nepali NL Dutch NO Norwegian OC Occitan ...

Страница 58: ...a ER Eritrea ES Spain ET Ethiopia FI Finland FJ Fiji FK Falkland Islands Malvinas FM Micronesia Federated States of FO Faroe Islands FR France FX France Metropolitan GA Gabon GB United Kingdom GD Grenada GE Georgia GF French Guiana GH Ghana GI Gibraltar GL Greenland GM Gambia GN Guinea GP Guadeloupe GQ Equatorial Guinea GR Greece GS South Georgia and the South Sandwich Islands GT Guatemala GU Guam...

Страница 59: ...U Russian Federation RW Rwanda SA Saudi Arabia SB Solomon Islands SC Seychelles SD Sudan SE Sweden SG Singapore SH Saint Helena SI Slovenia SJ Svalbard and Jan Mayen SK Slovakia SL Sierra Leone SM San Marino SN Senegal SO Somalia SR Suriname ST Sao Tome and Principe SV El Salvador SY Syrian Arab Republic SZ Swaziland TC Turks and Caicos Islands TD Chad TF French Southern Territories TG Togo TH Tha...

Страница 60: ...VICTOR COMPANY OF JAPAN LIMITED J VC EN 0700RIMUBNJEM ...

Отзывы: