background image

VR-N900U

LST0577-001A

Powered by Milestone

ENGLISH

DEUTSCH

FR

ANÇAIS

E

S

P

AÑOL

IT

ALI

A

NO

NETWORK VIDEO RECORDER

STARTUP GUIDE

(A)

When this device is used as a general
household, there is a possibility of radio
disturbance to the radio and television
receiver etc.

Please read the following before getting started: 

Thank you for purchasing this JVC product.
Before operating this unit, please read the instructions
carefully to ensure the best possible performance.

For Customer Use: 

Enter below the Serial No. which is located on the
body.
Retain this information for future reference.
Model No.

VR-N900U 

Serial No.

Precautions for use 

• The hard disk drive (HDD) contained within this 

Digital video recorder is a fragile, precision 
apparatus. Handle it with extreme care and do not 
subject it to physical shock.

• The HDD is most susceptible to damage when the 

unit is on or when the HDD is being accessed.

• Before moving the network video recorder, wait one 

minute after unplugging the power cord.

• Do not switch off the power on the rear panel or 

unplug the power cord during recording or playback, 
or when the hard disk drive is being accessed. It will 
result in damage.

Содержание VR-N900U

Страница 1: ...e Enter below the Serial No which is located on the body Retain this information for future reference Model No VR N900U Serial No Precautions for use The hard disk drive HDD contained within this Digital video recorder is a fragile precision apparatus Handle it with extreme care and do not subject it to physical shock The HDD is most susceptible to damage when the unit is on or when the HDD is bei...

Страница 2: ...rt the plug into the outlet contact your electrician to replace your obsolete outlet Do not defeat the safety purpose of the grounding plug 11 For added protection for this product during a lightning storm or when it is left unattended and unused for long periods of time unplug it from the wall outlet and disconnect the antenna or cable system This will prevent damage to the product due to lightni...

Страница 3: ...erference when the equipment is operated in a commercial environment This equipment generates uses and can radiate radio frequency energy and if not installed and used in accordance with the instruction manual may cause harmful interference to radio communications Operation of this equipment in a residential area is likely to cause harmful interference in which case the user will be required to co...

Страница 4: ...letter N or which is coloured BLACK The wire which is coloured BROWN must be connected to the terminal which is marked with the letter L or coloured RED POWER SYSTEM Connection to the mains supply This unit operates on voltage of 120 V to 240 V AC 50 Hz 60 Hz WARNING TO REDUCE THE RISK OF FIRE OR ELECTRIC SHOCK DO NOT EXPOSE THIS APPLIANCE TO RAIN OR MOISTURE CAUTION To prevent electric shock do n...

Страница 5: ...opean Union If you wish to dispose of this product please do so in accordance with applicable national legislation or other rules in your country for the treatment of old electrical and electronic equipment WARNING It should be noted that it may be unlawful to re record pre recorded tapes records or discs without the consent of the owner of copyright in the sound or video recording broadcast or ca...

Страница 6: ...m Land zur Behandlung elektrischer und elektronischer Geräte SPANNUNGSVERSORGUNG Anschluss am Netz Die Betriebsspannung für dieses Gerät beträgt AC120 V bis 240 V 50 Hz 60 Hz ACHTUNG UM DER GEFAHR VON BRÄNDEN UND ELEKTRISCHEN SCHLÄGEN VORZUBEUGEN DARF DIESES GERÄT WEDER DEM REGEN NOCH HOHER FEUCHTIGKEIT AUSGESETZT WERDEN ACHTUNG Um elektrische Schläge zu vermeiden das Gehäuse nie öffnen Im Innern ...

Страница 7: ...hutzkontaktstecker einem Stecker mit Erdungsbügeln an beiden Seiten ausgestattet Dieser Stecker lässt sich nur in eine geerdete Schutzkontaktsteckdose einstecken Dies dient Ihrer Sicherheit Falls sich der Stecker nicht problemlos in die Steckdose einstecken lassen sollte lassen Sie die veraltete Steckdose von einem Elektriker austauschen Versuchen Sie niemals die Sicherheit die Ihnen ein Schutzkon...

Страница 8: ...er die Kante des Recorders hinausragt auf den Recorder stellen kann dieser aus dem Gleichgewicht geraten Dadurch besteht die Gefahr dass der Recorder kippt oder auf den Boden fällt und Verletzungen verursacht Steigen Sie nicht auf den Recorder Der Recorder könnte umfallen oder beschädigt werden Achten Sie besonders auf kleine Kinder Stellen Sie keine wasserhaltigen Gegenstände auf dem Recorder ab ...

Страница 9: ...auf den VR N900U wenn dieser in einem Rack montiert ist Dies kann durch Ungleichgewicht zum Herunterfallen des Recorders führen und Verletzungen oder Schäden verursachen Werden zwei oder mehrere Recorder in dem Rack eingebaut achten Sie darauf dass der Abstand mindestens die Größe eines Recorders beträgt Bauen Sie den VR N900U nicht in ein Rack ein wenn die Umgebungstemperatur 40 C oder mehr beträ...

Страница 10: ...RECAUTIONS 11 Copyrights 12 Part Names and Functions 13 Preparation Installing the VR N900U to EIA Rack 19 System Connection Example 19 Initial Setup 20 Basic Operation Viewing Live Images 23 Viewing Recorded Images 25 Others Troubleshooting 26 Specifications 27 This STARTUP GUIDE deals only with the initial setup and basic operational procedures on the VR N900U Besides the STARTUP GUIDE the VR N9...

Страница 11: ... electric shock Do not insert foreign objects into the recorder If any metal object or flammable item gets into the recorder through the ventilation openings etc it may lead to fire or electric shock Maintaining the recorder Wipe the recorder with a soft cloth Do not use thinner or benzene as this may cause the surface to dissolve or tarnish For stubborn stains wipe first with a water diluted neut...

Страница 12: ... images will be erased when replacing hard disks Note that there are cases where recorded images may be erased when software is upgraded CAUTION Consult your nearest JVC dealer for details of the recommended HDD when HDD needs to be exchanged or you increase it Any other non approved HDD may cause system instability Consumable Parts The table below is a list of the consumable parts The parts fee t...

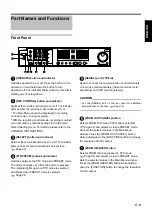
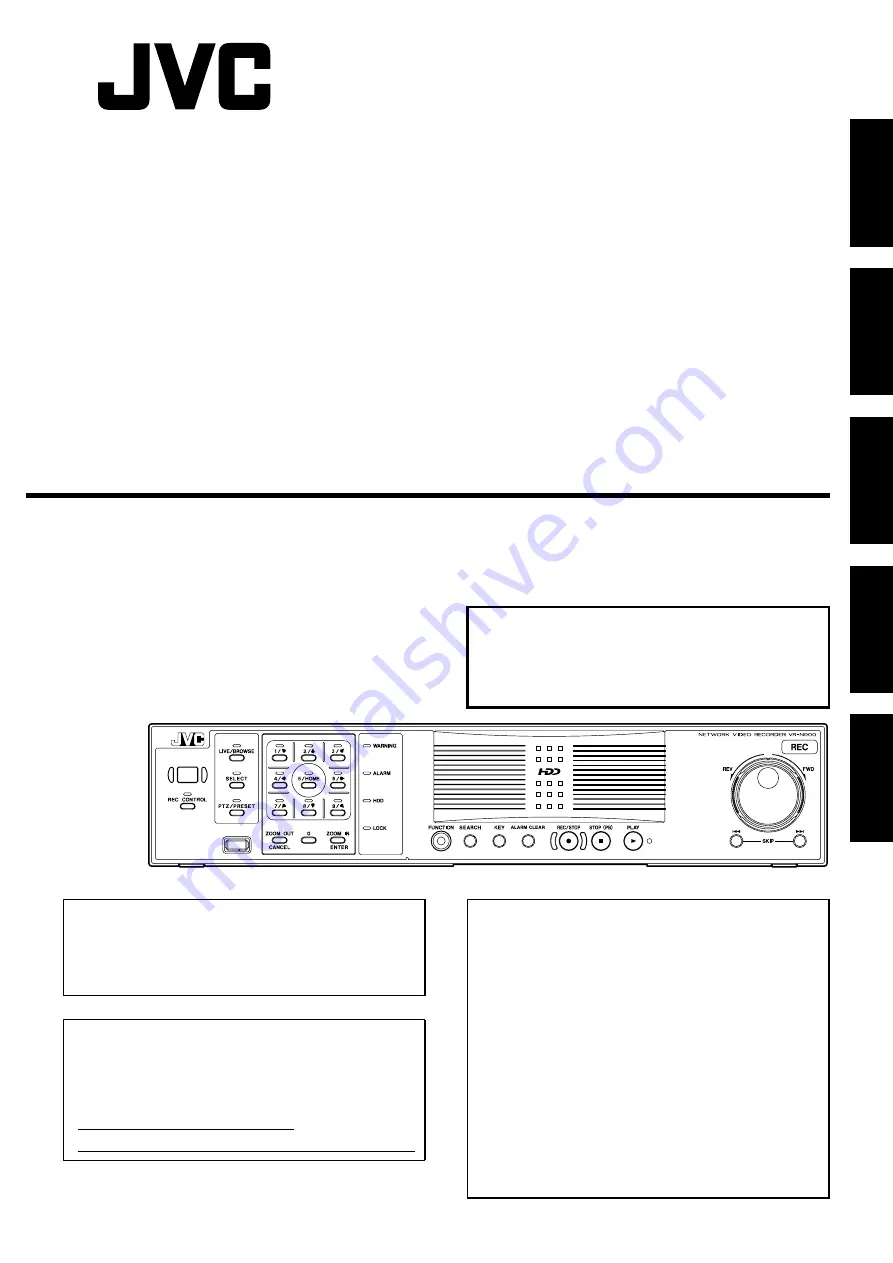
Страница 13: ...t to on Page 23 4 PTZ PRESET button and indicator Switches between the PTZ mode and PRESET mode The mode changes each time the button is pressed The indicator lights up when PTZ mode is selected and blinks when PRESET mode is selected Page 24 5 SERIAL port TYPE A Used to connect the communication control terminals on a mouse sold separately flash memories sold separately and UPS sold separately CA...

Страница 14: ...g control mode Recording will not be started in cameras to which no video signal is being input With the forced recording mode recording is carried out in all cameras regardless of the settings in the Camera Record Setting menu Recording is carried out in accordance with the frame rate selected in the Image storage settings For details please refer to the VR N900U INSTRUCTIONS 14 STOP PB button St...

Страница 15: ...responds to the selected camera input lights up during camera selection mode Used to move the camera to the specified position during PTZ mode to enter the preset number during PRESET mode and to narrow down the search date month week and time in the search mode When the Main Menu is displayed press or button to move the option highlight These buttons are also used as numeric keys 22 LIVE BROWSE b...

Страница 16: ... sold separately flash memories sold separately UPS sold separately and additional disk drives sold separately 7 Connector cover CAUTION Do not remove the connector cover 8 LAN 2 connection interface Intranet network For connection to the remote PC network using a LAN cable 9 CAMERA CONTROL terminal Lets you control the analog cameras 10 LAN 1 connection interface Camera network For connection to ...

Страница 17: ... being input 5 OPE ON OFF terminal Switches between OPERATE on or off when a signal is input Output ports 6 COMMON terminal The common grounding terminal Connected to the signal grounding terminal on the connected device This can be used when there are insufficient common grounding terminals 7 ALARM OUT terminal Outputs a signal when recording is started by an alarm 8 WARNING OUT terminal Outputs ...

Страница 18: ...the output impedance to 10kΩ or less Make Contact Input EXT REC IN Set the output impedance to 10kΩ or less Make Contact Input OPE ON OFF Set the output impedance to 10kΩ or less Make Contact Input REC TALLY ALARM OUT WARNING OUT OPTION OUT 1 2 Open collector DC15V 10mA or less 250ms or more 250ms or more Break Make 250ms or more 250ms or more 1s or more Approx 50ms Switches to off when OPERATE is...

Страница 19: ...stem of analog cameras and IP cameras connected to the VR N900U and using a VGA monitor You can connect up to 9 cameras of which up to 4 can be analog cameras Note The following operations are possible with this system Surveillance viewing recording playback by connecting up to 9 cameras Checking recorded images on the VGA monitor CAUTION Connect the IP camera to the LAN1 network Connect the IP ca...

Страница 20: ...efer to the INSTRUCTIONS on how to specify a Time zone settings Starting Up the VR N900U 1 Turn the power switch on the rear panel to ON The VR N900U will start up Selecting a Language The Language Setting window will appear when the VR N900U is started up for the first time Follow the instructions below to select the language you want to use 1 Select the language you want to use Use the or button...

Страница 21: ...ected When the message disappears the detected camera will be added to the list If the camera is indicated as Analog In it is an analog camera connected to the VIDEO IN terminal on the rear panel For analog cameras select NTSC or PAL on the screen Note In the VR N900U analog input circuitry is considered an IP video server and the IP address 192 168 201 12 has been set You cannot change this IP ad...

Страница 22: ...eps 5 to 7 for each detected camera The Camera Record Setting window will appear 9 Select Exit with the SKIP button then press the ZOOM IN ENTER button Setup will be ended and the Live Viewing window will appear You can see all the registered cameras in the Default View at the top of the window Camera Record Setting window Live Viewing window Keypad ZOOM IN ENTER button SKIP button KEY button ...

Страница 23: ...d square indicators with the following functions Event indicator left indicator solid yellow Lights up when events specified in the Camera Record Setting application occur The indicator appears black if event indication has not been specified for the camera in question or if no specified events have occurred Motion indicator indicator in the middle solid red Lights up when motion is detected Onlin...

Страница 24: ...een PTZ mode indicator lights up and PRESET mode indicator blinks each time the button is pressed 2 Press the ZOOM IN ENTER button or the ZOOM OUT CANCEL button Using Preset Positions 1 Press the PTZ PRESET button to select preset mode The mode switches between PTZ mode indicator lights up and PRESET mode indicator blinks each time the button is pressed 2 Enter the preset number with the numeric k...

Страница 25: ...e image display window on the right from the selected date and time Playing Back Skipping and Stopping Recorded Images Use the PLAY SKIP and STOP buttons Playing Back 1 Press the PLAY button Playback will start from the date and time displayed in the Master Time area of the Time Navigation window Playback speed is selectable from x 1 20 x 1 5 x 1 x 2 x 5 x 10 and x 20 according to the shuttle dial...

Страница 26: ...l mode Unable to play back sound Check that audio for the camera device is set to Enable in the Camera Record Setting window Error message Possible cause and solution WARNING HDD 0 1 The HDD seems to be no longer serviceable Replacement is recommended Consult to your nearest JVC dealer OVERHEATED Check the temperature of the operating environment Check that the fan unit operates properly If the te...

Страница 27: ...A x 2 8 dBs 10 kΩ or more unbalanced Audio output Analog audio RCA x1 8 dBs 600 Ω or less unbalanced Control terminal RS 485 D Sub 9 pin male 1 In Out terminal Push terminal Input x 8 Output x 5 GND x 3 Compression format Video JPEG MPEG 4 IP camera JPEG analog camera Audio µ law 64 Kbps A D 8 bit Fs 8 kHz Recording HDD capacity 250 GB Accessories STARTUP GUIDE this manual 1 CD ROM INSTRUCTIONS 1 ...

Страница 28: ......

Страница 29: ...bsanweisungen Das in diesem Digitalvideorekorder installierte Festplattenlaufwerk ist ein empfindliches Präzisionsgerät Behandeln Sie es bitte mit Vorsicht und setzen Sie es keinen Erschütterungen aus Das Festplattenlaufwerk ist besonders anfällig wenn das Gerät eingeschaltet ist oder auf das Laufwerk zugegriffen wird Bitte warten Sie eine Minute nach Ziehen des Netzsteckers bevor Sie den Videorek...

Страница 30: ...ur Behandlung elektrischer und elektronischer Geräte SPANNUNGSVERSORGUNG Anschluss am Netz Die Betriebsspannung für dieses Gerät beträgt AC120 V bis 240 V 50 Hz 60 Hz ACHTUNG UM DER GEFAHR VON BRÄNDEN UND ELEKTRISCHEN SCHLÄGEN VORZUBEUGEN DARF DIESES GERÄT WEDER DEM REGEN NOCH HOHER FEUCHTIGKEIT AUSGESETZT WERDEN ACHTUNG Um elektrische Schläge zu vermeiden das Gehäuse nie öffnen Im Innern befinden...

Страница 31: ...nnt automatisch jede Bewegung in einem bestimmten Livebild und startet die Aufnahme Der Erkennungsbereich kann für jede Kamera speziell eingestellt werden Übermittlung von Alarm E Mails E Mails können übermittelt werden wenn ein Alarm empfangen wird oder eine Bewegung erkannt wird Hinweise zu diesem Handbuch Symbole Vorsicht Weist auf Punkte hin die beim Betrieb des Gerätes zu beachten sind Anmerk...

Страница 32: ... 13 Grundeinstellungen 14 Grundbedienung Ansicht von Livebildern 17 Anzeige von aufgezeichneten Bildern 19 Sonstiges Fehlerbehebung 20 Technische Daten 21 Dieses ANLEITUNG behandelt nur die Grundeinstellungen und die Basisfunktionen des VR N900U Neben dem ANLEITUNG umfasst der Lieferumfang des VR N900U auch eine CD ROM mit einer BEDIENUNGSANLEITUNG die die verschiedenen Betriebsmöglichkeiten genau...

Страница 33: ...en Schlägen führen Führen Sie keine Fremdkörper in den Rekorder ein Falls Metallgegenstände oder entflammbare Gegenstände z B durch die Lüftungsschlitze in den Rekorder gelangen kann dies zu Bränden oder elektrischen Schlägen führen Instandhaltung des Rekorders Wischen Sie das Gerät mit einem weichen Tuch ab Verwenden Sie kein Verdünnungsmittel oder Benzin die Oberfläche könnte ansonsten verätzt o...

Страница 34: ...stplatte ausgewechselt wird Bitte beachten Sie dass in manchen Fällen Aufnahmen gelöscht werden können wenn ein Software Upgrade ausgeführt wird VORSICHT Für Informationen zu empfohlenen Festplatten und deren Austausch oder Upgrade wenden Sie sich bitte an den nächsten JVC Händler Jede nicht empfohlene Festplatte kann die Stabilität des Systems beeinträchtigen Verbrauchsmaterialien Die folgende Ta...

Страница 35: ...aste und Anzeige PTZ PRESET Dient zum Wechseln zwischen den Modi PTZ und PRESET Der Modus wechselt jedes Mal wenn die Taste gedrückt wird Die Anzeige leuchtet wenn der PTZ Modus gewählt wurde und blinkt wenn der PRESET Modus gewählt wurde Seite 18 5 SERIAL Port TYP A Dient zur Verbindung der Anschlüsse zur Kommunikationssteuerung an eine Maus separat erhältlich Flash Speicher separat erhältlich un...

Страница 36: ...gsmodus ausschalten wollen Die Aufnahme kann bei Kameras die kein Videosignal erhalten nicht gestartet werden Im Zwangsaufnahmemodus erfolgt die Aufnahme durch alle Kameras unabhängig von den Einstellungen im Menü Kameraaufzeichnungseinstellung Die Aufnahme wird entsprechend der unter Aufnahme Einstellungen ausgewählten Einstellungen ausgeführt Weitere Informationen finden Sie in der VR N900U BEDI...

Страница 37: ...ige die dem ausgewählten Kameraeingang entspricht leuchtet im Kameraauswahl Modus auf Dient dazu die Kamera in die ausgewählte Position im PTZ Modus zu bringen die vorgegebene Zahl im PRESET Modus einzugeben und die Suche nach Datum Monat Woche und Uhrzeit im Suchmodus zu begrenzen Wenn das Hauptmenü angezeigt wird drücken Sie auf die Taste oder um den Auswahlfokus zu verschieben Diese Tasten dien...

Страница 38: ...icher separat erhältlich und USV separat erhältlich und zusätzliche Festplatten separat erhältlich 7 Abdeckung der Steckverbindung VORSICHT Entfernen Sie niemals die Abdeckung der Steckverbindung 8 LAN 2 Verbindungsschnittstelle Intranet Dient zur Verbindung an das externe PC Netzwerk mit Hilfe eines LAN Kabels 9 Ausgang CAMERA CONTROL Dient zur Steuerung der analogen Kameras 10 LAN 1 Verbindungss...

Страница 39: ... gestartet werden 5 Anschluss OPE ON OFF Wechselt zwischen OPERATE ein oder aus wenn ein Signal eingeht Ausgangsanschlüsse 6 Anschluss COMMON Allgemeiner Masseanschluss der mit dem Signalmasseanschluss des angeschlossenen Gerätes verbunden ist Verwendung bei unzureichenden Anschlüssen mit gemeinsamer Masse 7 Anschluss ALARM OUT Sendet ein Signal wenn die Aufzeichnung durch einen Alarm ausgelöst wi...

Страница 40: ...der weniger ein Schließkontakteingang EXT REC IN Stellen Sie die Ausgangsimpedanz auf 10kΩ oder weniger ein Schließkontakteingang OPE ON OFF Stellen Sie die Ausgangsimpedanz auf 10kΩ oder weniger ein Schließkontakteingang REC TALLY ALARM OUT WARNING OUT OPTION OUT 1 2 Kollektor öffnen DC15V 10mA oder weniger 250 MS oder mehr 250 MS oder mehr Unterbrechung Ausführen 250 MS oder mehr 250 MS oder meh...

Страница 41: ...andbuch auf ein Überwachungssystem mit analogen und IP Kameras die an den VR N900U angeschlossen sind und bei dem ein VGA Bildschirm verwendet wird Sie können bis zu 9 Kameras davon maximal 4 analoge Kameras an das System anschließen Anmerkung Das System kann folgende Funktionen ausführen Überwachung Anzeige Aufnahme Wiedergabe mit bis zu 9 angeschlossenen Kameras Überprüfen von aufgezeichneten Bi...

Страница 42: ...eitzone eingestellt werden kann Starten des VR N900U 1 Schalten Sie den Netzschalter auf der Rückseite des Gerätes ein Der VR N900U wird gestartet Auswahl der Sprache Das Fenster Spracheneinstellung wird angezeigt wenn Sie den VR N900U zum ersten Mal in Betrieb nehmen Befolgen Sie die unten stehenden Anweisungen zur Auswahl der gewünschten Sprache 1 Wählen Sie die gewünschte Sprache aus Verwenden ...

Страница 43: ...iste hinzugefügt Wenn die Kamera als Analogeing anzeigt wird handelt es sich um eine analoge Kamera die an den Anschluss VIDEO IN an der Rückseite angeschlossen ist Für analoge Kameras wählen Sie am Bildschirm bitte NTSC oder PAL Anmerkung Beim VR N900U wird die analoge Eingansschaltung als IP Videoserver angesehen und die IP Adresse 192 168 201 12 ist eingestellt Diese IP Adresse kann nicht verän...

Страница 44: ...e erkannte Kamera Das Fenster Kameraaufzeichnungseinstellung wird angezeigt 9 Verwenden Sie die Taste SKIP um die Eingabe mit Schließen zu bestätigen und drücken Sie anschließend die Taste ZOOM IN ENTER Die Konfiguration ist abgeschlossen und das Fenster Live Ansicht wird angezeigt Sie können alle erkannten Kameras in der Standardansicht am oberen Rand des Fensters sehen Fenster Kameraaufzeichnung...

Страница 45: ...bige quadratische Anzeigen mit den folgenden Funktionen Ereignisanzeige linke Anzeige dunkelgelb Leuchtet auf wenn in der Anwendung Kameraaufzeichnungseinstellung definierte Ereignisse auftreten Die Anzeige erscheint schwarz wenn die Ereignisanzeige für die fragliche Kamera nicht angegeben wurde oder wenn keine angegebenen Ereignisse aufgetreten sind Bewegungsanzeige mittlere Anzeige dunkelrot Leu...

Страница 46: ...edem Betätigen dieser Taste wird zwischen den Modi PTZ Anzeige leuchtet auf und PRESET Anzeige blinkt gewechselt 2 Drücken Sie die Taste ZOOM IN ENTER oder ZOOM OUT CANCEL Verwendung der Preset Positionen 1 Drücken Sie die Taste PTZ PRESET um den Preset Modus auszuwählen Bei jedem Betätigen dieser Taste wird zwischen den Modi PTZ Anzeige leuchtet auf und PRESET Anzeige blinkt gewechselt 2 Geben Si...

Страница 47: ...ER Die Wiedergabe wird in der Bildanzeige rechts von der Datums und Uhrzeitauswahl gestartet Wiedergabe Überspringen und Anhalten von aufgezeichneten Bildern Verwenden Sie die Tasten PLAY SKIP und STOP Wiedergabe 1 Drücken Sie die Taste PLAY Die Wiedergabe wird von den im Bereich Master Time des Fensters Zeitnavigation angezeigten Datums und Uhrzeitangaben an gestartet Die Abspielgeschwindigkeit k...

Страница 48: ...t Tonwiedergabe ist nicht möglich Vergewissern Sie sich dass die Toneinstellung Ton für die Kamera im Fenster Kameraaufzeichnungseinstellung auf Aktiviert steht Fehlermeldung Mögliche Ursachen und Lösung VORSICHT HDD 0 1 Das Festplattenlaufwerk scheint nicht mehr funktionsfähig Sie sollten es auswechseln Wenden Sie sich an den nächsten JVC Händler ÜBERHITZUNG Überprüfen Sie die Temperatur der Betr...

Страница 49: ... mehr unausgeglichen Audio Ausgang Analog Audio RCA x1 8 dBs 600 Ω oder weniger unausgeglichen Steuerungsterminal RS 485 D Sub 9 Pin Außen 1 Ein Ausgangsterminal Push Terminal Eingang x 8 Ausgang x 5 GND x 3 Komprimierungsformat Video JPEG MPEG 4 IP Kamera JPEG analoge Kamera Audio µ Gesetz 64 Kbps A D 8 bit Fs 8 kHz Aufnahme Festplattenkapazität 250 GB Zubehör BETRIEBSANLEITUNG vorliegendes Handb...

Страница 50: ......

Страница 51: ...cautions d utilisation Le disque dur intégré dans l enregistreur vidéo réseau est un appareil de précision fragile Manipulez le avec extrême précaution et ne lui faites pas subir de choc Le disque dur est le plus vulnérable quand l appareil est sous tension ou quand un accès au disque dur est en cours Avant de déplacer l enregistreur vidéo réseau attendez une minute après avoir débranché le cordon...

Страница 52: ...tionale ou autres règles en vigueur dans votre pays pour le traitement des appareils électriques et électroniques usagés SYSTÈME D ALIMENTATION Connexion au secteur Cet appareil fonctionne sur une tension de 120 V à 240 V CA 50 Hz 60 Hz ATTENTION POUR RÉDUIRE LE RISQUE D INCENDIE OU D ÉLECTROCUTION N EXPOSEZ PAS CET APPAREIL À LA PLUIE OU À L HUMIDITÉ ATTENTION Pour éviter les chocs électriques n ...

Страница 53: ...strement Détection de mouvement Détecte automatique un mouvement dans une image en direct donnée et démarre l enregistrement La zone de détection peut être spécifiée pour chaque caméra Envoie d un courriel d alarme Des courriels peuvent être envoyés quand une alarme se déclenche ou qu un mouvement est détecté Comment lire ce manuel Comment lire les symboles Attention Indique les points importants ...

Страница 54: ...pérations de base Visionnement en direct des images 17 Visionnement des images enregistrées 19 Autres Guide de dépannage 20 Spécifications 21 Ce GUIDE DE DÉMARRAGE explique uniquement les procédures de fonctionnement de base du VR N900U En plus du GUIDE DE DÉMARRAGE vous trouverez dans le CD ROM fourni le MANUEL D INSTRUCTIONS DU VR N900U qui vous donnera des explications détaillées sur les procéd...

Страница 55: ...un incendie ou un choc électrique N insérez aucun objet étranger dans l enregistreur Si un objet métallique ou inflammable pénètre dans l enregistreur par un orifice de ventilation etc il peut entraîner un incendie ou un choc électrique Entretien de l enregistreur Essuyez l enregistreur avec un chiffon doux N utilisez pas de diluant ni de benzène car cela pourrait dissoudre ou ternir la surface Po...

Страница 56: ... sont effacées lors de la mise à niveau du logiciel ATTENTION Consultez votre revendeur JVC le plus proche pour en savoir plus sur les disques durs recommandés si vous avez besoin d en changer ou d en ajouter des supplémentaires Tout autre disque dur non approuvé peut créer une instabilité du système Pièces à remplacer périodiquement Le tableau ci dessous donne la liste des pièces à remplacer péri...

Страница 57: ... service Page 17 4 Touche et témoin PTZ PRESET Commute entre le mode PTZ et le mode PRESET Le mode change chaque fois que vous appuyez sur la touche Le témoin s allume quand le mode PTZ est choisi et clignote quand le mode PRESET est choisi Page 18 5 Port SERIAL TYPE A Utilisez ce port pour connecter les prise de commande de communication d une souris vendue séparément de mémoires flash vendues sé...

Страница 58: ...ez pressée cette touche pour annuler le mode de contrôle de l enregistrement L enregistrement ne démarre pas pour les caméras pour lesquelles aucun signal vidéo n est entré Avec le mode d enregistrement forcé l enregistrement est réalisé pour toutes les caméras quels que soient les réglages du menu Réglage du mode d enregistrement caméra L enregistrement est réalisé en fonction de la fréquence d i...

Страница 59: ... de la caméra lors de l affichage d image en direct et lors de la lecture d images enregistrées Le témoin qui correspond à l entrée de la caméra choisie s allume pendant le mode de sélection de caméra Ces touches sont aussi utilisées pour spécifier une position pendant le mode PTZ pour entrer un numéro programmé pendant le mode PRESET et pour réduire la plage de recherche de date mois semaine et h...

Страница 60: ...séparément de mémoires flash vendues séparément d un onduleur vendu séparément et de lecteurs de disque supplémentaires vendus séparément 7 Cache connecteurs ATTENTION Ne retirez pas le cache connecteurs 8 Interface de connexion LAN 2 réseau local Pour la connexion à un réseau informatique local en utilisant un câble de réseau local 9 Prise CAMERA CONTROL Vous permet de commander des caméras analo...

Страница 61: ...gnal vidéo n est entré 5 Prise OPE ON OFF Commute entre la mise sous ou hors tension quand un signal est entré Ports de sortie 6 Prise COMMON La prise commune de mise à la terre Connectez la à la prise de terre du signal de l appareil connecté Elle peut être utilisée quand il n y a pas suffisamment de prises communes de mise à la terre 7 Prise ALARM OUT Sort un signal lorsque l enregistrement est ...

Страница 62: ...trée d établissement de contact EXT REC IN Réglez l impédance de sortie sur 10kΩ ou moins Entrée d établissement de contact OPE ON OFF Réglez l impédance de sortie sur 10kΩ ou moins Entrée d établissement de contact REC TALLY ALARM OUT WARNING OUT OPTION OUT 1 2 Collecteur ouvert CC15V 10mA ou moins 250ms ou plus 250ms ou plus Interruption Établissement 250ms ou plus 250ms ou plus 1s ou plus Envir...

Страница 63: ...caméras IP connectées au VR N900U et utilisant un moniteur VGA Vous pouvez connecter un maximum de 9 caméras parmi lesquels 4 caméras analogiques maximum Remarque Les opérations suivantes sont possibles avec ce système Surveillance visionnement enregistrement lecture en connectant 9 caméras maximum Contrôle des images enregistrées sur le moniteur VGA ATTENTION Connectez les caméras IP au réseau lo...

Страница 64: ...avoir comment régler le fuseau horaire Démarrage du VR N900U 1 Mettez l interrupteur d alimentation situé sur le panneau arrière sur la position ON Le VR N900U démarre Sélection d une langue La fenêtre Réglage de la langue apparaît quand le VR N900U est démarré pour la première fois Suivez les instructions ci dessous pour choisir la langue que vous souhaitez utiliser 1 Choisissez la langue que vou...

Страница 65: ...étectée est ajoutée à la liste Si la caméra est indiquée sous la forme Ent analog c est une caméra analogique connectée à la prise VIDEO IN du panneau arrière Pour les caméras analogiques choisissez NTSC ou PAL sur l écran Remarque Dans le VR N900U le circuit d entrée analogique est considéré comme serveur vidéo IP et sont adresse IP est réglée sur 192 168 201 12 Vous ne pouvez pas changer cette a...

Страница 66: ...ra détectée La fenêtre Réglage du mode d enregistrement caméra apparaît 9 Choisissez Quitter avec la touche SKIP puis appuyez sur la touche ZOOM IN ENTER Le réglage est terminé et la fenêtre Visionnement en direct apparaît Vous pouvez voir toutes les caméras enregistrées dans la Vue par défaut en haut de la fenêtre Fenêtre Réglage du mode d enregistrement caméra Fenêtre Visionnement en direct Pavé...

Страница 67: ...uleur pour les fonctions suivantes Indicateur d événement indicateur de gauche jaune solide S allume quand les événements spécifiés dans l application Réglage du mode d enregistrement caméra se produisent L indicateur apparaît en noir si l événement n a pas été spécifié pour la caméra en question ou si aucun des événements spécifiés ne s est produit Indicateur de mouvement indicateur central rouge...

Страница 68: ...TZ indicateur allumé et le mode PRESET indicateur clignotant chaque fois que vous appuyez sur la touche 2 Appuyez sur la touche ZOOM IN ENTER ou la touche ZOOM OUT CANCEL Utilisation des positions programmées 1 Appuyez sur la touche PTZ PRESET pour choisir le mode programmé Le mode commute entre le mode PTZ indicateur allumé et le mode PRESET indicateur clignotant chaque fois que vous appuyez sur ...

Страница 69: ...TER La lecture démarre dans la fenêtre d affichage d image à droite de la date et de l heure choisies Lecture saut et arrêt de la lecture des images enregistrées Utilisez les touches PLAY SKIP et STOP Lecture 1 Appuyez sur la touche PLAY La lecture démarre à partir de la date et l heure affichée dans la zone Heure de base de la fenêtre Navigation chronologique La vitesse de lecture peut être chois...

Страница 70: ... contrôle de l enregistrement Impossible de reproduire le son Vérifiez que le son pour la caméra est réglé sur Activé dans la fenêtre Réglage du mode d enregistrement caméra Message d erreur Cause possible et solution WARNING HDD 0 1 Le disque semble ne plus être en état de fonctionnement Son remplacement est recommandé Consultez votre revendeur JVC le plus proche OVERHEATED Vérifiez la températur...

Страница 71: ...gique Cinch x 1 8 dBs 600 Ω ou moins asymétrique Prise de commande RS 485 D Sub 9 broches male 1 Prise d entrée sortie Prise à poussoir Entrée x 8 Sortie x 5 Terre x 3 Format de compression Vidéo JPEG MPEG 4 caméra IP JPEG caméra analogique Audio µ law 64 Kbps A N 8 bits Fs 8 kHz Enregistrement Capacité du disque dur 250 Go Accessoires GUIDE DE DÉMARRAGE ce manuel 1 CD ROM MANUEL D INSTRUCTIONS 1 ...

Страница 72: ......

Страница 73: ...ra garantizar un rendimiento óptimo Precauciones de uso La unidad de disco duro HDD que se incluye dentro de esta grabadora de vídeo digital es un aparato frágil y de precisión Manipúlelo con extremo cuidado y no lo someta a golpes físicos La HDD es más susceptible de sufrir daños si la unidad está encendida o cuando se accede a la HDD Antes de trasladar la grabadora de vídeo digital espere un min...

Страница 74: ...d con la legislación nacional vigente u otras normativas de su país para el tratamiento de equipos eléctricos y electrónicos usados SISTEMA ELÉCTRICO Conexión a red eléctrica Esta unidad funciona en una tensión de CA de 120 V a 240 V AC 50 Hz 60 Hz ADVERTENCIA PARA REDUCIR EL RIESGO DE INCENDIO O DESCARGA ELÉCTRICA NO EXPONGA ESTA UNIDAD A LA LLUVIA O HUMEDAD PRECAUCIÓN Para impedir la descarga el...

Страница 75: ...ales de alarma durante la grabación Detección de movimiento Detecta automáticamente el movimiento en la imagen en directo especificada e inicia la grabación Puede especificarse la zona de detección para cada cámara Transmisión de correos electrónicos de alarmas Los correos electrónicos pueden enviarse cuando la alarma está instalada o se detecta un movimiento Cómo utilizar este manual Cómo utiliza...

Страница 76: ...eraciones básicas Visualización de imágenes en directo 17 Visualización de imágenes grabadas 19 Otros Resolución de problemas 20 Especificaciones 21 La presente GUÍA DE INICIO describe únicamente los procedimientos operativos básicos y la instalación inicial de la VR N900U Además de la GUÍA DE INICIO las MANUAL DE INSTRUCCIONES de la VR N900U se suministran en un CD ROM que explica de forma más de...

Страница 77: ...e origine una descarga eléctrica o incendio No introduzca objetos extraños en la grabadora Si algún objeto metálico o elemento inflamable se introduce en la grabadora a través de las aberturas de ventilación etc puede provocar un incendio o descarga eléctrica Mantenimiento de la grabadora Limpie la grabadora con un paño húmedo No use disolventes ni benceno ya que pueden provocar que la superficie ...

Страница 78: ...ontacto con su distribuidor JVC más cercano para obtener más información qué unidad de disco duro se recomienda cuándo es preciso cambiarla o aumentarla El uso de otras unidades de disco duro no autorizadas puede originar una inestabilidad en el sistema Piezas consumibles La tabla siguiente ofrece una lista de las piezas consumibles La tarifa de las piezas que acompaña cualquier recambio y los cos...

Страница 79: ...PTZ PRESET Alterna entre el modo PTZ y el modo PRESET El modo cambia cada vez que se pulsa el botón El indicador se enciende al seleccionar el modo PTZ y parpadea al seleccionar el modo PRESET Página 18 5 Puerto SERIAL TIPO A Se utiliza para conectar los terminales de control de comunicación a un ratón se vende por separado las memorias Flash se venden por separado y el SAI se vende por separado P...

Страница 80: ...ontrol de grabación No se iniciará la grabación en las cámaras a la cuales no se transmita ninguna señal de vídeo Con el modo de grabación forzada la grabación se lleva a cabo independientemente de la configuración en el menú Configuración de la grabación de la cámara La grabación se lleva a cabo en función de la velocidad de imagen seleccionada en el menú Ajustes de grabación Para obtener informa...

Страница 81: ...lumina durante el modo de selección de cámara Se utiliza para mover la cámara a la posición especificada durante el modo PTZ para introducir el número predefinido durante el modo PRESET y para restringir la búsqueda de fecha mes semana y hora en el modo de búsqueda Cuando se muestra el Menú principal presione el botón o para mover la opción de resaltar Estos botones también se utilizar como teclas...

Страница 82: ...nidades de disco adicionales se venden por separado 7 Cubierta del conector PRECAUCIÓN No extraiga la cubierta del conector 8 Interfaz de conexión LAN 2 Red Intranet Para la conexión a la red remota del PC con un cable LAN 9 Terminal CAMERA CONTROL Le permite controlar las cámaras analógicas 10 Interfaz de conexión LAN 1 Red IP Para la conexión a la red de cámara IP se vende por separado con un ca...

Страница 83: ...uales no entra ninguna señal de vídeo 5 Terminal OPE ON OFF Alterna entre activar o desactivar OPERATE cuando entra una señal Puertos de salida 6 Terminal COMMON El terminal de tierra común Conectado al terminal de tierra de señal en el dispositivo conectado Puede utilizarse cuando no haya suficientes terminales de tierra comunes 7 Terminal ALARM OUT Emite una señal cuando una alarma inicia la gra...

Страница 84: ...cia de salida en 10kΩ o menos Entrada de contacto de cierre EXT REC IN Establezca la impedancia de salida en 10kΩ o menos Entrada de contacto de cierre OPE ON OFF Establezca la impedancia de salida en 10kΩ o menos Entrada de contacto de cierre REC TALLY ALARM OUT WARNING OUT OPTION OUT 1 2 Colector abierto CC 15V 10mA o inferior 256 ms o más 256 ms o más Corte Establecimiento 256 ms o más 256 ms o...

Страница 85: ... analógicas y cámaras IP conectadas a la VR N900U y utilizando un monitor VGA Puede conectar hasta 9 cámaras de las cuales 4 pueden ser cámaras analógicas Nota Las siguientes operaciones son posibles con este sistema Vigilancia visualización grabación reproducción mediante la conexión de hasta 9 cámaras Comprobación de las imágenes grabadas en el monitor VGA PRECAUCIÓN Conecte la cámara IP a la re...

Страница 86: ...las INSTRUCCIONES sobre cómo especificar la configuración del huso horario Poner en marcha la VR N900U 1 Encienda el interruptor de alimentación situado en el panel trasero ON La VR N900U se pondrá en marcha Seleccionar un idioma Aparecerá la ventana Configuración de idioma cuando la VR N900U se ponga en marcha p primera vez Siga las siguientes instrucciones para seleccionar el idioma que desea em...

Страница 87: ...a detectada se agregará a la lista Si la cámara se indica como EntradaAnal se trata de una cámara analógica conectada al terminal VIDEO IN del panel trasero Para cámaras analógicas seleccione NTSC o PAL en la pantalla Nota En la VR N900U los circuitos de entrada analógica son considerados como un servidor de vídeo IP y se ha establecido la dirección IP 192 168 201 12 No es posible cambiar esta dir...

Страница 88: ...ectada Aparecerá la ventana Configuración de la grabación de la cámara 9 Seleccione Salir con el botón SKIP y a continuación presione el botón ZOOM IN ENTER La configuración finalizará y aparecerá la ventana Visualización en directo Puede ver todas las cámaras registradas en la vista predeterminada de la parte superior de la ventana Ventana Configuración de la grabación de la cámara Ventana Visual...

Страница 89: ...uadrados de colores con las funciones siguientes Indicador de eventos indicador izquierdo amarillo sólido Se enciende cuando tienen lugar eventos especificados en la aplicación Configuración de la grabación de la cámara El indicador se muestra en negro si no se ha especificado la indicación de eventos para la cámara en cuestión o si no han tenido lugar eventos específicos Indicador de movimiento i...

Страница 90: ... modo PTZ el indicador se ilumina y el modo PRESET el indicador parpadea cada vez que se pulsa el botón 2 Pulse el botón ZOOM IN ENTER o el botón ZOOM OUT CANCEL Utilizar las posiciones predefinidas 1 Pulse el botón PTZ PRESET para seleccionar el modo predefinido El modo alterna entre el modo PTZ el indicador se ilumina y el modo PRESET el indicador parpadea cada vez que se presiona el botón 2 Int...

Страница 91: ...iciará en la ventana de visualización de imágenes a la derecha de la fecha y hora seleccionadas Reproducir saltar y detener imágenes grabadas Utilice los botones PLAY SKIP y STOP Reproducir 1 Pulse el botón PLAY La reproducción se iniciará a partir de la fecha y hora indicadas en el área Hora principal de la ventana Navegación en la hora La velocidad de reproducción puede seleccionarse desde x 1 2...

Страница 92: ...ir sonido Compruebe que el audio de la cámara esté ajustado a Habilitado en la ventada Configuración de la grabación de la cámara Mensaje de error Causa posible y solución ADVERTENCIA HDD 0 1 Parece que la HDD ha dejado de funcionar o no funciona correctamente Se recomiend que se sustituya Póngase en contacto con su distribuidor JVC más cercano SOBRECALENTAMIENTO Compruebe la temperatura del entor...

Страница 93: ...rado Salida de audio RCA Audio analógico x1 8 dBs 600 Ω o menos desequilibrado Terminal de control RS 485 D Sub de 9 patillas macho 1 Terminal de entrada salida Terminal de empuje Entrada x 8 Salida x 5 GND x 3 Formato de compresión Vídeo JPEG MPEG 4 Cámara IP JPEG cámara analógica Audio µ law 64 Kbps A D 8 bit Fs 8 kHz Grabación Capacidad HDD 250 GB Accesorios GUÍA DE INICIO este manual 1 CD ROM ...

Страница 94: ......

Страница 95: ...questo videoregistratore digitale è realizzato con tecnologia d alta precisione ed è fragile Deve pertanto essere trattato con molta cura evitando in particolare di sottoporlo agli urti Il disco fisso è maggiormente suscettibile ai danneggiamenti quando mentre l apparecchio è acceso vi è un accesso in corso Prima di spostare il videoregistratore si raccomanda di attendere un minuto dopo aver rimos...

Страница 96: ...normativa nazionale applicabile o alle altre leggi della propria nazione relative al trattamento delle apparecchiature elettriche ed elettroniche obsolete ALIMENTAZIONE Collegamento all alimentazione di rete Questo apparecchio funziona a una tensione compresa tra 120 V e 240 VCA e alla frequenza di 50 60 Hz AVVERTENZA PER RIDURRE I RISCHI D INCENDIO O DI FOLGORAZIONE NON SI DEVE ESPORRE QUESTO APP...

Страница 97: ...durante la registrazione riceve un segnale d allarme Rilevamento di movimento Rileva automaticamente il movimento nell immagine dal vivo specificata e ne avvia inoltre la registrazione Per ogni videocamera è possibile specificare un area di rilevamento Notifica degli allarmi mediante posta elettronica Alla ricezione di un allarme o al rilevamento di un movimento il sistema può inviare messaggi di ...

Страница 98: ...isione delle immagini dal vivo 17 Visualizzazione delle immagini registrate 19 Altre informazioni Risoluzione dei problemi 20 Caratteristiche tecniche 21 La presente GUIDA ALL AVVIAMENTO tratta esclusivamente l avviamento iniziale e le procedure basiche d uso del VR N900U Oltre a questa guida nel CD ROM sono altresì fornite le ISTRUZIONI DEL VR N900U le quali illustrano ulteriori dettagli sulle pr...

Страница 99: ...one o le altre piccole aperture si potrebbero generare scosse elettriche o un incendio Pulizia del videoregistratore L apparecchio deve essere pulito esclusivamente con un panno morbido Non si devono usare né solventi né benzolo poiché questi liquidi possono causare lo scioglimento o l opacamento dello strato superficiale Per la rimozione delle macchie più ostinate è innanzi tutto necessario strof...

Страница 100: ...no Va inoltre notato che in alcuni casi le immagini registrate potrebbero cancellarsi anche durante l aggiornamento del software AVVERTENZA Per informazioni sul tipo di disco fisso raccomandato sulla necessità di sostituirlo o di aumentarne la capacità s invita a rivolgersi al più vicino rivenditore JVC L uso di dischi fissi di tipo non approvato potrebbe causare l instabilità del sistema Parti di...

Страница 101: ... PRESET Commuta tra la modalità PTZ e la modalità PRESET Ad ogni pressione del tasto avviene la commutazione tra le due modalità Quando si seleziona la modalità PTZ l indicatore s illumina mentre lampeggia quando si seleziona la modalità PRESET Pagina 18 5 Porta SERIAL TIPO A È usata per collegare ai terminali di controllo comunicazioni un mouse una memoria flash o un unità UPS tutti acquistabili ...

Страница 102: ...azione non si avvia nelle videocamere che non ricevono in ingresso segnali video Nella modalità di registrazione forzata essa si avvia in tutte le videocamere a prescindere dalle impostazioni eseguite nel menu Impostazione videocamere La registrazione si svolge in conformità alla velocità di registrazione velocità dei fotogrammi selezionata in Impostazioni Registrazione Per maggiori informazioni i...

Страница 103: ...orrispondente s illumina La sua funzione nella modalità PTZ è dirigere la videocamera nella posizione specificata nella modalità PRESET è inserire un numero di preselezione mentre durante la ricerca è ridurre la gamma selezionabile della data del mese della settimana e dell ora Per spostare l evidenziatore di selezione mentre è aperto il Menu principale si deve premere o Questi tasti svolgono altr...

Страница 104: ...re ai terminali di controllo comunicazioni un mouse una memoria flash un apparecchio UPS e dischi fissi aggiuntivi tutti acquistabili a parte 7 Coperchio dei connettori AVVERTENZA Il coperchio dei connettori non deve essere rimosso 8 Interfaccia di connessione LAN 2 rete intranet Da usare per il collegamento a una rete remota di PC mediante cavo LAN 9 Terminale CAMERA CONTROL Permette di gestire l...

Страница 105: ...E ON OFF Quando qui s inserisce un segnale si ottiene la commutazione on off dello stato OPERATE Porte di uscita 6 Terminale COMMON È il terminale comune di messa a terra Esso è collegato al terminale di terra del segnale della periferica collegata è utilizzabile quando i terminali comuni di terra non sono sufficienti 7 Terminale ALARM OUT Pone in uscita un segnale quando un allarme avvia la regis...

Страница 106: ...RM RESET Impostare l impedenza di uscita a 10kΩ o meno Ingresso contatto di chiusura EXT REC IN Impostare l impedenza di uscita a 10kΩ o meno Ingresso contatto di chiusura OPE ON OFF Impostare l impedenza di uscita a 10kΩ o meno Ingresso contatto di chiusura REC TALLY ALARM OUT WARNING OUT OPTION OUT 1 2 Collettore aperto 15VCC 10mA o meno 250 ms o più 250 ms o più Apertura contatto Chiusura conta...

Страница 107: ... connesse all apparecchio insieme ad un monitor VGA È possibile collegare sino a 9 videocamere delle quali sino a quattro di tipo analogico Nota Con questo sistema è possibile eseguire le seguenti operazioni Sorveglianza visione registrazione e riproduzione collegandovi sino a 9 videocamere Controllo delle immagini registrate su un monitor VGA AVVERTENZA Le videocamere IP devono essere collegate a...

Страница 108: ...cificare il fuso orario d interesse Per istruzioni sull impostazione del fuso orario si prega di leggere le ISTRUZIONI Avvio del VR N900U 1 Premete nella posizione ON l interruttore di accensione del pannello posteriore L apparecchio si avvia Selezione della lingua La prima volta che si accende l apparecchio appare la finestra Impostazione lingua Per selezionare la lingua d interesse si deve dar c...

Страница 109: ... videocamera appena rilevata va ad aggiungersi all elenco Se la videocamera reca l indicazione Ing analog si tratta di una videocamera analogica collegata al terminale VIDEO IN del pannello posteriore Per le videocamere analogiche sullo schermo è necessario selezionare NTSC o PAL Nota Nel VR N900U la circuiteria d ingresso analogico è considerata un server video IP per il quale è già impostato l i...

Страница 110: ...vate Appare così la finestra Impostazione videocamere 9 Con il tasto SKIP selezionate Esci e quindi premete il tasto ZOOM IN ENTER L impostazione del sistema è così terminata e appare quindi la finestra Visualizzazione dal vivo In Visione predefinita in cima allo schermo si potranno vedere le immagini riprese da tutte le videocamere registrate Finestra Impostazione videocamere Finestra Visualizzaz...

Страница 111: ...rrispondente e tre indicatori quadrati provvisti delle seguenti funzioni Indicatore di evento a sinistra giallo fisso S illumina al verificarsi degli eventi specificati in Impostazione videocamere L indicatore è nero se per la videocamera selezionata non è stato specificato alcun evento oppure sin tanto che esso non si verifica Indicatore di movimento centrale rosso fisso S illumina quando il sist...

Страница 112: ...PTZ Ad ogni pressione del tasto la modalità della videocamera si commuta tra PTZ l indicatore s illumina e PRESET l indicatore lampeggia 2 Premete il tasto ZOOM IN ENTER o ZOOM OUT CANCEL Uso delle posizioni predefinite 1 Premete il tasto PTZ PRESET in modo da selezionare la modalità delle posizioni predefinite Ad ogni pressione del tasto la modalità della videocamera si commuta tra PTZ l indicato...

Страница 113: ...estra di visualizzazione delle immagini a destra si otterrà quindi la riproduzione a partire dalla data e dall ora selezionate Riproduzione salto e arresto delle immagini registrate Per queste funzioni si usano i tasti PLAY SKIP e STOP Riproduzione 1 Premete il tasto PLAY La riproduzione si avvia dalla data e dall ora visualizzate nell area Ora di riferimento della finestra Navigazione Temporale I...

Страница 114: ...ossibile riprodurre il suono Verificare che nella finestra Impostazione videocamere la funzione audio sia impostata su Abilitata Messaggio d errore Possibile causa e soluzione WARNING HDD 0 1 È probabile che il disco fisso non sia più utilizzabile Se ne raccomanda pertanto la sostituzione Si prega di rivolgersi al più vicino rivenditore JVC OVERHEATED Controllare la temperatura nel punto in cui l ...

Страница 115: ...i Uscita audio n 1 analogica RCA 8 dBs 600 Ω o meno non bilanciati Terminale di controllo n 1 RS 485 D Sub a 9 contatti maschio Terminale I O a pressione n 8 ingressi n 5 uscite n 3 collegamenti di terra Formati di compressione Video JPEG MPEG 4 videocamera IP JPEG videocamera analogica Audio 64 Kbps legge µ A D 8 bit Fs 8 kHz Registrazione Capacita del disco fisso 250 GB Accessori GUIDA ALL AVVIA...

Страница 116: ...LST0577 001A 2007 Victor Company of Japan Limited NETWORK VIDEO RECORDER VR N900U ...

Отзывы: