background image

16

Prep

aration

/Ba

sic Ope

ra

tio

ns

Preparation/Basic Operations

Basic Operations

This manual explains the operations assuming that 
you will use the remote control. Some buttons on 
the main unit are the same as those on the remote 
control.

CAUTION

• Set the remote control mode selector to 

AUDIO before using the number buttons.

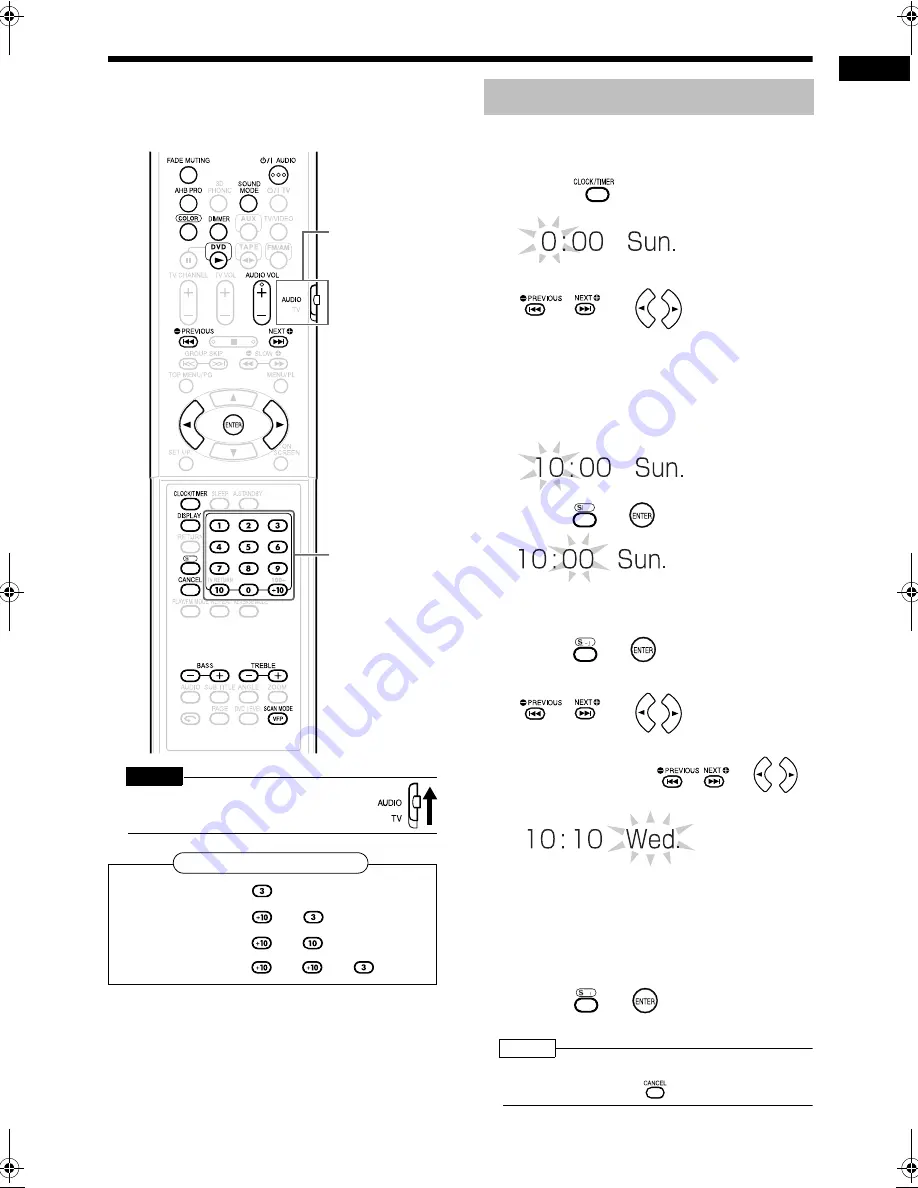
You can set the clock while the main unit is turned 

either on or off. 

Example: To set the clock to 10:10 a.m. on Wednesday

1

Press . 

2

Set the hour. 


or 


                                      Back  Next

• Holding down the button causes the hour to 

increment.  

• You can use the number buttons to specify 

the hour.

Refer to "Using the number buttons" shown 

on the left.

3

Press  

or  . 

4

Set the minute. 

• Set the minute in the same manner as in step 2. 

5

Press  

or . 

6

Set the day of the week. 


or 


                                      Back  Next

• Each time you press 


 or 


the day of the week changes. 

• Abbreviations are used for the days of the week. 

Sun.

Sunday 

Mon.

Monday 

Tue.

Tuesday 

Wed.

Wednesday 

Thu.

Thursday 

Fri.

Friday 

Sat.

Saturday 

7

Press  

or . 

• The clock starts from 0 seconds in the minute you set. 

NOTE

• While setting the clock, you can return to the previ-

ous step by pressing


.

(Continued on next page)

Number buttons

Remote control 
mode selector

Examples

: 3: 

13:


20:


23:


Setting the Clock

 Back

Next

 Back

Next

Using the number buttons

UX-QD90[UG_UX]-03.fm  Page 16  Tuesday, September 27, 2005  8:19 PM

Содержание UX-QD90S

Страница 1: ...STEM 微型 DVD 组合音响 For turning off the demonstration display refer to page 15 关闭演示显示的有关详情 请参阅 第 15 页 UX QD90S Consists of CA UXQD90S and SP UXQD90S 由 CA UXQD90S 和 SP UXQD90S 组成 INSTRUCTIONS 使用说明书 LVT1368 001A UN US English 中 文 ...

Страница 2: ...y naked flame sources such as lighted candles on the apparatus When discarding batteries environmental problems must be considered and local rules or laws governing the disposal of these batteries must be followed strictly Do not expose this apparatus to rain moisture dripping or splashing and that no objects filled with liquids such as vases shall be placed on the apparatus ଐ ժ ࠈࠁׅ ᨭᲰ ح ୈᨭᲰࣕˊ ơ ᨭ...

Страница 3: ...e level surface Maintain adequate air path for ventilation by placing on a stand with a height of 10 cm or more In addition maintain the best possible air circulation 注意 正确的通风方法 为了防止触电 火灾及避免损坏 按如下要求放置机器 上面 前面 后面 侧面 在图中所示范围中 不应放置任何障 碍物 底部 放置在水平面上 放置在一个高 10 cm 或更高的台上以保留足够的通风道 此外 如图所示 尽可能保持最佳的空气循环 15cm 10cm 15cm 15cm 1cm 1cm 15cm Wall or obstructions 墙壁或障碍物 Front 前面 Main unit 本机 Main unit 本机 Front vi...

Страница 4: ...MODE 19 Listening to Radio Broadcasts 20 Setting the AM Tuner Spacing 20 Selecting a Radio Station 21 Storing Radio Stations Preset 21 Tuning In to a Preset Radio Station 21 Basic Operations of the DVD Player 22 Playback 22 Playing Back from a Position 10 Seconds Before One Touch Replay 24 Stopping Playback 25 Resuming Playback RESUME 25 Pausing Playback 25 Advancing Picture Frame by Frame 25 Fast...

Страница 5: ...m a Disc 45 Recording the Second or Subsequent Track to the Last Track from a Disc 45 Program Recording from a Disc 45 Recording with No Blank Time between Tracks 45 Erasing Recorded Sound from a Cassette Tape 45 Using the Timers 46 Sleep Timer 46 Recording Timer 47 Playback Timer 48 Auto Standby 50 Disc Ejection Lock 51 Using AV COMPU LINK 51 Connection and Setting 51 Operations 51 Handling Discs...

Страница 6: ...wipe it with a cloth dampened with a small amount of a neutral detergent and then wipe it with a soft dry cloth CAUTION Do not wipe the operation panel with thinners ben zenes or other chemical agents Do not spray insecticides onto the operation panel These may cause discoloration and damage to the surface When using headphones keep the volume at a moderate level so as not to over stimulate your e...

Страница 7: ...possible in some cases due to the disc characteristics recording condition scratches or dirt on the disc or dirt or condensation on the lens Before using a disc carefully read the cautions regarding the disc This product does not support playback or CD text display of sound files such as MP3s To play back a CD RW or DVD RW on this product erase all tracks if the CD RW or DVD RW was recorded in a f...

Страница 8: ...amera File System standard when a function such as the automatic image rotation function of a digital camera is applied the data no longer complies with the DCF standard so the image may not be displayed If data has been processed edited and restored with PC image editing software the data may not be displayed This product cannot play back animations such as MOTION JPEG still pictures TIFF etc oth...

Страница 9: ...he system Care of the cabinet When cleaning the system use a soft cloth and fol low the relevant instructions on the use of chemi cally coated cloths Do not use benzene thinner or other organic solvents including disinfectants These may cause deformation or discoloring If water gets inside the system Turn the system off and disconnect the power cord plug from the wall outlet then call the store wh...

Страница 10: ...fore connecting the power plug make sure that the voltage selector is set to the correct voltage for your area CAUTION DO NOT plug in before setting the voltage selector on the bottom of the main unit and all connections are complete Bottom view of the main unit ...

Страница 11: ... pair of headphones equipped with a stereo mini plug commercially avail able While the headphones are connected the speakers do not produce any sound The numbers refer to the pages in which the parts are explained Cassette holder 42 PUSH OPEN Disc tray 22 Remote control sensor 9 18 46 49 17 50 32 34 42 15 18 25 42 26 31 38 45 22 51 17 43 44 45 30 18 21 22 42 44 45 31 32 2 23 22 1 17 20 30 26 38 45...

Страница 12: ...nsor on the main unit is approximately 5 m maximum When the effective distance decreases replace the batteries Do not drop the remote control or subject it to excessive shock The numbers refer to the pages in which the parts are explained 17 17 10 43 10 21 35 36 Number buttons 16 21 26 32 36 42 44 42 17 26 27 50 34 17 29 31 29 19 30 30 18 18 18 25 25 27 42 45 39 16 47 48 24 21 33 28 24 18 10 26 38...

Страница 13: ...ting it towards the TV 1 Make sure to slide the remote control mode selector to the TV side in advance NOTE When the batteries are replaced perform the man ufacturer s code setting again This page is for when operating your TV using the remote control of this product Operating the TV Using the Remote Control Remote control mode selector Number buttons Setting the manufacturer s code Manufacturer C...

Страница 14: ...M antenna Insert the tab into the slot Main unit rear view Main unit side view Connecting the antenna cord Connect the ends of the antenna cord as shown above When insulation covers the tips of the antenna cord twist and pull off the insulation When positioning the antennas find the best position for reception while listening to an actual radio program refer to Listening to Radio Broadcasts page 2...

Страница 15: ...view FM antenna supplied Main unit side view When positioning the antennas find the best position for reception while listening to an actual radio program refer to Listening to Radio Broadcasts page 20 Main unit rear view Main unit side view Depending on the radio reception conditions an FM feeder antenna sold separately compatible with 300 Ω can be used In the case a converter sold separately is ...

Страница 16: ... distance between the TV and the speakers NOTE Improper speaker cord connection spoils the stereo effect and sound quality The impedance of speakers connected to this product must be within the range of 4 Ω to 16 Ω A cooling fan is built into the main unit The inter nal cooling fan automatically rotates to dissipate generated heat To ensure sufficient cooling leave a space of at least 1 cm between...

Страница 17: ...g back Such picture distortion is caused by a copy protection system and is not a malfunction Also if the main unit is connected to a TV with a built in VCR there may be picture distortion during playback NOTE Before playing back the discs with video output you need to select the color system and the video processing system Refer to Selecting the Color System and the Video Processing System SCAN M...

Страница 18: ... power is turned off Hold down on the main until DEMO CLEAR appears Disconnecting and then reconnecting the power plug will not start the demonstration display NOTE To activate the demonstration display again hold down on the main unit while the power is off until Hello appears Activating the demonstration display turns on the main unit When you press a button on the main unit DEMO OFF appears in ...

Страница 19: ...our to increment You can use the number buttons to specify the hour Refer to Using the number buttons shown on the left 3 Press or 4 Set the minute Set the minute in the same manner as in step 2 5 Press or 6 Set the day of the week or Back Next Each time you press or the day of the week changes Abbreviations are used for the days of the week Sun Sunday Mon Monday Tue Tuesday Wed Wednesday Thu Thur...

Страница 20: ...nge of 0 to 40 Press Each time you press the display changes as follows While the sound mode is set to an item other than FLAT is displayed in the display window NOTE This function does not affect recording sound 1 Press repeatedly to display MANUAL 2 For adjusting bass sound Press For adjusting treble sound Press You can adjust the sound quality within the range of 5 to 5 The display returns to t...

Страница 21: ...splay window the disc tray and the circumference of the VOLUME control light in pale blue for approximately 2 seconds When recording finishes the color of the display window the disc tray and the circumference of the VOLUME control switches to red to inform you that recording has ended Next time you press a button the color pattern returns to the selected pattern For the locations of remote contro...

Страница 22: ... to the aspect ratio of your TV page 39 If you play back an NTSC disc with this setting set to PAL or PAL PROG you can watch the playback pictures the disc will be reproduced using PAL 60 format but the TV screen may rolls over upward and downward rapidly If you play back a PAL disc with this setting set to NTSC or NTSC PROG you can watch the playback pictures but the following symptoms may occur ...

Страница 23: ... use 10 kHz spacing On the main unit ONLY When the main unit is turned off To select 10 kHz spacing while holding down on the main unit press on the main unit to turn on the power AM 10 kHz SP appears in the display window To select 9 kHz spacing while holding down on the main unit press on the main unit to turn on the power AM 9 kHz SP appears in the display window NOTE If the spacing is switched...

Страница 24: ...a radio station to a preset num ber to which another radio station has previously been stored the newly set radio station replaces the previously stored radio station While an FM or AM broadcast is being received 1 Set the remote control mode selector to AUDIO 2 Use the number buttons to select the preset number of the radio sta tion to which you want to tune in Refer to Using the number buttons p...

Страница 25: ...ile the DVD VIDEO is stopped How to read this manual Operations are described by mainly using the remote control buttons If there are the same marks on the main unit the buttons on the main unit can also be used The following marks tell you for which type of the discs the operation can be made The illustrations and TV screens may be different between the actual case and the description DVD VR mean...

Страница 26: ...enu may appear in the display window after DVD playback starts In such a case select the desired menu item by using the following buttons on the remote control Select a menu item with or and then press Select a menu item with the number buttons Operation may differ from the explanation given here depending on the disc type PG Original program page 27 PL Play list page 27 Title number Chapter numbe...

Страница 27: ...layed on the TV screen on screen guide Containing multi angle views page 29 Containing multi audio page 28 Containing multi subtitle page 29 The disc cannot accept the operation you have attempted Play page 22 Pause page 25 Fast reverse Fast forward search page 25 Slow motion playback reverse forward directions page 26 Playing Back from a Position 10 Seconds Before One Touch Replay PBC Playback co...

Страница 28: ... will disappear and the stored information will be cleared Resume function is set to on as the initial preset You can set the function to off page 40 While a disc is being played back Press To resume normal playback press Playback cannot be paused by pressing on the main unit during JPEG disc slide show While a disc is paused Press Each time you press picture will be advanced frame by frame You ca...

Страница 29: ...he beginning of the next chapter track file Press to select a title or group NOTE Except for a DVD VIDEO this operation can also be carried out while the disc is stopped This operation may not work with some discs While a disc is being played back 1 Set the remote control mode selector to AUDIO 2 Press the number buttons or to select the track chapter you want to listen to Refer to Using the numbe...

Страница 30: ...u do not press While a disc is stopped or being played back 1 Press to display the origi nal program or press to dis play the play list Example A play list will appear only when it has been recorded in the disc 2 Press to select the desired title 3 Press When you have selected the original pro gram playback will start from the selected title to the following titles When you have selected the play ...

Страница 31: ...s The audio language setting will change automatically in a few seconds even if is not pressed NOTE You can also operate this function by using the menu bar page 35 For a language code such as AA refer to Lan guage Codes page 41 When 2 channel sounds are recorded in 1 2 and multi channel sounds with down mix prohibited are recorded in 2 2 in a DVD AUDIO you can select 1 2 only Remote control mode ...

Страница 32: ...ngle will be changed The angle can also be changed by pressing 2 Press The view angle setting will change auto matically in a few seconds even if is not pressed NOTE You can also operate this function by using the menu bar page 35 While a disc is played back or paused 1 Press Each time you press the picture magnification will be changed OFF ZOOM1 6 When a JPEG disc is used the picture magnificatio...

Страница 33: ...other items go back to step 3 7 Press NOTE If no operation is made for several seconds during the procedure the settings made so far will be automatically stored VFP stands for Video Fine Processor The two speakers produce an effect resembling surround sound While a disc is being played back Press Example For DVD VIDEO Each time you press the display changes as follows While 3D phonic is activated...

Страница 34: ...up called a bonus group recorded This operation can be carried out when BONUS is lit in the display window on the main unit While a disc is being played back 1 Set the remote control mode selector to AUDIO 2 Press repeatedly during playback to select a bonus group KEY_ _ _ _ appears on the TV screen and in the display window on the main unit 3 Press the number buttons to enter the pin code 4 digit...

Страница 35: ...function on the menu bar page 35 You can program a maximum of 99 chapters or tracks You can program the same chapter or track more than once While a disc is stopped 1 Set the remote control mode selector to AUDIO 2 Press to select PROGRAM In case you have pressed more than twice press repeatedly to display PROGRAM Example For DVD VIDEO 3 Press the number buttons or to program chapters tracks Displ...

Страница 36: ...Y FULL appears 4 Press NOTE For a DVD VIDEO DVD AUDIO MP3 or WMA disc if you press instead of specifying a track chapter number in step 3 ALL is displayed and all of the tracks chapters included in the selected group title are programmed While playback is stopped press or repeatedly During this operation you can add a track as the last in the program or erase the last track step 3 While playback i...

Страница 37: ...yed back PL is displayed 3 The current title is repeated for a DVD VR 4 STEP is displayed during program playback or random playback NOTE You can also operate this function on the menu bar except when using this function with an MP3 WMA or JPEG disc page 35 Repeat playback is automatically canceled for an unplayable MP3 WMA or JPEG discs For details on A B repeat repeat playback of a designated pa...

Страница 38: ...ed playing time of current title group T REM Remaining time of current title group TIME Elapsed playing time of current chapter track REM Remaining time of current chapter track DVD VR TOTAL Elapsed playing time of original program play list T REM Remaining time of original program play list CD VCD SVCD TIME Elapsed playing time of current track REM Remaining time of current track TOTAL Elapsed pl...

Страница 39: ... selector to AUDIO 2 Press twice The menu bar appears page 35 3 Press to select 4 Press 5 Enter the time using the number buttons Example When you want to play back a disc from the position of 0 hour 23 minutes 45 seconds press the buttons in the order You can skip entering minutes and seconds If you enter wrong numbers press to delete the numbers and then enter the numbers again 6 Press To delete...

Страница 40: ...nd JPEG files set one of them to be played FILE TYPE on page 39 1 Insert a disc Example For MP3 Example For MP3 Number buttons Remote control mode selector Playback Elapsed playing time of the selected track only for MP3 WMA Tag information of the selected track only for MP3s WMAs Group list Track list Tracks con tained in the selected group TV screen Group number Track number WMA is displayed whe...

Страница 41: ...can also use in step 2 You can also use the number buttons in step 4 In this case steps 3 and 5 are not needed Refer to Using the number buttons page 16 You can also use or in step 4 In this case step 3 is not needed Group number Track number Elapsed playing time This indicator is not displayed while a JPEG is loaded Slide show playback For a JPEG disc when you press in step 5 files are continuous...

Страница 42: ...e for your TV 16 9 16 9 MULTI wide TV Select this item when the aspect ratio of your wide TV is fixed to 16 9 when playing back a DVD VIDEO recorded at 4 3 this product automatically adjusts the screen width of the output signal Select this item when the aspect ratio of your TV is conventional 4 3 While viewing a wide screen picture the black bars appear on the top and bottom of the screen 4 3 PS ...

Страница 43: ...digital audio output terminals Sound sources other than those shown in the table above do not output signals Playback disc DIGITAL AUDIO OUTPUT preference STREAM PCM DOLBY DIGITAL PCM PCM ONLY 48 kHz 16 20 24 bit Linear PCM DVD VIDEO 96 kHz linear PCM DVD VIDEO 48 kHz 16 bit stereo linear PCM 48 96 192 kHz 16 20 24 bit linear PCM DVD AUDIO 48 kHz 16 bit stereo linear PCM 44 1 88 2 176 4 kHz 16 20 ...

Страница 44: ...krit FA Persian SD Sindhi FI Finnish SG Sangho FJ Fiji SH Serbo Croatian FO Faroese SI Singhalese FY Frisian SK Slovak GA Irish SL Slovenian GD Scots Gaelic SM Samoan GL Galician SN Shona GN Guarani SO Somali GU Gujarati SQ Albanian HA Hausa SR Serbian HI Hindi SS Siswati HR Croatian ST Sesotho HU Hungarian SU Sundanese HY Armenian SV Swedish IA Interlingua SW Swahili IE Interlingue TA Tamil IK In...

Страница 45: ...ss the cassette tape playback direction changes The initial play back direction after you have inserted a cas sette tape is always the normal direction The cassette tape playback direction indica tor facing right is displayed during normal playback The indicator facing left is dis played during reverse playback Operation Stop Press Fast forward Rewind Press or When a cassette tape is played back i...

Страница 46: ...volume and making other necessary settings refer to Basic Opera tions page 17 You can adjust the sound input level from the con nected equipment While the sound source is selected to AUX you can adjust the sound input level Hold down until the input level appears Each time you hold down the display changes as follows Adjusting the Sound Input Level from Other Equipment For ordinary use factory set...

Страница 47: ...ly recorded to these types of cas sette tapes You cannot obtain proper playback sound Write protect tags are attached to a cassette tape for preventing the erasing of recorded sound They enable you to avoid losing impor tant recordings because once you snap off the write protect tags you cannot record to the cas sette tape or erase recorded material When you want to use the cassette tape for recor...

Страница 48: ...the group number by pressing or and then select the track number by pressing or Before proceeding to step 4 program the tracks you want to record page 32 Before proceeding to step 4 play back a disc pause the playback and then press to return to the beginning of the first track Select the sound from other equip ment AUX in step 3 and then press Do not play back any tracks on the connected equipmen...

Страница 49: ...s Example Display while the sleep timer is set to 60 minutes NOTE When you set the sleep timer the display window automatically dims Before the clock has been set While 0 00 is flashing when you press CLOCK ADJUST appears Press repeatedly to select the time again With the sleep timer activated press once Set the clock beforehand page 16 Number buttons Remote control mode selector Sleep Timer Cance...

Страница 50: ...ding timer works once WEEKLY The recording timer works weekly or every day 7 Press 8 Press or to select the desired day of the week Each time you press or the dis play changes as follows When ONCE is selected When WEEKLY is selected 9 Press 10 Press or to select REC TIMER REC stands for Recording 11 Press 12 Press or to select a sound source Example To record an FM broadcast to a cassette tape Whe...

Страница 51: ...lank time is less than 2 minutes the second recording timer does not work When the power plug is disconnected or the power is interrupted the recording timer settings may be lost If the settings are lost set the clock and recording timer again 1 Prepare the sound source you want to play back 2 Press repeatedly to select TIMER1 TIMER2 or TIMER3 Example When TIMER2 is selected 3 Press 4 Press and to...

Страница 52: ...nd track T you can play back a DVD VIDEO DVD AUDIO or DVD VR only from the beginning of the disc When you want to play back a CD VCD or SVCD With DVD CD selected Press twice and then press or the number buttons to select the number of a track T from which you want to start playback Refer to Using the number buttons page 16 The group number G is ignored When you want to specify a track from which y...

Страница 53: ...deo will not come out before you select the desired item to be played back on the disc menu Auto Standby If no sound is produced for 3 minutes when the disc or cassette tape is selected as a sound source the main unit automatically turns off When the disc or cassette tape is selected as a sound source Press When playback or recording finishes auto standby starts the countdown the A STANDBY indicat...

Страница 54: ... read manuals of equipment to be connected Set the main unit s AV COMPU LINK MODE setting page 40 as follows When connecting to the VIDEO 1 input terminal of the TV DVD 2 When connecting to the VIDEO 2 input terminal of the TV DVD 3 When connecting to the VIDEO 3 input terminal of the TV DVD 1 You can enjoy sound or video simply by starting playback on the main unit You do not have to select the i...

Страница 55: ... the cabi net with the dampened cloth followed by a soft dry cloth Do not wipe the cabinet with thinners or ben zenes Wiping it with these agents may cause discoloration of the cabinet or removal of the paint Do not spray insecticides or other highly volatile agents onto the cabinet Do not leave pieces of rubber or plastic on the cabinet for a long period Handling discs Cleaning discs Signal surfa...

Страница 56: ...e the disc on the disc tray with the letter printed surface facing up 22 Moisture has condensed on the lens Leave the main unit turned on wait for approximately 1 or 2 hours and then operate the main unit 3 A certain point cannot be played back properly The disc is scratched or dirty Clean or replace the disc 52 The volume of cassette tape playback is low The head or capstans are dirty Clean the h...

Страница 57: ...ement AC 110 127 230 240 V 50 60 Hz Power consumption 55 W at operation 3 0 W on standby Dimensions 165 mm W 200 mm H 350 mm D Mass approx 4 6 kg Speaker SP UXQD90S System 3 way bass reflex type Magnetically shielded type Speakers Woofer 10 cm cone speaker 1 Midrange 4 cm cone speaker 1 Tweeter 1 5 cm dome speaker 1 Powerhandling 20 W capacity Impedance 4 Ω Frequency range 55 Hz 40 kHz Sound press...

Страница 58: ...hat your mains AC line voltage corresponds with the position of the voltage selector switch provided on the bottom of this equipment and if different reset the voltage selector switch to prevent from a damage or risk of fire electric shock 有关主 AC 电源线路的重要事项 接插电源以前 请务必检查当地的主 AC 电源线路电压是 否和位于本机底部的电压选择开关设定的位置一致 如果 不一致 请重新设定电压选择开关使其符合当地电压 以免 损坏机器或引起火灾 触电的危险 Bottom view of the main unit 本机仰视图 ...

Страница 59: ...MICRO COMPONENT DVD SYSTEM For turning off the demonstration display refer to page 15 UX QD90S Consists of CA UXQD90S and SP UXQD90S INSTRUCTIONS LVT1368 005A UG UX English ...

Страница 60: ...loth etc the heat may not be able to get out Do not place any naked flame sources such as lighted candles on the apparatus When discarding batteries environmental problems must be considered and local rules or laws governing the disposal of these batteries must be followed strictly Do not expose this apparatus to rain moisture dripping or splashing and that no objects filled with liquids such as v...

Страница 61: ...s should be placed in the areas shown by the dimensions below Bottom Place on the level surface Maintain adequate air path for ventilation by placing on a stand with a height of 10 cm or more In addition maintain the best possible air circulation 15cm 10cm 15cm 15cm 1cm 1cm 15cm Wall or obstructions Front Main unit Main unit Front view Side view European Union only ...

Страница 62: ...MODE 19 Listening to Radio Broadcasts 20 Setting the AM Tuner Spacing 20 Selecting a Radio Station 21 Storing Radio Stations Preset 21 Tuning In to a Preset Radio Station 21 Basic Operations of the DVD Player 22 Playback 22 Playing Back from a Position 10 Seconds Before One Touch Replay 24 Stopping Playback 25 Resuming Playback RESUME 25 Pausing Playback 25 Advancing Picture Frame by Frame 25 Fast...

Страница 63: ...Disc 45 Recording the Second or Subsequent Track to the Last Track from a Disc 45 Program Recording from a Disc 45 Recording with No Blank Time between Tracks 45 Erasing Recorded Sound from a Cassette Tape 45 Using the Timers 46 Sleep Timer 46 Recording Timer 47 Playback Timer 48 Auto Standby 50 Disc Ejection Lock 51 Using AV COMPU LINK 51 Connection and Setting 51 Operations 51 Handling Discs Cas...

Страница 64: ...ipe it with a cloth dampened with a small amount of a neutral detergent and then wipe it with a soft dry cloth CAUTION Do not wipe the operation panel with thinners ben zenes or other chemical agents Do not spray insecticides onto the operation panel These may cause discoloration and damage to the surface When using headphones keep the volume at a moderate level so as not to over stimulate your ea...

Страница 65: ...ible in some cases due to the disc characteristics recording condition scratches or dirt on the disc or dirt or condensation on the lens Before using a disc carefully read the cautions regarding the disc This product does not support playback or CD text display of sound files such as MP3s To play back a CD RW or DVD RW on this product erase all tracks if the CD RW or DVD RW was recorded in a forma...

Страница 66: ...amera File System standard when a function such as the automatic image rotation function of a digital camera is applied the data no longer complies with the DCF standard so the image may not be displayed If data has been processed edited and restored with PC image editing software the data may not be displayed This product cannot play back animations such as MOTION JPEG still pictures TIFF etc oth...

Страница 67: ...age the system Care of the cabinet When cleaning the system use a soft cloth and fol low the relevant instructions on the use of chemi cally coated cloths Do not use benzene thinner or other organic solvents including disinfectants These may cause deformation or discoloring If water gets inside the system Turn the system off and disconnect the power cord plug from the wall outlet then call the sto...

Страница 68: ...ke sure that the voltage selector is set to the correct voltage for your area CAUTION DO NOT plug in before setting the voltage selector on the bottom of the main unit and all connections are complete Bottom view of the main unit For Saudi Arabia Bottom view of the main unit For other countries ...

Страница 69: ...r of headphones equipped with a stereo mini plug commercially avail able While the headphones are connected the speakers do not produce any sound The numbers refer to the pages in which the parts are explained Cassette holder 42 PUSH OPEN Disc tray 22 Remote control sensor 9 18 46 49 17 50 32 34 42 15 18 25 42 26 31 38 45 22 51 17 43 44 45 30 18 21 22 42 44 45 31 32 2 23 22 1 17 20 30 26 38 45 20 ...

Страница 70: ...nsor on the main unit is approximately 5 m maximum When the effective distance decreases replace the batteries Do not drop the remote control or subject it to excessive shock The numbers refer to the pages in which the parts are explained 17 17 10 43 10 21 35 36 Number buttons 16 21 26 32 36 42 44 42 17 26 27 50 34 17 29 31 29 19 30 30 18 18 18 25 25 27 42 45 39 16 47 48 24 21 33 28 24 18 10 26 38...

Страница 71: ... it towards the TV 1 Make sure to slide the remote control mode selector to the TV side in advance NOTE When the batteries are replaced perform the man ufacturer s code setting again This page is for when operating your TV using the remote control of this product Operating the TV Using the Remote Control Remote control mode selector Number buttons Setting the manufacturer s code Manufacturer Code ...

Страница 72: ...M antenna Insert the tab into the slot Main unit rear view Main unit side view Connecting the antenna cord Connect the ends of the antenna cord as shown above When insulation covers the tips of the antenna cord twist and pull off the insulation When positioning the antennas find the best position for reception while listening to an actual radio program refer to Listening to Radio Broadcasts page 2...

Страница 73: ... FM antenna supplied Main unit side view When positioning the antennas find the best position for reception while listening to an actual radio program refer to Listening to Radio Broadcasts page 20 Main unit rear view Main unit side view Depending on the radio reception conditions an FM feeder antenna sold separately compatible with 300 Ω can be used In the case a converter sold separately is requ...

Страница 74: ... distance between the TV and the speakers NOTE Improper speaker cord connection spoils the stereo effect and sound quality The impedance of speakers connected to this product must be within the range of 4 Ω to 16 Ω A cooling fan is built into the main unit The inter nal cooling fan automatically rotates to dissipate generated heat To ensure sufficient cooling leave a space of at least 1 cm between...

Страница 75: ...ck Such picture distortion is caused by a copy protection system and is not a malfunction Also if the main unit is connected to a TV with a built in VCR there may be picture distortion during playback NOTE Before playing back the discs with video output you need to select the color system and the video processing system Refer to Selecting the Color System and the Video Processing System SCAN MODE ...

Страница 76: ... power is turned off Hold down on the main until DEMO CLEAR appears Disconnecting and then reconnecting the power plug will not start the demonstration display NOTE To activate the demonstration display again hold down on the main unit while the power is off until Hello appears Activating the demonstration display turns on the main unit When you press a button on the main unit DEMO OFF appears in ...

Страница 77: ...to increment You can use the number buttons to specify the hour Refer to Using the number buttons shown on the left 3 Press or 4 Set the minute Set the minute in the same manner as in step 2 5 Press or 6 Set the day of the week or Back Next Each time you press or the day of the week changes Abbreviations are used for the days of the week Sun Sunday Mon Monday Tue Tuesday Wed Wednesday Thu Thursday...

Страница 78: ...nge of 0 to 40 Press Each time you press the display changes as follows While the sound mode is set to an item other than FLAT is displayed in the display window NOTE This function does not affect recording sound 1 Press repeatedly to display MANUAL 2 For adjusting bass sound Press For adjusting treble sound Press You can adjust the sound quality within the range of 5 to 5 The display returns to t...

Страница 79: ...ay window the disc tray and the circumference of the VOLUME control light in pale blue for approximately 2 seconds When recording finishes the color of the display window the disc tray and the circumference of the VOLUME control switches to red to inform you that recording has ended Next time you press a button the color pattern returns to the selected pattern For the locations of remote control b...

Страница 80: ... to the aspect ratio of your TV page 39 If you play back an NTSC disc with this setting set to PAL or PAL PROG you can watch the playback pictures the disc will be reproduced using PAL 60 format but the TV screen may rolls over upward and downward rapidly If you play back a PAL disc with this setting set to NTSC or NTSC PROG you can watch the playback pictures but the following symptoms may occur ...

Страница 81: ... 10 kHz spacing On the main unit ONLY When the main unit is turned off To select 10 kHz spacing while holding down on the main unit press on the main unit to turn on the power AM 10 kHz SP appears in the display window To select 9 kHz spacing while holding down on the main unit press on the main unit to turn on the power AM 9 kHz SP appears in the display window NOTE If the spacing is switched the...

Страница 82: ...a radio station to a preset num ber to which another radio station has previously been stored the newly set radio station replaces the previously stored radio station While an FM or AM broadcast is being received 1 Set the remote control mode selector to AUDIO 2 Use the number buttons to select the preset number of the radio sta tion to which you want to tune in Refer to Using the number buttons p...

Страница 83: ...the DVD VIDEO is stopped How to read this manual Operations are described by mainly using the remote control buttons If there are the same marks on the main unit the buttons on the main unit can also be used The following marks tell you for which type of the discs the operation can be made The illustrations and TV screens may be different between the actual case and the description DVD VR means a ...

Страница 84: ...enu may appear in the display window after DVD playback starts In such a case select the desired menu item by using the following buttons on the remote control Select a menu item with or and then press Select a menu item with the number buttons Operation may differ from the explanation given here depending on the disc type PG Original program page 27 PL Play list page 27 Title number Chapter numbe...

Страница 85: ...d on the TV screen on screen guide Containing multi angle views page 29 Containing multi audio page 28 Containing multi subtitle page 29 The disc cannot accept the operation you have attempted Play page 22 Pause page 25 Fast reverse Fast forward search page 25 Slow motion playback reverse forward directions page 26 Playing Back from a Position 10 Seconds Before One Touch Replay PBC Playback contro...

Страница 86: ...RESUME will disappear and the stored information will be cleared Resume function is set to on as the initial preset You can set the function to off page 40 While a disc is being played back Press To resume normal playback press Playback cannot be paused by pressing on the main unit during JPEG disc slide show While a disc is paused Press Each time you press picture will be advanced frame by frame ...

Страница 87: ...eginning of the next chapter track file Press to select a title or group NOTE Except for a DVD VIDEO this operation can also be carried out while the disc is stopped This operation may not work with some discs While a disc is being played back 1 Set the remote control mode selector to AUDIO 2 Press the number buttons or to select the track chapter you want to listen to Refer to Using the number bu...

Страница 88: ...u do not press While a disc is stopped or being played back 1 Press to display the origi nal program or press to dis play the play list Example A play list will appear only when it has been recorded in the disc 2 Press to select the desired title 3 Press When you have selected the original pro gram playback will start from the selected title to the following titles When you have selected the play ...

Страница 89: ...e audio language setting will change automatically in a few seconds even if is not pressed NOTE You can also operate this function by using the menu bar page 35 For a language code such as AA refer to Lan guage Codes page 41 When 2 channel sounds are recorded in 1 2 and multi channel sounds with down mix prohibited are recorded in 2 2 in a DVD AUDIO you can select 1 2 only Remote control mode sele...

Страница 90: ...ngle will be changed The angle can also be changed by pressing 2 Press The view angle setting will change auto matically in a few seconds even if is not pressed NOTE You can also operate this function by using the menu bar page 35 While a disc is played back or paused 1 Press Each time you press the picture magnification will be changed OFF ZOOM1 6 When a JPEG disc is used the picture magnificatio...

Страница 91: ...r items go back to step 3 7 Press NOTE If no operation is made for several seconds during the procedure the settings made so far will be automatically stored VFP stands for Video Fine Processor The two speakers produce an effect resembling surround sound While a disc is being played back Press Example For DVD VIDEO Each time you press the display changes as follows While 3D phonic is activated is ...

Страница 92: ...up called a bonus group recorded This operation can be carried out when BONUS is lit in the display window on the main unit While a disc is being played back 1 Set the remote control mode selector to AUDIO 2 Press repeatedly during playback to select a bonus group KEY_ _ _ _ appears on the TV screen and in the display window on the main unit 3 Press the number buttons to enter the pin code 4 digit...

Страница 93: ...tion on the menu bar page 35 You can program a maximum of 99 chapters or tracks You can program the same chapter or track more than once While a disc is stopped 1 Set the remote control mode selector to AUDIO 2 Press to select PROGRAM In case you have pressed more than twice press repeatedly to display PROGRAM Example For DVD VIDEO 3 Press the number buttons or to program chapters tracks Display f...

Страница 94: ...Y FULL appears 4 Press NOTE For a DVD VIDEO DVD AUDIO MP3 or WMA disc if you press instead of specifying a track chapter number in step 3 ALL is displayed and all of the tracks chapters included in the selected group title are programmed While playback is stopped press or repeatedly During this operation you can add a track as the last in the program or erase the last track step 3 While playback i...

Страница 95: ...back PL is displayed 3 The current title is repeated for a DVD VR 4 STEP is displayed during program playback or random playback NOTE You can also operate this function on the menu bar except when using this function with an MP3 WMA or JPEG disc page 35 Repeat playback is automatically canceled for an unplayable MP3 WMA or JPEG discs For details on A B repeat repeat playback of a designated part r...

Страница 96: ...ed playing time of current title group T REM Remaining time of current title group TIME Elapsed playing time of current chapter track REM Remaining time of current chapter track DVD VR TOTAL Elapsed playing time of original program play list T REM Remaining time of original program play list CD VCD SVCD TIME Elapsed playing time of current track REM Remaining time of current track TOTAL Elapsed pl...

Страница 97: ...ector to AUDIO 2 Press twice The menu bar appears page 35 3 Press to select 4 Press 5 Enter the time using the number buttons Example When you want to play back a disc from the position of 0 hour 23 minutes 45 seconds press the buttons in the order You can skip entering minutes and seconds If you enter wrong numbers press to delete the numbers and then enter the numbers again 6 Press To delete the...

Страница 98: ...nd JPEG files set one of them to be played FILE TYPE on page 39 1 Insert a disc Example For MP3 Example For MP3 Number buttons Remote control mode selector Playback Elapsed playing time of the selected track only for MP3 WMA Tag information of the selected track only for MP3s WMAs Group list Track list Tracks con tained in the selected group TV screen Group number Track number WMA is displayed whe...

Страница 99: ...also use in step 2 You can also use the number buttons in step 4 In this case steps 3 and 5 are not needed Refer to Using the number buttons page 16 You can also use or in step 4 In this case step 3 is not needed Group number Track number Elapsed playing time This indicator is not displayed while a JPEG is loaded Slide show playback For a JPEG disc when you press in step 5 files are continuously p...

Страница 100: ...e for your TV 16 9 16 9 MULTI wide TV Select this item when the aspect ratio of your wide TV is fixed to 16 9 when playing back a DVD VIDEO recorded at 4 3 this product automatically adjusts the screen width of the output signal Select this item when the aspect ratio of your TV is conventional 4 3 While viewing a wide screen picture the black bars appear on the top and bottom of the screen 4 3 PS ...

Страница 101: ...tal audio output terminals Sound sources other than those shown in the table above do not output signals Playback disc DIGITAL AUDIO OUTPUT preference STREAM PCM DOLBY DIGITAL PCM PCM ONLY 48 kHz 16 20 24 bit Linear PCM DVD VIDEO 96 kHz linear PCM DVD VIDEO 48 kHz 16 bit stereo linear PCM 48 96 192 kHz 16 20 24 bit linear PCM DVD AUDIO 48 kHz 16 bit stereo linear PCM 44 1 88 2 176 4 kHz 16 20 24 b...

Страница 102: ...krit FA Persian SD Sindhi FI Finnish SG Sangho FJ Fiji SH Serbo Croatian FO Faroese SI Singhalese FY Frisian SK Slovak GA Irish SL Slovenian GD Scots Gaelic SM Samoan GL Galician SN Shona GN Guarani SO Somali GU Gujarati SQ Albanian HA Hausa SR Serbian HI Hindi SS Siswati HR Croatian ST Sesotho HU Hungarian SU Sundanese HY Armenian SV Swedish IA Interlingua SW Swahili IE Interlingue TA Tamil IK In...

Страница 103: ...cassette tape playback direction changes The initial play back direction after you have inserted a cas sette tape is always the normal direction The cassette tape playback direction indica tor facing right is displayed during normal playback The indicator facing left is dis played during reverse playback Operation Stop Press Fast forward Rewind Press or When a cassette tape is played back in the n...

Страница 104: ...volume and making other necessary settings refer to Basic Opera tions page 17 You can adjust the sound input level from the con nected equipment While the sound source is selected to AUX you can adjust the sound input level Hold down until the input level appears Each time you hold down the display changes as follows Adjusting the Sound Input Level from Other Equipment For ordinary use factory set...

Страница 105: ...ecorded to these types of cas sette tapes You cannot obtain proper playback sound Write protect tags are attached to a cassette tape for preventing the erasing of recorded sound They enable you to avoid losing impor tant recordings because once you snap off the write protect tags you cannot record to the cas sette tape or erase recorded material When you want to use the cassette tape for recording...

Страница 106: ...the group number by pressing or and then select the track number by pressing or Before proceeding to step 4 program the tracks you want to record page 32 Before proceeding to step 4 play back a disc pause the playback and then press to return to the beginning of the first track Select the sound from other equip ment AUX in step 3 and then press Do not play back any tracks on the connected equipmen...

Страница 107: ...ample Display while the sleep timer is set to 60 minutes NOTE When you set the sleep timer the display window automatically dims Before the clock has been set While 0 00 is flashing when you press CLOCK ADJUST appears Press repeatedly to select the time again With the sleep timer activated press once Set the clock beforehand page 16 Number buttons Remote control mode selector Sleep Timer Cancel Sl...

Страница 108: ...ding timer works once WEEKLY The recording timer works weekly or every day 7 Press 8 Press or to select the desired day of the week Each time you press or the display changes as follows When ONCE is selected When WEEKLY is selected 9 Press 10 Press or to select REC TIMER REC stands for Recording 11 Press 12 Press or to select a sound source Example To record an FM broadcast to a cassette tape When...

Страница 109: ... time is less than 2 minutes the second recording timer does not work When the power plug is disconnected or the power is interrupted the recording timer settings may be lost If the settings are lost set the clock and recording timer again 1 Prepare the sound source you want to play back 2 Press repeatedly to select TIMER1 TIMER2 or TIMER3 Example When TIMER2 is selected 3 Press 4 Press and to set...

Страница 110: ...nd track T you can play back a DVD VIDEO DVD AUDIO or DVD VR only from the beginning of the disc When you want to play back a CD VCD or SVCD With DVD CD selected Press twice and then press or the number buttons to select the number of a track T from which you want to start playback Refer to Using the number buttons page 16 The group number G is ignored When you want to specify a track from which y...

Страница 111: ...will not come out before you select the desired item to be played back on the disc menu Auto Standby If no sound is produced for 3 minutes when the disc or cassette tape is selected as a sound source the main unit automatically turns off When the disc or cassette tape is selected as a sound source Press When playback or recording finishes auto standby starts the countdown the A STANDBY indicator f...

Страница 112: ... read manuals of equipment to be connected Set the main unit s AV COMPU LINK MODE setting page 40 as follows When connecting to the VIDEO 1 input terminal of the TV DVD 2 When connecting to the VIDEO 2 input terminal of the TV DVD 3 When connecting to the VIDEO 3 input terminal of the TV DVD 1 You can enjoy sound or video simply by starting playback on the main unit You do not have to select the i...

Страница 113: ... cabi net with the dampened cloth followed by a soft dry cloth Do not wipe the cabinet with thinners or ben zenes Wiping it with these agents may cause discoloration of the cabinet or removal of the paint Do not spray insecticides or other highly volatile agents onto the cabinet Do not leave pieces of rubber or plastic on the cabinet for a long period Handling discs Cleaning discs Signal surface W...

Страница 114: ...e the disc on the disc tray with the letter printed surface facing up 22 Moisture has condensed on the lens Leave the main unit turned on wait for approximately 1 or 2 hours and then operate the main unit 3 A certain point cannot be played back properly The disc is scratched or dirty Clean or replace the disc 52 The volume of cassette tape playback is low The head or capstans are dirty Clean the h...

Страница 115: ... Saudi Arabia AC 110 127 220 V 50 60 Hz For other countries AC 110 127 230 240 V 50 60 Hz Power consumption 55 W at operation For Saudi Arabia 2 5 W on standby For other countries 3 W on standby Dimensions 165 mm W 200 mm H 350 mm D Mass approx 4 6 kg Speaker SP UXQD90S System 3 way bass reflex type Magnetically shielded type Speakers Woofer 10 cm cone speaker 1 Midrange 4 cm cone speaker 1 Tweete...

Страница 116: ...o check that your mains AC line voltage corresponds with the position of the voltage selector switch provided on the bottom of this equipment and if different reset the voltage selector switch to prevent from a damage or risk of fire electric shock For Saudi Arabia For other countries Mains AC Line Instruction Bottom view of the main unit ...

Отзывы: