background image


10


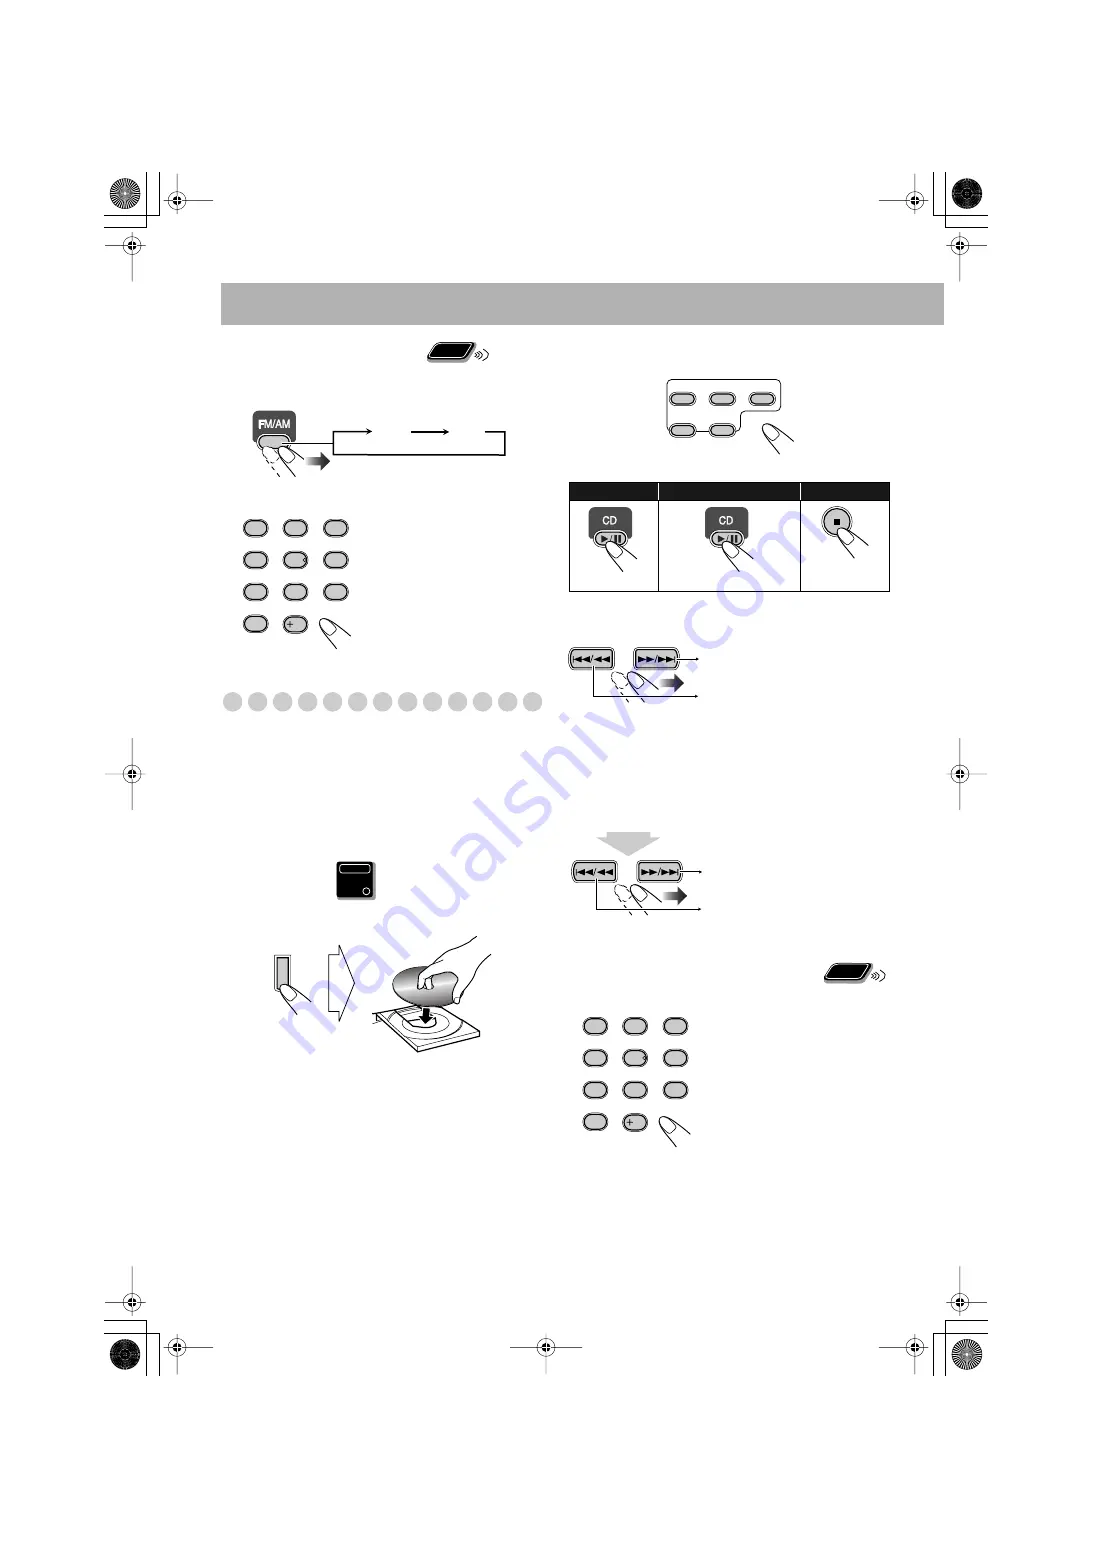
To tune in to a preset station


1


Select a band (FM or AM).


2


Select a preset number for the station you store.


Playing Back a Disc


This System can play back the following discs—regular CD 
and CD-R/CD-RW (recorded either in the audio CD or MP3 
format).


• Caution for DualDisc playback


The Non-DVD side of a “DualDisc” does not comply with 
the “Compact Disc Digital Audio” standard. Therefore, the 
use of Non-DVD side of a DualDisc on this product may 
not be recommended.


To insert a disc


You can insert discs while playing another source.


To close the disc tray,


 press the same 

0


 again.

• When the current disc tray is open, pressing CD 

6


 closes 

the tray and the playback starts.

• When you press 

0


 for the next tray you want to place 

another disc onto, the first disc tray automatically closes 
and then the next tray comes out.


To select a disc to be played back

To select a track/group


*

* For details about the group selection, see “For MP3 

playback” on page 11.


To locate a particular portion


While playing a disc, press and hold until the portion you 
want is reached.


To locate a track directly and 
start play


• For MP3 discs: with the “GROUP” mode (see page 11), 

you can select the tracks only within the current group.

• You can also use the 

PRESET UP or 
PRESET DOWN.

Remote
ONLY

FM

AM

1

4

7

10

2

5

8

3

6

9

10

Main Unit

ONLY

0


To start:

To pause:

To stop:


To release, press again.


Examples:


To select track number 5, press 
5.
To select track number 15, press 
+10, then 5.
To select track number 30, press 
+10, +10, then 10.

CD 1

CD 2

CD 3

CD 4

CD 5

Decreases the track/group* 
numbers.

Increases the track/group* 
numbers.

Fast-forwards the track.

Fast-reverses the track.

Remote
ONLY

1

4

7

10

2

5

8

3

6

9

10

UX-G5[UJ].book Page 10 Friday, June 10, 2005 1:07 PM

Содержание UX-G5

Страница 1: ...UX G5 Consists of CA UXG5 and SP UXG5 LVT1349 003A UJ English MICRO COMPONENT SYSTEM INSTRUCTIONS Cover UJ fm Page 1 Thursday June 9 2005 11 15 AM ...

Страница 2: ...ses shall be placed on the apparatus IMPORTANT FOR LASER PRODUCTS 1 CLASS 1 LASER PRODUCT 2 CAUTION Do not open the top cover There are no user serviceable parts inside the Unit leave all servicing to qualified service personnel 3 CAUTION Visible and invisible laser radiation when open and interlock failed or defeated Avoid direct exposure to beam 4 REPRODUCTION OF LABEL CAUTION LABEL PLACED INSID...

Страница 3: ...he Sound 13 Changing the Display Brightness DIMMER 14 Setting the Clock 14 Turning Off the Power Automatically 14 Advanced Disc Operations 15 Programming the Playing Order Program Play 15 Playing at Random Random Play 16 Playing Repeatedly Repeat Play 17 Prohibiting Disc Ejection Child Lock 17 Advanced Tape Operations 18 Recording on a Tape 18 Synchronized Disc Recording 19 Timer Operations 20 Set...

Страница 4: ...ainly explained however you can use the buttons and controls on the main unit if they have the same or similar name and marks Some related tips and notes are explained later in the sections Learning More about This System and Troubleshooting but not in the same section explaining the operations If you want to know more about the functions or if you have a doubt about the functions go to these sect...

Страница 5: ...NTENNA Step 1 Unpack the package and check the accessories Step 2 Prepare the remote control Step 3 Hook up the components such as AM FM antennas speakers etc see pages 4 to 6 Finally plug the AC power cord Now you can operate the System DO NOT use an old battery together with a new one DO NOT use different types of batteries together DO NOT expose batteries to heat or flame DO NOT leave the batte...

Страница 6: ...f to all components before connections To a wall outlet Plug the AC power cord only after all connections are complete If the wall outlet does not match the AC plug use the supplied AC plug adapter Disconnect the supplied FM antenna and connect to an outdoor FM antenna using a 75 Ω wire with coaxial type connector Vynile covered wire not supplied Extend it horizontally AM loop antenna Keep it conn...

Страница 7: ... VOLTAGE SELECTOR 110V 127V FM antenna supplied Extend it so that you can obtain the best reception AM loop antenna supplied Turn it until the best reception is obtained Non stripe Black stripe UX G5 UJ book Page 5 Friday June 10 2005 1 07 PM ...

Страница 8: ... speakers are connected correctly and firmly When connecting the speaker cords match the polarity of the speaker terminals The cord with black stripe to the cord without stripe to Adjusting the voltage selector Use a screwdriver to slide the voltage selector so that the voltage marker is pointing at the same voltage as where you are plugging in the unit See also the back cover page 1 Hold 2 Insert...

Страница 9: ...epeats the disc ALL Repeats all the discs PRGM program Lights when Program Play mode is activated RANDOM Lights when Random Play mode is activated 8 Main display 9 A auto STANDBY indicator Lights when Auto Standby is activated Flashes when disc playback stops with Auto Standby activated p Timer indicators Lights when Daily Timer or Recording Timer stands by flashes while working 1 2 3 Lights when ...

Страница 10: ... DISPLAY REV MODE Numeric buttons 2 1 VOLUME STANDBY ON 3 4 REC The STANDBY lamp on the main unit lights up A small amount of power is always consumed even while on standby For private listening Connect a pair of headphones to the PHONES jack on the main unit The sound will no longer come out of the speakers Be sure to turn down the volume before connecting or putting the headphones Disconnecting ...

Страница 11: ...If the received FM station is hard to listen To preset the stations You can preset 30 FM and 15 AM stations 1 Tune in to a station you want to preset 2 Activate the preset number entry mode Finish the following process while the indication on the display is flashing 3 Select a preset number for the station you store You can also use the PRESET UP PRESET DOWN buttons 4 Store the station Remote cont...

Страница 12: ...ray automatically closes and then the next tray comes out To select a disc to be played back To select a track group For details about the group selection see For MP3 playback on page 11 To locate a particular portion While playing a disc press and hold until the portion you want is reached To locate a track directly and start play For MP3 discs with the GROUP mode see page 11 you can select the t...

Страница 13: ... of the MP3 discs GROUP Both groups and tracks are detected 4 1 and numeric buttons work for the group selection of the MP3 discs Numeric buttons work for selecting the track numeric within the group MP3 REC GR Total group number Total track number GR Group indicator FM MODE MP3 TRACK GROUP A B C D E 1 1 1 2 1 2 1 1 1 6 3 3 5 3 2 4 3 1 3 2 1 7 4 1 8 4 2 11 6 1 12 6 2 10 5 2 9 5 1 Hierarchy ROOT Le...

Страница 14: ...start To stop To rewind tape Tape is played from the forward side to the reverse side When the reverse side of the tape reaches its end playback stops Tape is automatically reversed and playback repeats until you stop it Tape will not be reversed When the current side of the tape reaches its end playback stops Push Insert Close With the tape side facing backside F PLAY wind forward the tape R PLAY...

Страница 15: ... and treble level from 0 to 5 To adjust the bass To adjust the treble SET FADE MUTING VOLUME DISPLAY CANCEL CLOCK TIMER BASS TREBLE 4 1 7 SLEEP AHB PRO SOUND TURBO DIMMER A STANDBY PRESET UP PRESET DOWN VOLUME SOUND TURBO DIMMER 4 Remote control Main unit Remote control Main unit To restore the volume press again or adjust the volume level VOLUME VOLUME Remote ONLY FADE MUTING SOUND TURBO OFF Canc...

Страница 16: ...en Auto Standby is in use the A STANDBY indicator lights on the display When the disc and tape playback stops the A STANDBY indicator starts flashing If no disc or tape operation is done for about 3 minutes while the indicator is flashing the System turns off stands by automatically Auto Standby only works after disc and tape playback To turn off the System after a certain period of time Sleep Tim...

Страница 17: ...m the other tracks To select a track from the same disc repeat step 3 5 Start playback CANCEL Numeric buttons CD 6 4 1 7 REPEAT RANDOM PROGRAM Disc selection buttons 7 CD 1 0 Remote control Main unit Examples To select track number 5 press 5 To select track number 15 press 10 then 5 To select track number 30 press 10 10 then 10 The tracks you have selected are played back in the order you have pro...

Страница 18: ...back all the tracks on the selected disc at random You can repeat the current disc by pressing REPEAT 1 Select a disc by pressing CD 1 CD 5 2 Press RANDOM Playback starts in random order If GROUP mode is selected for the MP3 disc it will be canceled Random Play ends when all tracks are played Pressing 4 goes to the beginning of the current track To exit from Random Play While the RANDOM indicator ...

Страница 19: ...k for this function To cancel the prohibition repeat the same procedure UNLOCKED appears on the display Repeats the current track Repeats all the tracks on the current disc Repeats all the tracks in the current group for MP3 playback mode in GROUP only Repeats all the discs Remote ONLY REPEAT CD ALL Canceled No indication 1 REPEAT CD ALL Canceled No indication 1 REPEAT CD ALL Canceled No indicatio...

Страница 20: ...REV MODE Disc selection buttons 4 7 Disc selection buttons CD 6 TAPE23 FM AM AUX REC PUSH OPEN IMPORTANT It may be unlawful to record or play back copyrighted material without the consent of the copyright owner To record on both sides When starting recording the Reverse mode changes to automatically To record on only one side Push Insert Close With the tape side facing backside REC Tape direction ...

Страница 21: ...ecording If starting recording while playing back a disc the disc player returns to the beginning of the current track If the beat are heard while recording an AM broadcast Select BEAT 1 or BEAT 2 to reduce the beat To stop recording On the main unit REC On the main unit CD 1 0 CD 5 0 CD 2 0 CD 3 0 CD 4 0 On the main unit On the main unit REC To record Program Play or Random Play 1 Select Program ...

Страница 22: ...e selected station or starts playing the specified disc or the tape The volume level is the level when the unit was turned off last time When selecting P the last tuned station will be selected for Daily Timer About one hour after turning on the System the System stops it and turns off stands by automatically While Daily Timer is working the timer and timer number indicators 1 2 or 3 flash on the ...

Страница 23: ...em turned on To turn off the Timer after its setting is done Since Daily Timer is activated at the same time everyday you may need to cancel it on some particular days 1 Select the Timer you want to cancel 2 Turn off the selected Timer The indicator corresponding to the Timer is turned off To turn on the Timer again repeat the above steps and press in step 2 The indicator corresponding to the Time...

Страница 24: ...the pinch rollers and capstans and may cause characteristic deterioration Daily Operations Sound Other Adjustments see pages 13 and 14 Adjusting the Volume Be sure to turn down the volume before connecting or putting the headphones Adjusting the Sound This function also affects the sound through the headphones SOUND TURBO and AHB PRO cannot be used at the same time Setting the Clock 0 00 will flas...

Страница 25: ...You need to set the clock first then the timer again Without stopping the recording you cannot change the source after Recording Timer starts recording You cannot use the SLEEP timer while activating the Recording timer To remove the speaker grilles Speaker grille Holes Projections UX G5 UJ book Page 23 Friday June 10 2005 1 07 PM ...

Страница 26: ...se The AM loop antenna is too close to the System The FM antenna is not properly extended and positioned Disc Operations The disc does not play The disc is placed upside down Place the disc with the label side up ID3 Tag on an MP3 disc cannot be shown There are two types of ID3 Tag Version 1 and Version 2 This System can only show ID3 Tag Version 1 The disc sound is discontinuous The disc is scrat...

Страница 27: ...y stained wipe it with a cloth soaked in water diluted neutral detergent and wrung well then wipe clean with a dry cloth Since the System may deteriorate in quality it become damaged or get its paint peeled off be careful about the following DO NOT wipe it with a hard cloth DO NOT wipe it strongly DO NOT wipe it with thinner or benzine DO NOT apply any volatile substance such as insecticides to it...

Страница 28: ...D 4 CD 5 PROGRAM RANDOM STANDBY PHONES AUX VOLUME SOUND TURBO REC DOWN UP CD 1 CD 2 CD 3 CD 4 CD 5 0 0 0 0 0 CD TAPE FM AM AUX 5 CD 5 CD CHANGER PLAY EXCHANGE Remote control Main unit 9 10 12 15 16 9 10 13 14 21 8 10 12 14 16 18 19 17 13 14 13 9 10 15 9 14 21 14 16 20 21 8 14 9 10 13 14 21 10 12 15 16 19 9 10 12 15 16 12 18 8 13 8 21 13 14 7 Remote sensor 8 8 10 12 18 19 9 12 17 19 8 13 10 17 19 8...

Страница 29: ...ltage selector switch provided on the outside of this equipment and if different reset the voltage selector switch to prevent from a damage or risk of fire electric shock Mains AC Line Instruction not applicable for Europe U S A Canada Australia and U K ANTENNA AM EXT GND AM LOOP 220V 240V AC VOLTAGE SELECTOR 110V 127V 220V 240V AC VOLTAGE SELECTOR 110V 127V Cover UJ fm Page 2 Thursday June 9 2005...

Отзывы: