background image

(No.MB412)1-3

SECTION 1

PRECAUTION

1.1

Safety Precautions

(1) This design of this product contains special hardware and

many circuits and components specially for safety  purpos-
es. For continued protection, no changes should be made
to the original design unless authorized in writing by the
manufacturer. Replacement parts must be identical to
those used in the original circuits. Services should be per-
formed by qualified personnel only.

(2) Alterations of the design or circuitry of the product should

not be made. Any design alterations of the product should
not be made. Any design alterations or additions will void
the manufacturers warranty and will further relieve the
manufacture of responsibility for personal injury or property
damage resulting therefrom.

(3) Many electrical and mechanical parts in the products have

special safety-related characteristics. These characteris-
tics are often not evident from visual inspection nor can the
protection afforded by them necessarily be obtained by us-
ing replacement components rated for higher voltage, watt-
age, etc. Replacement parts which  have these special
safety characteristics are identified in the Parts List of Ser-
vice Manual. Electrical components having such features
are identified by shading on the schematics and by (   ) on
the Parts List in the Service Manual. The use of a substitute
replacement which does not have the same safety charac-
teristics as the recommended replacement parts shown in
the Parts List of Service Manual may create shock, fire, or
other hazards.

(4) The leads in the products are routed and dressed with ties,

clamps, tubings, barriers and the like to be separated from
live parts, high temperature parts, moving parts and/or
sharp edges for the prevention of electric shock and fire
hazard. When service is required, the original lead routing
and dress should be observed, and it should be confirmed
that they have been returned to normal, after reassem-
bling.

(5) Leakage shock hazard testing

After reassembling the product, always perform an isola-
tion check on the exposed metal parts of the product (an-
tenna terminals, knobs, metal cabinet, screw heads,
headphone jack, control shafts, etc.) to be sure the product
is safe to operate without danger of electrical shock.Do not
use a line isolation transformer during this check.
• Plug the AC line cord directly into the AC outlet. Using a

"Leakage Current Tester", measure the leakage  current
from each exposed metal parts of the cabinet, particular-
ly any exposed metal part having a return path to the
chassis, to a known good earth ground. Any leakage cur-
rent must not exceed 0.5mA AC (r.m.s.).

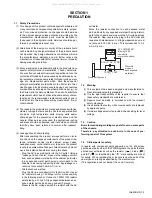
• Alternate check method

Plug the AC line cord directly into the AC outlet. Use an
AC voltmeter having, 1,000

 per volt or more sensitivity

in the following manner. Connect a 1,500

 10W resistor

paralleled by a 0.15

µ

F AC-type capacitor between an ex-

posed metal part and a known good earth ground.
Measure the AC voltage across the resistor with the AC

voltmeter. 
Move the resistor connection to each exposed metal
part, particularly any exposed metal part having a return
path to the chassis, and measure the AC voltage across
the resistor. Now, reverse the plug in the AC outlet and
repeat each measurement. Voltage measured any must
not exceed 0.75 V AC (r.m.s.). This corresponds to  0.5
mA AC (r.m.s.). 

1.2

Warning

(1) This equipment has been designed and manufactured to

meet international safety standards.

(2) It is the legal responsibility of the repairer to ensure that

these safety standards are maintained.

(3) Repairs must be made in accordance with the relevant

safety standards.

(4) It is essential that safety critical components are replaced

by approved parts.

(5) If mains voltage selector is provided, check setting for local

voltage.

1.3

Caution

Burrs formed during molding may be left over on some parts
of the chassis. 
Therefore, pay attention to such burrs in the case of pre-
forming repair of this system.

1.4

Critical parts for safety

In regard with component parts appearing on the silk-screen
printed side (parts side) of the PWB diagrams, the parts that are
printed over with black such as the resistor ( 

 ), diode ( 

 )

and ICP ( 

 ) or identified by the "   " mark nearby are critical

for safety.  When replacing them, be sure to use the parts of the
same type and rating as specified by the manufacturer. 
(This regulation dose not Except the J and C version)

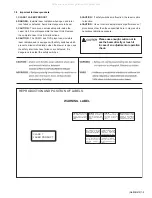
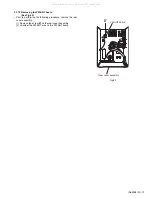
Good earth ground

Place this 
probe on 
each exposed
metal part.

AC VOLTMETER
(Having 1000 
ohms/volts,
or more sensitivity)

1500     10W

0.15   F  AC TYPE

All manuals and user guides at all-guides.com

Содержание UX-G1

Страница 1: ... 6 3 DISASSEMBLY 1 7 4 ADJUSTMENT 1 14 5 TROUBLESHOOTING 1 17 CA UXG1 SP UXG1 SP UXG1 TIMER SET RANDOM SLEEP REPEAT STANDBY ON TIMER ON OFF REMAIN BEAT CUT DISPLAY CLOCK SET MUTING SOUND BASS CD TAPE CD VOLUME TUNER BAND FM MODE PROGRAM REMOTE CONTROL STANDBY ON OPEN VOLUME MICRO COMPONENT SYSTEM CD SYNCHRO RECORDING Area suffix US Singapore UB Hong Kong UT Taiwan UW Brazil Mexico Peru UY Argentin...

Страница 2: ...se ratio 85 dB Wow and flutter Immeasurable Cassette deck Frequency response Normal type I 100 Hz 10 000 Hz Wow and flutter 0 35 WRMS General Power requirement AC 110 V 127 V 220 V 240 V adjustable with the voltage selector 50 Hz 60 Hz Power consumption 22 W at operation 4 5 W on standby Dimensions W H D approx 145 mm 209 mm 226 mm Mass approx 3 0 kg Type Full range Bass reflex type Speakers 10 cm...

Страница 3: ...to be sure the product is safe to operate without danger of electrical shock Do not use a line isolation transformer during this check Plug the AC line cord directly into the AC outlet Using a Leakage Current Tester measure the leakage current from each exposed metal parts of the cabinet particular ly any exposed metal part having a return path to the chassis to a known good earth ground Any leaka...

Страница 4: ...he tester s internal power source can easily destroy the laser diode 1 6 Handling the traverse unit optical pickup 1 Do not subject the traverse unit optical pickup to strong shocks as it is a sensitive complex unit 2 Cut off the shorted part of the flexible cable using nippers etc after replacing the optical pickup For specific details refer to the replacement procedure in the text Remove the ant...

Страница 5: ... AVOID DIRECT EXPOSURE TO BEAM e VARNING Synlig och osynling laserstrålning när den öppnas och spärren är urkopplad Betrakta ej strålen s VARO Avattaessajasuojalukitus ohitettuna tai viallisena olet alttiina näkyvälle ja näkymättömälle lasersäteilylle Vältä säteen kohdistumista suoraan itseesi f ADVARSEL Synlig og usynlig laserstråling når maskinen er åben eller interlocken fejeler Undgå direkte e...

Страница 6: ...1 6 No MB412 SECTION 2 SPECIFIC SERVICE INSTRUCTIONS This service manual does not describe SPECIFIC SERVICE INSTRUCTIONS All manuals and user guides at all guides com a l l g u i d e s c o m ...

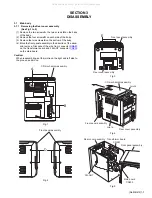
Страница 7: ...emove Disconnect the wire from connector CN901 on the transformer board and FM ANT connector CN203 on the main board Caution When reassembling set the joint a on the right and left side to the groove and move Fig 1 Fig 2 Fig 3 Fig 4 Fig 5 A B CD mechanism assembly D Front panel assembly E Front panel assembly Rear cover assembly Joint a Joint a Front panel assembly CD mechanism assembly Rear cover...

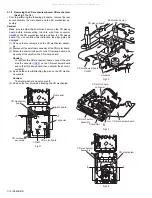
Страница 8: ...re from all connectors on the main board 2 Cut off the band setting the wire 3 Remove the two screws F and release the joint b Fig 6 Fig 7 CN801 CN851 CN850 CN370 CN301 CN401 CN402 CN260 Main board CD mechanism assembly Front panel assembly F Main board CD mechanism assembly Front panel assembly Joint b All manuals and user guides at all guides com ...

Страница 9: ...screws G on the front panel assembly 4 Release the joint d of the CD mechanism assembly 5 Remove the five screws H attaching the switch board to the CD mechanism assembly 6 Unsolder the switch board if necessary Fig 8 Fig 9 Fig 10 CD mechanism board CD mechanism assembly Open switch connecter CN603 CN606 Front panel assembly Band Band Band G G Joint d CD mechanism assembly Front panel assembly Ope...

Страница 10: ...ircuit point on the CD pickup board and disconnect the wire from the CD pickup board Caution To reattach the CD mechanism board connect the card wire to connector CN601 on the CD mechanism board and to the CD pickup board then unsolder the short cir cuit point 4 Remove the screw K attaching the wire on the CD mecha nism board Caution The metal washer and nut come off 5 Remove the four screws L att...

Страница 11: ...mbly 1 Remove the ten screws N and the two screws P on the Front panel assembly Fig 16 3 1 7 Removing the Cassette mechanism See Fig 17 Prior to performing the following procedure remove the rear cover assembly and the main board 1 Remove the four screws Q on the front panel assembly and press the eject button on the front side to remove the cas sette mechanism assembly Fig 17 M Head phones board ...

Страница 12: ...rior to performing the following procedure remove the rear cover assembly and the transformer board 1 From the rear cover assembly remove the four screws U attaching the transformer 2 Remove the two screws Y setting the power cord 3 Remove the two screws A attaching the voltage selector on the bottom of the body 4 Remove the transformer from the rear panel assembly in the direction of the arrow Fi...

Страница 13: ...2 Prior to performing the following procedure remove the rear cover assembly 1 Remove the screw B on the rear cover assembly 2 Unsolder the FM ANT wire on the FM ANT board Fig 22 Rear cover assembly B FM ANT board All manuals and user guides at all guides com ...
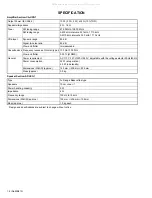
Страница 14: ...4 2 Test tape Playback tape VT712 tape speed wow flutter VT724 reference level VT703L head azimuth VT738 frequency responce Recording tape AC225 type l Power supply voltage AC220V 240V 50Hz 4 3 Measuring instruments Radio section 4 4 Amplifier section Reference output Speaker output 0 dB 1 V 4 Ω Headphone output 10 dB 0 1 V 32 Ω 4 5 CD section Test disc CTS 1000 JVC TCD 731R A BEX TCD 712R A BEX T...

Страница 15: ... to record Check to see if the frequency at the measuring point R335 or R336 is 60 kHz 1 kHz if not adjust T360 until the frequency counter indicates 60 kHz 1 kHz At TUNER set the BAND to the FM position and record the reference 1 kHz signal and 8 kHz signal altemately repeatedly While playing back the recorded signal differ from that of the 1 kHz signal by within 0 3 to 6 dB Test tape VT703 Signa...

Страница 16: ...parts Cassette mechanism section CASSETTE MOTOR Tape speed adj Main board assembly BIAS FREQUENCY T201 AM OSC T360 AM RF AM RF AM IF AM VT R245 TC201 T203 T204 114 kHz T202 All manuals and user guides at all guides com a l l g u i d e s c o m ...

Страница 17: ... No MB412 1 17 SECTION 5 TROUBLESHOOTING This service manual does not describe TROUBLESHOOTING All manuals and user guides at all guides com ...
Страница 18: ...12 AV MULTIMEDIA COMPANY AUDIO VIDEO SYSTEMS CATEGORY 10 1 1chome Ohwatari machi Maebashi city 371 8543 Japan Victor Company of Japan Limited VPT Printed in Japan All manuals and user guides at all guides com ...
Страница 19: ... solder used in the board material Sn Ag Cu melting point 219 Centigrade CA UXG1 SP UXG1 SP UXG1 TIMER SET RANDOM SLEEP REPEAT STANDBY ON TIMER ON OFF REMAIN BEAT CUT DISPLAY CLOCK SET MUTING SOUND BASS CD TAPE CD VOLUME TUNER BAND FM MODE PROGRAM REMOTE CONTROL STANDBY ON OPEN VOLUME MICRO COMPONENT SYSTEM CD SYNCHRO RECORDING Area suffix US Singapore UB Hong Kong UT Taiwan UW Brazil Mexico Peru ...

Страница 20: ...on the silk screen printed side parts side of the PWB diagrams the parts that are printed over with black such as the resistor diode and ICP or identified by the mark nearby are critical for safety All manuals and user guides at all guides com ...

Страница 21: ...N OW173 00300 02 P N OW261 041102 14 P N OW261 041032 23 P N OW555 020001 02 UX G1 CD PCB P N OW235 020240 01 P N OW555 020001 13 P N OW31 00210 80 P N OW261 061031 13 P N OW261 042032 08 P N OW200 020001 00 P N OW235 020047 01 CD MECH BOTTOM SIDE WHITE DOT SIDE CN901 1 3 P N 235 020047 01 P N 177 020001 02 TRANSFORMER P N 182 010212 01 AC 230V AC 120V UX G1 POWER PCB 6 5 3 6 0 1 1 6 2 3 4 6 4 4 4...

Страница 22: ...084050 01 P N OW261 041021 38 P N OW173 00300 02 P N OW261 041102 14 P N OW261 041032 23 P N OW555 020001 02 UX G1 CD PCB P N OW235 020240 01 P N OW555 020001 13 P N OW31 00210 80 P N OW261 061031 13 P N OW261 042032 08 P N OW200 020001 00 P N OW235 020047 01 CD MECH BOTTOM SIDE WHITE DOT SIDE CN901 1 3 P N 235 020047 01 P N 177 020001 02 TRANSFORMER P N 182 010212 01 AC 230V AC 120V UX G1 POWER P...

Страница 23: ...084050 01 P N OW261 041021 38 P N OW173 00300 02 P N OW261 041102 14 P N OW261 041032 23 P N OW555 020001 02 UX G1 CD PCB P N OW235 020240 01 P N OW555 020001 13 P N OW31 00210 80 P N OW261 061031 13 P N OW261 042032 08 P N OW200 020001 00 P N OW235 020047 01 CD MECH BOTTOM SIDE WHITE DOT SIDE CN901 1 3 P N 235 020047 01 P N 177 020001 02 TRANSFORMER P N 182 010212 01 AC 230V AC 120V UX G1 POWER P...

Страница 24: ...084050 01 P N OW261 041021 38 P N OW173 00300 02 P N OW261 041102 14 P N OW261 041032 23 P N OW555 020001 02 UX G1 CD PCB P N OW235 020240 01 P N OW555 020001 13 P N OW31 00210 80 P N OW261 061031 13 P N OW261 042032 08 P N OW200 020001 00 P N OW235 020047 01 CD MECH BOTTOM SIDE WHITE DOT SIDE CN901 1 3 P N 235 020047 01 P N 177 020001 02 TRANSFORMER P N 182 010212 01 AC 230V AC 120V UX G1 POWER P...

Страница 25: ... AMP POWER AMP CASSETTE DECK PHONE SPEAKER FOR TAPE FOR TUNER MP3 MP3 MCU KEY BOARD SENSOR REMOTE CD PICKUP CD RF AMP CD DSP CD DRIVER MAIN VOLTAGE REGILATOR RECTIFIER FOR MCU FOR CD CD MCU VOLTAGE REGULATOR POWER SUPPLY AC IN All manuals and user guides at all guides com ...
Страница 26: ...2 6 Standard schematic diagrams Primaty section All manuals and user guides at all guides com a l l g u i d e s c o m ...

Страница 27: ...2 7 Amp section All manuals and user guides at all guides com ...
Страница 28: ...2 8 Display section All manuals and user guides at all guides com ...
Страница 29: ...2 9 CD section All manuals and user guides at all guides com ...

Страница 30: ...2 10 Cassette section All manuals and user guides at all guides com ...

Страница 31: ...2 11 Tuner section All manuals and user guides at all guides com a l l g u i d e s c o m ...

Страница 32: ...erse side forward side reverse side Trans board Lead free solder used in the board material Sn Ag Cu melting point 219 Centigrade Lead free solder used in the board material Sn Ag Cu melting point 219 Centigrade All manuals and user guides at all guides com ...
Страница 33: ...2 13 Display board forward side reverse side Lead free solder used in the board material Sn Ag Cu melting point 219 Centigrade All manuals and user guides at all guides com ...

Страница 34: ...2 14 CD board forward side reverse side Lead free solder used in the board material Sn Ag Cu melting point 219 Centigrade All manuals and user guides at all guides com ...

Страница 35: ... M E M O All manuals and user guides at all guides com ...
Страница 36: ...pan Limited No MB412SCH Printed in Japan VPT AV MULTIMEDIA COMPANY AUDIO VIDEO SYSTEMS CATEGORY 10 1 1chome Ohwatari machi Maebashi city 371 8543 Japan All manuals and user guides at all guides com a l l g u i d e s c o m ...

Страница 37: ...xploded view of general assembly and parts list Block No M1 Electrical parts list Block No 01 04 Packing materials and accessories parts list Block No M3 UX G1 3 2 3 6 3 14 Area suffix US Singapore UB Hong Kong UT Taiwan UW Brazil Mexico Peru UY Argentina MB412 All manuals and user guides at all guides com ...
Страница 38: ... d c r p q b 46 45 44 43 42 41 48 68 69 68 68 69 70 59 12 1 2 3 5 67 64 63 62 60 69 37 38 49 50 51 52 53 54 47 56 58 55 55 57 55 73 69 69 69 65 Block No M M M 1 LED board CD board AC BK Display board 39 40 P 70 69 76 h 70 All manuals and user guides at all guides com ...
Страница 39: ... 81 80 CD board AC Cord BKT board Phone board Key board 4 J P J 70 77 24 29 90 89 F902 F901 F903 76 29 82 82 G 70 69 31 76 76 32 29 g A 35 75 70 Main board n e q p m h k B 87 76 28 74 Power board 83 E F 74 27 86 L k 70 74 70 30 88 69 L Phone BKT board 84 FM ANT board All manuals and user guides at all guides com ...

Страница 40: ... 37 OW689000010103 MAIN PCB BKT2 38 OW605000010027 CASS KNOB Door Plate 39 OW689000010093 MAIN PCB BKT1 40 OW659004200064 CASS KNOB BKT 41 OW684000010168 CASS KNOB PAUSE 42 OW684000010181 CASS KNOB STOP EJECT 43 OW684000010146 CASS KNOB F FWD 44 OW684000010157 CASS KNOB REW 45 OW684000010135 CASS KNOB PLAY 46 OW684000010179 CASS KNOB REC 47 OW688000010045 CASS KNOB Door 48 OW605000010038 CASS DOOR...

Страница 41: ...AGE SWITCH SW901 SL14 22AM5A 86 OW618092606009 SCREW 2 6X6 87 OW618093008069 SCREW 3X8 88 OW370057312042 FUSE T3 15A 250V F901 89 OW370057202047 FUSE 2A 250V F902 90 OW370057501026 FUSE 500MA 250V F903 Symbol No Part No Part Name Description Local All manuals and user guides at all guides com a l l g u i d e s c o m ...

Страница 42: ...6 E CAPACITOR 4 7uF 50V C209 OW120103527004 C CAPACITOR 0 01uF 50V C210 OW120103527004 C CAPACITOR 0 01uF 50V C211 OW131477052906 E CAPACITOR 4 7uF 50V C212 OW131477052906 E CAPACITOR 4 7uF 50V C214 OW120223527006 C CAPACITOR 0 022uF 50V C215 OW120202527002 C CAPACITOR 0 002uF 50V C216 OW120202527002 C CAPACITOR 0 002uF 50V C217 OW120223527006 C CAPACITOR 0 022uF 50V C219 OW131108052912 E CAPACITO...

Страница 43: ...221022912 E CAPACITOR 22uF 16V C807 OW131227052907 E CAPACITOR 2 2uF 50V Symbol No Part No Part Name Description Local C808 OW131227052907 E CAPACITOR 2 2uF 50V C809 OW131102022904 E CAPACITOR 100uF 16V C810 OW131102022904 E CAPACITOR 100uF 16V C811 OW131332032902 E CAPACITOR 330uF 25V C813 OW120101526004 C CAPACITOR 100pF 50V C814 OW120101526004 C CAPACITOR 100pF 50V C815 OW120331526004 C CAPACIT...

Страница 44: ...7KΩ 1 16W R346 OW390100226108 C RESISTOR 10KΩ 1 16W Symbol No Part No Part Name Description Local R347 OW390100226108 C RESISTOR 10KΩ 1 16W R348 OW390100126102 C RESISTOR 1KΩ 1 16W R349 OW390100226108 C RESISTOR 10KΩ 1 16W R350 OW390100226108 C RESISTOR 10KΩ 1 16W R351 OW380220223314 C RESISTOR 22KΩ 1 8W R352 OW390100226108 C RESISTOR 10KΩ 1 16W R353 OW390680126104 C RESISTOR 6 8KΩ 1 16W R354 OW39...

Страница 45: ... XXXXX OW622010001017 SPONGE For L203 10X10X10mm UW XXXXX OW622010001017 SPONGE For L204 10X10X10mm UW XXXXX OW236092070004 WIRE L 70 BLK for OSC US UW XXXXX OW261042052163 CONNECTOR WIRE 5P for PHONE CN880 to MAIN CN801 XXXXX OW261041062176 CONNECTOR WIRE 6P For C MECH to MAIN CN370 XXXXX OW261061053221 CONNECTOR WIRE 5P For C HEAD to MAIN CN301 Symbol No Part No Part Name Description Local XXXXX...

Страница 46: ...10KΩ 1 16W R149 OW390100226108 C RESISTOR 10KΩ 1 16W R150 OW390100226108 C RESISTOR 10KΩ 1 16W R151 OW390100226108 C RESISTOR 10KΩ 1 16W R152 OW390100226108 C RESISTOR 10KΩ 1 16W R153 OW390100226108 C RESISTOR 10KΩ 1 16W R154 OW390100226108 C RESISTOR 10KΩ 1 16W R155 OW390330126102 C RESISTOR 3 3KΩ 1 16W R156 OW390100226108 C RESISTOR 10KΩ 1 16W R157 OW390100226108 C RESISTOR 10KΩ 1 16W R158 OW390...

Страница 47: ...F 50V C678 OW101102077004 C CAPACITOR 1000pF Symbol No Part No Part Name Description Local C679 OW120104527009 C CAPACITOR 0 1uF 50V C680 OW120104527009 C CAPACITOR 0 1uF 50V C681 OW131471012902 E CAPACITOR 47uF 10V C682 OW131471022911 E CAPACITOR 47uF 16V C683 OW120104527009 C CAPACITOR 0 1uF 50V C684 OW120222527001 C CAPACITOR 2200pF 50V C685 OW120222527001 C CAPACITOR 2200pF 50V C686 OW13110202...

Страница 48: ...2070471036 AXIAL INDUCTOR 47uH L609 OW162070471036 AXIAL INDUCTOR 47uH L611 OW162070101054 AXIAL INDUCTOR 10uH L612 OW168001122012 FERRITE BEAD RH03509ST B246 L613 OW168001122012 FERRITE BEAD RH03509ST B246 CN601 OW238080160124 HEADER 16P for CD Pick Up CN602 OW261041061377 CONNECTOR WIRE 6P for CD MECH CN603 OW260021030017 HEADER 3P for DISPLAY CN109 CN604 OW261061031138 CONNECTOR WIRE 3P for MAI...

Страница 49: ...3 13 MEMO All manuals and user guides at all guides com ...

Страница 50: ...3 14 Packing materials and accessories parts list Block No M M M 3 P2 P6 P4 P5 P7 A5 A7 A6 P9 P1 A8 P8 A3 A2 P4 A4 P3 A1 A9 US UW UT All manuals and user guides at all guides com ...

Страница 51: ... L 1M A 4 BATTERY x2 A 5 OW800USREJV01 REMOTE CONTROL A 6 OW622001000019 TABLE CUSHION 116X17X2mm A 7 OW905001182025 PROTECT Board A 8 OW622003222028 SHEET PROTECT 145X40mm A 9 OW177000501017 AC PLUG ADAPTOR JT 0475UL VDE UT A 9 OW275002755024 AC ADAPTOR AZ2755 16 US UW P 1 OW905020001019 CARTON P 2 OW906090710107 POLY BAG 7X10 P 3 OW906091014057 POLY BAG 10x14 P 4 OW906000025058 POLY BAG 3 5X10 x...

Отзывы: