JVC TH-P3 Скачать руководство пользователя страница 32

29

Advanced operations

Frame-by-frame playback

7

During playback

Press 

8

 repeatedly.

Each time you press the button, the still 
picture advances by one frame.

To return to normal playback

Press play button for corresponding source (

DVD

3

 or 

USB 

MEMORY

3

).

Playing back in slow-motion

7

During playback

1

Press 

8

 at the point 

where you want to start playback 
in slow-motion from.

The system pauses playback.

2

Press SLOW 

9

.

Playback in forward slow-motion starts.

For DVD VIDEO only:
• To play back in reverse slow-motion, press 

SLOW


(

.

Each time you press the button, the playback speed 
becomes faster (1/32, 1/16, 1/8, 1/4, 1/2).

To return to normal playback

Press 

DVD

3

.

NOTE

• Sound cannot be heard during slow-motion playback.

Zooming in

7

During playback or while paused

1

Press ZOOM with SHIFT 
pressed.

Each time you repeat the procedure, 
the scene magnification changes.

2

While zoomed in, press Cursor 

3

/

2

/

Y

/

5

 to move zoom-in area.

To return to normal playback

Press 

ZOOM

 repeatedly with 

SHIFT

 pressed, to select OFF.

NOTE

• The number of the magnification steps varies depending on 

the disc type.

• During slide-show playback of JPEG, zooming in is not 

available. In such a case, press 

8

 to pause slide-show 

playback, then zoom in.

• During playback, there may be a case where Cursor (

3

/

2

/

Y

/

5

) does not work in step 2.

Changing the VFP setting

The VFP (Video Fine Processor) function 
enables you to adjust the picture character 
according to the type of programming, 
picture tone or personal preference.

7

During playback

1

Press VFP.

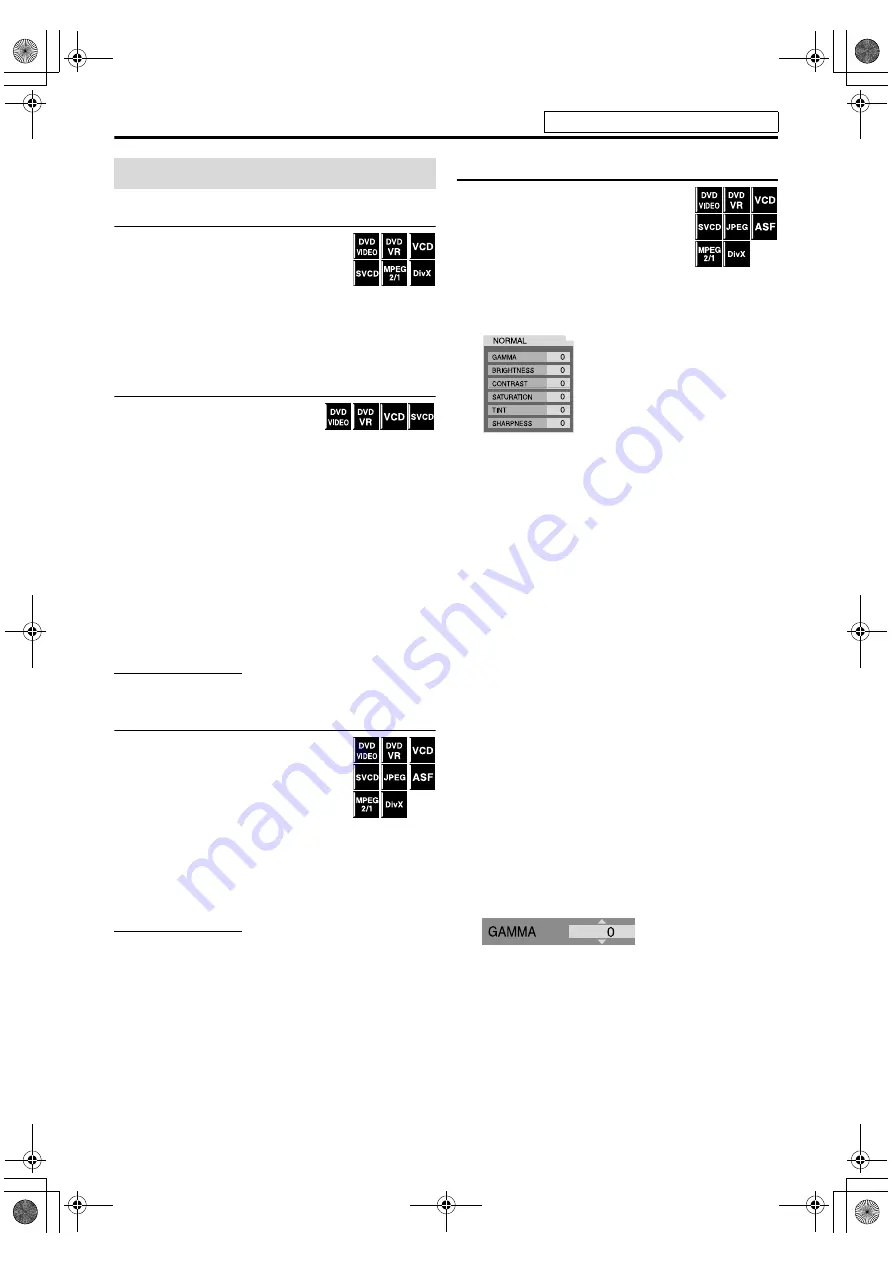
The current VFP settings appear on the TV screen.

Example:

2

Press Cursor 

3

/

2

 repeatedly to 

select the VFP mode.

• NORMAL: Normally select this.
• CINEMA: Suitable for movies.
When you select “NORMAL” or “CINEMA”, press 

VFP


to complete the setting.
• USER 1 and USER 2: You can adjust parameters that 

affect picture appearance.

Only when selecting “USER 1” or “USER 2” in step 2, 
proceed to perform the following operation;

3

Press Cursor 

Y

/

5

 repeatedly to 

select a parameter you want to 
adjust.

Adjust gradually and confirm picture appearance 
results are as preferred.
• GAMMA: Controls brightness of neutral tints while 

maintaining brightness of dark and bright portions 
(–3 to +3).

• BRIGHTNESS: Controls screen brightness (–8 to 

+8).

• CONTRAST: Controls screen contrast (–7 to +7).
• SATURATION: Controls screen color depth (–7 to 

+7).

• TINT: Controls screen tint (–7 to +7).
• SHARPNESS: Controls screen sharpness (–8 to +8).

4

Press ENTER.

Example:

5

Press Cursor 

Y

/

5

 to change the 

setting.

Special picture playback

See page 21 for button locations.

EN_THP7-P3[U]4.book  Page 29  Tuesday, April 4, 2006  5:08 PM

Содержание TH-P3

Страница 1: ... UB A DVD DIGITAL CINEMA SYSTEM INSTRUCTIONS TH P7 Consists of XV THP7 SP WP7 SP THP7F SP THP7C and SP THP7S TH P3 Consists of XV THP3 SP WP5 SP THP3F SP THP3C and SP THP3S EN_THP7 P3 U 4 book Page i Tuesday April 4 2006 5 08 PM ...

Страница 2: ...p goes off The power can be remote controlled CAUTION Do not block the ventilation openings or holes If the ventilation openings or holes are blocked by a newspaper or cloth etc the heat may not be able to get out Do not place any naked flame sources such as lighted candles on the apparatus When discarding batteries environmental problems must be considered and local rules or laws governing the di...

Страница 3: ...on when open Do not view directly with optical instruments Caution Proper Ventilation To avoid risk of electric shock and fire and to protect from damage place the apparatus on a level surface The minimal clearances are shown below European Union only 15 cm Wall or obstructions XV THP7 XV THP3 15 cm 15 cm 15 cm Front view XV THP7 XV THP3 15 cm Front No obstructions Wall or obstructions Side view E...

Страница 4: ... 16 Playback 17 Basic Playback 17 One Touch Replay 19 Fast forward fast reverse search 19 Skip to the beginning of a desired selection 19 Skipping at about 5 minute intervals 20 Locating a desired title group using number buttons 20 Selecting the desired title playlist from the control display 20 Advanced operations 21 Using the surround mode 21 Using the on screen bar 23 Playing from a specified ...

Страница 5: ...ot place the system in moist or dusty places Avoid high temperatures Do not expose the system to direct sunlight and do not place it near a heating device When you are away When away on travel or for other reasons for an extended period of time disconnect the power cord plug from the wall outlet Do not block the vents Blocking the vents may damage the system Care of the cabinet When cleaning the s...

Страница 6: ... Notes on DVD R and DVD RW This system does not support multi border disc Notes on CD R and CD RW This system can play CD Rs or CD RWs recorded with ISO 9660 format This system supports multi session discs up to 20 sessions This system cannot play packet write discs Region code of DVD VIDEO DVD VIDEO players and DVD VIDEO discs have their own Region Code numbers This system can play back DVD VIDEO...

Страница 7: ...s system also supports the resolutions of 352 x 576 480 x 576 352 x 288 pixels 25 fps and 352 x 480 480 x 480 352 x 240 pixels 30 fps The file format should be MP ML Main Profile at Main Level SP ML Simple Profile at Main Level MP LL Main Profile at Low Level Audio streams should conform to MPEG1 Audio Layer 2 or MPEG2 Audio Layer 2 For DivX files The system supports DivX 6 x 5 x 4 x and 3 11 The ...

Страница 8: ... details of the parts are described Front panel center unit Rear panel center unit Display window 21 36 18 22 18 36 37 17 17 17 15 Disc tray inside 17 Remote sensor 6 17 15 15 14 18 30 18 14 27 31 30 16 12 37 20 9 10 7 12 11 11 12 EN_THP7 P3 U 4 book Page 5 Tuesday April 4 2006 5 08 PM ...

Страница 9: ...system from the remote control Aim the remote control directly to the front panel of the center unit Do not block the remote sensor Number buttons 19 14 15 20 24 33 18 15 17 17 37 15 17 19 29 28 29 27 28 17 37 30 16 13 15 16 25 27 29 31 32 33 30 13 13 20 20 24 32 16 20 33 23 15 36 19 36 22 19 25 15 16 29 13 15 13 16 31 31 16 15 R6P SUM 3 AA 15F type dry cell batteries supplied EN_THP7 P3 U 4 book ...

Страница 10: ...for the FM antenna as it is well shielded against interference Connecting the FM and AM antennas If the antenna cord is covered with the insulation coat twist and pull the insulation coat off and remove White Black Outdoor single vinyl covered wire antenna not supplied AM loop antenna white Center unit Extend the supplied FM antenna horizontally Center unit FM antenna supplied Outdoor FM antenna n...

Страница 11: ...nst them Do not reproduce sounds at so high a volume that the sound is distorted otherwise the speakers may be damaged by internal heat buildup Connecting the satellite front center surround speakers and the subwoofer Assembled speakers With stand Refer to steps 1 to 3 Withoutstand Refer to steps 2 and 3 Front speaker SP THP7F 2 Stand 4 Base plate 4 Surround speaker SP THP7S 2 or Stand Screw M5 x ...

Страница 12: ... the wall due to incorrect installation or weakness in wall structure Care must be taken in selecting a location for speaker installation on a wall Injury to personnel or damage to equipment may result if the speakers installed interfere with daily activities SP THP7C Center speaker Connect the black cords to the black terminals Connect the white cords to the red terminals Speaker cord SP WP7 Subw...

Страница 13: ...tallation on a wall Injury to personnel or damage to equipment may result if the speakers installed interfere with daily activities Precautions for daily use When moving the speakers do not pull the speaker cords otherwise the speakers may fall over causing damage or injury Do not reproduce sounds at so high a volume that the sound is distorted otherwise the speakers may be damaged by internal hea...

Страница 14: ...V screen from appearing mottled You can get better picture quality in the order Component video S video Composite video Distortion of picture may occur when connecting the TV via a VCR or to a TV with a built in VCR You need to set MONITOR TYPE in the PICTURE menu correctly according to the aspect ratio of your TV See page 33 7 To connect a TV equipped with the component video input jacks If your ...

Страница 15: ... Speed not compatible with the USB 1 1 You can play back the following types of files in a USB mass storage class device maximum data transfer rate 2 Mbps Music MP3 WMA Picture JPEG Movie MPEG 4 ASF DivX maximum frame rate of 30 fps for progressive You cannot play back a file larger than 2 GB When playing a file which has a large transfer rate frames or sounds may be dropped during playback This s...

Страница 16: ...C TVs Refer also to the manuals supplied for the TV To operate the TV aim the remote control directly at the remote sensor on the TV TV Turn on or off the TV TV VOL with SHIFT pressed and held Adjust the volume TV VIDEO Set the input mode either TV or VIDEO TV CH with SHIFT pressed and held Change the channels EN_THP7 P3 U 4 book Page 13 Tuesday April 4 2006 5 08 PM ...

Страница 17: ...nit The buttons on the remote control are used to explain most of the operations in this manual You can use the buttons on the center unit same as on the remote control for operations unless otherwise noted The buttons described below are used on pages 14 to 16 Turning the system on off OPEN CLOSE Appears when opening or closing the disc tray NOW READING Appears when the system is reading the disc...

Страница 18: ... or putting on headphones as high volume may damage both the headphones and your hearing Before disconnecting headphones as high volume may be suddenly output from the speakers While connecting a pair of headphones to the PHONES jack on the center unit the system automatically cancels the surround mode see page 21 currently selected deactivates the speakers and activates the headphone mode H PHONE...

Страница 19: ...he desired mode NTSC Select when your TV supports the NTSC interlaced video input only NTSC PRG Select when your TV equipped with component jacks supports the NTSC progressive video input PAL Select when your TV supports the PAL interlaced video input only PAL PRG Select when your TV equipped with component jacks supports the PAL progressive video input You can get better picture quality in NTSC P...

Страница 20: ...age 26 on the TV screen during playback NOTE When several types of files are recorded on a disc device select appropriate file type on the setup menu See page 34 7 To pause Press 8 To continue playback press play button for corresponding source DVD 3 or USB MEMORY 3 7 To stop Press 7 7 On screen guide icons During DVD VIDEO playback the following guide icons may appear for a while on the TV screen...

Страница 21: ...number Elapsed playing time hour minute second Surround mode and digital signal format See page 22 Title number Pressing FL DISPLAY Chapter number Title number Pressing FL DISPLAY Chapter number Elapsed playing time hour minute second Chapter number Playlist number Pressing FL DISPLAY Chapter number Elapsed playing time hour minute second Chapter number Track number Elapsed playing time hour minut...

Страница 22: ...forward search and 11 12 and 13 for reverse search 7 Using x 4 buttons 7For DVD VIDEO DVD VR chapter During playback 7For VCD SVCD track During playback without PBC function 7For CD MP3 WMA JPEG ASF MPEG 2 MPEG 1 DivX track file During playback or while stopped Press x or 4 repeatedly NOTE When playing back an MP3 WMA JPEG ASF MPEG 2 MPEG 1 DivX you can make operations using the file control displ...

Страница 23: ...he control display is shown on the TV screen and the system starts playback of the first title playlist The PLAY LIST is shown only when the playlist is on the DVD VR disc TOP MENU PG shows the ORIGINAL PROGRAM Example 1 Title number 2 Recording date 3 Recording source TV station the input terminal of the recording equipment etc 4 Start time of recording 5 Title of the original program playlist Th...

Страница 24: ...such as Dolby Digital EX 7 DTS Digital Surround 2 Used to reproduce multichannel soundtracks of the software encoded with DTS Digital Surround DTS Digital Surround DTS is another discrete multichannel digital audio format available on CD and DVD software There are other encoding formats of multi channel digital surround introduced by Digital Theater Systems Inc such as DTS ES DTS 96 24 The buttons...

Страница 25: ...oducing the channels sound If the channels sound decoded into 5 1 channel is reproduced only lights Selecting the surround mode The system is set up to automatically select the optimal surround mode for input signal from digital multichannel software When playing back a 2 channel source you can select the desired surround mode manually NOTE This function also takes effect for the sources other tha...

Страница 26: ... the time information See page 24 F Shows playback status appears during playback appears during fast forward reverse appears during playback in forward slow motion reverse slow motion appears when paused appears when stopped G Select this to change time information E See Changing the time information See page 24 H Select this for Repeat Playback See page 31 I Select this for time search function ...

Страница 27: ... start playing a title chapter or track you specify You can also play a disc from specified time Locatinga desired scene from theDVD menu DVD VIDEOs generally have their own menus which show disc contents and you can display them on the TV screen You can locate a desired scene by using these menus 7Whenever a DVD VIDEO is loaded 1 Press TOP MENU PG or MENU PL The menu appears on the TV screen Norm...

Страница 28: ...number buttons while stopped Press x repeatedly until the desired track number is displayed then start playback by pressing DVD 3 play button The track number appears on the display window instead of PBC To activate the PBC function when playing a PBC compatible VCD SVCD without using the PBC function perform any of the following Press TOP MENU PG or MENU PL Press 7 twice to stop playback then pre...

Страница 29: ...nning of the current title track during playback Example To play back from a point 2 hours 34 minutes 08 seconds elapsed To cancel a misentry Press Cursor 2 repeatedly 5 Press ENTER 6 Press ON SCREEN The on screen bar disappears You can search and play desired groups and tracks files using the file control display on the TV screen Example When the source is DVD 1 For JPEG ASF MPEG 2 MPEG 1 DivX Th...

Страница 30: ...lay window Turning off the power see page 14 Pressing 7 once Changing the source see page 15 To start playback from the stored position Press play button for corresponding source DVD 3 or USB MEMORY 3 on the remote control or 3 play button on the center unit Select DVD or USB MEMORY as the source again if you changed the source To clear the stored position Press 7 again Opening the disc tray or di...

Страница 31: ... pop up window See The language codes list See page 35 Each time you press SUBTITLE the subtitle appears and disappears alternately For DivX you cannot operate this procedure using the on screen bar 7During playback of a disc file containing audio in several languages When using the AUDIO button 1 Press AUDIO Example DVD VIDEO ENGLISH is selected out of 3 audio languages recorded 2 Press AUDIO rep...

Страница 32: ...e slide show playback then zoom in During playback there may be a case where Cursor 3 2 Y 5 does not work in step 2 Changing the VFP setting The VFP Video Fine Processor function enables you to adjust the picture character according to the type of programming picture tone or personal preference 7During playback 1 Press VFP The current VFP settings appear on the TV screen Example 2 Press Cursor 3 2...

Страница 33: ...med tracks files have been played back playback stops and the program window appears again Note that program setting remains To check the program contents During playback press 7 Playback stops and the program window appears To quit the Program mode While stopped press PLAY MODE repeatedly until both program window and RANDOM disappear from the TV screen NOTE When the source is USB MEMORY Program ...

Страница 34: ... the part you want to repeat point A The repeat mode indicator appears on the display window 2 Press A B RPT again with SHIFT pressed at the end of the part you want to repeat point B The repeat mode indicator on the display window changes to and A B Repeat Playback starts The selected part of the disc between point A and B is played repeatedly To cancel Press A B RPT with SHIFT pressed during A B...

Страница 35: ...ED appears to indicate that the tray is locked To cancel Carry out the same operation again UNLOCKED appears on the display window NOTE Before you start the operation There is a time limit when doing the following steps If the setting is cancelled before you finish start from step 1 again 1 Press SETTING with SHIFT pressed Example 2 Press Cursor Y 5 to select the item you want to set BAL Balance Y...

Страница 36: ...VDs recorded in the picture s height width ratio of 16 9 16 9 16 9 MULTI Wide television conversion Select this when the aspect ratio of your TV is 16 9 wide TV 4 3 LB 4 3 MULTI LB Letter Box conversion Select this when the aspect ratio of your TV is 4 3 conventional TV While viewing a wide screen picture the black bars appear on the top and the bottom of the screen 4 3 PS 4 3 MULTI PS Pan Scan co...

Страница 37: ...n effect useful at midnight NOTE When you play a multichannel Dolby Digital source with the surround mode is off the setting of D RANGE COMPRESSION is set to ON automatically Speaker setting menu SPK SETTING 7 Level menu LEVEL FRONT LEFT SPEAKER FRONT RIGHT SPEAKER CENTER SPEAKER SURROUND RIGHT SPEAKER SURROUND LEFT SPEAKER While monitoring the test tone adjust the output level of the speakers You...

Страница 38: ...AF Afrikaans ET Estonian IW Hebrew MO Moldavian SD Sindhi TL Tagalog AM Ameharic EU Basque JI Yiddish MR Marathi SG Sangho TN Setswana AR Arabic FA Persian JW Javanese MS Malay MAY SH Serbo Croatian TO Tonga AS Assamese FI Finnish KA Georgian MT Maltese SI Singhalese TR Turkish AY Aymara FJ Fiji KK Kazakh MY Burmese SK Slovak TS Tsonga AZ Azerbaijani FO Faroese KL Greenlandic NA Nauru SL Slovenian...

Страница 39: ... When the system is tuned in to 810 kHz 2 Press TUNING 9 repeatedly until you find the frequency you want When you hold down the button until the system starts searching for stations and then release it the system stops searching automatically when a station of sufficient signal strength is tuned in to NOTE When an FM stereo program is received the ST indicator lights on the display window The but...

Страница 40: ...mber erases the previously stored one 7 To tune in to a preset station 1 Press FM AM repeatedly to select FM or AM 2 Press number button s 1 10 h10 to select a preset number For details on using the number buttons see How to use the number buttons See page 19 You can also select a preset number by pressing Cursor 3 and 2 When the stereo FM program currently tuned in is noisy you can change the FM ...

Страница 41: ... the batteries See page 6 Sunlight is shining directly on the remote sensor Hide the remote sensor from direct sunlight The remote control does not work as expected The remote control mode is not for the desired source Before operation press one of the source selecting buttons for the desired source No sound The speaker cord is not connected Check the connection See pages 8 to 10 An incorrect sour...

Страница 42: ...d Compatible device Mass Storage Class Compatible file system FAT16 FAT32 Bus power supply Max 500 mA Tuner section Tuning Range FM 87 50 MHz to 108 00 MHz AM At 10 kHz intervals 530 kHz to 1 710 kHz 1 600 kHz At 9 kHz intervals 531 kHz to 1 710 kHz 1 602 kHz For the countries of the Middle East Speaker impedance Front Surround 3 Ω to 16 Ω Center Subwoofer 4 Ω to 16 Ω General Power Requirements AC...

Страница 43: ...D 280 mm M 1106 mm M 280 mm Mass 3 1 kg each 7 Satellite speakers For TH P3 Front speakers SP THP3F Type 1 Way Bass Reflex Type Magnetically shielded Type Speaker 6 5 cm cone M 1 Power Handling Capacity 40 W Impedance 3 Ω Frequency Range 90 Hz to 20 000 Hz Sound Pressure Level 75 dB W m Dimensions W M H M D 92 mm M 99 mm M 95 5 mm Mass 0 45 kg each Center speaker SP THP3C Type 1 Way Bass Reflex Ty...

Страница 44: ...EN 0406RYMMDWJEM 2006 Victor Company of Japan Limited TH P7 TH P3 DVD DIGITAL CINEMA SYSTEM EN_THP7 P3 U 4 book Page xliv Tuesday April 4 2006 5 08 PM ...

Отзывы: