background image

43

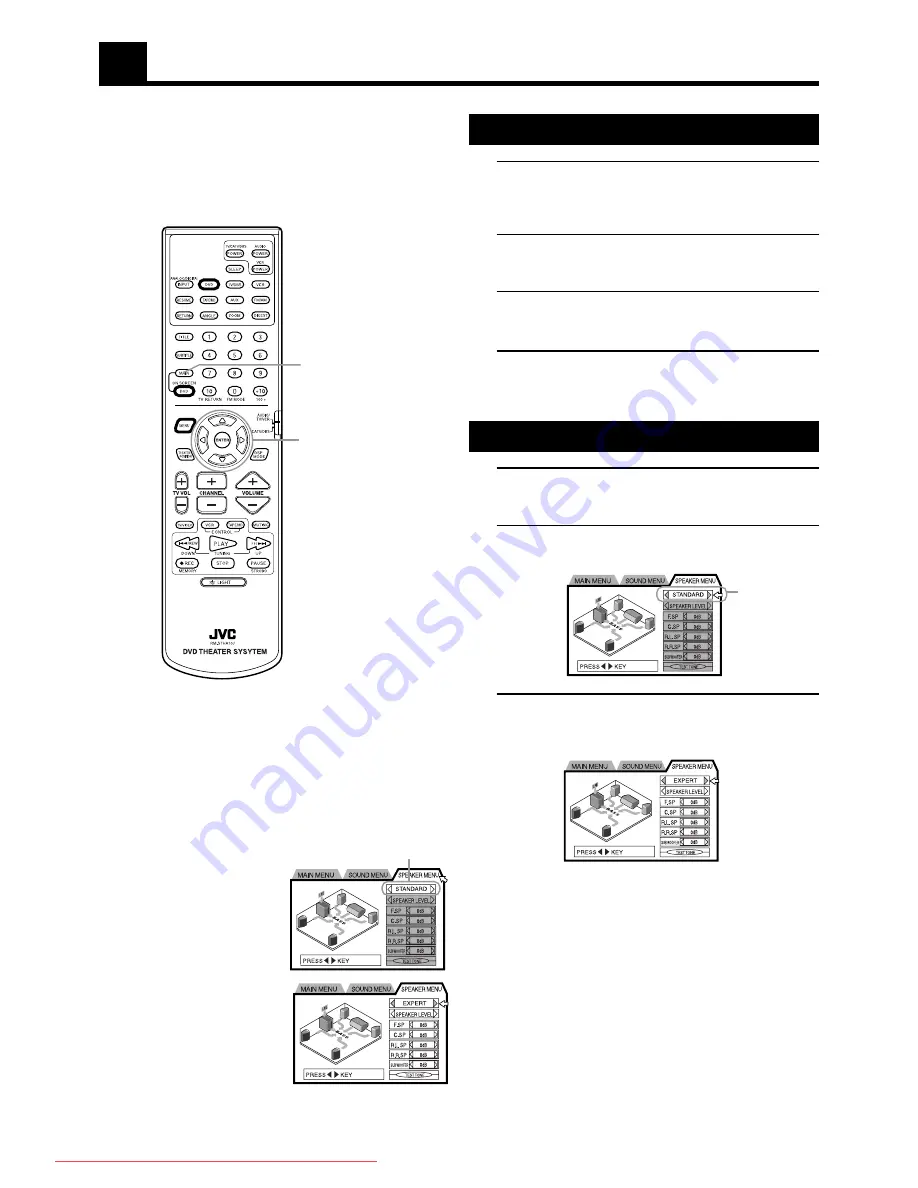
Use the primary remote control to perform speaker settings with the
on-screen SPEAKER MENU.

Buttons used ————————————————

MAIN ON SCREEN, the 

2

/

3

/

5

/

 cursors, and ENTER.

Opening the SPEAKER MENU

1.

Stop DVD image playback on the TV screen.

Select a playback source other than the tuner. If the playback
source is set to DVD, press STOP to quit playback.

2.

Press MAIN ON SCREEN.

The MAIN MENU will be displayed.

3.

Move the pointer to the SPEAKER MENU tag using
the 

2

/

3

 cursors.

4.

When you are finished with on-screen settings,
press MAIN ON SCREEN again to close the
SPEAKER MENU.

Switching speaker mode

1.

Open the SPEAKER MENU.

See “Opening the SPEAKER MENU”.

2.

Move the pointer to STANDARD using the 

5

/

cursors.

3.

Use the 

2

/

3

 cursors to switch between

STANDARD and EXPERT.

Enabled options will be highlighted.

SPEAKER MENU Settings

MAIN ON SCREEN

2

/

3

/

5

/

 cursors,

and ENTER

Before performing speaker settings ———————

There are two speaker modes, STANDARD and EXPERT.

STANDARD :

This is the default setting for using the speakers that
come with this system.

EXPERT

:

Use expert settings when speaker placement
prevents full 3-dimensional surround sound, or
when using speakers other than those that came
with the system.

When the speaker mode is set to
STANDARD, only the speaker
mode may be changed.  Other
options (shown in gray) cannot
be selected.

Setting the speaker mode to
EXPERT enables additional
speaker setting options.
(The enabled options will be
highlighted)

Speaker mode

Speaker mode

TH-A10[J]6/1

00.2.24, 14:57

43

Downloaded From TheatreSystem-Manual.com Manuals

Содержание TH-A10

Страница 1: ...Model No and Serial No which are located either on the rear bottom or side of the cabinet Retain this information for future reference Model No Serial No TH A10 DVD DIGITAL THEATER SYSTEM INSTRUCTIONS Downloaded From TheatreSystem Manual com Manuals ...

Страница 2: ... no guarantee that interference will not occur in a particular installation If this equipment does cause harmful interference to radio or television reception which can be determined by turning the equipment off and on the user is encouraged to try to correct the interference by one or more of the following measures Reorient or relocate the receiving antenna Increase the separation between the equ...

Страница 3: ... 28 To display Continuous Photos STROBE 28 Zooming a scene ZOOM 29 Changing the Subtitle Language SUB TITILE 29 Changing the audio language or sound AUDIO 30 Changing the audio channel AUDIO 30 Viewing from Multiple Angles ANGLE 31 Selecting the Picture Character THEATER POSITION 32 Repeating a current title chapter or track or all tracks REPEAT 32 Repeating a desired part A B REPEAT 33 Sampling a...

Страница 4: ... coryguard system activates and the picture may not be played back correctly Safety precautions Avoid moisture water and dust Do not place your unit in moist or dusty places Avoid high temperatures Do not expose the unit to direct sunlight or place it near a heating device When you re away When away on travel or otherwise for an extended period of time remove the plug from the wall outlet Do not b...

Страница 5: ...r radio and preamp volume control tone control together with a Dolby digital decoder and DTS digital surround decoder for Dolby Surround and DTS Digital Surround effects For some music software the DAP mode offers the expanded sound field This system is capable of most operations As it is illuminated it may also be used in the dark It may also be used to operate JVC TVs VTRs MD recorders and casse...

Страница 6: ...ocation which interferes with daily activities Attaching speakers to the bracket 1 Use the screw supplied to attach the speaker to the bracket Tilting the speaker to the front Tilting left right 2 Adjusting the angle of the satellite speakers The angle of the speaker may be adjusted in the front rear and left right directions along the channel in the bracket When adjusting the angle loosen the scr...

Страница 7: ...rol function What is Playback Control function The Playback Control function allows you to enjoy menu driven operation and high resolution still images which have a resolution four times greater than moving pictures Menu driven playback You can interact with the screen using a menu display to select and play an entry High resolution still image display You can display high quality images four time...

Страница 8: ...onnect an outdoor single vinyl covered wire to the AM EXT terminal Keep the AM loop antenna connected To connect the powered sub woofer Use the supplied system cable to connect the powered sub woofer SP PWA10 Center unit XV THA10 Powered sub woofer SP PWA10 Connecting the TV Connect the TV to view video images from the center unit Note When connecting the TV to the TV SOUND DBS jacks DO NOT connec...

Страница 9: ...nal Twist and remove the insulation at the end of each speaker cord Conneceting the front speakers Connect the right speaker to the FRONT SPEAKERS RIGHT terminal Connect the left speaker to the FRONT SPEAKERS LEFT terminal Connecting the rear and center speakers Connect the right rear speaker to the REAR SPEAKERS RIGHT terminals Connect the left rear speaker to the REAR SPEAKERS LEFT terminals Con...

Страница 10: ... detailed information about the connection and the COMPU LINK 3 remote control system Video component connections Use the cable with RCA pin plugs not supplied Connect the white plug to the audio left jack the red plug to the audio right jack and the yellow plug to the composite video jack If your video components have S video Y C separation terminals connect them using S video cable not supplied ...

Страница 11: ...her composite video terminal or S video terminal on the rear Without connecting it to the video jack you can view no playback picture After connecting the components using the DIGITAL IN terminal set the following correctly if necessary Select the digital input mode correctly For details see Selecting the analog or digital input mode on page 18 Connections DBS tuner Notes When you want to operate ...

Страница 12: ...o they match the polarity to Use the correct type of batteries Batteries that look similar may differ in voltage Always replace both batteries at the same time Do not expose batteries to heat or flame Light up the primary remote control buttons The buttons on the primary remote control may be lit for a few seconds for use in the dark CAUTIONS Do not touch the power cord with wet hands Do not pull ...

Страница 13: ... ATT 19 20 21 7 SURROUND SOURCE NAME 17 21 8 SOURCE 17 9 Display window p Audio channel lamp 19 9 Display window 1 2 3 4 5 6 7 8 9 Front panel 1 Decord mode indicator 18 2 Radio indicator 36 3 Multi information window Display time and status information 4 Time selection indicator 34 5 PROGRAM indicator 34 Powered sub woofer 6 RESUME indicator 24 7 Radio reception mode indicator 37 8 ATT indicator ...

Страница 14: ...CATV DBS POWER button 56 VCR POWER button 56 e Source selecting buttons 17 DVD TV DBS VCR TAPE MD AUX FM AM r DVD operating buttons RESUME 24 RETURN 25 ANGLE 30 ZOOM 29 DIGEST 27 t Number buttons y Remote control mode selector 55 56 u DSP MODE button 21 i CHANNEL button 56 o VOLUME button 16 MUTING button 17 a Operating buttons s LIGHT button 10 1 SLEEP button 20 2 Source selecting buttons 17 3 ME...

Страница 15: ...nd operating buttons operate in the DVD mode enabling operation of the DVD audio CD and video CD Press FM AM The number buttons and operating buttons operate in the radio mode Note Pressing the source selecting buttons on the remote control also changes the remote control mode When using the remote control always press the source selecting buttons on the equipment to suit the appropriate remote co...

Страница 16: ...tion with the on screen menu 1 Move the pointer to the desired item using the remote control buttons Use the 2 3 cursor to select a tag Use the 5 cursor to select an item 2 Use the items Use the 2 3 cursor to change the details of a selected item Press ENTER to use the selected item Follow the method of use explained in the message field Use the number buttons to enter numerals See each function d...

Страница 17: ... CD CONTROL display DVD CONTROL display VCD CONTROL display Preventing screen burn out with the screen saver SCREEN SAVER A television monitor screen may be burned out if a static picture is displayed for a long time To prevent this the unit automatically activates the screen saver function if a static picture such as an on screen display or menu is displayed for over 5 minutes Pressing any button...

Страница 18: ...ff when power is turned off A small amount of power is consumed in the standby mode Remove both AC power cords from the AC outlets to turn the center unit and powered sub woofer off completely To turn TV power ON and OFF JVC TVs may be used as is with the primary and secondary remote controls TVs from other manufacturers require changes to the transmittable signals before they can be used with the...

Страница 19: ...h time the button is pressed DVD TAPE or MD VCR AM FM TV SOUND or DBS AUX back to the beginning Changing the source name When you have connected an MD recorder to the TAPE MD jacks or the DBS tuner to the TV SOUND DBS jacks on the rear panel change the source name shown on the display window when you select the MD recorder or DBS tuner as the source On the front panel 1 When changing the source na...

Страница 20: ... returns to analog Note When selecting a digital source press ANALOG DIGITAL INPUT once to display the currently selected mode Changing the decode mode Primary remote control only 1 Press DVD to select DVD as the source 2 Press ANALOG DIGITAL INPUT to select the decode mode The display changes as shown below each time the button is pressed AUTO PCM DOLBY DGTL DOLBY DIGITAL DTS back to the beginnin...

Страница 21: ...l light up in the display window However when the playback source is digital DVD etc it will go off Lighting up will resume if playback is switched to an analog device Even while in INPUT ATT ON mode if the DSP mode is turned off DSP OFF playback will continue without any reduction of the input signal Basic operations VOLUME knob PHASE button Sub woofer volume control and phase setting Use the VOL...

Страница 22: ...ing the mark or with Dolby Surround bearing the mark Dolby Digital and Dolby Pro Logic can be selected automatically according to software played back DTS Digital Surround DTS Digital Surround is a discrete 5 1 channel digital audio format available on CD and DVD software To watch the soundtracks of video software bearing the mark the system can provide you with DTS Digital Surround decoder DTS Di...

Страница 23: ...ital surround audio Note It is possible to select only SURROUND ON and SURROUND OFF when playing a Dolby digital audio or DTS digital audio DVD On the front panel When playing a video with audio recorded in Dolby surround Dolby Basic operations Primary remote control Secondary remote control DSP MODE DSP MODE DSP MODE SURROUND digital or DTS digital surround audio Press SURROUND The current status...

Страница 24: ...en the tray is closed and the disc may not be removed form the unit Playback begins automatically with some discs DVD or video CDs recorded with PBC playback control pressing PLAY may display the menu on the TV screen You may select items from the menu screen thus displayed and call up the locations to be viewed see pages 24 and 25 for details You can also open and close the disc tray from the ope...

Страница 25: ...ow motion playback Pausing From the primary remote control Press PAUSE On the front panel Press 8 Playback is paused Press PAUSE while paused to move to the next still picture To resume playback From remote control Press PLAY On the front panel Press 3 Fast forward and rewind 7 During playback From the remote controls Continue pressing FF or 4 REW On the front panel Continue pressing or 4 Continue...

Страница 26: ...e point you stored To clear the stored position Open the disc tray The RESUME indicator in the display window goes off Selecting playback from the DVD menu DVD discs generally have their own menus which show the disc contents These menus contain various items such as titles of a movie names or songs or artist information and display them on the TV screen You can locate a desired scene by using the...

Страница 27: ... 5 to move the pointer to PBC CALL then press ENTER If you want to playback a PBC compatible Video CD disc without activating the PBC function start playback by using the number buttons instead of the PLAY button To specify the title or track number for playback Use the number buttons to specify the title DVDs or track number CDs to begin playback from the desired location 7 For DVD While stopped ...

Страница 28: ...nd GO TO CHAPTER appears in the message area 3 Use the number buttons 0 9 to enter the desired chapter number The selected chapter number appears in the message area Example To select chapter number 8 Press 8 To select chapter number 37 Press 3 7 4 Press ENTER The unit starts playback from the selected chapter To return the regular display Press DVD ON SCREEN Notes When the chapter number is incor...

Страница 29: ...unction To select the screen for playback from the digest screen DIGEST The unit can display the opening scene of each title or chapter on a DVD or each track of a Video CD You can select a desired title chapter or track from the opening scenes displayed on the TV screen 7 For DVD While stopped or during playback For Video CD While stopped or during playback without PBC function From primary remot...

Страница 30: ... in reverse slow motion DVD only Each time you hold down either button during slow motion the playback speed will increase as follows Forward 1 32 1 16 1 8 1 4 1 3 1 2 Reverse 1 16 1 12 1 8 1 4 1 3 Pausing slow motion playback Press the PAUSE button to pause slow motion playback Restoring regular playback Press the PLAY button to resume normal playback Notes Audio is automatically muted during slo...

Страница 31: ...ich kind of subtitles to display or turn off subtitles entirely At the beginning of subtitled parts appears on the TV screen Using the SUBTITLE button 7 During playback From primary remote control only 1 Press SUBTITLE 2 Use CURSOR 2 3 to select the desired subtitle Turning subtitles ON OFF Press SUBTITLE Pressing the button toggles subtitle display ON and OFF Note When appears on the TV screen Yo...

Страница 32: ...n display Press DVD ON SCREEN Note When appears on the TV screen You cannot select the audio Changing the audio channel AUDIO For in some karaoke Video CDs one of the audio channels includes a vocal while the other does not With such discs you can choose to enjoy karaoke without the vocal or with the vocal by selecting the audio channel to be played back 7 During playback From the remote controls ...

Страница 33: ...Press and hold ANGLE for more than 1 seconds Up to nine camera angle recorded on a disc appear on the TV screen 2 Use CURSOR 2 3 5 to select the desired angle 3 Press ENTER The selected angle appears on the TV screen Selecting a scene angle from the on screen display 7 During playback From the remote controls 1 Press DVD ON SCREEN The on screen display appears on the TV screen 2 Use CURSOR 5 to mo...

Страница 34: ...ess DVD ON SCREEN The on screen display appears on the TV screen 2 Use CURSOR 5 to move the pointer to REPEAT then press ENTER Each time you press ENTER the repeat mode changes as follows For DVD T REPEAT title repeat C REPEAT chapter repeat No indication off back to the beginning The current title or chapter will be repeated For Audio CD and Video CD REPEAT ALL REPEAT 1 No indication off back to ...

Страница 35: ... press ENTER To turn off the onscreen display Press DVD ON SCREEN Notes If appears when pressing ENTER in step 2 during DVD playback You cannot repeat the selected portion because of the disc contents Sampling all tracks INTRO You can sample the tracks of an Audio CD or Video CD by playing back only beginning 10 seconds of each track in order 7 While stopped From the remote controls 1 Press DVD ON...

Страница 36: ... the tracks you wish Checking the Disc Time TIME SELECT You can choose the displayed time mode for an Audio or Video CD disc in the display on the front panel and in the on screen display 7 For Audio CD Any time For Video CD While stopped From the remote controls 1 Press DVD ON SCREEN The on screen display appears on the TV screen 2 Use CURSOR 5 to move the pointer to TIME SELECT 3 Press ENTER Eac...

Страница 37: ...ped From the remote controls 1 Press DVD ON SCREEN The on screen display appears on the TV screen 2 Use CURSOR 5 to move the pointer RANDOM 3 Press ENTER The color of RANDOM changes Random play begins When all tracks have been played once random play ends The same track will not be played back more than once during random play To turn off the on screen display Press DVD ON SCREEN To quit random pl...

Страница 38: ...set stations Before you start remember There is a time limit in doing the following steps If the setting is canceled before you finish start from step 1 again Primary remote contol only 1 Tune in the station you want to preset see Tuning in stations manually If you want to store the FM reception made for this stations select the FM reception mode you want See Selecting the FM reception mode on pag...

Страница 39: ...he FM reception mode for each preset station From primary remote control 1 Press FM MODE Each time you press the button the FM reception mode alternates between AUTO and MONO AUTO When a program is broadcasted in stereo you will hear stereo sound when in monaural you will hear monaural sounds This mode is also useful to suppress static noise between stations The AUTO MUTING indicator lights up on ...

Страница 40: ...s It is possible to perform a variety of settings from the on screen display The two on screen displays used for settings are the AV amplifier settings on screen display and the DVD settings on screen display Only the primary remote control can be used on the MAIN MENU SOUND MENU and SPEAKER MENU found on AV amplifier settings screen Either the primary or secondary remote can be used on the DVD ME...

Страница 41: ... set the sleep time Select the sleep time in minutes from the following OFF j 10 j 20 j 30 j 60 j 90 j 120 j 150 If the SLEEP TIMER has already been set you can confirm or change the remaining time here MAIN MENU Settings MAIN ON SCREEN 2 3 5 cursors Opening the MAIN MENU 1 Stop DVD image playback on the TV screen Select a playback source other than the tuner If the playback source is set to DVD p...

Страница 42: ...ged and a disk has been played back return the decode mode to AUTO PCM Changing the DSP MODE See page 20 1 Open the MAIN MENU See page 39 Opening the MAIN MENU 2 Move the pointer to DSP MODE using the 5 cursors 3 Use the 2 3 cursors to set the DSP mode When the source is DVD You may choose between SURROUND j OFF When the source is not DVD or TUNER You may choose between j SURROUND j THEATER j LIVE...

Страница 43: ... augments low and high frequency ranges for a fuller sound at low volume 1 Open the SOUND MENU See Opening the SOUND MENU 2 Move the pointer to LOUDNESS using the 5 cursors 3 Use the 2 3 cursors to select ON or OFF Pressing 2 3 toggles loudness ON OFF SOUND MENU Settings MAIN ON SCREEN 2 3 5 cursors Opening the SOUND MENU 1 Stop DVD image playback on the TV screen Select a playback source other th...

Страница 44: ...U See page 41 Opening the SOUND MENU 2 Move the pointer to LFE ATT using the 5 cursors 3 Use the 2 3 cursors to select ON or OFF Pressing 2 3 toggles loudness ON OFF ON Recommended to reduce sound distortion NORMAL Default setting Adjusting the dynamic range It is possible to compress the dynamic range the difference between the loudest and quietest audio signals This is useful when enjoying surro...

Страница 45: ...inter to STANDARD using the 5 cursors 3 Use the 2 3 cursors to switch between STANDARD and EXPERT Enabled options will be highlighted SPEAKER MENU Settings MAIN ON SCREEN 2 3 5 cursors and ENTER Before performing speaker settings There are two speaker modes STANDARD and EXPERT STANDARD This is the default setting for using the speakers that come with this system EXPERT Use expert settings when spe...

Страница 46: ...to set then adjust the parameter with the 2 3 cursors The Note icon on the screen indicates the selected speaker Speaker parameters Speaker size Select LARGE when the cone speaker imbedded in the speaker being used has a diameter of 12 cm or more Select SMALL when the diameter is less than 12 cm When using this system s front center or rear speakers select SMALL for each Selecting LARGE may result...

Страница 47: ...ween the rear center speakers and the listening point with the distance between the front speakers and the listening point 1 Open the SPEAKER MENU See page 43 Opening the SPEAKER MENU 2 Switch the speaker mode to EXPERT 3 Move the pointer to the speaker selection box using the 5 cursors Use the 2 3 cursors to select DELAY Pressing the 2 3 cursors switches between the following settings jSPEAKER SI...

Страница 48: ...multiple languages With these discs it is possible to set the default language for menu display 1 Open the DVD MENU See Opening the DVD MENU 2 Move the pointer to MENU LANGUAGE using the 5 cursors 3 Use the 2 3 cursors to select a default menu language Pressing the cursors toggles between the following options ENGLIGH SPANISH FRENCH CHINESE GERMAN ITALIA JAPANESE language code AA ZU back to the be...

Страница 49: ...fault language for subtitle display 1 Open the DVD MENU See page 46 Opening the DVD MENU 2 Move the pointer to SUBTITLE using the 5 cursors 3 Use the 2 3 cursors to select a default subtitle display language Pressing the cursors toggles between the following options ENGLIGH SPANISH FRENCH CHINESE GERMAN ITALIA JAPANESE language code AA ZU back to the beginning See Appendix A Table of languages and...

Страница 50: ...bottom of the screen WIDE S1 Wide Television Screen 16 9 Select this option for playback on a wide screen TV Note If the DVD disc is not optimized for Pan scan the image will be shown in 4 3 LB Letter Box Conversion even if 4 3 PS Pan scan Conversion is selected Screen saver settings Set the screen saver to prevent screen burn 1 Open the DVD MENU See page 46 Opening the DVD MENU 2 Move the pointer...

Страница 51: ...n display appears on the TV screen 2 Use CURSOR 5 to move the pointer to Country Code then use CURSOR 2 3 to select US for country code and press ENTER 3 Use CURSOR 5 to move the pointer to Set Level then use CURSOR 2 3 to select the parental lock level Each time you press CURSOR 3 the parental level changes as follows LEVEL 1 LEVEL 8 No restriction back to the beginning LEVEL 1 is the strictest l...

Страница 52: ...nter 8888 To temporarily release the Parental lock When you set the parental level strictly some discs may not be played back at all When you insert such a disc and try to play it the Parental Lock on screen display appears on the TV screen and the unit will ask you whether you want the parental lock to be temporarily released or not 1 Use the CURSOR 5 to move the pointer to Temporary then use CUR...

Страница 53: ...not put discs in a location where they may be exposed to direct sunlight or in a placewhere the humidity or temperature is high Avoid leaving discs in your car Maintenance of discs If there are fingerprints or other dirt adhering to a disc wipe with a soft dry cloth moving from the center outwards If a disc is difficult to clean wipe with a cloth moistened with water Never use record cleaners petr...

Страница 54: ...er unit Notes Refer also to the manual supplied with your video components CONNECTIONS 2 CASE 1 If the components are equipped with the S video terminals To Video input 1 VCR DO NOT use these video terminals To Video input 2 VCR CASE 2 If the components are not equipped with the S video terminals TV TV DO NOT use these video terminals CASE 3 If only the VCR is equipped with the S video terminal To...

Страница 55: ...r DBS DIGITAL as the source to play on the center unit the TV automatically changes the input mode to the appropriate position either Video Input 1 or Video Input 2 so that you can view the playback picture Note When you select TV SOUND as the source on the center unit you cannot see the menu on the TV screen since the AV COMPU LINK remote control system automatically changes the TV s input mode t...

Страница 56: ...Control System Cassette deck or MD recorder Remote Control through the Remote Sensor on the center unit You can control the connected audio components through the remote sensor on the center unit using this remote control Aim the remote control directly at the remote sensor on the center unit For details see page 10 Automatic Source Selection When you press the play 3 button on a connected compone...

Страница 57: ...ntrol To operate the cassette deck or MD recorder using the COMPU LINK remote control system set the source name correctly see page 17 Refer also to the manuals supplied with your components To operate JVC s video components using this remote control You need to connect JVC video components through the AV COMPU LINK terminals see page 52 in addition to the connections using cables with RCA pin plu...

Страница 58: ...ays perform the following operations with the remote control mode selector set to AUDIO TV VCR VCR POWER Turns on or off the VCR After pressing VCR or VCR CONTROL with the remote control mode selector set to AUDIO TV VCR you can perform the following operations on the VCR PLAY Starts playing 1 Rewinds a tape Fast winds a tape STOP Stops operations PAUSE Pauses playing To release it press PLAY REC ...

Страница 59: ...set to AUDIO TV VCR TV CATV DBS POWER Turns on and off the TV TV VOL Adjusts the volume TV VIDEO Sets the input mode either TV or VIDEO After pressing TV DBS with the remote control mode selector set to AUDIO TV VCR you can perform the following operations on a TV CHANNEL Changes the channels 1 10 0 100 10 Selects the channels 100 10 button will function as the ENTER button if your TV requires pre...

Страница 60: ...anufacturer s code three digits using buttons 1 9 and 0 See the list on pages 61 and 62 to find the code Examples For a JVC product press 0 0 then 8 For a Funai product press 0 0 then 0 5 Release VCR POWER Following button can be used for operating the VCR with the remote control mode selector set to AUDIO TV VCR VCR POWER Turns on and off the VCR After pressing VCR or VCR CONTROL with the remote ...

Страница 61: ...enter unit and the TV Initial setup monitor type was incorrect The TV has been set up incorrectly The received signal is too weak The station is too far away The antenna is not connected correctly Lightning and electronic noise interferes with operation of the microcomputer Immediately after beginning to heat the room the unit was moved to a cold location causing condensation to form inside SOLUTI...

Страница 62: ... kHz 0 7 THD Woofer 100 watts 4 ohms 100 Hz 0 7 THD Speaker section Speaker 10 inches 25 cm bass reflex Frequency Range 25 Hz to 200 Hz Dimensions W H D 280 mm 475 mm 506 mm 11 1 16 inches 18 3 4 inches 19 15 16 inches Mass 18 8 kg 41 3 lbs Power Requirements AC 120 V Ó 60 Hz Power Comsumption 125 watts Satellite Speakers SP XSA10 Speakers 7 cm 4 cm 2 13 16 inches 1 5 8 inches bass reflex Magnetic...

Страница 63: ...ebrew JI Yiddish JW Javanese KA Georgian KK Kazakh KL Greenlandic KM Cambodian KN Kannada KO Korean KOR KS Kashmiri KU Kurdish KY Kirghiz LA Latin LN Lingala LO Laothian LT Lithuanian LV Latvian Lettish MG Malagasy MI Maori MK Macedonian ML Malayalam MN Mongolian MO Moldavian MR Marathi MS Malay MAY MT Maltese MY Burmese NA Nauru NE Nepali NL Dutch NO Norwegian OC Occitan OM Afan Oromo OR Oriya PA...

Страница 64: ...Ethiopia FI Finland FJ Fiji FK Falkland Islands Malvinas FM Micronesia Fedelated States of FO Faroe Islands FR France FX France Metropolitan GA Gabon GB United Kingdom GD Grenada GE Georgia GF French Guiana GH Ghana GI Gibraltar GL Greenland GM Gambia GN Guinea GP Guadeloupe GQ Equatorial Guinea GR Greece GS South Georgia and the South Sandwich Islands GT Guatemala GU Guam GW Guinea Bissau GY Guya...

Страница 65: ...wanda SA Saudi Arabia SB Solomon Islands SC Seychelles SD Sudan SE Sweden SG Singapore SH Saint Helena SI Slovenia SJ Svalbard and Jan Mayen SK Slovakia SL Sierra Leone SM San Marino SN Senegal SO Somalia SR Suriname ST Sao Tome and Principe SV El Salvador SY Syrian Arab Republic SZ Swaziland TC Turks and Caicos Islands TD Chad TF French Southern Territories TG Togo TH Thailand TJ Tajikistan TK To...

Страница 66: ...u may contact your local JVC Dealer Or from the 48 Continental United States call toll free 800 882 2345 10 New Maple Avenue Pine Brook NJ 07058 9641 973 396 1000 5665 Corporate Avenue Cypress CA 90630 0024 714 229 8011 13 Cummings Park Woburn MA 01801 781 376 9100 705 Enterprise Street Aurora IL 60504 8149 630 851 7855 10700 Hammerly Suite 110 Houston TX 77043 713 935 9331 890 Dubuque Avenue Sout...

Страница 67: ...vided with the products or if the model number or serial number has been altered tampered with defaced or removed 2 Initial installation and installation and removal for repair 3 Operational adjustments covered in the Owner s Manual normal maintenance video and audio head cleaning 4 Damage that occurs in shipment due to act of God and cosmetic damage 5 Signal reception problems and failures due to...

Страница 68: ...VICTOR COMPANY OF JAPAN LIMITED EN J VC 0200TNMNATSAN Downloaded From TheatreSystem Manual com Manuals ...

Отзывы: