JVC SR-DVM70AG Скачать руководство пользователя страница 52

Filename [DVM70S_11Navigation.fm]

Masterpage:Left+

52


EN

NAVIGATION ON HDD/DVD DECK

Page 52Monday, 27 December 2004  14:08

Divide Title (HDD deck only)

1

Press 

EDIT

. The Editing screen appears.

2

Press 

FGD E

 to select 

A

DIVIDE

B

, then press 

ENTER

.

3

Press 

FGD E

 to select a title to divide, then press 

ENTER

.

4

Press 

I

 to start playback. Press 

O

 or 

N

 to locate a point to 

divide, then press 

W

.

5

Confirm the arrow is on 

A

DIVIDE

B

, then press 

ENTER

.

The first picture (start) of the newly created title appears in the 
bottom right window.

Select 

A

PREVIEW

B

, then press 

ENTER

. The first several 

seconds of the newly created title is played back, then the 
playback pauses at the dividing point.

To undo the division, press 

D E

 to select 

A

RETRY

B

, then press 

ENTER

. Repeat the above procedure to locate another point to 

divide.

6

Press 

D E

 to select 

A

OK

B

, then press 

ENTER

.

7

Press 

D E

 to select 

A

DIVIDE

B

, then press 

ENTER

.

Select 

A

CANCEL

B

, then press 

ENTER

 to return to the previous 

screen.

8

Press 

EDIT

 to return to the normal screen.

NOTE:

There may be a discrepancy of several seconds between the 
scene you intend to edit, and the scene which is actually edited.

Modify Chapter
(HDD, DVD-RAM & DVD-RW (VR mode) only)

You can create and delete chapter marks in titles.

1

Perform steps

1

4

 of 

A

Modify Index

B

 (

A

pg. 50) before 

continuing.

2

Press 

FGD E

 to select 

A

CHAPTER

B

, then press 

ENTER

.

3

Press 

I

 to start playback. 

Press 

O

 or 

N

, then press 

W

 at the positions you want to 

mark.

4

Press 

D E

 to select 

A

MARK

B

then press 

ENTER

.

To undo the marking, press 

D E

 to select 

A

RETRY

B

, then 

press 

ENTER

.

Repeat the above steps 

3

 and 

4

 to locate another point to mark.

5

Press 

S

 or 

T

 to select one chapter you want to delete, 

press 

D E

 to select 

A

ERASE

B

, then press 

ENTER

.

To undo the deletion, press 

D E

 to select 

A

RETRY

B

, then press 

ENTER

.

6

Press 

EDIT

 to return to the normal screen.

NOTE:

There may be a discrepancy of several seconds between the 
scene you intend to edit, and the scene which is actually edited.

Play List

It is a collection of the scenes. A play list can be freely edited and 
played back without ever changing any original recording data.
Using the random access of a disc (which allows video data to be 
instantly read no matter where it is on the disc), a play list includes 
information such as the timer counter for the playback start point 
and end point, indexes for checking the contents of recorded data, 
category information, and more. Playback according to a play list 
you have created allows you to enjoy various combinations of 
video images from a single title.
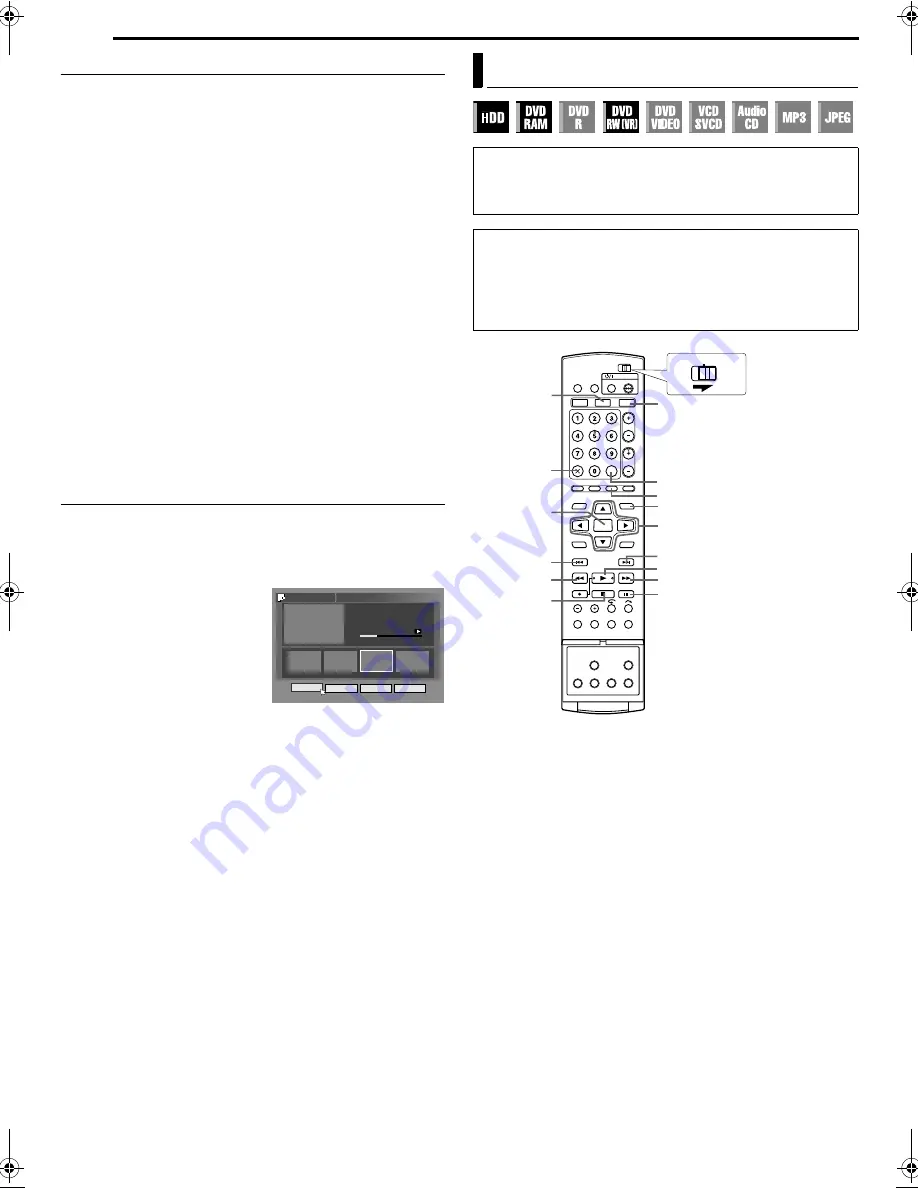
0 : 07 : 01

01 00 : 00 : 00

02 00 : 05 : 30

03 00 : 07 : 00

04 00 : 30 : 00

MARK

EDITING > MODIFY CHAPTER

ERASE

RETRY

RETURN

CHAPTER 03/10

Edit Play List Information

Turn on the TV and select the AV mode.

Slide the 

TV/CABLE/SAT/DVD

 switch to 

DVD

.

Press 

HDD

 or 

DVD

 to choose the corresponding deck.

Load a DVD disc to modify.

ATTENTION:

It is not possible to modify discs recorded on DVD units from 
other manufacturers.

You cannot perform timer recording during editing the index by 
pressing 

EDIT

. Press 

EDIT

 to clear the editing screen before 

performing timer recording.

DFGE

W

I

MEMO

NAVIGATION

N

EDIT

T

ENTER

CANCEL

O

S

DVD

o

HDD

CABLE/SAT

DVD

TV

DVM70S_00.book  Page 52  Monday, December 27, 2004  2:08 PM

Содержание SR-DVM70AG

Страница 1: ...V VIDEO TV AUX CANCEL MEMO MARK PROGRAMME EDIT DUBBING LIVE JUMP SET UP SAT AUDIO SUBTITLE VPS PDC ANGLE LIVE CHECK PROGRESSIVE SCAN EJECT EJECT DISPLAY OPERATE DV HDD DVD REC MODE INSTANT REPLAY AUDIO DUB INSERT S VIDEO IN F 1 VIDEO MONO L AUDIO R REC DVD REC HDD REC DV DV IN OUT REC PAUSE PLAY INPUT SELECT FF REW STOP LPT1002 001A EN 17 DVD HDD Mini DV VIDEO RECORDER INSTRUCTIONS SR DVM70EU ...

Страница 2: ...for the various procedures are clearly indicated through the use of illustrations at the beginning of each major section Safety Precautions CAUTION A UNIT IS A CLASS 1 LASER PRODUCT HOWEVER THIS UNIT USES A VISIBLE LASER BEAM WHICH COULD CAUSE HAZARDOUS RADIATION EXPOSURE IF DIRECTED BE SURE TO OPERATE THE UNIT CORRECTLY AS INSTRUCTED WHEN THIS UNIT IS PLUGGED INTO THE WALL OUTLET DO NOT PLACE YOU...

Страница 3: ...t your dealer DON T remove any fixed cover as this may expose dangerous voltages DON T leave equipment switched on when it is unattended unless it is specifically stated that it is designed for unattended operation or has a standby mode Switch off using the switch on the equipment and make sure that your family knows how to do this Special arrangements may need to be made for infirm or handicapped...

Страница 4: ...e Recording HDD Deck Only 48 NAVIGATION ON HDD DVD DECK 49 Library Database Navigation 49 Edit Original Information 50 Edit Play List Information 52 Edit Library Information 54 Playback With MP3 WMA JPEG Navigation 55 EDITING 56 Dubbing 56 DV Dubbing HDD DVD Deck Only 59 Edit From A Camcorder 61 Edit To Or From Another Recorder 62 Output Input Set 63 Digital Audio Dubbing 64 Audio Dubbing DV Deck ...

Страница 5: ...s even if they have not been finalised It is impossible to overwrite recorded areas of DVD R discs Available recording capacity does not increase even if a recorded programme is deleted from a DVD R disc After finalising After a DVD R RW disc Video mode has been finalised it is possible to play back the recorded programmes video and or audio on a standard DVD video player as a DVD VIDEO disc Edite...

Страница 6: ...Ds SACD compatible with conventional CD players can be played Unplayable Discs The following types of discs cannot be played using this unit Do not attempt to play back any kind of disc that is damaged cracked warped or repaired with adhesive tape or discs in unusual shapes heart shaped octagonal or other forms If such discs are accidentally played back it may cause noise that can lead to speaker ...

Страница 7: ...cording or playback Once the disc has been finalised these chapter marks are deleted and new chapter marks are assigned automatically approximately every 5 minutes In Video mode even before finalising it is impossible to perform editing operations other than changing the disc name and or title names and deleting programmes and or titles After finalising it is impossible to perform editing operatio...

Страница 8: ...discs contained in cartridges Double sided discs Remove the disc from the cartridge Align the disc with the grooves on the disc tray as shown in the illustration and insert with the side you wish to play back or record facing down If you insert the disc with ASide AB facing down programmes are recorded on the side A Single sided discs Remove the disc from the cartridge Align the disc with the groo...

Страница 9: ... dirty when removed from cartridge then put back in after use Storage Make sure that discs are kept in their cases If discs are piled on top of one another without their protective cases they can be damaged Do not put discs in a location where they may be exposed to direct sunlight or in a place where the humidity or temperature is high Avoid leaving discs in your car Maintenance of discs If there...

Страница 10: ...Connectors VIDEO AUDIO MONO L R A pg 61 Q Input Select Buttons INPUT SELECT JK A pg 32 35 R Front Display Panel A pg 12 S Infrared Beam Receiving Window T Stop Button STOP o A pg 22 37 U Reverse Search Button O HDD DVD deck A pg 23 42 Rewind Button REW O DV deck A pg 39 40 V Play Button PLAY I A pg 22 37 W Forward Search Button N HDD DVD deck A pg 23 42 Fast Forward Button FF N DV deck A pg 39 40 ...

Страница 11: ...Set AJUST CLOCKB to AOFFB if you mind the noise of the fan D Digital Audio Output Connectors DIGITAL AUDIO OUT OPTICAL COAXIAL HDD DVD deck only A pg 64 70 E S video Output Connector S VIDEO OUT A pg 16 F Audio Output Connectors AUDIO OUT LEFT RIGHT A pg 16 G BNC Video Output Connector VIDEO OUT A pg 16 H Component Video Output Connectors COMPONENT VIDEO OUT Y PB PR HDD DVD deck only A pg 16 I Ant...

Страница 12: ...ator Indicates the channel received I Track Chapter Indicator TRK CHAP ATRKB or ACHAPB lights depending on a disc loaded while the 3rd and 4th digits from the left of the Multi Display R indicate the numbers explained below ATRKB Total number of tracks or track number being played back are displayed on the Multi Display ACHAPB Chapter number being played back are displayed on the Multi Display J S...

Страница 13: ...ton RETURN A pg 26 28 44 h Forward Skip Button T A pg 23 42 Next Button NEXT A pg 26 i Forward Search Button N HDD DVD deck A pg 23 42 Fast Forward Button N DV deck A pg 39 Forward Slow Button SLOW A pg 24 j Play Button I A pg 22 37 Select Button SELECT A pg 55 k Pause Button W A pg 22 37 l Stop Button o A pg 22 37 Clear Button CLEAR A pg 30 m Skip Search Button v A pg 24 42 n Set Up Button SET UP...

Страница 14: ...ime D Recording channel number When pressing REC MODE Appears for eight seconds A Remaining disc time for each recording speed B Recording speed When pressing R during recording A Recording time for Instant Timer Recording ITR mode When using Live Memory playback HDD DVD A Time scale for recording HDD deck Bar meter for recording DVD deck B Current recording point C Recording mode D Current time E...

Страница 15: ...e control switch P Auto capture button Q Sound monitor switch R Elapsed recording time On Screen Display DV deck When ASUPERIMPOSEB is set to AONB or AAUTOB and ON SCREEN on the remote control is pressed various operational indicators appear on the TV screen To clear the operational indicators press ON SCREEN again A Operation Mode Indicators B Tape Speed SP LP C Sound Mode Display A pg 72 D Curre...

Страница 16: ...ion 8 Component Video Connection To connect to TV s component video input connectors A Perform A C of ATo connect to a TV with 21 pin SCART connector B in the left column B Connect the unit s COMPONENT VIDEO OUT Y PB PR connectors to the TV s component video input connectors C Connect the unit s AUDIO OUT connectors to the TV s AUDIO input connectors You can obtain high quality component video pic...

Страница 17: ...Select the appropriate TV system for those channels A pg 76 AINFORMATIONB Auto Set Up After the A button on the unit or DVD A on the remote control is pressed for the first time to turn on the unit by simply selecting your country the Auto Set Up function sets the tuner channels clock and Guide Programme numbers automatically If you live in Belgium BELGIUM or Switzerland SUISSE you also need to se...

Страница 18: ...or if you press A or SET UP while downloading or set up is in progress it will be interrupted be sure to turn off the unit power once and try again from the beginning Auto Clock Set may not function properly depending on the reception condition On this unit the characters available for station names ID are A Z 0 9 Z and space Some names of downloaded stations may differ from those of your TV A pg ...

Страница 19: ...cord a TV programme using the a system the unit will record a TV programme of a different station When programming the timer using the a system be sure to check the desired channel is selected correctly A pg 44 Your unit memorizes all detected stations even if reception of some of them is poor You can delete those stations with an unacceptable picture A pg 76 ADelete A ChannelB INFORMATION Languag...

Страница 20: ...ss D E to select ADVD VIDEO SET UPB then press G 4 Press D E to select ALANGUAGE SETB then press G 5 Press F G to select AMENU LANGUAGEB then press ENTER 6 Press F G to select your desired language then press ENTER See ALanguage Code ListB A pg 86 7 Press SET UP to complete the setting NOTE When the selected language is not available on the disc the disc s default menu language is played back Lang...

Страница 21: ...9AUTO Wide television conversion Select this when the aspect ratio of your TV is 16 9 wide TV 16 9FIX Wide television conversion Select this when the aspect ratio of your TV is fixed to 16 9 wide TV The unit automatically adjusts the screen width of the output signal correctly when playing back a picture whose aspect ratio is 4 3 Pan Scan Letter Box In general DVD VIDEO disc are produced for a wid...

Страница 22: ... pg 50 4 Press W to pause playback To resume normal playback press I 5 Press o to stop playback When a recordable disc is played playback stops and a programme received with the unit s tuner resumes on the TV screen When a playback only disc is played playback stops and the still image at the time you press o remains on the TV screen Pressing o again resumes a programme received with the unit s tu...

Страница 23: ...back Variable Speed Search During playback press N for forward variable speed search or O for reverse variable speed search Each press of the button increases the search speed for each direction To resume normal playback press I For Audio CD You can perform 4 levels of speed search with N and O Audio is active also during variable speed search You cannot perform slow motion for each direction Stil...

Страница 24: ... and memorises the position where you have stopped playback as a resume point The inside of the disc status indicator on the front display panel blinks while memorising The unit retains a memory of the resume points of the last 30 discs played back even though they have been ejected if ARESUMEB is set to ADISC RESUMEB A pg 72 To clear the resume points The inside of the disc status indicator stops...

Страница 25: ...op mode Press REC MODE The disc remaining time according to recording modes appears on the TV screen It is possible to check disc remaining time according to recording modes also by pressing REMAIN In FR mode it is possible to set recording time in detail While the recording mode and the disc remaining time are displayed by pressing REMAIN press F G to select AFRB then press D E to select the desi...

Страница 26: ...eo CD SVCD discs you can switch the audio channel to choose Karaoke either with or without the vocal 1 Press AUDIO during playback The Audio Language Sound selection display appears 2 Press AUDIO or D E to select your desired audio language sound Each time you press AUDIO or D E the audio language sound changes To clear the Audio Language Sound selection display press ENTER NOTES When A7B appears ...

Страница 27: ...hen selecting Picture Control function of DVD During playback or while stopped 1 Press ON SCREEN twice to access the on screen bar The item currently selected is highlighted and pointed by 2 Press D E to select A B then press ENTER The pop up window appears under the selected item 3 Press F G to select the desired option then press ENTER To clear the on screen bar Press ON SCREEN NOTE See the corr...

Страница 28: ...n such a case repeat the procedure from step 1 The point B must be set at least 3 seconds after the point A When playing back a DVD A B Repeat Playback is possible only within the same title AA B xB cannot be selected during Programme and Random Playback AA B xB cannot be selected while stopped Locating The Beginning Of A Desired Selection You can locate the beginning of a title chapter group or t...

Страница 29: ...appears alternately To clear the on screen bar Press ON SCREEN To cancel the simulated surround effect Press ENTER to clear A3D ONB from the screen NOTES Simulated Surround Effect works correctly only when playing back a title recorded in multichannels Simulated Surround Effect does not affect the DVD VIDEO bitstream signal from the DIGITAL AUDIO OUT connectors When Simulated Surround Effect is ac...

Страница 30: ...key A1B and A5B C To select track 25 press the number key A2B and A5B If you have specified a wrong selection Press CANCEL L The last selection is erased Or press CLEAR o The whole selection is erased 4 Press I Playback starts in the programmed order When all of the programmed tracks have been played back Programme Playback stops but the programmed information remains To add tracks to the end of t...

Страница 31: ...Parental LockB A pg 87 6 Press the number keys to enter the same password as in step 6 of ATo Set Parental Lock For The First TimeB then press ENTER 7 Press SET UP to complete the setting NOTE If you forget your password enter A8888B in step 6 To Temporarily Release Parental Lock When you set the Parental Lock level strictly some discs may not be played back at all When you insert such a disc and ...

Страница 32: ...D players Perform AFinalise A Disc DVD Deck Only B A pg 79 You can record up to 99 programmes and 99 play lists on each disc Some programmes can only be recorded one time When recording is started an index of the first part of recording is automatically recorded A pg 49 To record satellite programmes refer to page 48 To delete the index refer to page 51 Recording sometimes may stop or cannot be pe...

Страница 33: ...disengaged and the VIDEO indicator on the front display panel lights off The programme received on the TV s tuner is displayed on the TV screen 2 Slide the TV CABLE SAT DVD switch to TV 3 Press PR repeatedly to select the desired channel NOTE If a decoder is connected to the unit A pg 70 you can select a scrambled channel as well as other normal channels Elapsed Recording Time And Disc Remaining T...

Страница 34: ...ond these remaining times The maximum recording time of FR JUST mode is the same as the recording time of FR480 mode When timer programming a long programme in FR JUST mode on a disc whose remaining time is short it is recommended to check the disc remaining time in FR480 mode to see if the remaining time is enough for the programme Even if more than one programme are timer programmed in FR JUST m...

Страница 35: ...cording Pressing W initiates Live Memory Playback However it is still possible to pause recording only when recording the channels of external sources AL 1B AL 2B AF 1B and ADVB While holding R press W on the remote To resume recording while holding R press I on the remote No operation can be made with the buttons on the unit Recording Mode MPEG2 format is used as recording format As a guide for p...

Страница 36: ...ing Time And Disc Remaining Time Indication During recording press DISPLAY on the remote control or the unit repeatedly until the desired indication appears on the front display panel Each time you press DISPLAY the time indication changes as follows Elapsed recording time N Disc remaining time N Clock N Back to the beginning You can also check the disc remaining time by pressing REMAIN while the ...

Страница 37: ...ances reverses the still picture frame by frame To resume normal playback press I Slow Motion 1 Press W to pause during playback 2 Press SLOW O or SLOW N for 2 or more seconds Each press of SLOW O or SLOW N increases the slow motion speed for each direction Skip Search During playback press v Each press initiates an approximately 30 second period of fast motion playback Normal playback resumes aut...

Страница 38: ...ill then be in accordance to the selected time interval When you cannot advance any further beginning or end of programme reached the message AUNABLE TO GO BACK ANY MOREB appears on the screen and the on air screen resumes In such a case press S O or o Example Playback search when jump interval is set to 15 MIN jumps Taking for instance you want to start jump search 40 minutes after the beginning ...

Страница 39: ...V NOTES When you record a tape on the DV deck with the recording speed set to ALPB it is recommended to play back that tape back on this DV deck Digital video recorder from other manufacturers may not be able to play back the tape properly Basic Playback Turn on the unit Turn on the TV and select the AV mode Slide the TV CABLE SAT DVD switch to DVD DV HDD DVD I M o O N DV o N O o CABLE SAT DVD TV ...

Страница 40: ...I within 2 seconds Soundtrack Selection Your unit is capable of recording two soundtracks L and R and will play back the one you select During Playback Pressing AUDIO changes the soundtrack as follows NOTE For instructions on recording stereo and bilingual programmes refer to page 34 Time Code During recording a time code is recorded on the tape This time code is used to confirm the position on th...

Страница 41: ...yback is automatically stopped just before recording starts and then recording starts when the time arrives for the next timer programme It is impossible to perform ITR even if you press R during Live Memory Playback A pg 36 Press o to display the programme being recorded then perform ITR settings Playback may be paused for a moment during Live Memory Playback which does not interfere with recordi...

Страница 42: ...en paused Each press of the button advances the still picture frame by frame Pressing down for 2 or more seconds advances playback at 1 16 times the normal speed Then each press of the button advances slow motion at 1 16 times 1 4 times and 1 2 times the normal playback G o Pressing once during Live Memory Playback or RetroActive Recording returns to the screen on air Pressing twice during recordi...

Страница 43: ...e desired playback method ABEGINNINGB ARESUMEB or AREPEATB then press ENTER Playback of the selected title begins automatically 5 Press o to stop playback The on air screen resumes NOTES You can use various playback features during Live Memory Playback To stop simultaneous playback press o The on air screen resumes To stop actual recording press o again Instant Replay You can move back the playbac...

Страница 44: ...B A pg 45 AWeekly Daily RecordingB AREC MODEB A pg 32 ARecording ModeB 9 Press F G to select AOKB then press ENTER to access the Programme Confirmation screen 10 Press D E to select AEXITB then press ENTER to complete timer programming To programme another timer press D E to select ACONTINUEB then press ENTER If APROGRAMME OVERLAPPEDB appears on the TV screen delete or modify the programmes NOTES ...

Страница 45: ...rding With this system special code signals are transmitted together with the audio video signals These code signals control your video unit and have precedence over the advertised times you may have preset into the timer This means that your unit will start and stop recording when the preset TV programmes actually start and end even if the broadcast time of a preset TV programme is changed NOTES ...

Страница 46: ...UEB then press ENTER If APROGRAMME OVERLAPPEDB appears on the TV screen delete or modify the programmes NOTES When two successive programmes are recorded on a DVD RW disc with Manual Timer Programming function the beginning of the second one may be left off the recording If the copy limited programme is received during timer recording the unit enters Record Pause mode Recording starts again if it ...

Страница 47: ... FGD E to select ACANCELB then press ENTER To modify the programme settings 1 Press FGD E to select AMODIFYB then press ENTER 2 Change the settings of the desired recording options as required Refer to steps 4 12 in AManual Timer ProgrammingB A pg 46 To skip the weekly daily programmes to the next week day It is easy to temporarily cancel weekly daily programmes of a week day 1 Press FGD E to sele...

Страница 48: ...ing is not possible if your satellite receiver does not have a timer Pressing the unit s A button while Automatic Satellite Programme Recording is in progress turns off the unit s power and disengages the Automatic Satellite Programme Recording mode If there are more than one satellite programmes you wish to record with Automatic Satellite Programme Recording it is not possible to set different re...

Страница 49: ... each title when ordinary recording or timer recording is performed then stored in an area specified on the unit index reduced pictures to show programme titles programme title category date and time channel recording mode length of recording time The items marked with an asterisk can be easily modified and registered again after recording by using Library Database Navigation system The limitation...

Страница 50: ...Title Name 1 Perform steps 1 4 of AModify IndexB A pg 50 before continuing 2 Press FGD E to select ANAMEB then press ENTER 3 Press FGD E to select AALPHABETB ASYMBOL1B or ASYMBOL2B 4 Press FGD E to select the desired letter or symbol then press ENTER Repeat this process to complete the name To correct a letter press FGD E to select ADELETEB then press ENTER You can enter the letters up to 64 5 Pre...

Страница 51: ...delete then press ENTER 5 Press D E to select ADELETEB then press ENTER When you cancel the deletion select ACANCELB then press ENTER 6 Press EDIT to return to the normal screen Delete Unwanted Part Of The Title DVD RAM DVD RW VR mode only You can delete unwanted part of the title 1 Perform steps 1 2 of AModify IndexB A pg 50 before continuing 2 Press FGD E to select ADEL SCENB then press ENTER 3 ...

Страница 52: ...elect ARETRYB then press ENTER Repeat the above steps 3 and 4 to locate another point to mark 5 Press S or T to select one chapter you want to delete press D E to select AERASEB then press ENTER To undo the deletion press D E to select ARETRYB then press ENTER 6 Press EDIT to return to the normal screen NOTE There may be a discrepancy of several seconds between the scene you intend to edit and the...

Страница 53: ... 8 Perform steps 5 11 in ACreate Play ListB A pg 53 Add scenes 1 Perform steps 1 5 in AEdit ScenesB A pg 53 before continuing 2 Press FGD E to select ASEL TITLEB then press ENTER 3 Perform steps 4 11 in ACreate Play ListB A pg 53 Move Scenes 1 Perform steps 1 5 of AEdit ScenesB A pg 53 before continuing 2 Press FGD E to select AMOVEB then press ENTER 3 Press F G to select a scene to move then pres...

Страница 54: ...een appears 2 Press FGD E to select the appropriate sort button to sort the information then press ENTER ADATEB Sort by date ADISC No B Sort by disc number ACATEGORYB Sort by category ANAMEB Sort by name ADATEB and ADISC No B are available for the DVD deck only 3 Press FGD E to select the desired title then press ENTER Playback begins automatically after the selected title is located NOTE If a dis...

Страница 55: ...TES If you press SELECT I instead of ENTER in step 4 the unit starts playback from the first file of the group JPEG files are played back as a slide show at the set intervals A pg 30 If a file name includes any 2 byte character the unit may not show the file name correctly The order of the groups and items shown in steps 4 and 5 may differ from the order shown on your PC Playback With MP3 WMA JPEG...

Страница 56: ...available disc space 1 Load a recordable disc 2 Press DUBBING to access the Dubbing Menu screen 3 Press FGD E to select AHDDNDVDB then press ENTER 4 Press FGD E to select AJUSTB then press ENTER 5 Perform steps 5 6 of AHigh Speed Dubbing From HDD To DVD B NOTES Play lists are dubbed as programmes In Video mode if the selected play list includes the scenes recorded in the different transfer rate th...

Страница 57: ...ordings and or play lists 5 Press D E to select AEXECUTEB then press ENTER to start dubbing NOTES It is not possible to dub play lists on DVD discs It is not possible to dub pre recorded DVD VIDEO discs It is not possible to dub Video CDs SVCDs or Audio CDs It is not possible to discontinue dubbing once it has been started Dubbing From DVD To DV It is possible to perform dubbing from the DVD deck ...

Страница 58: ...ENTIREB then press ENTER 5 Press F G to select ASELECT REC MODEB then press ENTER Press F G to select the desired option then press ENTER 6 Press F G to select ASELECT SND MODEB then press ENTER Press F G to select the desired option then press ENTER 7 Press G to select ACONFIRMB then press ENTER The confirmation screen appears 8 Press D E to select AEXECUTEB then press ENTER for confirmation Once...

Страница 59: ... the right for the DV equipment 6 Press REC MODE repeatedly to set the recording mode 7 Locate the point from where you want to start dubbing then stop or pause playback by pressing the following buttons on the remote control I N O o W To play back in slow speed 1 10 of the normal speed press W to pause playback then press O or N To play back frame by frame press W to pause playback then press W r...

Страница 60: ...stop both equipment then press D E to select Locate the point where you want to restart dubbing by pressing I N or O then press o Press D E to select then press ENTER to restart dubbing When you dub from DV equipment other than a camcorder A Perform step 1 to 4 B Locate the point from where you want to start dubbing then stop on the DV equipment If you pause the DV equipment in this step a few sec...

Страница 61: ...t from where you wish to start dubbing 6 Press R on the unit to start recording Or while holding R press I on the remote control The dubbing starts 7 Press o on the unit then stop playback on the camcorder NOTES All necessary cables can be obtained from your dealer Refer to the camcorder s instruction manual for operating procedure The quality of dubbed picture becomes poorer than that of the orig...

Страница 62: ...recording deck 7 Stop recording on the recording deck then stop playback on the source player NOTES All necessary cables can be obtained from your dealer For Y C signal input output be sure to use a 21 pin SCART cable that is compatible with the Y C signal When you use this unit as the source player for editing be sure to set ASUPERIMPOSEB to AOFFB before starting A pg 73 If you are using another ...

Страница 63: ...OUTPUTB A pg 63 L 2 Select Setting Set AL 2 SELECTB to the appropriate mode depending on the type of appliance connected to the unit s L 2 IN DECODER connector 1 Perform steps 1 and 2 of AL 1 Output And L 1 Input SettingB on the left column 2 Press F G to select AL 2 SELECTB then press ENTER 3 Press F G to select the appropriate setting then press ENTER 4 Press SET UP to complete the setting The b...

Страница 64: ...s at your purchase 8 F 1 INPUT VIDEO S VIDEO VIDEO When connecting an appliance to the VIDEO input connector set to AVIDEOB S VIDEO When connecting an appliance to the S VIDEO input connector set to AS VIDEOB You can dub selected audio from a DVD or Audio CD disc to a digital audio device However it is not possible to dub copy protected discs Example Dubbing to an MD 1 Connect the unit and a digit...

Страница 65: ...an audio mixer 8 Engage the audio device s playback then press I to start the tape in the unit Audio dubbing starts at this point To stop dubbing temporarily press W Press I to resume dubbing 9 Press o on the unit then stop playback on the audio device to end the audio dubbing NOTES Once the Audio Dubbing starts you cannot use the other deck When monitoring the audio dubbed sound on the DV deck se...

Страница 66: ...I to start the tape in your unit Insert editing begins at this point 8 Press o to stop recording on the DV deck to end insert editing NOTES Once the Insert Editing starts you cannot use the other deck All necessary cables can be obtained from your dealer Insert Editing cannot be performed on a Mini DV cassette that has had its erase protection switch set to ASAVEB When Insert Editing is performed ...

Страница 67: ...emote Control Your remote control can operate the basic functions of your TV set In addition to JVC TVs other manufacturer s TVs can also be controlled IMPORTANT Although the provided remote control unit is compatible with JVC televisions as well as many other models it may not work with your TV or in some instances may have limited function capability Keep pressing SET UP down during step 1 1 Ent...

Страница 68: ... control s batteries Some brands of satellite receivers have more than one code If the satellite receiver does not function with one code try entering another 3 Press the corresponding buttons to operate the satellite receiver A PR number keys For some brands of satellite receivers you must press ENTER after having pressed the number keys The number keys may not function with some satellite receiv...

Страница 69: ... You can use the Automatic Satellite Programme Recording function A pg 48 with this connection HDD deck only To record a programme via the satellite receiver select L 2 mode by pressing PR or INPUT SELECTJK so that AL 2B appears on the front display panel To receive a scrambled broadcast descramble the signal with the decoder connected to the satellite receiver For details refer to the instruction...

Страница 70: ...ded on a DVD RAM or DVD RW VR mode disc In this case perform the following steps using the remote control to switch ADIGITAL AUDIO OUTB from ADOLBY DIGITAL PCMB to APCM ONLYB A Press SET UP to access the Main Menu screen B Press D E to select ADVD VIDEO SET UPB then press G C Press D E to select AAUDIO OUTPUTB then press G D Press F G to select ADIGITAL AUDIO OUTB then press ENTER E Press F G to s...

Страница 71: ...stereo amplifier receiver or TV set or in case you want to record the audio from a DVD VIDEO disc to a Mini Disc etc DOLBY SURROUND Select this when listening to multichannel surround audio with the unit s AUDIO OUT connectors connected to an amplifier receiver with a built in surround decoder or a surround decoder 8 D RANGE CONTROL NORMAL WIDE RANGE TV MODE The dynamic range the difference betwee...

Страница 72: ...ack JPEG files DV SET UP 8 DV AUDIO REC 12BIT 16BIT This is the setting for sound mode before recording on a Mini DV tape 12BIT Enables Audio Dubbing later 16BIT Audio Dubbing is not possible but the recorded sound quality is higher than A12BITB 8 AUDIO MODE SOUND1 SOUND2 MIX You can select the desired sound mode when playing back an audio dubbed Mini DV tape SOUND1 Original recorded sound SOUND2 ...

Страница 73: ...set to AONB the TV screen becomes all blue when receiving a channel not in use NOTE When you want to receive an unstable channel with poor signals set this function to AOFFB 8 DIMMER BRIGHT DIMMED You can change the brightness of the front display panel BRIGHT Normally select this DIMMED To dim the front display panel Blue lamp on the front display panel is turned off 8 POWER SAVE OFF ON When this...

Страница 74: ...Guide Programme numbers automatically You need to set the Guide Programme numbers manually only in the following cases When timer programming with the a system the channel position where the station you wish to record is received on your unit is not selected OR when you add a channel after Auto Set Up Preset Download or Auto Channel Set has taken place Set the Guide Programme number for that stati...

Страница 75: ... regular and CC cable then press ENTER 9 Press F G to select ACHB then press ENTER 10 Press F G to input the channel number you want to store To enter the registered station name A pg 89 press F G to select AIDB then press ENTER Press F G For fine tuning adjustment press F G to select AFINEB then press ENTER Press F G to perform fine tuning When storing a channel that sends scrambled broadcasts pr...

Страница 76: ...s necessary 7 Press SET UP or RETURN to close the Confirmation screen Set Stations B Set station names other than the ones registered in your unit 1 Perform steps 1 5 of AManual Channel SetB A pg 75 2 Press FGD E to select the channel you want to modify then press ENTER The Confirmation screen appears 3 Press F G to select AIDB then press ENTER 4 Press FGD E to select the desired characters A Z 0 ...

Страница 77: ...exists between the built in clock s time and the actual time the unit is in the Automatic Satellite Programme Recording mode A pg 48 HDD deck only the unit is in the Power Save mode A pg 73 AL 2 SELECTB is set to ASAT VIDEOB or ASAT S VIDEOB A pg 63 If Just Clock is set to AONB the unit s clock is automatically adjusted at the start end of Summer Time Just Clock may not function properly depending...

Страница 78: ...ata on the disc repeatedly AVIDEO MODEB To be chosen when you want to erase all the data on the disc once played back to record new data or play back the disc on other DVD players 3 Press D E to select AEXECUTEB then press ENTER NOTES It is impossible to format Version 1 0 DVD RW discs in Video mode It is impossible to format DVD R discs All the titles on a disc will be deleted once the disc is fo...

Страница 79: ...lay back the discs In this case play back the discs on this unit Additional recordings become impossible Finalise A DVD R RW Disc 1 Perform steps 1 to 4 of AFormat A DVD RAM DiscB A pg 78 before continuing 2 Press FGD E to select AFINALISEB then press ENTER For DVD R RW Video mode discs the background selection screen will appear Press FGD E to select the desired background from a selection of 18 ...

Страница 80: ...screen is displayed When the Progressive scan mode is engaged no video signal is output from L 1 IN OUT connector You can lock the disc tray to prohibit the unwanted disc ejection by children To lock tray While the unit is turned off press and hold o then press M on the unit ALOCKB appears on the front display panel and the disc tray is locked To unlock tray While the unit is turned off press and ...

Страница 81: ...amp lights up on the unit The TV receiver s channel selector is not set to the AV mode Set the TV to its AV mode When interlace scanned programme is played back progressive scan mode is selected Press and hold PROGRESSIVE SCAN until q disappears from the front display panel A pg 80 The disc is loaded upside down Place the disc on the disc tray with the playback surface facing down A pg 8 A disc no...

Страница 82: ...ause mode Press I to resume recording There is no cassette loaded or the cassette loaded has had its erase protection switch set to ASAVEB Insert a Mini DV cassette or set the erase protection switch set to ARECB The camcorder has not been properly connected Confirm that the camcorder is properly connected The input mode is not correct Set the input mode to AF 1B or ADVB The end of the tape was re...

Страница 83: ... seconds so that the Video output indicator q lights up on the front display panel The camcorder s microphone is too close to the TV Position the camcorder so its microphone is away from the TV The TV s volume is too high Turn the TV s volume down Those channels have been designated to be skipped If you need the skipped channels restore them A pg 75 Recording or RetroActive Recording is in progres...

Страница 84: ... complete since the disc may be dirty or damaged Take out the disc clean it and retry A pg 9 79 During Live Memory playback o has been pressed A pg 42 Timer recording has finished during Live Memory playback Timer recording finished during Live Memory playback then the next timer recording is about to begin while playback continues An attempt has been made to record copy protected contents An atte...

Страница 85: ...VBR Video recording compression system MPEG2 VBR Audio recording system Dolby Digital 2 ch Linear PCM XP mode only Recording time Maximum 300 hours with 160 GB HDD XP Approx 34 hours SP Approx 69 hours LP Approx 138 hours EP Approx 209 hours FR Approx 300 hours Signal system PAL colour signal 625 lines 50 fields Recording system Digital Component Recording Format DV format SD mode Cassette Mini DV...

Страница 86: ...Siswati CO Corsican LO Laothian ST Sesotho CS Czech LT Lithuanian SU Sundanese CY Welsh LV Latvian Lettish SW Swahili DZ Bhutani MG Malagasy TA Tamil EL Greek MI Maori TE Telugu EO Esperanto MK Macedonian TG Tajik ET Estonian ML Malayalam TH Thai EU Basque MN Mongolian TI Tigrinya FA Persian MO Moldavian TK Turkmen FJ Fiji MR Marathi TL Tagalog FO Faroese MS Malay MAY TN Setswana FY Frisian MT Mal...

Страница 87: ...ados EC Ecuador IL Israel BD Bangladesh EE Estonia IN India BE Belgium EG Egypt IO British Indian Ocean Territory BF Burkina Faso EH Western Sahara IQ Iraq BG Bulgaria ER Eritrea IR Iran Islamic Republic of BH Bahrain ES Spain IS Iceland BI Burundi ET Ethiopia IT Italy BJ Benin FI Finland JM Jamaica BM Bermuda FJ Fiji JO Jordan BN Brunei Darussalam FK Falkland Islands Malvinas JP Japan BO Bolivia ...

Страница 88: ... Ukraine MP Northern Mariana Islands RO Romania UG Uganda MQ Martinique RU Russian Federation UM United States Minor Outlying Islands MR Mauritania RW Rwanda US United States MS Montserrat SA Saudi Arabia UY Uruguay MT Malta SB Solomon Islands UZ Uzbekistan MU Mauritius SC Seychelles VA Vatican City State Holy See MV Maldives SD Sudan VC Saint Vincent and the Grenadines MW Malawi SE Sweden VE Vene...

Страница 89: ...M MDR MOVE MTV MTV1 MTV2 MTV3 NGEO N24 N3 N TV NBC NDR NED1 NED2 NED3 NET5 NEWS NICK NOVA NRK1 NRK2 ODE ORF1 ORF2 PHOE POLS PREM PRIM PRO7 RAI1 RAI2 RAI3 RET4 RTB1 RTB2 RTL RTL2 RTL4 RTL5 RTL7 RTLK RTP RTV4 SAT1 SBS6 SERV SF1 SF2 JIM TV JSTV KA2 KABEL1 KANAL2 KANAL5 KBH KANAL KINDER KANAL LA7 LIBERTY TV LOCAL M6 MBR MCM MDR MOVIE MTV MTV1 MTV2 MTV3 NATIONAL G NEWS24 NORD3 N TV NBC SUPER NDR NED1 N...

Страница 90: ...0 Mode Lock 80 N Next Function Memory 40 O On screen Bar 27 On screen Language Set 20 P Pan Scan 21 Play List 52 Playback Control PBC 26 Programme Playback 30 Progressive scan 80 R Random Playback 30 Receiving Stereo And Bilingual Programmes 34 36 Recordable Playable Discs 5 Recording Medium And Format 7 Recording Mode 32 35 Region Number 6 Register Disc 54 Relief Recording 46 Repeat Playback 27 R...

Страница 91: ...EN 91 MEMO ...

Страница 92: ... 2004 Victor Company of Japan Limited EU Printed in China 0105CSH SW BJ EN SR DVM70EU ...

Отзывы: