background image

3

About discs

This system has been designed to play back the following discs:
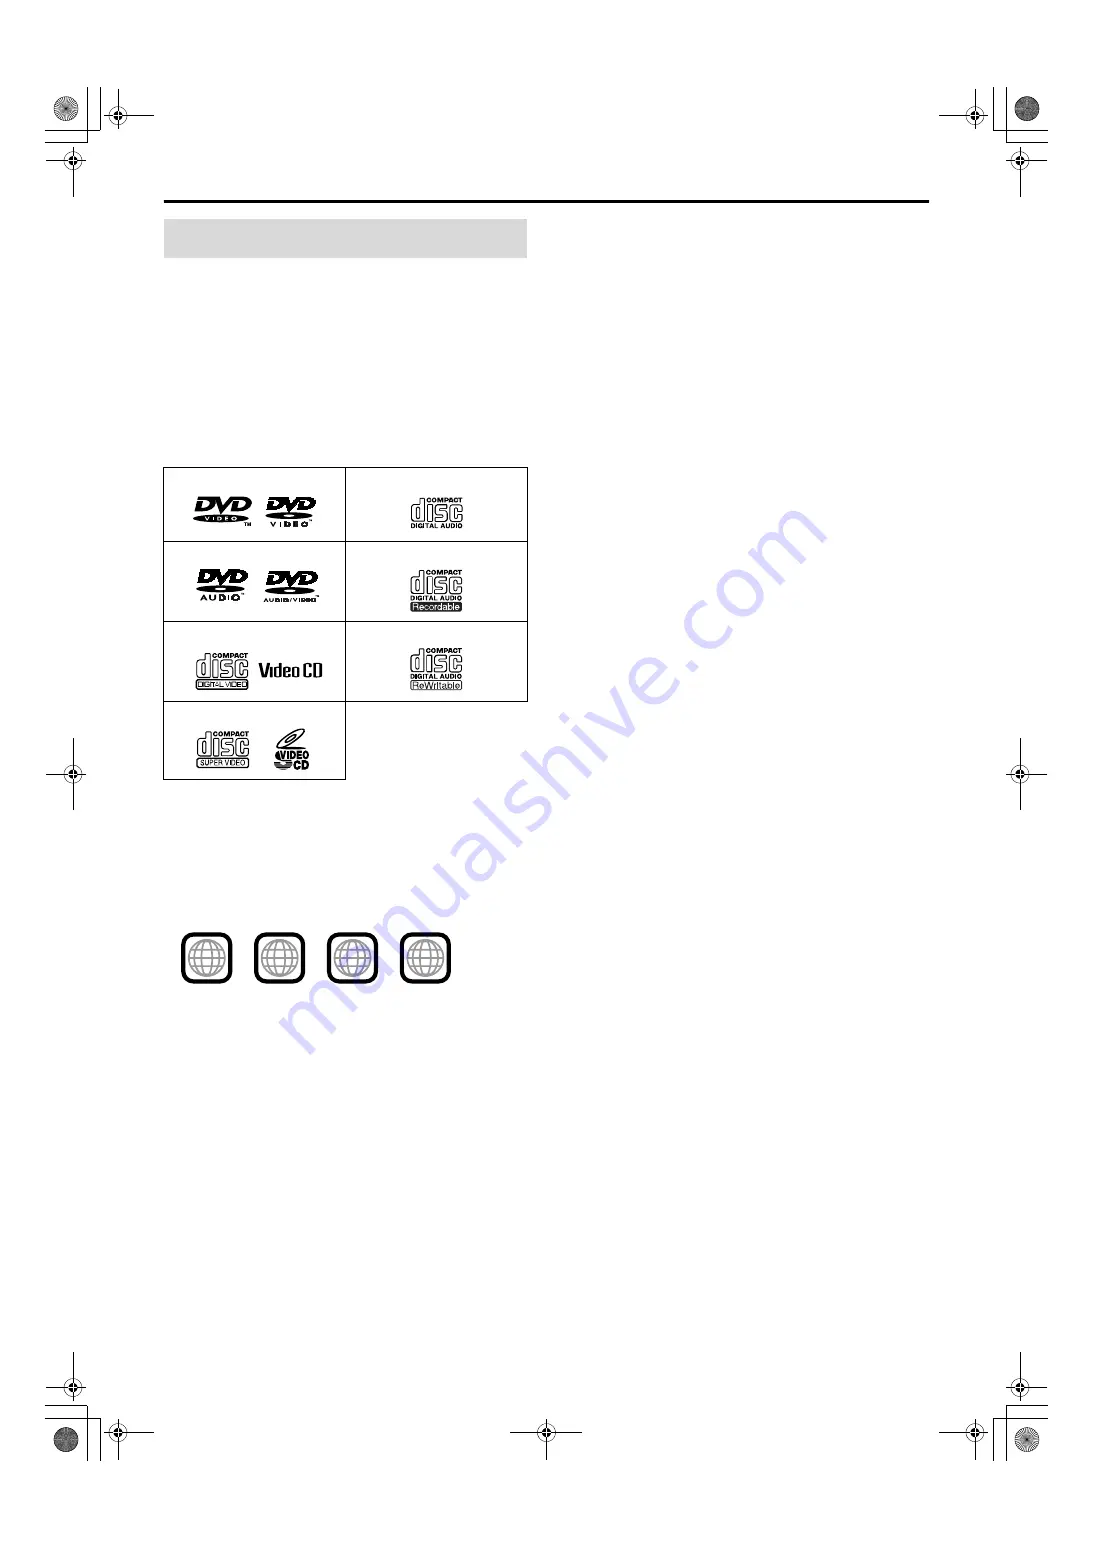
DVD VIDEO, DVD AUDIO, Video CD (VCD), Super Video CD 
(SVCD), Audio CD (CD), CD-R and CD-RW.
• This system accommodates the PAL system, and also can play 

discs recorded with NTSC system. Note that an NTSC video 
signal on a disc is converted to the PAL60 signal and output.

• This system can also play MP3, WMA, JPEG and MPEG4 files 

recorded on CD-Rs and CD-RWs. (

A

pg. 20)

• This system can also play finalized DVD-R/-RWs recorded in 

DVD VIDEO format. However, some discs may not be played 
because of their disc characteristics or recording conditions.

Discs you can play:

DVD Logo is a trademark of DVD Format/Logo Licensing 
Corporation.

Region code of DVD VIDEO

DVD VIDEO players and DVD VIDEO discs have their own 
Region Code numbers. This system can play back DVD VIDEO 
discs whose Region Code numbers include the system’s Region 
Code, which is indicated on the rear panel.

If a DVD with an improper Region Code number is loaded, 
“REGION CODE ERROR!” appears on the TV screen and 
playback cannot start.

• The following discs cannot be played back:

DVD-ROM, DVD-RAM, SACD, CD-ROM, CD-I (CD-I Ready), 
Photo CD, etc.
Playing back these discs will generate noise and damage the 
speakers.

• On some DVD VIDEOs, DVD AUDIOs, VCDs or SVCDs, 

their actual operation may be different from what is 
explained in this manual. This is due to the disc 
programming and disc structure, not a malfunction of this 
system.

Notes on CD-R and CD-RW

• User-edited CD-Rs (Recordable) and CD-RWs (Rewritable) can 

be played back only if they are already “finalized”.

• This system can play CD-Rs or CD-RWs recorded on a personal 

computer if they have been recorded in the audio CD format.
This system can also play CD-Rs or CD-RWs if MP3, WMA, 
JPEG or MPEG4 files are recorded on them.
However, some discs may not be played back because of their 
disc characteristics, recording conditions, or damage or stain on 
them.
Especially, the configuration and characteristics of an MP3, 
WMA, JPEG or MPEG4 disc are determined by the writing 
(encoding) software and hardware used for recording. Therefore, 
due to the software and hardware used, the following symptoms 
may occur:

Some discs may not be played back.

Some tracks on an MP3 or WMA disc may be skipped or may 
not be played back normally.

Some files on a JPEG or MPEG4 disc may be played back 
distortedly.

• Before playing back CD-Rs or CD-RWs, read their instructions 

or cautions carefully.

• CD-RWs may require a longer readout time. This is caused by 

the fact that the reflectance of CD-RWs is lower than that of 
regular CDs.

Playable disc types

DVD VIDEO

CD

DVD AUDIO

CD-R

VCD

CD-RW

SVCD

ALL

2

5

2

3

4

2

Example of playable DVD:

TH-S8-S5-S51[B].book  Page 3  Friday, March 12, 2004  6:37 PM

Содержание SP-PWS8

Страница 1: ...M INSTRUCTIONS Consists of XV THS8 SP PWS8 SP THS9F SP THS9C and SP THS9S Consists of XV THS5 SP PWS5 SP THS5F SP THS5C and SP THS5S Consists of XV THS51 SP PWS51 SP THM303F SP THM303C and SP THM303S TH S8 S5 S51 B 01Cov1 fm Page 1 Monday March 15 2004 2 34 PM ...

Страница 2: ... etc 1 Do not remove screws covers or cabinet 2 Do not expose this appliance to rain or moisture CAUTION F button XV THS8 XV THS5 XV THS51 Disconnect the mains plug to shut the power off completely the STANDBY lamp goes off The F button in any position does not disconnect the mains line When the system is on standby the STANDBY lamp lights red When the system is turned on the STANDBY lamp goes off...

Страница 3: ...ated that it is designed for unattended operation or has a standby mode Switch off using the switch on the equipment and make sure that your family know how to do this Special arrangements may need to be made for infirm or handicapped people DON T use equipment such as personal stereos or radios so that you are distracted from the requirements of traffic safety It is illegal to watch television wh...

Страница 4: ...SUBWFR CENTER SURR L R 18 Adjusting the treble sound TREBLE 18 Changing the scan mode 18 Optimizing the speaker settings Smart Surround Setup 19 Playback 20 Basic playback 20 One Touch Replay 22 Fast forward fast reverse search 22 Skip to the beginning of a desired selection 22 Locating a desired title group using number buttons 23 Playing back a bonus group 23 Advanced operations 24 Using the sur...

Страница 5: ...back correctly 7 Safety precautions Avoid moisture water and dust Do not place the system in moist or dusty places Avoid high temperatures Do not expose the system to direct sunlight and do not place it near a heating device When you are away When away on travel or for other reasons for an extended period of time disconnect the power cord plug from the wall outlet Do not block the vents Blocking t...

Страница 6: ...or SVCDs their actual operation may be different from what is explained in this manual This is due to the disc programming and disc structure not a malfunction of this system Notes on CD R and CD RW User edited CD Rs Recordable and CD RWs Rewritable can be played back only if they are already finalized This system can play CD Rs or CD RWs recorded on a personal computer if they have been recorded ...

Страница 7: ... 1 kHz and at a data transfer rate of 128 96 kbps Some tracks may be skipped or may not be played back normally For WMA only Notes on JPEG discs only We recommend to record a file at 640 x 480 resolution If a file has been recorded at a resolution of more than 640 x 480 it will take a longer time to be displayed This system can only play baseline JPEG files Some files on a JPEG disc may be played ...

Страница 8: ...pg 40 pg 21 pg 25 pg 18 pg 21 pg 23 pg 31 pg 40 pg 40 pg 41 pg 33 pg 20 pg 20 pg 20 pg 17 Disc tray inside pg 20 pg 16 Remote sensor pg 7 pg 20 pg 17 pg 17 pg 16 pg 21 pg 21 pg 41 43 pg 21 pg 21 FM 75 AM LOOP COAXIAL AM EXT AV COMPU LINK PR PB Y AV AC IN COMPONENT VIDEO OUT ANTENNA DIGITAL IN OPTICAL AUX IN RIGHT LEFT pg 13 pg 13 pg 13 pg 8 For future use pg 13 pg 12 pg 12 TH S8 S5 S51 B 04Start f...

Страница 9: ... PWS5 SP PWS51 NOTE For safety reasons always ensure that there is sufficient space behind the powered subwoofer Front Rear POWER ON lamp pg 16 pg 10 Power cord pg 13 pg 13 Do not block the ventilation openings TH S8 S5 S51 B book Page 6 Friday March 12 2004 6 37 PM ...

Страница 10: ...ROUP ANGLE VFP ZOOM PAGE REPEAT SETUP SLEEP S WFR TV RETURN A B RPT SETTING SMART S SETUP CENTER PLAY MODE RETURN DIMMER 100 CANCEL SCAN MODE TREBLE L SURR R PTY PTY RDS DISPLAY TITLE GROUP ANGLE VFP ZOOM PAGE REPEAT SETUP SLEEP TV RETURN A B RPT SETTING SMART S SETUP PLAY MODE RETURN DIMMER 100 CANCEL SCAN MODE TREBLE NOTE To use the buttons under the cover slide down the cover pg 14 pg 14 pg 17 ...

Страница 11: ... the FM antenna as it is well shielded against interference Connecting the FM and AM MW antennas If the antenna cord is covered with the insulation coat twist and pull the insulation coat off and remove 1 Center unit 2 3 Antenna cord Outdoor single vinyl covered wire antenna not supplied AM MW loop antenna Center unit Extend the supplied FM antenna horizontally Center unit FM antenna supplied Outd...

Страница 12: ...aker cords through one on the three grooves on the base plate depending on the speaker layout Depending on the installing condition you can assemble the front and surround speakers without the stands In such a case attach the speaker directly to the base plate instead of the stand 2 3 Completion Assembling the front and surround speakers Base plate 4 Stand 4 Front speaker 2 Surround speaker 2 Stan...

Страница 13: ...ack r terminals Connect the copper cords to the q terminals referring to the table below Speaker cord supplied FRONT SPEAKERS LEFT White FRONT SPEAKERS RIGHT Red CENTER SPEAKER Green SURROUND SPEAKERS LEFT Blue SURROUND SPEAKERS RIGHT Gray Before connecting the speaker cords Twist and pull the insulation coat off and remove Powered subwoofer SP PWS8 Surround speakers SP THS9S Center speaker SP THS...

Страница 14: ...if the speakers installed interfere with daily activities Connect the silver cords to the black r terminals Connect the copper cords to the q terminals referring to the table below Speaker cord supplied FRONT SPEAKERS LEFT White FRONT SPEAKERS RIGHT Red CENTER SPEAKER Green SURROUND SPEAKERS LEFT Blue SURROUND SPEAKERS RIGHT Gray Before connecting the speaker cords Twist and pull the insulation co...

Страница 15: ... VCR or to a TV with a built in VCR You need to set MONITOR TYPE in the PICTURE menu correctly according to the aspect ratio of your TV A pg 37 7 To connect a TV equipped with the component video input jacks NOTE If your TV supports progressive video input you can enjoy a high quality picture by setting the progressive scan mode to active A pg 18 If the component video input jacks of your TV are o...

Страница 16: ...put jack of the component to the video input jack of the TV directly and select the correct input mode on the TV Make sure that all other connections have been completed CAUTION Disconnect the power cord before cleaning or moving the system Do not pull on the power cord to unplug the cord When unplugging the cord always grasp and pull the plug so as not to damage the cord Connecting the powered su...

Страница 17: ...TV Set the remote control mode selector to TV The following buttons are available F TV Turns TV on and off TV VOL Adjusts the volume TV VIDEO Selects the input mode either TV or VIDEO CHANNEL Changes the channels 1 10 0 10 100 Selects the channel TV RETURN Alternates between the previously selected channel and the current channel The buttons described below are used on pages 14 and 15 Operating th...

Страница 18: ... The following buttons are available F VCR Turns VCR on and off 3 play button Starts playback 7 Stops operation 8 Pauses playback y Fast forwards video tape 1 Rewinds video tape REC Press this button together with 3 play button to start recording or together with 8 to pause recording CHANNEL Changes the TV channels on the VCR Operating the VCR Manufac turer Code Manufac turer Code JVC 01 Nokia 16 ...

Страница 19: ... One of the source selecting buttons on the remote control 3 on the center unit You can use the same buttons on the remote control except after pressing FM AM The buttons on the remote control are used to explain most of the operations in this manual You can use the buttons on the center unit same as on the remote control for operations unless otherwise noted The buttons described below are used o...

Страница 20: ... may damage both the headphones and your hearing Before disconnecting headphones as high volume may be suddenly output from the speakers While connecting a pair of headphones to the PHONES jack on the center unit the system automatically cancels the surround mode A pg 24 currently selected deactivates the speakers turn the subwoofer s power off and activates the headphone mode HEADPHONE appears on...

Страница 21: ...lay window 2 Press Cursor 3 2 to select the desired mode RGB Select this when your TV accommodates the interlaced RGB composite video signal Y C Select this when your TV accommodates the interlaced S video signal PROGRESSIVE Select this when your TV equipped with component jacks supports the progressive video input You can get better picture quality in the order PROGRESSIVE RGB Y C Composite 3 Pre...

Страница 22: ... sound through the satellite speakers then automatically makes the best settings for each speaker COMPLETED appears on the TV screen when Smart Surround Setup completes When FAILED appears on the TV screen The system could not detect the clapping sound correctly In such a case follow the instructions that appears on the TV screen When the system detects the clapping sound as FAILED three times set...

Страница 23: ...e TV screen during playback 7 To pause playback Press 8 To return to playback press 3 play button 7 To stop Press 7 7 On screen guide icons During DVD VIDEO playback the following guide icons may appear for a while on the TV screen appears at the beginning of a scene containing multi subtitle languages appears at the beginning of a scene containing multi audio languages appears at the beginning of...

Страница 24: ...1 Signal and speaker indicators A pg 25 Chapter number Elapsed playing time hour minute second Surround mode and digital signal format A pg 24 Title number Pressing FL DISP Chapter number T 1 1 2 3 4 5 D V D A G 1 T 1 Track number Elapsed playing time hour minute second Group number Signal and speaker indicators Pressing FL DISP Track number C D 1 1 0 3 1 Track number Elapsed playing time minute s...

Страница 25: ...tent and low during fast forward reverse search This feature may not work for some discs 7 Using x 4 buttons 7 For DVD VIDEO chapter During playback For VCD SVCD track During playback without PBC function For DVD AUDIO CD MP3 WMA JPEG MPEG4 track file During playback or while stopped Press x or 4 repeatedly NOTE When playing back an MP3 JPEG disc you can make operations using the file control disp...

Страница 26: ...ord The way of getting the key number depends on the disc After getting the key number you can play back the bonus group by following the procedure below 7 While the BONUS indicator lights up on the display window 1 Select the bonus group For selecting the group see Locating a desired title group using number buttons described above The key number entry indication appears On the TV On the display ...

Страница 27: ...ichannel soundtracks of the software encoded with DTS Digital Surround DTS Digital Surround DTS is another discrete multichannel digital audio format available on CD and DVD software The buttons described below are used on pages 24 to 35 AUDIO SUBTITLE SURR AUDIO TOP MENU MENU ON SCREEN ENTER ZOOM PAGE REPEAT A B RPT SETTING PLAY MODE RETURN 100 CANCEL VFP ANGLE Cursor 3 2 Y 5 ENTER Number buttons...

Страница 28: ...AUDIO 7 When playing back digital multichannel software except during SURR OFF mode The appropriate multichannel surround mode Dolby Digital DTS Digital Surround or Linear Packed PCM is automatically selected 7 When playing back 2 channel source You can select either mode of Dolby Pro Logic II PL II MOVIE PL II MUSIC or the DSP ALL CH ST mode Press SURR repeatedly to select the desired mode The su...

Страница 29: ...search function A pg 27 K Select this to change audio language channel or stream A pg 30 L Select this to change subtitle language A pg 29 M Select this to change view angle A pg 29 N Select this to change the page A pg 31 O Shows Playback Mode status PROGRAM appears during Program Playback A pg 32 RANDOM appears during Random Playback A pg 33 P Shows Repeat Mode status A pg 33 Changing the time i...

Страница 30: ...ing the number buttons see How to use the number buttons A pg 22 To return to the menu Press RETURN When NEXT or PREVIOUS is shown on the TV screen To go to the next page press x To return to the previous page press 4 NOTE If you want to play a PBC compatible VCD SVCD without using the PBC function perform any of the following Start playback by pressing number buttons while stopped Press x repeate...

Страница 31: ...sed To cancel a misentry Press Cursor 2 repeatedly 5 Press ENTER 6 Press ON SCREEN The on screen bar disappears NOTE You can specify time in hours minutes seconds for DVD VIDEO DVD AUDIO and in minutes seconds for VCD SVCD CD You can search and play desired groups and tracks files using the file control display on the TV screen The file control display appears automatically during playback MP3 WMA...

Страница 32: ...To clear the stored position Press 7 again or open the disc tray 7 During playback of a disc containing multi view angles When using the ANGLE button 1 Press ANGLE Example The first view angle is selected out of 3 view angles recorded 2 Press ANGLE repeatedly or press Cursor Y 5 to select the desired view angle When using the on screen bar 1 Press ON SCREEN twice The on screen bar appears on the T...

Страница 33: ...d audio 5 Press ENTER 6 Press ON SCREEN The on screen bar disappears NOTE Some subtitle or audio languages are abbreviated in the pop up window See The language codes list A pg 36 ST L or R is displayed when playing a VCD or SVCD respectively representing stereo left sound and right sound Frame by frame playback 7 During playback Press 8 repeatedly Each time you press the button the still picture ...

Страница 34: ...In such a case press 8 to pause slide show playback then zoom in During DVD AUDIO playback this feature is available only for the video part During MPEG4 playback there may be a case where Cursor 3 2 Y 5 does not work in step 2 above Changing the VFP setting The VFP Video Fine Processor function enables you to adjust the picture character according to the type of programming picture tone or person...

Страница 35: ...ks whose number is up to 99 For CD SVCD or VCD When the total playback time exceeds 99 minutes 59 seconds will appear on the display window But it is possible to continue programming For DVD VIDEO DVD AUDIO MP3 or WMA When you press ENTER instead of the number buttons in the Track Chaper column ALL appears and all the tracks or chapters on the selected group or title are programmed as a step To cl...

Страница 36: ...er in the mode the system repeats all the programmed tracks instead of all tracks on the disc For DVD VIDEO and DVD AUDIO REPEAT ALL may not be available depending on the disc When using the on screen bar except for MP3 WMA JPEG MPEG4 disc 1 Press ON SCREEN twice The on screen bar appears on the TV screen 2 Press Cursor 3 2 to highlight 3 Press ENTER 4 Press Cursor Y 5 repeatedly to select the Rep...

Страница 37: ... 3 Press ENTER 4 Press Cursor Y 5 repeatedly to select A B 5 Press ENTER at the beginning of the part you want to repeat point A 6 Press ENTER at the end of the part you want to repeat point B A B Repeat Playback starts 7 Press ON SCREEN The on screen bar disappears To cancel Select OFF in step 4 then press ENTER NOTE When playing back a DVD VIDEO A B Repeat Playback is possible only within the sa...

Страница 38: ...at the beginning of playback Noise comes out while searching for or skipping chapters or tracks AUT PCM Auto PCM Normally select this The system automatically detects the incoming signals DOLBY D Select this if the symptoms above occur when playing a disc or software encoded with Dolby Digital DTS Select this if the symptoms above occur when playing a disc or software encoded with DTS Digital Surr...

Страница 39: ... Ameharic IW Hebrew RW Kinyarwanda AR Arabic JI Yiddish SA Sanskrit AS Assamese JW Javanese SD Sindhi AY Aymara KA Georgian SG Sangho AZ Azerbaijani KK Kazakh SH Serbo Croatian BA Bashkir KL Greenlandic SI Singhalese BE Byelorussian KM Cambodian SK Slovak BG Bulgarian KN Kannada SL Slovenian BH Bihari KO Korean KOR SM Samoan BI Bislama KS Kashmiri SN Shona BN Bengali Bangla KU Kurdish SO Somali BO...

Страница 40: ...source disc 7 SCREEN SAVER A pg 22 You can activate or deactivate Screen Saver function 7 FILE TYPE When several types of files are recorded on a disc you can select which files to play If you have changed FILE TYPE setting be sure to turn the power off then turn the power on to enable the new setting AUDIO Select this to play MP3 WMA files STILL PICTURE Select this to play JPEG files VIDEO Select...

Страница 41: ...l Lock level information Level 1 most restrictive to Level 8 least restrictive COUNTRY CODE Select this when you set the code for your resident A pg 39 SET LEVEL Select this when you set the level of restriction PASSWORD This item is selected automatically when some changes are made on Parental Lock setting Enter a four digit number as your password with number buttons 0 9 then press ENTER If you ...

Страница 42: ...BR Brazil GW Guinea Bissau MW Malawi TN Tunisia BS Bahamas GY Guyana MX Mexico TO Tonga BT Bhutan HK Hong Kong MY Malaysia TP East Timor BV Bouvet Island HM Heard Island and McDonald Islands MZ Mozambique TR Turkey BW Botswana NA Namibia TT Trinidad and Tobago BY Belarus HN Honduras NC New Caledonia TV Tuvalu BZ Belize HR Croatia NE Niger TW Taiwan CA Canada HT Haiti NF Norfolk Island TZ Tanzania ...

Страница 43: ...A pg 41 Example When the system is tuned in to 103 5 MHz 2 Press MEMORY While CH and are flashing 3 Press number button s 1 10 10 to select a preset number you want For details on using the number buttons see How to use the number buttons A pg 22 Example When the preset channel 1 is selected If the setting is cancelled before you finish start from step 2 again While the selected number is flashing...

Страница 44: ...he display window With the system you can receive the following types of RDS signals PS Program Service Shows commonly known station names PTY Program Type Shows types of broadcast programs RT Radio Text Shows text messages the station sends Enhanced Other Network See page 43 NOTE RDS is not available for AM MW broadcasts RDS may not operate correctly if the station tuned is not transmitting RDS s...

Страница 45: ...ned with any aspect of sports Educate Educational programs Drama All radio plays and serials Culture Programs concerning any aspect of national or regional culture including language theater etc Science Programs about natural sciences and technology Varied Used for mainly speech based programs such as quizzes panel games and personality interviews Pop M Commercial music of current popular appeal R...

Страница 46: ...The TEST signal makes the system work in the same way as the Alarm signal does If the TEST signal is received the system automatically switches to the station broadcasting the TEST signal While receiving the TEST signal TEST appears on the display window 7 How the Enhanced Other Network function actually works Case 1 If there is no station broadcasting the program you have selected The system cont...

Страница 47: ...ord and system cord correctly A pg 13 The remote control does not work The batteries are exhausted Replace the batteries A pg 7 Sunlight is falling directly on the remote sensor Hide the remote sensor from direct sunlight No sound The system cord and or speaker cord is not connected Check the connection A pg 13 The audio cord is not connected to AUX IN and or DIGITAL IN correctly Connect the cord ...

Страница 48: ...t 6 C Center Surround 120 W per channel RMS at 4 C Front at 1 kHz with 10 total harmonic distortion Subwoofer 120 W RMS at 4 C at 100 Hz with 10 total harmonic distortion Speaker section Speaker unit 16 cm Bass reflex Magnetically Shielded Frequency Range 30 Hz to 200 Hz General Power Requirements AC 230 V 50 Hz Power Consumption 110 W at operation 0 W in standby mode Dimensions W M H M D 170 mm M...

Страница 49: ...Hz Dimensions W M H M D 137 5 mm M 105 mm M 108 mm Mass 0 67 kg 7 Satellite Speakers Front speakers SP THM303F Speakers 8 0 cm Bass reflex Magnetically Shielded Power Handling Capacity 120 W Impedance 4 C Frequency Range 90 Hz to 20 kHz Dimensions W M H M D 106 mm M 119 5 mm M 102 mm Mass 0 69 kg Surround speakers SP THM303S Speakers 8 0 cm Bass reflex Magnetically Shielded Power Handling Capacity...

Страница 50: ...EN 0204SKMIDEJEM 2004 VICTOR COMPANY OF JAPAN LIMITED TH S8 TH S5 TH S51 DVD DIGITAL CINEMA SYSTEM TH S8 S5 S51 B 09Cov4 fm Page 48 Monday March 15 2004 2 47 PM ...

Отзывы: