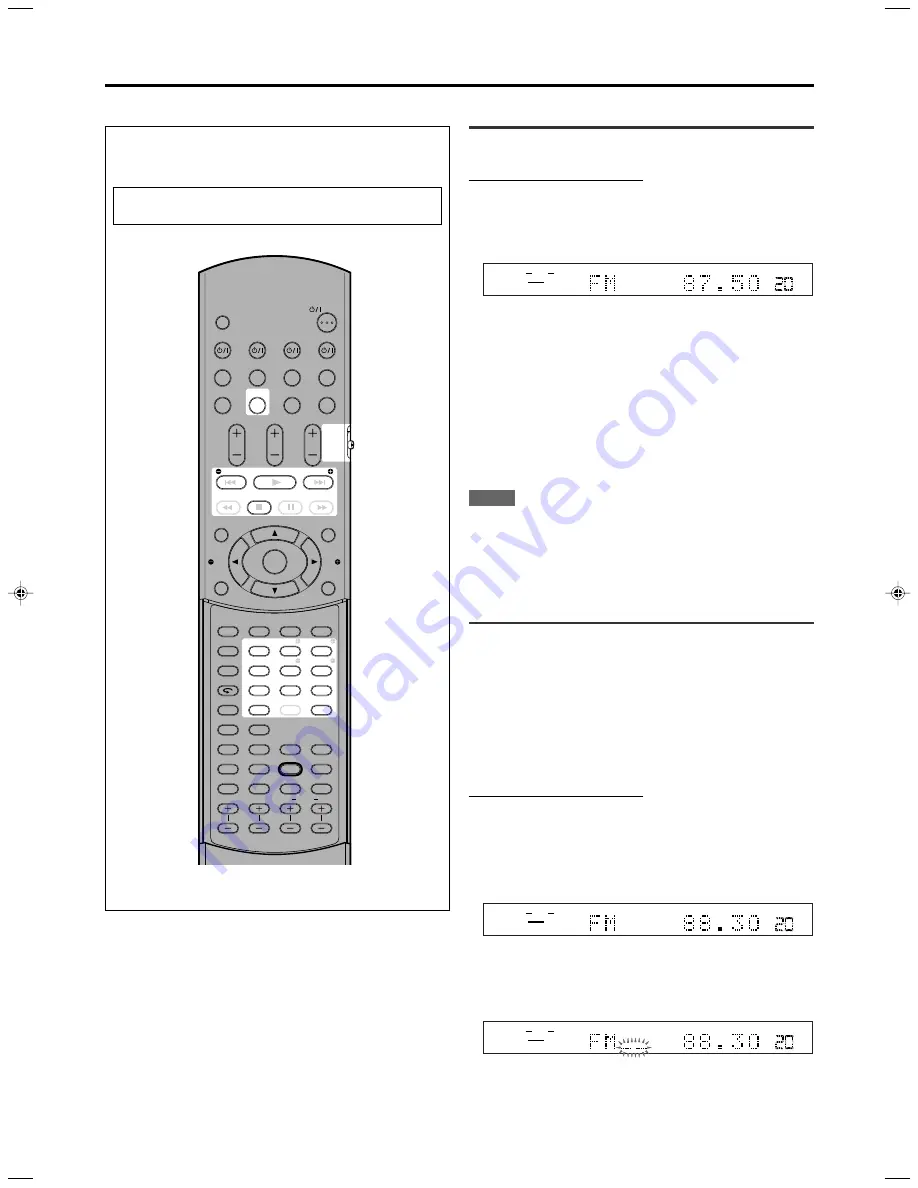
JVC RX-ES9SL Скачать руководство пользователя страница 27

23

Tuner operations

The buttons on the remote control are mainly used for tuner
operations. 

To use buttons on the remote control, press

FM/AM before operation.

When operating this receiver using the remote control,
always set the mode selector to AUDIO/TV/VCR/STB.

Tuning in to stations manually

From the remote control ONLY:

1

Press FM/AM to select the band.

The last received station of the selected band is tuned in.
• Each time you press the button, the band alternates between

FM and AM (MW).

You can also select “FM” or “AM” by turning SOURCE
SELECTOR on the front panel.

2

Press repeatedly or hold TUNING 

9

 or

TUNING 

(

 until you find the frequency you

want.

If you select “FM” or “AM” using SOURCE SELECTOR on the
front panel, press FM/AM on the remote control before this
operation.

• Pressing (or holding) TUNING 

9

 increases the frequency.

• Pressing (or holding) TUNING 

(

 decreases the frequency.

NOTES

• When you hold and release TUNING 

9

 or TUNING 

(

, the

frequency keeps changing until a station is tuned in.

• When a station of sufficient signal strength is tuned in, the TUNED

indicator lights up on the display.

• When an FM stereo program is received, the ST (Stereo) indicator

also lights up.

Using preset tuning

Once a station is assigned to a channel number, the station can be
quickly tuned. You can preset up to 30 FM and 15 AM (MW) stations.

To store the preset stations

Before you start, remember...

There is a time limit in doing the following steps. If the setting is
canceled before you finish, start from step 

again.

From the remote control ONLY:

1

Tune in to the station you want to preset (see
“Tuning in to stations manually” above).

• If you want to store the FM reception mode for this station,

select the FM reception mode you want. See “Selecting the FM
reception mode” on page 24.

2

Press MEMORY.

The channel number position starts flashing on the display for
about 5 seconds.

ANALOG

SUBWFR

ST

TUNED

AUTO MUTING

MH

Z

VOL

L

R

ANALOG

SUBWFR

ST

TUNED

AUTO MUTING

MH

Z

VOL

L

R

TV DIRECT

DVD

VCR

STB

TV

DVD

VR

STB

TV

DVD MULTI

TV VOL

CHANNEL

TUNING

TUNING

DVD

AUDIO/TV
/VCR/STB

FM MODE

MEMORY

TOP MENU

PTY

CHOICE

PTY SEARCH

DISPLAY


AUDIO

ZOOM

ANGLE

REPEAT

DIMMER

SUBWFR

CENTER

L

R

SURR

BASS BOOST

A.POSITION

SMART S. SETUP

SLEEP

CANCEL

SURROUND

ANALOG/DIGITAL

TV RETURN

100

+

BASS

TREBLE

SUBTITLE

RETURN

TITLE/GROUP

ON

SCREEN

PTY

MENU

TA/NEWS/INFO

VOLUME

FM/AM

TV/VIDEO

MUTING

AUDIO

HOME CINEMA CONTROL CENTER

BASS

TREBLE

1

2

3

4

VFP

INPUT

TONE

TEST

EFFECT

DECODE

5

6

7

8

9

10

3D

0

+10

ENTER

ANALOG

SUBWFR

ST

TUNED

AUTO MUTING

MH

Z

VOL

L

R

CONTINUED ON THE NEXT PAGE

23-27_RX-ES9SL[B]f

03.6.27, 16:46

23

Содержание RX-ES9SL

Страница 1: ...A CONTROL CENTER RX ES9SL INSTRUCTIONS For Customer Use Enter below the Model No and Serial No which are located either on the rear bot tom or side of the cabinet Retain this information for future reference Model No Serial No ...

Страница 2: ...h the letter E or by the safety earth symbol or coloured green or green and yellow The wires in the mains lead on this product are coloured in accordance with the following code Blue Neutral Brown Live As these colours may not correspond with the coloured markings identifying the terminals in your plug proceed as follows The wire which is coloured blue must be connected to the terminal which is ma...

Страница 3: ...ure dripping or splashing and that no objects filled with liquids such as vases shall be placed on the apparatus Caution Proper Ventilation To avoid risk of electric shock and fire and to protect from damage Locate the apparatus as follows Front No obstructions open spacing Sides No obstructions in 10 cm from the sides Top No obstructions in 10 cm from the top Back No obstructions in 15 cm from th...

Страница 4: ...equipment switched on when it is unattended unless it is specifically stated that it is designed for unattended operation or has a standby mode Switch off using the switch on the equipment and make sure that your family know how to do this Special arrangements may need to be made for infirm or handicapped people DON T use equipment such as personal stereos or radios so that you are distracted from...

Страница 5: ...put DIGITAL IN terminals DIGITAL IN 19 Setting Auto Surround AUTO SR 20 Setting the Auto Function mode MODE 20 Sound adjustments 21 Operating procedure 21 Adjusting the tone BASS TREBLE 21 Adjusting the subwoofer output level SUBWFR 21 Adjusting the front speakers output balance BAL 22 Reinforcing the bass B BOOST 22 Attenuating the input signal ATT 22 Tuner operations 23 Tuning in to stations man...

Страница 6: ...ic buttons for adjusting tone 21 BASS 9 TREBLE 9 Numeric buttons for selecting preset channels 24 Numeric buttons for operating video components 35 37 ANALOG DIGITAL INPUT button 11 12 a TONE button 21 s A audio POSITION button 22 d DECODE button 12 f SURROUND button 30 32 The term VR Video Recorder in this manual is used to refer to both video cassette recorders VCR and video disc recorders VDR V...

Страница 7: ...ndicator 11 y A audio POSITION indicator 22 Rear panel 1 ANTENNA terminals 5 2 SCART terminals 8 AV IN OUT VR TV AV IN DVD STB 3 DIGITAL IN terminals 7 DIGITAL 1 VR DIGITAL 2 STB DIGITAL 3 DVD See pages in parentheses for details 4 Speaker terminals 6 FRONT SPEAKERS SURROUND SPEAKERS CENTER SPEAKER 5 DVD IN jacks 10 FRONT CENTER SURR REAR SUBWOOFER 6 SUBWOOFER OUT jack 6 Parts identification RX ES...

Страница 8: ...binet DO NOT expose the unit to rain or moisture Locations Install the unit in a location that is level and protected from moisture The temperature around the unit must be between 5 C and 35 C Make sure there is good ventilation around the unit Poor ventilation could cause overheating and damage the unit Handling the unit DO NOT touch the power cord with wet hands DO NOT pull on the power cord to ...

Страница 9: ...f the reception is poor connect an outdoor single vinyl covered wire not supplied to the AM EXT terminal Keep the AM MW loop antenna connected FM antenna connection Connect the FM antenna supplied to the FM 75 Ω COAXIAL terminal as temporary measure Extend the supplied FM antenna horizontally If the reception is poor connect an outdoor FM antenna not supplied Before attaching a 75 Ω coaxial cable ...

Страница 10: ... IN OUT AV IN SUBWOOFER OUT DIGITAL IN DIGITAL 3 DVD DIGITAL 2 STB DIGITAL 1 VR CENTER SPEAKER SURROUND SPEAKERS RIGHT LEFT RIGHT LEFT FRONT SPEAKERS SUB WOOFER SURR REAR CAUTION SPEAKER IMPEDANCE 8 16 DVD VR TV STB SUBWOOFER OUT CENTER SPEAKER SURROUND SPEAKERS RIGHT LEFT RIGHT LEFT FRONT SPEAKERS CAUTION SPEAKER IMPEDANCE 8 16 1 2 1 2 3 AB CD E Connecting the subwoofer By connecting a subwoofer ...

Страница 11: ...correctly See Setting the digital input DIGITAL IN terminals DIGITAL IN on page 19 Select the correct digital input mode See Selecting the analogue or digital input mode on page 11 Connecting video components Digital optical cord not supplied Digital coaxial cord supplied 1 cable CAUTION If you connect a sound enhancing device such as a graphic equalizer between the source components and this rece...

Страница 12: ...mponents For recording pictures from STB When you connect a STB and a VR directly with a SCART cable you can record the pictures from the STB onto VR without using the STB menu screens For details refer also to the manuals supplied with the STB For digital sounds To reproduce the digital sound use both the digital connection see page 7 and the SCART cable connection OP TENNA AUDIO L R AV IN OUT AV...

Страница 13: ...with the TV and the VR Connect a SCART cable to EXT 2 terminal on your JVC s T V LINK compatible TV for the T V LINK function Some TV VR STB and DVD players support the data communication like T V LINK For complete details refer also to the manuals supplied with these components SCART Terminal Specifications TV VR STB DVD AUDIO L R 䡬 䡬 䡬 䡬 IN Composite 䡬 䡬 䡬 䡬 VIDEO S video 䡬 䡬 䡬 RGB 䡬 䡬 䡬 AUDIO L...

Страница 14: ...he same DVD player connected to this receiver by a SCART cable If you connect a different DVD player the mixed sound from front left and right channels are reproduced Connecting the power cord Before plugging the power cord into an AC outlet make sure that all connections have been made Plug the power cord into an AC outlet Keep the power cord away from the connecting cables and the antenna The po...

Страница 15: ...lly detects the incoming signal format then the digital signal format indicator DOLBY D DTS or LPCM for the detected signals lights up ANALOGUE Select for the analogue input mode Initial setting NOTE You cannot select the digital input mode when selecting DVD MULTI as the playing source When operating the receiver using the remote control always set the mode selector to AUDIO TV VCR STB Basic oper...

Страница 16: ...n damage both the headphones and your hearing Before removing headphones as high volume may output from the speakers Selecting the digital decode mode If the following symptoms occur while playing Dolby Digital or DTS Digital Surround software with DGTL AUTO selected see page 11 follow the procedure below Sound does not come out at the beginning of playback Noise comes out while searching for or s...

Страница 17: ...en 2 Turn on the video component and TV 3 Select the target video component On the front panel Turn SOURCE SELECTOR until one of the source indicator DVD VR or STB lights in green From the remote control Press one of the source selecting buttons DVD VR or STB The source indicator corresponding to the selected source lights in green To cancel TV Direct and turn off the receiver press STANDBY ON on ...

Страница 18: ... display and the shut off time changes in 10 minutes intervals ANALOG PL ΙΙ SUBWFR LFE AUTO SR INPUT ATT DSP HP L C R LS S RS LPCM DOLBY D DTS SUBWFR L C R LS RS LFE L C R LS S RS ANALOG SUBWFR SLEEP VOL L R 10 20 30 40 50 60 70 90 80 0 Canceled Basic operations SLEEP indicator When the shut off time comes The receiver turns off automatically To check or change the remaining time until the shut of...

Страница 19: ...output level of the center and surround speakers automatically SILENT The receiver cannot detect sound from some speakers SILENT ALL The receiver cannot detect any sound from all speakers FAILED The receiver cannot detect both right and left channels for the front and or surround speakers correctly When the receiver cannot detect the sound correctly SILENT SILENT ALL or FAILED appears on the displ...

Страница 20: ...cted a subwoofer As you turn MULTI JOG the indication changes as follows Initial setting 7 Press SET ENTER ROOM SIZE scrolls on the display 8 Turn MULTI JOG to select the room size As you turn MULTI JOG the indication changes as follows Initial setting The center and surround speakers delay time is registered appropriately according to the room size For details see the list STANDBY ON STANDBY TV D...

Страница 21: ...etting NOTES If you have selected SML small for the front speaker size you cannot select LRG large for the center and surround speaker sizes If you have selected NO for the subwoofer setting see above and page 16 you can only select LRG large for the front speaker size ANALOG VOL L R 2 7 m C 2 4 m 2 1 m L R L S R S When selecting LARGE ROOM Center speaker delay time is set to 0 msec Surround speak...

Страница 22: ...ccording to the size of the small speaker connected If you have selected LRG large for all speakers see page 17 this function will not take effect 80HZ Select when the cone speaker unit built in the speaker is about 12 cm 100HZ Select when the cone speaker unit built in the speaker is about 10 cm 120HZ Select when the cone speaker unit built in the speaker is about 8 cm 150HZ Select when the cone ...

Страница 23: ... DIGITAL IN When you use the digital input terminals register what components are connected to which terminals DIGITAL 1 2 3 see page 7 so that the correct source name will appear when you select the digital source 1VR2STB3DVD Select when connecting the following components DIGITAL 1 VR VDR DIGITAL 2 STB DIGITAL 3 DVD player 1VR2DVD3STB Select when connecting the following components DIGITAL 1 VR ...

Страница 24: ...n you change the source When you change the analogue digital input and When you reset AUTO SR to ON again Setting the Auto Function mode MODE The video components can be operated through this receiver by activating Auto Function mode This function takes effect for the following sources DVD except DVD MULTI STB and VR when they are connected using SCART cables AUTO1 When a video component is turned...

Страница 25: ...e sound level from 10 dB to 10 dB NOTE When you use the numeric buttons to operate your target source after tone adjustments press the corresponding source selecting button first so that the numeric buttons work for your target source Adjusting the subwoofer output level SUBWFR You can adjust the subwoofer output level if you have connected a subwoofer and set the subwoofer information correctly U...

Страница 26: ... CENTER to R 21 Decrease the right channel output CENTER is the initial setting Sound adjustments AUDIO ZOOM ANGLE REPEAT DIMMER SUBWFR CENTER L R SURR BASS BOOST A POSITION SMARTS SETUP SLEEP CANCEL SURROUND ANALOG DIGITAL TV RETURN 100 BASS TREBLE SUBTITLE RETURN TITLE GROUP BASS TREBLE 1 2 3 4 VFP INPUT TONE TEST EFFECT DECODE 5 6 7 8 9 10 3D 0 10 AUDIO ZOOM ANGLE REPEAT DIMMER SUBWFR CENTER L ...

Страница 27: ...p Using preset tuning Once a station is assigned to a channel number the station can be quickly tuned You can preset up to 30 FM and 15 AM MW stations To store the preset stations Before you start remember There is a time limit in doing the following steps If the setting is canceled before you finish start from step 2 again From the remote control ONLY 1 Tune in to the station you want to preset s...

Страница 28: ...RESET P appears on the display and MULTI JOG now works for selecting preset channels 3 Turn MULTI JOG to select a preset channel number during P appears on the display Turning MULTI JOG clockwise increases the preset channel numbers Turning MULTI JOG counterclockwise decreases the preset channel numbers Selecting the FM reception mode When an FM stereo broadcast is hard to receive or noisy you can...

Страница 29: ...ength is weak What information can RDS signals provide You can see the RDS signals the station sends on the display Press DISPLAY while listening to an FM station Each time you press the button the display changes to show you the following information PS Program Service While searching PS appears and then the station names will be displayed NO PS appears if no signal is sent PTY Program Type While...

Страница 30: ...ural sciences and technology Varied Used for mainly speech based programs such as quizzes panel games and personality interviews Pop M Commercial music of current popular appeal Rock M Rock music Easy M Current contemporary music considered to be easy listening Light M Instrumental music and vocal or choral works Classics Performances of major orchestral works symphonies chamber music etc Other M ...

Страница 31: ...gram selected by Enhanced Other Networks Press TA NEWS INFO repeatedly again so that the program type TA NEWS INFO indicator goes off from the display The receiver exits from Enhanced Other Networks standby mode and goes back to the previously selected station When an emergency broadcast Alarm signal is sent from an FM station The receiver automatically tunes in the station except in the following...

Страница 32: ...d encoded sources bearing the mark DOLBY SURROUND You can enjoy a sound field very close to the one created with discrete 5 1 channel sounds Pro Logic II Music suitable for reproduction of any 2 channel stereo music sources You can enjoy wide and deep sound by using this mode For this mode Panorama control can be selected which gives wraparound sound effect with side wall image When Dolby Pro Logi...

Страница 33: ... 䡬 䡬 Multi channel Dolby Digital 䡬 䡬 䡬 2 channel DTS Digital Surround 䡬 䡬 Multi channel DTS Digital Surround 䡬 䡬 䡬 2 channel Linear PCM 䡬 䡬 䡬 䡬 䡬 䡬 䡬 䡬 Analogue 䡬 䡬 䡬 䡬 䡬 䡬 䡬 䡬 DVD MULTI 䡬 Possible Impossible The following DAP modes are provided with this receiver LIVE CLUB Reproduces the spatial feeling of a live music club with a low ceiling DANCE CLUB Reproduces the spatial feeling of a rocking...

Страница 34: ...ou can make adjustments from your listening point and use the test signal For selecting Panorama control for Pro Logic II Music use the buttons on the front panel 1 Select and play software you like If AUTO SR Auto Surround is set to ON Playing a digital source automatically activates an appropriate Surround mode See page 20 Go to step 3 2 Press SURROUND to select an appropriate Surround mode Each...

Страница 35: ... SR Auto Surround is set to ON Playing a digital source automatically activates an appropriate Surround mode See page 20 Go to step 4 2 Press SURROUND MULTI JOG now works for the Surround DSP mode selection 3 Turn MULTI JOG to select a appropriate Surround mode As you turn MULTI JOG the indication changes as follows When playing back multi channel digital software such as Dolby Digital or DTS Digi...

Страница 36: ...the other settings To cancel Surround mode Press SURROUND repeatedly on the remote control or press SURROUND then turn MULTI JOG on the front panel so that STEREO appears on the display If Surround mode is canceled while playing back multi channel digital software all channel signals are mixed and output through the front speakers and subwoofer if you have connected a subwoofer and set the subwoof...

Страница 37: ...appears on the display then press SET As you turn MULTI JOG the indication changes as follows Available only for DAP modes SURR L 1 To adjust the left surround speaker output level from 10 dB to 10 dB SURR R 1 To adjust the right surround speaker output level from 10 dB to 10 dB EFFECT available only for DAP modes 2 To adjust the DAP effect level As the number increases the effect becomes stronger...

Страница 38: ... L C R LS RS BASS TREBLE PANORAMA B BOOST ATT Back to the beginning SUBWFR SURR R EFFECT SURR L BAL CENTER On the front panel Before you start remember There is a time limit in doing the following steps If the setting is canceled before you finish start from step 1 again 1 Press ADJUST MULTI JOG now works for the sound adjustment 2 Turn MULTI JOG until the setting item you want to set appears on t...

Страница 39: ... then pressing DVD source selecting button you can perform the following operations on the DVD Player 3 Start playback 7 Stop playback 8 Pause playback To release it press 3 Skip to the beginning of the next chapter 4 Return to the beginning of the current or previous chapter MENU Display or erase the menu screen 5 3 2 Select an item on the menu screen ENTER Enter a selected item You can also use ...

Страница 40: ...smittable signals for operating an STB 1 Press and hold STB 2 Press STB 3 Enter the manufacturer s code using buttons 1 9 and 0 4 Release STB Now you can perform the following operations on the STB STB Turn on or off the STB After pressing STB source selecting button you can perform the following operations on the STB CHANNEL Change the channel numbers on the STB 1 9 0 Select the channel numbers o...

Страница 41: ...s 1 9 and 0 4 Release VCR Now you can perform the following operations on the VCR VCR Turn on or off the VCR After pressing VR source selecting button you can perform the following operations on the VCR CHANNEL Change the channel numbers on the VCR 1 9 0 Select the channel numbers on the VCR 3 Start playback 7 Stop playback 8 Pause playback To release it press 3 Fast wind a tape 1 Rewind a tape 5 ...

Страница 42: ... a high voltage The remote control is not ready for your intended operation There is an obstruction hiding the remote sensor on the unit Batteries are weak The mode selector is set to the incorrect position You cannot use this remote control to operate the VDR Appropriate bass level is not selected SOLUTION Plug the power cord into an AC outlet Check speaker wiring and reconnect if necessary Selec...

Страница 43: ...ve the antenna farther from automobile traffic NOTE When you use the digital coaxial connection the sounds may be intermittently distorted by the outside noise such as a lightning discharge but they will restore automatically This is not a malfunction POSSIBLE CAUSE Surround mode is not available on the software being played back or only the front speakers are set for use DSP mode is not available...

Страница 44: ...32 kHz 44 1 kHz 48 kHz Audio Output Level VR TV 250 mV Signal to Noise Ratio 66 IHF DIN DVD MULTI 87 dB 62 dB Frequency Response 8 Ω DVD STB VR TV 20 Hz to 20 kHz 1 dB Tone Control Bass 100 Hz 10 dB 2 dB Treble 10 kHz 10 dB 2 dB Bass Boost 4 dB 1 dB at 100 Hz Video Video Input Sensitivity Impedance 1 kHz Composite video DVD STB VR TV 1 V p p 75 Ω S VIDEO DVD STB VR Y luminance 1 V p p 75 Ω C chrom...

Страница 45: ...EN 0703NHMMDWJEIN VICTOR COMPANY OF JAPAN LIMITED 2003 VICTOR COMPANY OF JAPAN LIMITED HOME CINEMA CONTROL CENTER RX ES9SL ...

Отзывы: